

Introduced: 2017
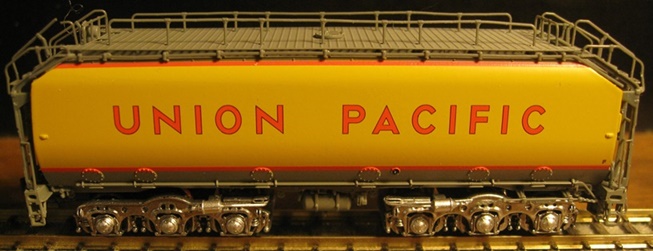
These sensational looking and fine running General Electric "Big Blow" models represent STC's debut into the world of N scale locomotives. Each set includes powered "A" and "B" units as well as a turbine tender (either 23C or 24C). They are available either DCC-Ready or equipped with factory-installed ESU LokSound Select DCC-Sound decoders.
Released as part of STC's high end "Rivet Counter" product line, the plethora of fine details on these models is simply amazing. Note however that most of the detail parts are simply press-fit plastic. And as such, it may be necessary to "fine tune" a few things before putting them on the rails for the first time (my set came with about a half a dozen different parts that were either crooked or otherwise mismounted). On the plus side, everything seems to hold together pretty well (IE, fumblefingered enthusiasts such as myself shouldn't have to stress too much about dislodging and losing tiny little parts).


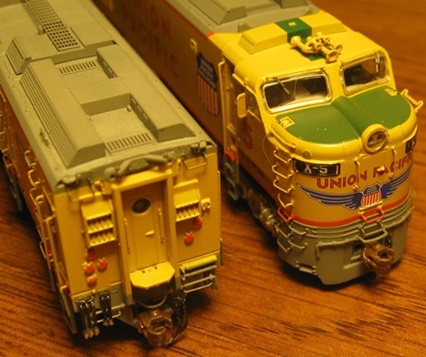
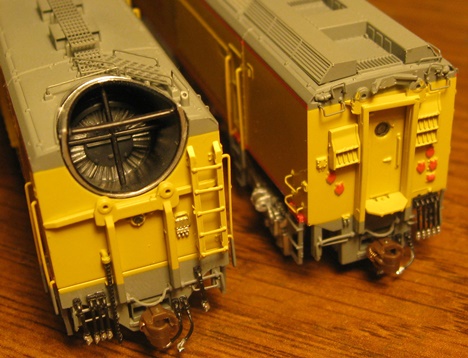
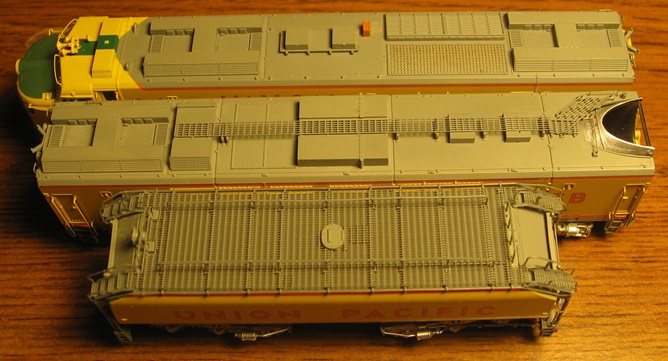
Each power unit (A and B) is motorized and shares a similar internal design (although due to size differences, not exactly the same).


The locomotive chassis is basically one big hunk of metal. A separate metal lid is screwed to the top of the chassis (under which is found the motor and drivetrain). The open-sided motor is 5-pole and skew-wound. A large brass flywheel is attached to each motorshaft. The plastic dogbone-style driveshafts fit inside of notched plastic cups (inside of the flywheels on one end and attached to the wormshafts on the other). The brass worms are mounted inside of the truck towers (and thus pivot right along with the trucks). Brackets clipped to the tops of the truck towers hold the trucks loosely inside the chassis. Wires from the trucks transfer track current to the main PC board. Additional wires from said board transfer current to the motor. The main PC board is screwed to the top of the lid (as is the rectangular speaker enclosure) -

All six axles are geared and all gearing is black plastic. There are no traction tires, so all twelve wheels provide pickup (by way of wired wheelback wipers). The wheels are blackened and low-profile (no problems on Atlas C55 rails). The plastic truck sideframes and bottomplates are a single casting (and must be removed in order to access the gearing for lubrication purposes, but more on that in a moment).
The McHenry-style couplers are chassis-mounted. And I must say, I am not overly impressed with them as I've had the springs fall off of mine on more than one occasion (and from what I've read elsewhere, this is not an uncommon occurrence). STC states that MTL couplers can be substituted in place of the stock couplers, however one must use the stock coupler boxes (and just swap out the internal coupler "guts"). They also state that stock MTL centering springs will not work for this conversion and instead supply their own custom centering springs (in the box) for those wishing to make the switch. MTL 1015's are reportedly a good replacement option (and despite what STC says, the stock MTL springs seem to work just fine).

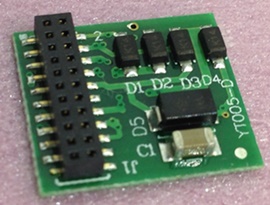
The main PC board provides a 21-pin interface for installing a decoder. The DCC-Ready models come with a dummy plug connected to said interface -
Directional LED lighting for the A headlight and B backup light is provided by separately wired PC boards mounted on the front and back (respectively) of the two units. Two additional LED boards on the A unit provide light for the numberboards. On the DCC-Sound models, the numberboards are only lit when the sound is turned on (via F8). As delivered, they are non-directional. The backup light on the B unit is controlled by F10. A backup light is also provided on the tender (with current provided by wired needlepoint axle / dimpled axle-cup wipers). And yes, the tender that comes with the DCC-Sound set actually has a factory-installed decoder somewhere in there (to provide directional lighting control). And sorry, said tender is an extremely complex assembly, so I'm not even going to try to take it apart in order to get pictures of the inside.
Note - a common malady with the tenders (as delivered) is that the backup light has a tendancy to lose current (IE flicker) as the model rolls along. Evidently this is due to factory crud on the wheels (blackening or whatever), since the problem seems to quickly resolve itself with some run time.

Performance on these models is mostly excellent, but it may take a few annoying tweaks to get them where they need to be. Out of the box, my DCC-Sound units ran well enough for the most part. However, I ran into a lot of problems with up and down lurching at speed steps 3 and 4. At first, I thought the problem was due to a bind someplace, and that maybe some breaking in would smooth things out. But after eight hours of back-and-forth roundy-rounding, I didn't notice any appreciable improvement in performance. In fact, things actually got worse as some emergant gear screeching sounds had now entered the equation.
At this point I decided that insufficient lubrication was the likely culprit. So, I disassembled the models in order to lubricate the motorshafts, worms, worm bearings and axle gears. And blimey, what a giant pain in the ass that all turned out to be! Suffice it to say, accessing the various lube points on these models is not a simple task. Particularly annoying are the axle gears. Since there are no handy-dandy openings in the truck bottomplates, one must remove the plastic sideframe/bottomplate pieces in their entirety in order to access said gears. OK, no big deal, right? Well, not so fast, because now you have to deal with those $#*@!! wheelwipers. And believe me, they are f'n diabolical! I must've spent half an hour on each truck - fumbling around trying to keep the wipers in place behind the wheels while simultaneously trying to click the sidesill/bottomplate pieces back in place. Frustrating in the extreme! And as if that all weren't bad enough, this whole business of having to remove (IE disassemble) the couplers in order to pull the shells off only added insult to injury. I must've spent an hour getting those damned things reassembled and reattached. Grr!
A note of caution when working on the powered units - the rat's nest of wiring for the various lightboards can interfere with ones ability to get the shells back on properly. So, do make sure that they are as flat and as neatly arranged as possible on top of the speaker enclosures before attempting to reattach the shells. Also, if you ever need to remove one of the chassis "lids", do not overtighten the screws when putting it back on as this may cause the mechanism to bind.
So, anyway... after spending several hours on the great lubrication project, I put the powered units back on the rails (fully expecting everything to be hunky dorey). And yes, the screeching sounds were indeed gone. However, the lurching at speed steps 3 and 4 remained. Well, at this point I figured my problems must be decoder related. So, I went ahead and did an ESU "automated motor tune" on each unit (set CV 54 to 0, put the locomotive on a stretch of straight/empty track, hit F1, and then watch it zoom off to the BEMF races). And lo, that did indeed do the trick - all of the weirdo lurching was gone. So, at that point all that remained was to redo the speed matching between the two units (and thus put an end to two days worth of frustrating trial and error).
Once suitably "tweaked", performance on these models is most excellent. They run smoothly and relatively quietly at all throttle levels (a bit hummy and growly perhaps, but not annoyingly so). Slow speed creep is one-tie-at a time and the top-end speed is quite realistic. Pickup is flawless (no problems creeping through insulated frog turnouts at yard speeds). Pulling power is pretty much off the charts, what with each powered unit being comfortably able to haul 50+ cars on level track all by itself. I didn't have any problems with any of the wheels derailing (even on curves as sharp as 9.75"-radius). My only minor performance gripe relates to the somewhat floppy truck situation. Given how loosely they seat inside the chassis, they do seem to have a tendancy towards up and down yawing - IE, the trucks will visibly see-saw as they roll along. And in the case of the shorter B unit, one will occasionally note a bit of a top-heavy wobble due to said truck-related instability. No, not a dealbreaker, but it does at least bear mentioning.
The sound on the DCC-equipped models is well rendered and nicely beefy. Although, OMG, that turbine - what a howler! I do love the horn, though (just ask my family, lol). Overall, these are truly outstanding looking models that run admirably well. And setting aside my own personal misadventures, I think most people will be suitably thrilled with them. I know I am (now) - it just took me maybe a little longer than necessary to get there.
A few notes on operating with sound - when you put the sound-equipped units on the rails, the default state is for the sound to be off and the models to be in "running" (as opposed to "hostler/switching") mode. The upshot of the latter is that the top-end speed is "normal" (IE relatively fast). Selecting F8 will turn the A unit's sound on and place both units in hostler mode (thus significantly reducing the top-end speed). Selecting F3 will turn the B unit's sound on and return the units to "running" mode (thus re-enabling the higher speed table).
I mention this here because I don't generally run my set with the B unit's sound turned on (it's just too grating) and it confused the heck out of me why my train would slow way down when I turned on the A unit's sound (while leaving the B unit's sound off). What I eventually had to do was disable sound on the B unit (set its master volume CV63 to 0) so that I could comfortably run both units with sound "on" via F3 and F8. This allowed me to enjoy the sound of just the A unit and still have the "normal" (non-hostler) speed table in play.
Prototype -
Record setting horsepower, massive size (3-unit set spans over 180' in length), screaming jet engine - these are the hallmarks of the Union Pacific Railroad's unique GTEL 8500 Horsepower Turbine locomotives. Often called "Big Blows" because of their deafening noise, they roamed the less populated landscape between Council Bluffs, IA and Ogden, UT. 30 three unit sets were built between 1958 and 1961 and all were retired by the early 1970s.
"A" Control Unit Features -
- Factory-applied windshield wipers, ladders, windshield wipers, and multiple unit (MU) hoses
- Photo-etched metal side grilles
- Intricate frame rail detail including traction motor cables
- H - H dynamic brake housing configuration
- Original fuel tank
- Modified radiators
- Air intake scoops
- Nose grab iron ladder
- Cab interior
- Cab mounted Leslie S-5T-R Brass Air Horn
- Square base whip antenna
- Wheel slip detectors
- Speed recorder
- LED headlights and number boards
- Powered
- All-wheel drive
"B" Turbine Unit Features -
- Factory-applied ladders and multiple unit (MU) hoses
- Photo-etched metal walkway
- Intricate frame rail detail including traction motor cables
- H - I dynamic brake housing configuration
- Small as delivered intake housing
- Turbine fan blades visible inside exhaust tube
- Wheel slip detectors
- Rear MU connections
- Powered
- All-wheel drive
23C and 24C Fuel Tender Features -
- 23K or 24K-gallon capacity
- Welded seams
- Insulated
- Commonwealth 6-wheel trucks
- Operating rear tender light
- Factory-applied air tank, brake cylinder, and control valve
- Factory-applied multiple unit (MU) hoses
- Photo-etched metal tender deck walkway
DCC & Sound Equipped Models Features -
- ESU-LokSound Select decoder
- "A" unit prime mover sound
- "B" unit turbine sound
Standard Rivet Counter Features -
- Fully assembled
- Factory-applied wire grab irons, coupler cut levers
- Durable body-mounted semi-scale Type E knuckle
- Operate using DC and DCC
- Color matched to Tru-Color Paint colors for easy touch-ups
- Minimum radius: 11"
- Recommended radius: 19"
To remove the shell from an A or B unit, simply unscrew and remove the couplers. The shell should lift right off at that point. As for the tender? Well, as noted previously, it's an extremely complex multi-piece assembly (IE, not simply a one-piece shell attached to a one-piece chassis). So, if you ever find yourself needing to get inside of it, you're just going to have to pull out the exploded parts diagram and have at it. Good luck!
Grade: A (eventually)