| NW2 | SW7 |
 |  |
| NW2 | SW7 |
 |  |
Introduced: 2019 (Paragon3 decoder) and 2021 (Paragon4 decoder)
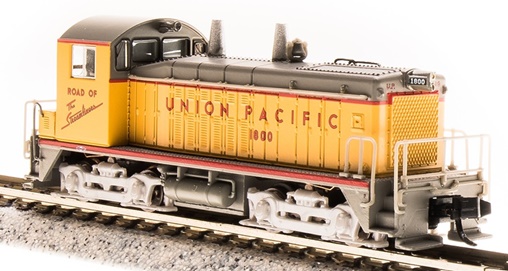
BLI's smooth running and gorgeous looking NW2 and SW7 models were released simultaneously. The primary differences between the two are in the cab windows and the forward radiator (rounded window tops and a small radiator grill on the NW2, rectangular window tops and a large radiator grill on the SW7). All of them come equipped with factory-installed DCC Sound decoders (Paragon3 in the first production run and Paragon4 after that). They are designed to run equally well on analog and DCC layouts (although analog users will need one of BLI's "DC Master" control boxes in order to take advantage of all the sound features). Support is provided for BLI's "Rolling Thunder" external sound system.
The chassis is one big hunk of metal (IE not split-frame). The sidesills and fuel tank are part of the chassis casting. The motor is a round can-style job (and presumably coreless). Each motorshaft is equipped with a small flywheel. The brass driveshafts include integral worms. These driveshaft/worms insert into holes in the flywheels on the one end and are free-floating on the other.

All four axles are geared and all gearing is plastic. The wheels are blackened and low-profile (no problems on Atlas C55 track). The couplers are chassis-mounted Micro-Trains 1015's. There are no traction tires. A single speaker is provided for DCC-Sound (mounted inside the metal fuel tank).

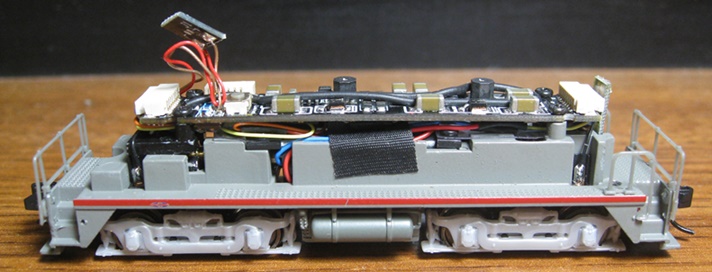
All eight wheels provide pickup. The axle ends insert into holes (as opposed to dimples) in the axle wipers. On the Paragon3 version (pictured below), the tips of the wipers push up against flexible contact strips mounted to (and insulated from) the underside of the chassis. Wires soldered to the tops of the contact strips transfer current to the decoder board. As delivered, the gears are very heavily lubricated. Consequently, if you find that your loco is having stalling issues, the first thing to do is to make sure that those chassis contact strips are clean and free of lube. The chassis contact strips were actually removed on the Paragon4 release, replaced instead by wires running directly from the axle wipers to the decoder board.
Plastic collars on top of the truck gear towers clip inside round openings in the chassis. The trucks pull off and go back on fairly readily, although it does take a bit more "oomph" than is typically the case with this style of mounting (I had to use a small screwdriver to pry mine off).

The Paragon decoder board is screwed to two posts on the front of the chassis and to two posts on a separate black metal bracket mounted over the rear worm. Wiring harnesses for track power, lighting control, motor control, and speaker control plug into sockets on either end of the board. A small piece of black tape covers up the wiring that runs over the top of the motor (presumably to prevent it from moving around and causing trouble). A small button on the decoder board allows one to reset the decoder to factory defaults (for situations where writing CV8 doesn't fix the locomotive's problems or where writing CV's isn't an option at all). I'm assuming the large black wire is the radio antenna for the Rolling Thunder system.
Two separate LED boards are provided for the hood and cab headlights. The board for the cab headlight is held in place by a couple of clips inside the cab shell. The wires for said board are decently long, so if you've taken the shell off, it's not too difficult to reseat the board. The board for the hood headlight mounts inside a slot in the chassis. Once turned on with F0, standard behavior is for both LEDs to be lit when the locomotive is parked. Once you start the locomotive moving, the headlights become directional (IE, the forward light gets brighter and the rear light turns off). All lighting is white, and (at least to my eyes) a bit dim. When the locomotive is put on the rails, all sounds are off. However, once you start it moving, sound comes on and stays on until you either mute it with F8 or recycle track power.

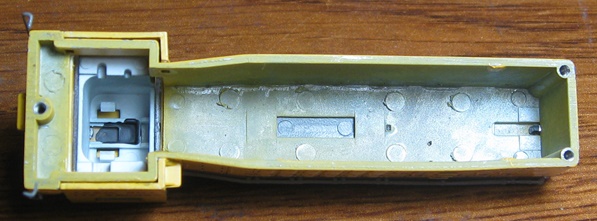
Apart from the plastic cab, the entire shell is metal. The air tanks, handrails, headlight housings, exhaust stacks, windows, bell, and horn are all separate plastic details.

These are exceptionally fine running models. Mine ran quite well right out of the box, albeit a bit stall-prone at the extreme low end of the throttle. However, that all went away after a few minutes of roundy-rounding (so, probably "wheel crud" related). Once broken in, mine ran super smooth and whisper quiet at all throttle settings. Slow speed creep is one-tie-a-time, whereas the "as delivered" top-end speed is a bit excessive. However, this can be easily tweaked in the decoder (suggested settings are CV5=40, CV6=25, CV3=20 and CV4=20). Mine can creep through insulated-frog turnouts at yard speeds, so no problems with pickup or current conductivity. Pulling power is outstanding, with mine able to comfortably haul 25 assorted 40' freight cars through curves on level track. No problems on sharp (9.75" radius) curves. The sound is robust and nicely rendered (even without bringing a Rolling Thunder system into the equation). Yes, the dim lighting is a small disappointment, but overall these are terrific looking models that run extremely well.
Prototype -
The EMD SW7 was the third diesel locomotive switcher the builder produced in the SW series and the first new design following World War II in the late 1940s (EMD stopped production on new models until after the war, mostly due to war restrictions ongoing at the time). Outwardly, the SW7 was virtually identical to future SW models and related NW designs of the time although it did differ slightly from the earlier SW1 in that it featured a more streamlined hood without the step in front of the nose. The most striking difference between the SW1 and SW7 was the latters additional horsepower, which was twice that of the former. As with many early EMD switcher locomotive models, the SW7 continues to see use today in various settings from industrial and shortline operations to tourist and excursion trains.
One complaint I've read about the BLI model is that the sidesill "gussets" are triangular as opposed to having a discernable bottom edge -
Prototype on the left, model on the right -


I guess the triangular gussets are appropriate for later EMD switchers, but not for an "as built" NW2 or SW7. So, something to fret about if you're so inclined.
Locomotive Features -
- Paragon sound & operation system featuring "Rolling Thunder" with authentic sounds and prototypical operation in both DC and DCC environments
- Integral DCC decoder with back EMF for industry best slow speed operation in DC and DCC
- Precision drive mechanism engineered for continuous heavy load towing and smooth slow speed operation
- Premium caliber painting with authentic paint schemes
- Prototypical light operation with golden white LED headlight
- Die cast body with die cast chassis for maximum tractive effort
- Microtrains #1015 couplers
- Separately applied hand rails, grab irons, and horn
- Will Operate on Code 55, 70, and 80 Rail
- Recommended Minimum Radius: 9.75 inches
DCC-Sound Features -
- Operates in DC & DCC (use DCMaster for DC Sound)
- Record & Play Operation - records and plays back sounds and movements once or repeatedly for automatic operation
- 16-bit Sample Rate for exceptional high frequency sound clarity
- Alternate Whistle where applicable - both the main whistle and alternate can be easily played
- Adjustable bell ringing interval for faster or slower bell
- Numerous user-mappable functions with available keys
- Passenger Station Ambient Sounds - controlled with function key
- Freight Yard Ambient Sounds - controlled with function key
- Lumber Yard Ambient Sounds - controlled with function key
- Farm Ambient Sounds - controlled with function key
- Crew Radio Communications - controlled with function key
- Maintenance Yard Ambient Sounds - controlled with function key
- Demo Mode for display and demonstrations
- Simple programming with integral DCC decoder
- Individually adjustable sound volumes for most effects
Shell Removal -
The shell is held on by three small screws on the underside of the chassis (two at the radiator end and one at the cab end). Unscrew those and then unhook the side handrails on the cab end and the shell will lift right off.
Grade: A