Introduced: 2019
These sharp looking and smooth running "Electro-Diesel" models were released in concert with a set of corresponding bi-level commuter cars. They are available either DCC-Ready or equipped with ESU LokSound DCC-Sound decoders.
The plastic shells are finely detailed and crisply painted -
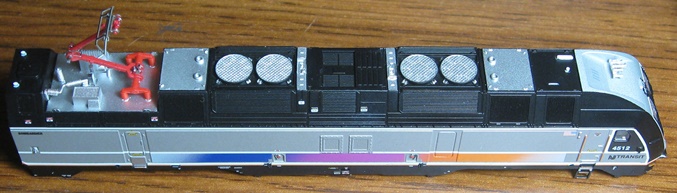
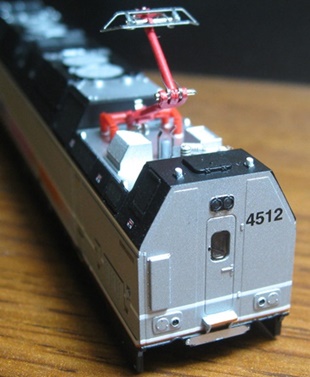
The pantographs are sprung and can either be locked down for diesel operations or raised for electric operations (note that they are non-functional insofar as they don't actually conduct electricity) -
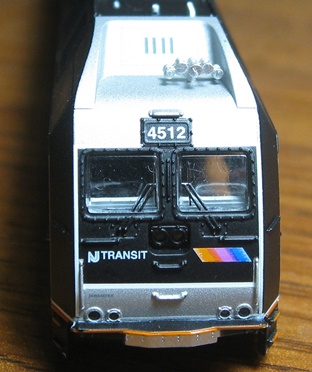
A plastic insert in the front of the shell allows the front ditchlights / marker lights to change from white to red (dependng on direction of travel) -
Internally, these models have very little in common with previous Atlas diesels. The chassis is one big hunk of metal (IE not split-frame). The motor sits inside of a plastic saddle that clips inside the chassis. Said motor is rectangular and open-sided (five poles / skew-wound). Each motorshaft is equipped with a brass flywheel. Lengthy dogbone-style plastic driveshafts insert into notched cups inside the flywheels (on one end) and attached to the wormshafts (on the other). The worms are mounted inside of towers that are part of the plastic truck assemblies. I haven't the faintest idea what holds the trucks inside the chassis or how one would go about removing them, so good luck with all that.
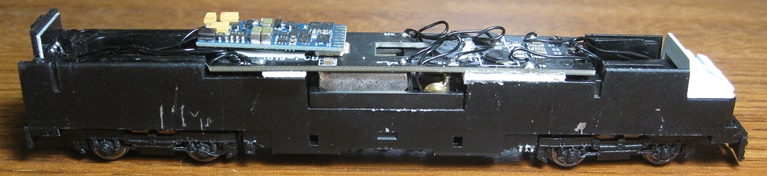
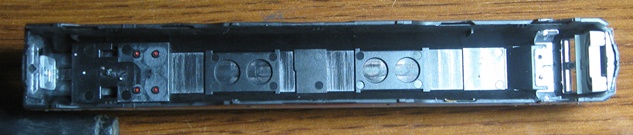
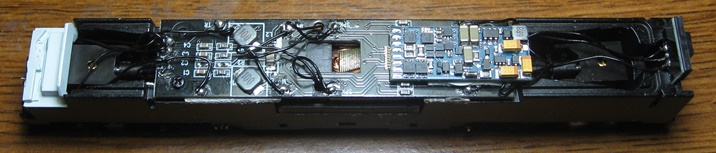
The main PC board is a bit of an annoyance. Not only is it screwed to the chassis, it's also held in place with some sort of foam adhesive that falls apart if you try to remove the board in order to get at the drivetrain underneath. And although I'd love to show you a picture of the motor (et al), all the various wires soldered to the board (for lighting, motor, track power, and speaker) totally restrict how far the board can be moved away from the chassis. Said board is equipped with a Next18 DCC socket. And for the models that come with a preinstalled sound decoder, said decoders are stuck to the main PCB with the same gooey "stuff" that holds the PCB to the chassis. There aren't any speaker holes, but I'm assuming that the speaker is mounted underneath the motor (although not having a parts diagram or any easy way to disassemble the model, that's just a guess). PC boards for the directional headlights, ditchlights and marker lights are wired up on either end of the chassis. The lighting is nicely bright and either white or red depending on direction of travel. Note that the headlight and ditchlights operate independently on the DCC-Sound models (F0 for the former, F6 for the latter).
All four axles are geared and all gearing (apart from the brass worms) is plastic. All wheels provide pickup (via dimpled axle-end wipers). Wires soldered to the axle wipers transfer current to the main PC board. The wheels don't appear to have any blackening and there are no traction tires. The wheel flanges are low-profile (no problems on Atlas C55 rails). The couplers are chassis-mounted Accumates. As pictured below, there are numerous press-fit plastic detail pieces attached to the undercarriage -

When turning sound on (via F8), the default setting is for the locomotive to be in "diesel" mode. To switch over to "electric" mode, you select F4 (and then F4 again to return to diesel mode). Like the rest of ESU's sound decoders, this one goes through a protracted "start up" sequence before the loco will actually start moving. If you find this annoying (as I do), set CV124 to 16
As delivered, mine ran extremely slowly at full throttle (like yard-creep slow). However, after about five minutes of running it started to get its legs under it and move along a bit more rapidly. And after about 20 hours of break-in running it finally ran normally (although it's still not a speed demon by any stretch of the imagination). After sitting for more than a day, I find that mine still requires a bit of a warm up period (a couple of minutes) before it will run "normally" again. From what I've read, this is due to the motor brushes being slightly oversized (and thus requiring an extended break-in period and extra warm up time). The issue appears to have been addressed in the second production run as my 2021 sample only required about 10 minutes of break-in running to get up to speed. But either way, I don't think it's that big of a deal.
Performance is quite impressive. Mine runs smoothly and whisper quiet at all throttle settings. Slow speed creep is "one tie at a time" and the top end speed is reasonable and realistic. Mine can ably navigate insulated frog turnouts at yard speeds, so no problems with the pickup. I didn't have any problems with the wheels derailing (even on 9.75" radius curves). I don't have any of the new bi-level cars, but mine had no problems pulling a full-sized train of streamliners (15+ cars). The DCC-Sound feature is decent as far as it goes (I'm not really a fan of N scale sound in general). And although I'm a little annoyed by the internals (vis'a'vis not being able to easily remove the trucks or access the drivetrain), overall these are gorgeous looking models with performance to match.
Note that Atlas does not recommend running the DCC-Sound models on DC power, so I didn't even try.
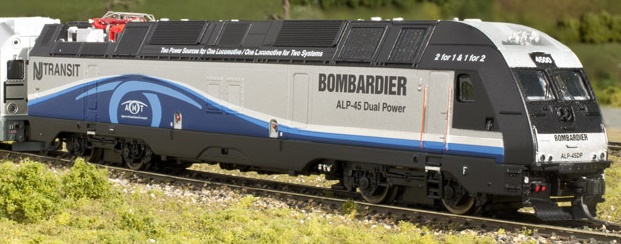
Prototype -
First released in 2010, the ALP-45DP is a single cab dual-mode (Electro-Diesel) passenger locomotive built by Bombardier Transportation for use by NJ Transit and Exo.
Features -
- Designed from prototype drawings and field research with the cooperation of NJ TRANSIT
- Illuminated directional LED headlight/ditchlights and red marker lights
- Pantograph (non-functioning) can be positioned up or down
- Five pole skewed armature motor with dual flywheels for optimum performance at all speeds
- Factory-applied railings, air horn, and antenna details
- Available either DCC Ready (Silver version) or with DCC Sound (Gold version)
The Atlas website also says "grab irons packed separately for customer application (includes drilling template)", but I believe that's a copy/paste error from the HO version. Mine didn't come with any of that stuff.
Gold version features -
- ESU LokSound decoder, supporting all DCC programming modes
- Flexible mapping of function keys F0 to F28
- A total of six DCC function outputs
- Follows all NMRA DCC standards and recommended practices
Shell Removal -
To remove the shell, you first have to remove the couplers. Next, spread the sides of the shell apart to free the little plastic claws on the inside of the shell from the chassis. Lastly, use a skinny screwdriver to carefully separate the front of the shell from the skirt detail and then pry upwards a bit. Repeat the same procedure at the back and the shell should lift right off.
Grade: A (once suitably broken in)