
01/06/20 - Short Attention Span Theatre
I decided that my new irrigation system was sitting a little too low relative to the corn, so I cut off some pieces of Bluford corn base and glued them underneath the wheels to provide a little more breathing room. As for the actual corn planting.... well, let's just say that it's coming along (slowly but surely) -
Suffice it to say that planting corn is kind of tedious. So, I've also been working on adding shoulder stripe decals to the long road north of the Waseca yard -

Of course, that's kind of tedious too. So, I also started in on my scratchbuild of the SunRich scale/admin building -


Of course, all of that window punching is kind of tedious as well, so I've also been spending some time playing around with Woodland Scenics "deep pour" water -

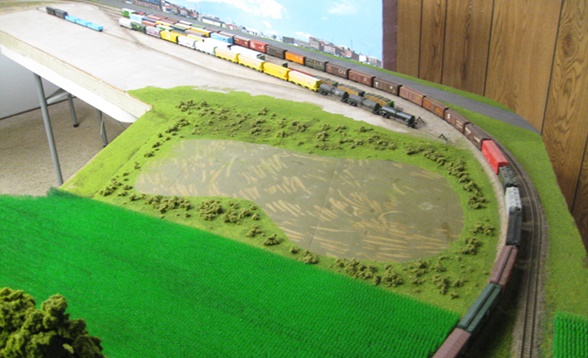
The plan is to use it for the large lake up by the yard, but I figured I'd better try it out on something smaller first just to get my feet wet (snicker). The water product itself is easy enough to use - mix the two parts, add the desired tint (I went with murky brown), pour it into the hole, and then wait for it to harden.

I thought I was being clever by slightly overfilling the hole (in order to make the grass and weeds around the edges look marshy). But wow, once it got a foothold in that turf it started sucking itself right out of the hole (in complete defiance of gravity) and going everywhere! I eventually had to bury it in turf just to slow it down and keep it from leeching right into the nearby roadbed. I then had to mix up a second batch to replace all the water that had escaped. Yeesh!
The prototypical area in question (between the main and the SunRich siding) has a lot of "stuff" on top of the water, so I sprinkled on some turf (after the water had set up a bit) to try to capture that look -
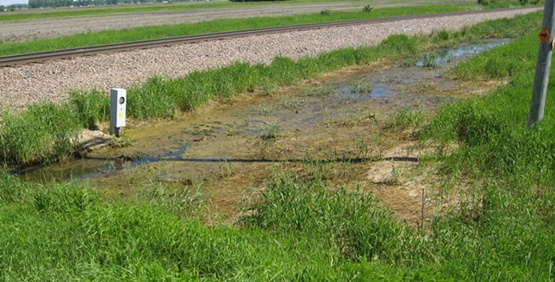
There are also some areas that have rushes and reeds and whatnot -

In aid of that, I decided to experiment around with making some reeds using this Busch "Grain Field / Reed" product (#7375) -

I guess it worked out "OK", but I do think that in the future I'm going to have to sprig it in in smaller clumps. Otherwise, it tends to want to fan out and become rather odd looking -
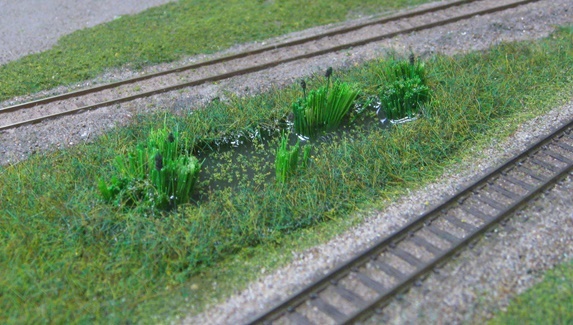
As for the cattails, those are (believe it or not) made from actual cat! Cat whiskers, to be exact (a commonly found item in our house). I just
paint them green, add a bit of white glue to the ends, and then dip them in WS "soil" turf. So, kudos to my cats for their contributions to the
project! 
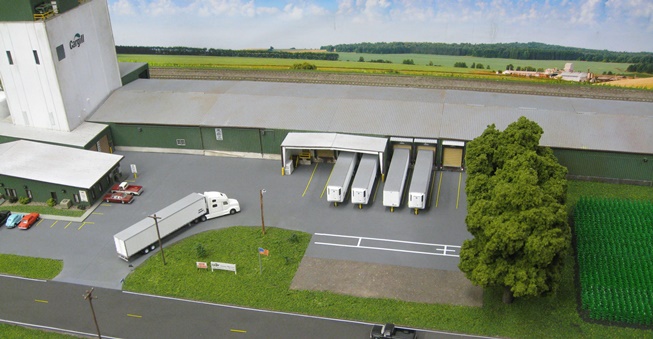
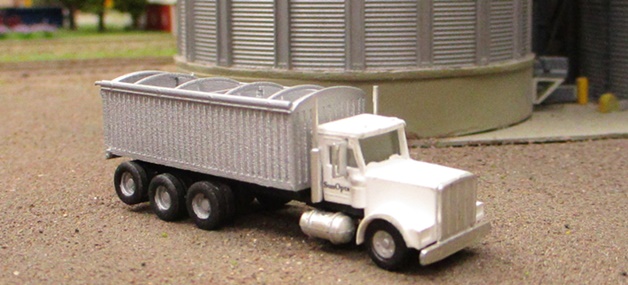
01/08/20 - The Trainworx trailers have landed....
....and they're every bit as gorgeous as advertised! 
My only job was to take them out of their boxes, add some "Schule Trucking" decals (ala all the trucks parked at the real Cargill), and then plant them. And since I had a spare Kato cab sitting around doing nothing, I tossed that into the mix as well. Having a truck that's ostensibly in motion does seem to add a bit of dynamism to the scene.
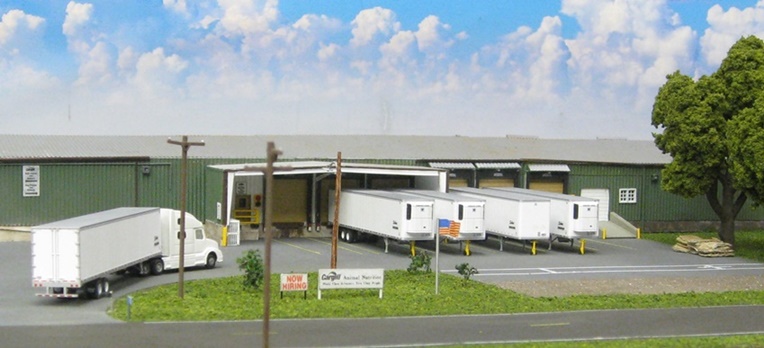
My only other contribution was to make some tiny little stabilizer jacks -

There are about a dozen of these things sitting around at the real Cargill. But given what a pain they were to build, I decided that four would be plenty

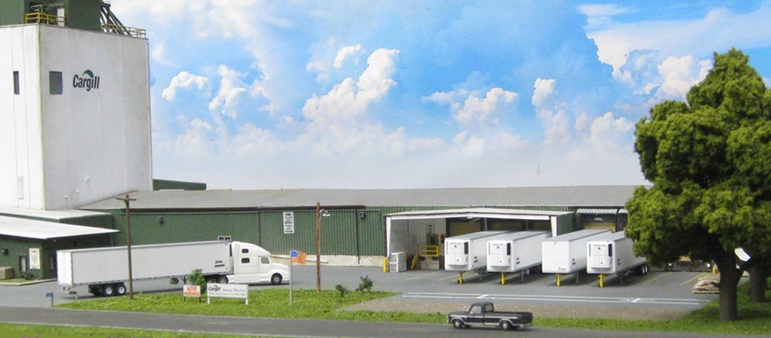
And direct from the Department O' Ignorance, I originally thought that those "bumps" on the fronts of some of the Cargill trailers were actually refrigeration units, and so I went with models that were so equipped. However, I've since learned that those bumps are simply there for aerodynamic purposes and have nothing to do with refrigeration (something that Cargill products probably wouldn't need anyway). Fortunately, I'm further told that reefer trailers could conceivably be used by Cargill if that's all that the trucking company had available - they just wouldn't have the refrigeration units turned on. So whew, I guess I get a pass on all that.

I had originally planned on having a couple of trailers sitting out on that dirt strip across from the loading dock, but after I tried putting a couple over there the whole scene wound up looking too crammed/busy due to my downsized parking lot. Fortunately, I'll no doubt have plenty of space for them up on the vast expanse that is the road north of the Waseca yard. I'll just have to pick up a couple more Kato cabs (since the Trainworx cabs are probably long gone by now).
So anyway, that was fun. And now, back to the corn.... and the stripes.... and the cornerpunch.... 
01/19/20 - Plugging away
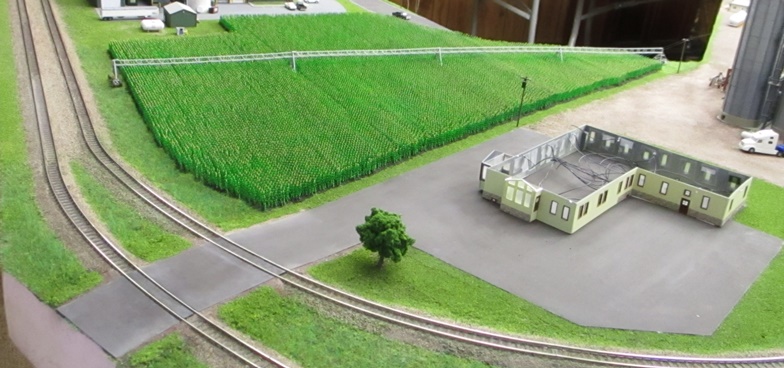
I'm just about out of corn (again) and unfortunately it looks like I'll still need at least another five boxes in order to finish off the field (IE, time to dust off the old Visa card again). Meanwhile, I finished punching all the office door and window openings (after which I glued in all the door and window inserts and then got the walls glued together and painted). Next up, a metric f*ck-ton of door and window frame handbrushing, whee.

As you can see, I decided to bite the bullet and make the parking lot accessable to the outside world (the upshot of which is that I now have a curving double-track grade crossing to build). I tell ya, this is turning into one helluva complicated project for just one building (and I haven't even started in on that crazy nine-piece roof yet). No wonder I put this beast off for so long!
02/21/20 - How to accomplish absolutely nothing on one's model railroad? Go on vacation!
I somehow managed to find another vintage locomotive to check out in the Caribbean. Namely, this restored steamer used by the St Nicholas Abbey Heritage Railway in Barbados -
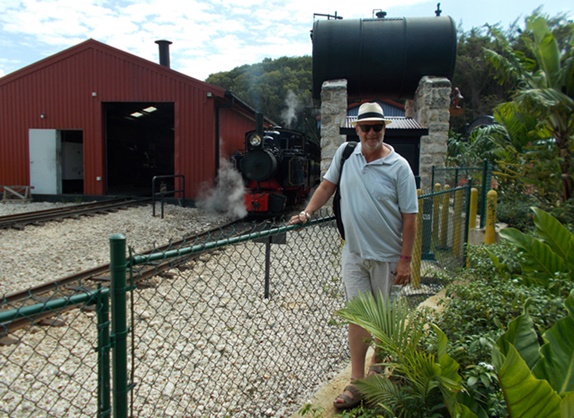
Built in 1914 by Arnold Jung Lokomotivfabrik in Germany, Tjepper No. 5 is an articulated locomotive of the mallet design (four steam cylinders and eight driving wheels). Prior to its relocation to Barbados it worked on a sugar plantation in Java, so it's definitely led an interesting life.
I didn't get to actually drive it myself, but I did get to toot the whistle and the ring the bell. I also got to help push the manual turntable that spun it around for the return
trip. Fun stuff!

03/01/20 - New camera
Sadly, my Canon PowerShot ELPH 180 has gone to camera heaven (I had it set up to take a timer shot outdoors when a gust of wind came along and.... boom  ). I was
on a cruise ship at the time, so my replacement options were limited to what they had in the onboard camera store and what I wound up with was a Nikon Coolpix A10. It was relatively cheap
($90), but the array of settings and controls is correspondingly slim. Also, it doesn't seem to handle extreme closeups in macro mode as well as my Canon camera did. Still and all, it
doesn't seem too bad, so we'll see how it goes.
). I was
on a cruise ship at the time, so my replacement options were limited to what they had in the onboard camera store and what I wound up with was a Nikon Coolpix A10. It was relatively cheap
($90), but the array of settings and controls is correspondingly slim. Also, it doesn't seem to handle extreme closeups in macro mode as well as my Canon camera did. Still and all, it
doesn't seem too bad, so we'll see how it goes.


03/29/20 - Assorted do-overs
This new Nikon camera really sucks when it comes to taking "night" layout photos (can't get it to focus properly), so I decided to just bite the bullet and order another Canon (the same one that I had before). So, for now you're just going to have to take me at my word when I say that I replaced my last two WS streetlights (which, for whatever reason, had turned out to be more yellow than white). Vis -


WS was kind enough to offer free replacements. But then again, they also made me send back the old ones - which was kind of an annoyance since the postage cost me
damned near as much as the streetlights themselves
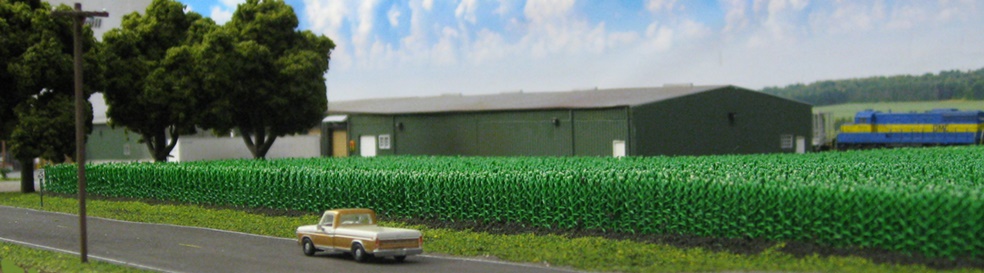
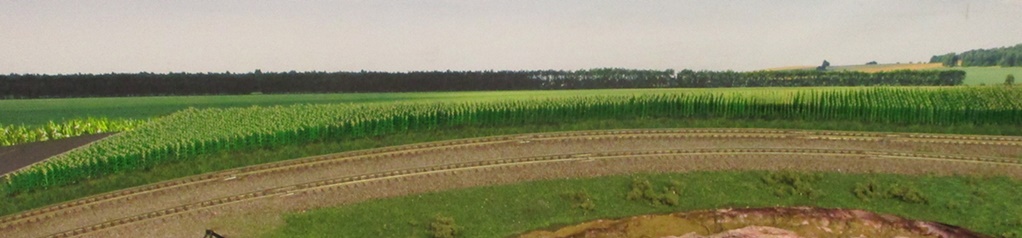
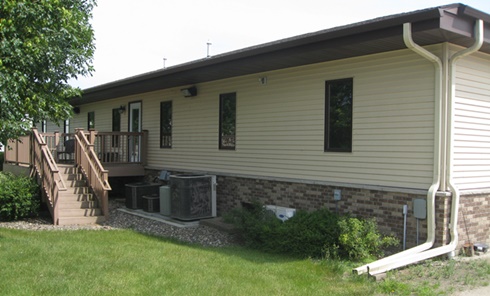
In other retrofitting news, I finally decided that my cornfields just aren't up to snuff when it comes to comparisons to the real thing.

Reality -

Yep, it just jumps right out and grabs you, doesn't it? Namely, the fact that cornfields are not 100% green! And although I've pretty much always known this, I also thought that taking tan plants and painting them green would leave me with enough tan up top (after slicing them off the sprues) to capture the correct look. However, now that I've spent some time living with mine, I've come to the conclusion that it didn't really work.
At this point I haven't quite decided what I'm going to do about it, but I think it's probably going to involve some WS pigment (yellow ochre and burnt umber) and a really big
sponge. Of course all the hobby shops are closed at the moment (damned virus), so I'm going to need a lot of help from Mr Postman before I can get going on all this. And here's hoping
that I actually have a decent camera at my disposal when/if I do finish
04/09/20 - By golly, I think it worked!
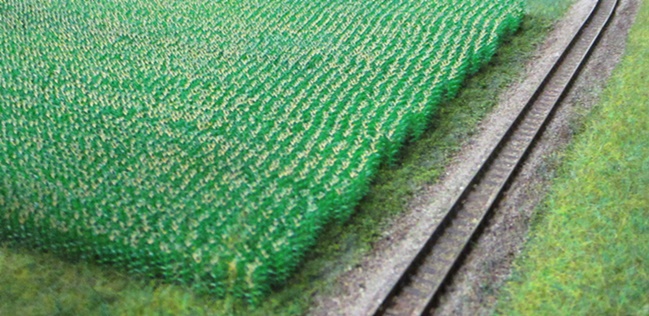
Given the sheer volume of corn on this layout, adding some tassle-ish coloring to the tops of all the plants was never going to happen if I couldn't come up with a quick and dirty method for doing so. Fortunately, I seem to have stumbled across a simple way to accomplish this that (at least to my eye) yields decent results -
After -

What I did was mix up a batch of Woodland Scenics "Yellow Ochre" and "Burnt Umber" pigments (about 2/3's yellow and 1/3 umber, then diluted by about 50% with water). This gave me the tan/gold tassle look that I was after -
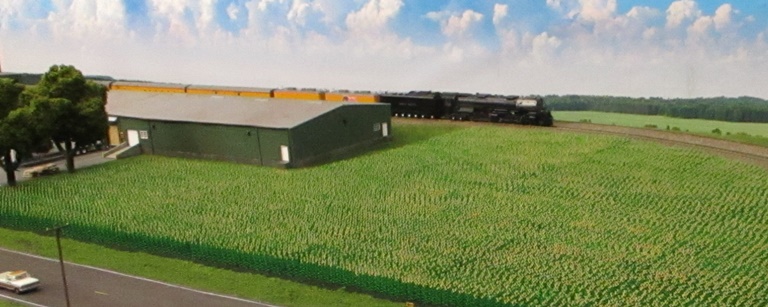
Actually applying the stuff to the plants was dead simple. I took a small, moistened sponge (2" x 2"), dipped it into the pigment, and then dabbed it around on top of the corn.
It only took me about 30 minutes to retro-tassle all of my fields and the end result turned out to be nicely natural looking, so color me happy
In other news, I did finally get my new camera, so night shots are back in my photographic repertoire once more -
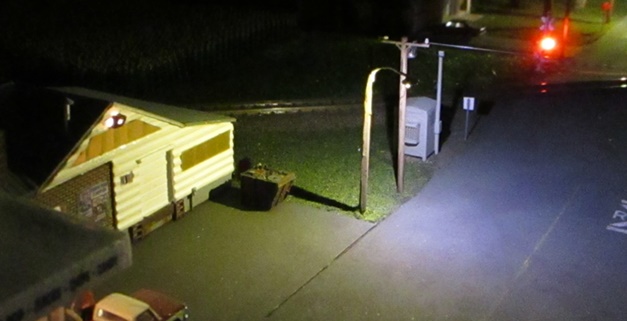

See? I told you I replaced those godawful yellow streetlights!
04/17/20 - Backed into a corner
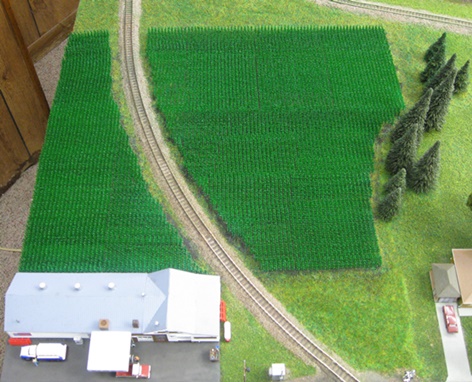
One problem with building these roundy-round layouts on top of rectangular tables is that you wind up with little orphaned triangular sections in the corners. Vis -

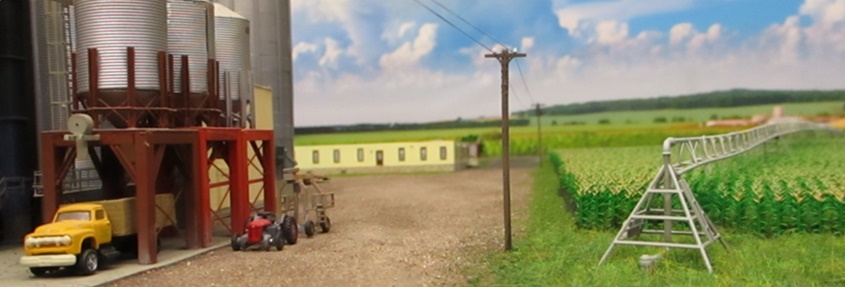
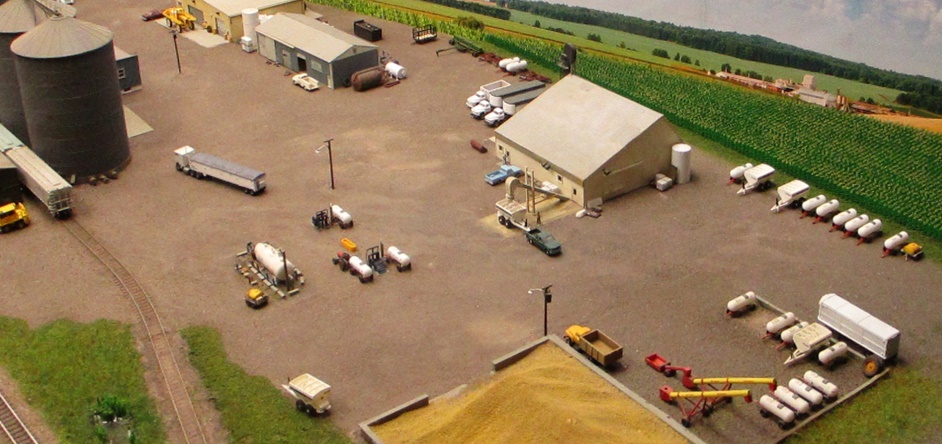
So, what to do? Well, I did consider (for about ten seconds) adding yet more corn, and then said "ugh, no thanks". Then I started thinking that since I already have that highway into Waseca up there I could maybe stick some sort of gas station or something into that space. Unfortunately, the reality is that you just don't find businesses like that out in the hinterlands between towns. However, while flying up and down the road (via Google Earth) what I did find was this rather intriguing looking private grain elevator operation about two miles northwest of town. Or at least I'm assuming it's private since there are no business signs whatsoever. Maybe it's some sort of local co-op thing? Or maybe one guy owns all the farmland in the area and has enough money to operate his own elevator? Model-wise, I guess the specifics of it don't really matter (apart from the fact that I wouldn't need to worry about making any signs).

I'd probably have to lose one of the bins. But other than that the size seems manageable, and it would certainly look right at home next to my cornfield -


So, yeah. I think that's the way I'm going to go. Of course, this all requires that I get off my ass and finish the damned SunRich admin building first. So, I guess I'd
better get busy with that
04/17/20 - Huzzah, my corn planting days are well and truly behind me! 
And not a moment too soon either - this stuff is getting damned near impossible to find! Anyway, here it is - my last cornfield ever (and my apologies, but this odd little corner of my layout is just not particularly conducive to pretty pitchers) -

On a scale of one to ten, I'd say my attempt at a center pivot irrigation system garnered me maybe a five.
It certainly would've looked a hella lot better if I could've made the spans arched (or at least straight), but those styrene rods weren't really interested in cooperating with me. Basically all they wanted to do was sag in the middle (grr). So I dunno, maybe somebody will come out with some sort of etched brass kit for this stuff someday and then I can do it over better. But for now, I guess it's good enough.
I kind of wimped out on the whole "gantry tracks through the corn" thing (well, totally wimped out actually). I think I'm just going to say that it's been a perfect growing season and
Farmer Johnson hasn't had to fire up the irrigation even once
As pictured, I also finished up the road coming out of SunRich (along with its associated grade crossings). As for whether or not there would be any sort of signs there, that seems to be up for debate (I've certainly seen it both ways). As for me, I think I'm going to put a couple of static crossbuck / stop sign thingies there just to add a bit of visual interest (although that's probably just an excuse to avoid getting back to work on that bleepin' office).
04/22/20 - Nibbling around the edges
I still can't work up much enthusiasm for that office scratchbuild, so I did the next best (IE easiest) thing by adding some scenery and detailing to the area instead. I started by planting some WS trees and bushes (the implementation of which still doesn't look quite right to me, so clearly I still haven't figured out how to do "untended" scenery yet). I also added a grass strip next to the office (where their BBQ deck will eventually go) -

Next, I made a model of the erstwhile SunRich sign (replaced last year by a Pipeline Foods sign) -

Lastly, I made some static grade crossing signs -

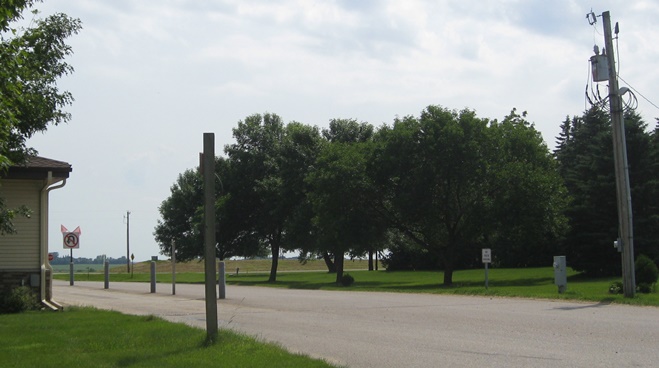
Since there are no such crossings or signs at the real SunRich, I had to kind of wing it there. And in aid of that, I used this picture as my guide -

The basic crossbuck signs came from Tichy Train Group (said signs being much thinner and nicer looking than the crap Bachmann signs I've used in the past). I started by painting the posts black and then finished them off with some stop sign and "private crossing" decals (Microscale #60-1430). Scaled down, the little blue signs in the prototype picture would be virtually unreadable (and the decal set didn't come with anything like that anyway), so I just left those off.
04/30/20 - More do-overs
Remember last year when I added that Shapeways hopper trailer to the Cargill facility?

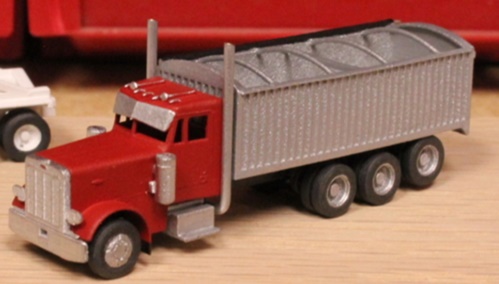
Well, ever since that fateful day I've become increasingly annoyed with all the antique (1954) Ford covered wagon trailers I have strewn around hither and yon at SunRich (particularly the red ones). Vis -

So, I finally decided to do something about it. IE, I got myself some more Shapeways hopper trailers (along with some tractors to pull them - a couple of Trainworx and a Con-Cor) -

Yes, I do still have a small fleet of old Fords, but they are (for the most part) limited to the equipment storage area. Maybe SunRich never found a buyer and now they're just sitting around rusting? Or maybe all they do is serve as emergency fill-ins during peak harvest season? Whatever the case, they're not driving around, so I'm happy.

This third one is destined for the scales next to the admin building (when/if I ever finish it) -

Now I just need to find a small / modern truck to replace that yellow 1954 jobber sitting under the hopper bins. And once again, I think it's going to be NScaleAddict (Shapeways) to the rescue -
So, cool. That project should allow me to keep the scratchbuild at bay for at least a couple more weeks
05/03/20 - Finished Waseca's "Old Highway 14"
Yep, the decals are done. All nine feet worth 

I don't know if that's the most tedious model railroading chore I've ever embarked upon, but it's certainly top five. Oy!
At this point I'd really like to add a line of utility poles along the highway, but having them next to the track (as the prototype dictates) would no doubt create an ongoing annoyance (vis'a'vis knocking them over, getting my flumblefingers tangled up in the wires, etc) -

Conversely, there's practically no shoulder on the other side of the road. So, if I went that route they'd need to be right up against the edge of the layout (IE, yet another open invitation to disaster). So, I dunno. I guess I'll just have to backburner that one for a while.
05/06/20 - Getting rid of some excess brain cells
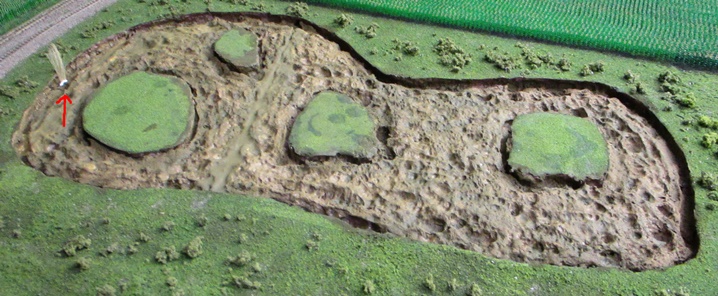
Making my lake (and its surrounding scenery) is going to be a pretty long term project, but I can't really do anything with it at all until there's actually a lake bed there to work with. So, I went ahead and got that off my to-do list. As pictured, I decided to make things a bit more interesting looking by adding some little islands to the festivities (said islands to eventually be covered with trees and vegetation) -
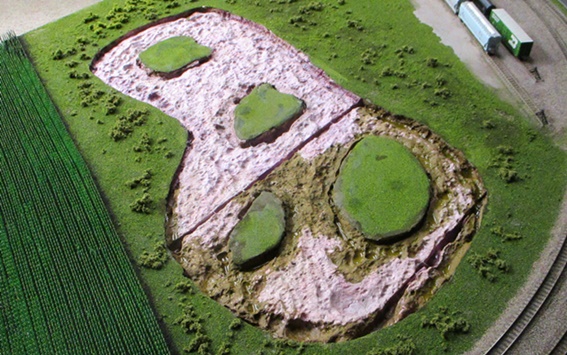
Lacquer thinner does a nice job of melting foam, so that's what I like to use for these sorts of projects (it also creates highly toxic fumes, so watch out for that). Unfortunately, the layer of laytex paint I'd applied to the foam base "way back when" turned out to be a huge impediment (I couldn't get past it, so the foam wasn't melting). I tried sanding it off, but after expending a lot of elbow grease and not getting anywhere, I went ahead and got out my power drill and a rotary rasp and stripped it all off that way. After that, the lacquer thinner was able to do its job on the foam (and tick my IQ down a few more points in the process).
My main goal was to have a nice deep trench around all the shorelines (into which I will be planting reeds and rushes). Some areas wound up a little deeper than they really need to be, so I'll be back-filling those with plaster (just as soon as it shows up in the mail). After that's all done I can get started on the task of planting this stuff -
I'm hoping that sprigging it in one small clump at a time will yield better results than what I got on my marsh last winter. Also, I'm going to save the "trimming it down to size" part for after it's all in place. Trying to do the resizing prior to installation was a huge pain, and something that I'd prefer to avoid this time.
This is what I'm shooting for -

I still haven't quite decided if I want blue water or brown. Fortunately. that's a decision that I won't need to make for quite a while.
05/07/20 - I guess I wasn't finished with the corn after all....
While working on my lake, I got to thinking about the edge of the layout up there and what I might do with it. It's not really big enough to accommodate anything interesting like a building or trees and bushes, yet too big to be just turf and static grass (ala most of the rest of my layout edges). Well, having a couple of leftover boxes of Bluford corn at my disposal (and not having any other better ideas), I eventually decided that I could simply take the existing cornfield on the south end and extend it all the way up to Highway 14 on the north end.
And so I did -
The corn on each end of the field is parallel with its neighboring road, however the roads themselves are not parallel. The upshot of that is that I had to kind of cheat the corn as I worked inward from the roads (occasionally tilting rows at slightly odd angles relative to their neighbors so that everything wound up being parallel when it joined up in the middle). It's not anything that you'd ever really notice and overall I think things wound up looking pretty good (or at least good enough for this odd little corner of my layout that nobody's ever going to spend much time looking at anyway).
And as long as I was puttering around with corn up there, I also took the opportunity to put some more distance between cornfield #2 and the tracks -
Dunno what I was thinking back then (vis'a'vis planting the corn right up to the roadbed), but in any case it wasn't anything that a Dremel and some weeds couldn't take care of. Of course now I suppose I'll have to go back to cornfield #1 and hack that thing back a bit as well -
Meanwhile, as I was taking pictures of all this stuff, I decided that I just didn't like the look of the bushes that I'd planted up there last summer. I don't know what I was thinking at the time, but having static grass slathered all over the bushes was looking just plain weird to me now -

So, I went ahead and pulled most of it off -
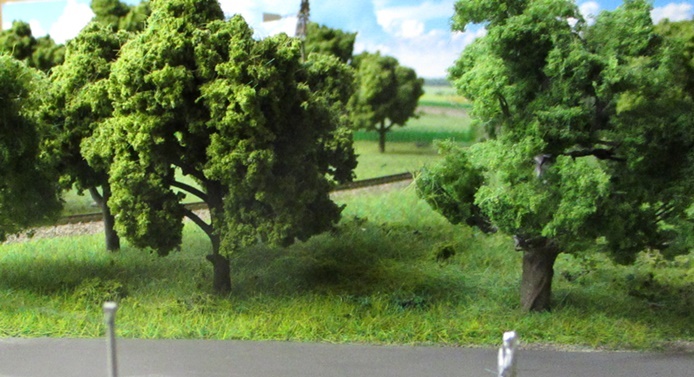
At this point I'm not sure what (if anything) I'm going to put there to replace the fuzzy bushes. Actually, I think what I need to do is wait a couple of months and then drive down to Hope and scout out one of these "out in the middle of nowhere" tree groves to see just what they're made of.
05/10/20 - Meanwhile, back at SunRich....
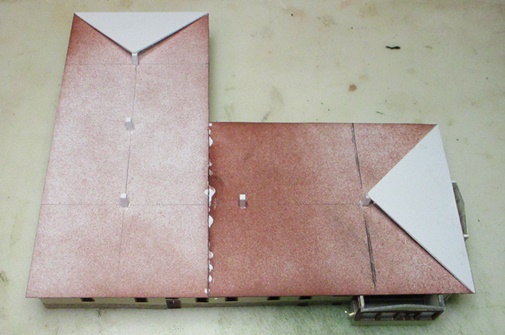
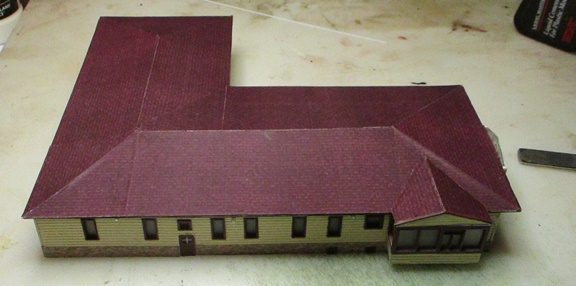
The main reason I've been reluctant to get on with this building is that I've been dreading making its ridiculously complicated roof -

However, after spending some time looking at things, it seems like I should be able to do this if I just break the roof down into its individual components and start putting them into place one at a time (like I did on Krause's). So, with two triangles, two parallelograms, and two trapezoids on my plate, I decided to start with the easy stuff (IE, the two triangles) -
I put little support posts at strategic locations on the base of the roof (where multiple roof sections meet up), which should allow me to mock things up as I go (and hopefully help me when it comes to making the more complex sections in "trial and error" fashion). Well, that's the plan anyway, so we shall see.
05/11/20 - Well, that was easy
Dunno what I was so worried about, I think this whole thing took maybe an hour. Going one piece at a time and mocking things up as I went turned out to be just the ticket.
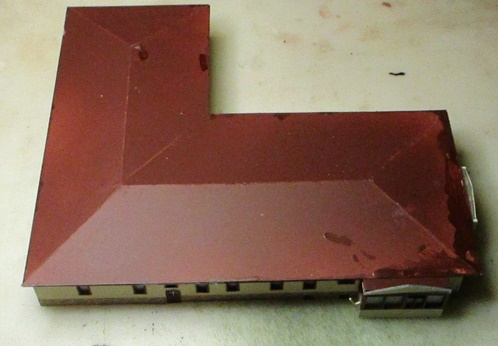
So, cool. Now I can get on with the detailing and finish this baby up.
05/17/20 - OK, not so easy....
These printed paper shingles have turned out to be a bit of a nightmare. Which I guess shouldn't come as a surprise since this is far and away the most (and most complicated) acreage I've ever tried to shingle before. I tell ya, the glue is such a pain. It gets everywhere, and if you slop so much as a single molecule onto the printed side of the paper you wind up having to start over (although I must admit that my standards definitely started to dip the further along I got).
That dormer roof wasn't any picnic either. I had to do a lot tweaking to get all the puzzle pieces to fit together (file a bit off here, glue on a bit there, squooge in some Bondo Putty, etc). And of course during all of that I managed to get brown paint all over a couple of the walls. And of course trying to retrofix that only made things worse. So of course I had to tear the walls apart and repaint them. Ugh! Fortunately, I think I can see the light at the end of the roofing tunnel (and here's hoping it's not an oncoming train).
In other news, I finished plastering my lake bed and coloring everything with WS "Earth Undercoat". I also got started on sprigging in the rushes (still a little ways to go there, lol).
Model Railroading - the only hobby where you can alternate between frustrating and tedious and still keep coming back for more
05/19/20 - Roof = Done
Not quite as pretty as I would have liked (damned glue), but good enough for me -

Not so funny story - back when I started this project I had planned on using Model Master "Light Ivory" for the walls and downspouts. Except that, oops, my can was almost empty and my
LHS didn't have
any on hand. OK, no problem, because what they did have was Model Master "Phoenician Yellow" (which I guess is some sort of Ford auto color, but is also a dead-on match for the Light
Ivory). And so that's what I've been using lo these many weeks, and.... now my can is nearly empty. OK, no problem, I'll just go get some more. Except that, oops, my LHS doesn't have it
anymore. OK, no problem, I'll just go order some online. Except that, oops, it's been discontinued and isn't being sold by anybody anywhere. So, ugh, I sure hope these last remaining
spritzes are going to be enough to get me through to the end of this project. I tell ya, talk about working without a net! 
05/22/20 - Scale = Done
I think I nailed all the details here - orange safety barrels, metal safety posts, scale proper, "Do Not Block Scale" sign, "Premises Under Surveillance" sign, two little orange flags,
"No U-Turn" sign, pointless wooden post, weight display post/box, "No Truck Parking" sign, electrical box, utility pole. And yes, I did put little "0.0" decals in the weight display
I opted to use metal screws for the gray safety posts (since plastic ones tend to look rather coarse and bloated by comparison). But damn, those little bastards are super tough to cut and file, so another "pick yer poison" type of situation I guess.
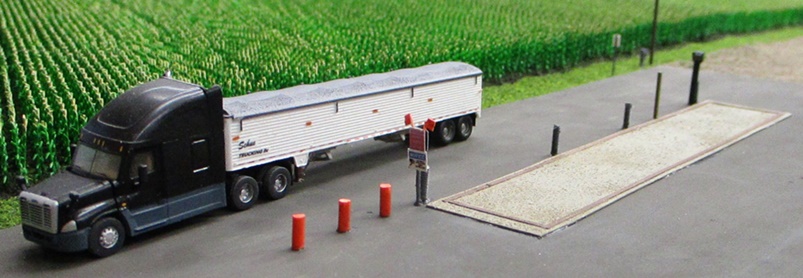

Now that I see it in photographs, I probably should've just painted that concrete scale right onto the parking lot base (instead of using a separate sheet of styrene). Fortunately, it doesn't stand out nearly so much when viewed in person.

I also got started on the building detailing, but I'll save those pictures for when there's actually something worthy of photographing
P.S. I did some more digging around at my LHS and miraculously scrounged up a misfiled can of Phoenician Yellow, so whew!
05/28/20 - OK, so the lights work
I had a bit of a lighting scare over at Cargill the other day - namely, I turned on the lights and a whole bunch of them weren't working (eep!). So, I'm fiddling around under the layout looking for the loose wire, getting nowhere, and starting to wonder if I'm going to have to tear the whole building apart in order to the find the problem (double eep!). Well, the good news there is that I did eventually find the loose wire; which begs the question - just how in the hell do screwed-down wires spuriously work themselves loose??
Anyway, the whole experience left me be a bit rattled, so I decided to go ahead and get lighting wires hooked up to the SunRich office and verify that everything was going to work OK there. And fortunately, no problems. So, after that brief diversion it was back to the detailing.

Speaking of detailing... while I was poking around my scouting photos of the office I came across the below picture of a couple of safety signs at the end of the hopper sidings -

And ten minutes later, my sidings had been similarly safteyized -

In other news, my NScaleAddict grain truck experiment has been put on hold due to "bad things happening". Yeah, the boxes and chasses are great, but those cabs? Ugh! In
addition to
looking like crap, all the various parts are as brittle as egg shells and don't fit together at all (and with the end result being a lot of broken eggshells). So, Plan B
is going to involve trying to adapt some old Con-Cor Kenworth cabs to the NScaleAddict boxes/chasses. And if that doesn't work out, I guess it's back to 1954 for me. Frankly, I'd
rather have nice looking anachronisms than something that looks like it came straight out of amateur hour. To my eye, nothing ruins a scene faster than sloppy looking vehicles
05/29/20 - First N scale JaHam grain truck probe ever?
I mean, I can't imagine it's something that's going to show up on too many layouts

This was another one of those projects that seemed like it was going to be hopelessly complex at first, but actually turned out to be pretty simple. I started out with the basic pole and then just cherrypicked a few of the more feasible looking details from the prototype (stabilizer fins, boxes, bracket, piston, crown, arm, probe, "nameless hose"). It doesn't really take much to capture the essence of the thing, so I didn't see any reason to make it any more complex than that -

So, good progress on the detailing so far -

Almost there, but I do have a short laundry list of items that I'm still waiting for. So, giddyup Mr Postman!
06/03/20 - OK, better
Combining a Con-Cor Kenworth tractor cab with an NScaleAddict grain truck box was an experiment worthy of Dr Frankenstein, but all in all I think it worked out pretty well -
I probably could've spruced it up a bit more, but given its situation (tucked away in the invisible zone) I decided that my energies would be better spent elsewhere. For those who might be interested in taking things a step further, The N Scale Vehicle Association has cooked up a bunch of tips and tricks for improving these old Con-Cor trucks (the details of which can be found HERE).

So, that does it for the truck project. My last antique Ford has been retired from service and relegated to the equipment storage area where it belongs
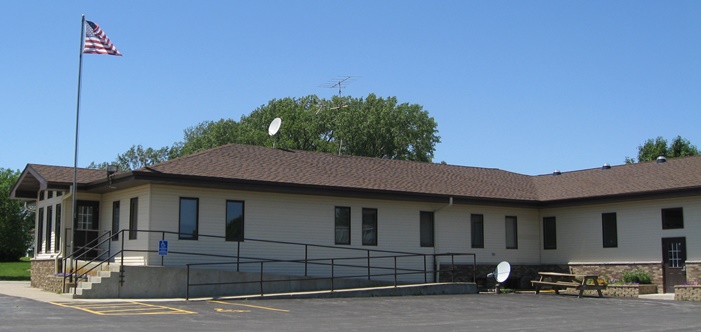
06/04/20 - The last of the Hope buildings be done!
For what is ultimately a pretty generic looking structure, this thing somehow managed to check pretty much every box on my list of
scratchbuilding annoyances - odd wall configuration (vis'a'vis the "L" shape and the two fancy shmantzy bay windows), waaaayyyy too many bleepin' windows overall (all of which had to
be handbrushed), unforgiving color combination (light ivory walls and dark brown trim), and a large and insanely complex shingled roof. On the plus side, all of the
fun little bits of detailing did help to make the overall scene look a lot more interesting than it probably really is
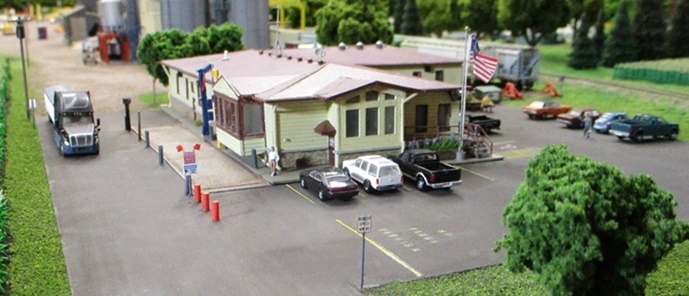
That kickass flagpole came from Woodland Scenics (their so-called "small" version). It's a beauty to behold and even comes with its own rope. On the downside, the accompanying spotlight is ridiculously oversized for N scale, so I had to roll my own there.
Note that the prototypical parking lot has two sets of "NO TRUCK PARKING" stencils whereas mine only has one. Well, you try putting down tiny little decals one stinking letter at
a time (right on your layout!) and see how long it takes you to wimp out and decide to cut your work in half

Unfortunately, the only wheelchair decal I could find was white. Oh well, I guess the parking lot stencil guy ran out of yellow paint that day and had to improvise. The large satellite dishes came from Shapeways designer TABEARSALES (they're actually HO, but just the right size for what I needed). And suffice it to say, that wheelchair ramp was absolutely no fun to build (I'm still having nightmares about all those handrails, yikes).
The flowers and bushes in the planters are an assortment of stuff from my LHS (the commonly available and mostly HO stuff from JTT, Busch and Noch). And if you ever find yourself in need of a bunch of different flavors of flowering shrub, do pick up JTT's "Blossom Hedges 8-pack" (#95509). You get a bunch of HO scale hedges in four different colors; all of which are made out of this weirdo spongy sort of material (dyed green on the bottom and red, pink, purple or yellow on top). To make N scale shrubs, you just tear off little chunks of the sponge and plant them. Works great!
Random gripe - why doesn't Woodland Scenics make more "suitable for a parking lot" people that don't look like they're headed to work at some Manhattan high rise? Give me some
regular people in jeans and plaid shirts instead of all these hoity toity folks in suits and 1950's style dresses! 

I had to re-do most of the shingles after making a mess of installing those large vents. I couldn't just glue them to the roof because I couldn't fabricate
four exactly-the-same
vents that had the right angle on the bottom. So, I opted to drill holes through the roof instead (which, as one might expect, turned into a disaster). Of course after I'd
finished cleaning everything up it occurred to me that using my soldering iron to neatly burn holes through the roof would've been a much better way to go.
Duhhhh... 

That picnic table is constantly moving around, so I just put it where I thought it would look best. And you can go ahead and ignore the shameless plug for my website


I made the brick trim by cropping a section of brick out of a proto photo and printing it out on my laser printer. I think it looks way better than any sort of styrene brick siding I might've used (for starters, no one can complain that I got the colors wrong, lol).
And yeah, my "white door with brown trim" turned into a "brown door" somewhere along the line. Oh, don't ask


I opted to put on the thin strip of stone trim that runs along the top of the brick trim on the prototype, which unfortunately made my gutter downspouts a huge pain to construct (they had to jog over said trim strips on their way down the sides of the building). As klunky looking as it all turned out, I think if I had to do it over again I'd skip all that and just fake the jogs.

Yeah, there's no way I'm going to put a truck on that scale and ruin my money shot. And besides, the scale permanantly reads "0.0"


Ayup, the lights work.

Thanks to selective compression, that's it for the Hope structures on this layout (unfortunate in the case of the SunRich premium conditioning plant, but a blessing
as far as all those punted houses are concerned). So, yep, I am rapidly approaching the finish line here. Basically a few small structures and some detailing for the Waseca yard, an
electrical substation, an elevator up in the NW corner, and then the lake. Hmmm... I wonder if it's too early to start planning my next layout?
06/08/20 - Waseca yard detailing commences
This seemed like the most interesting place to start, and so that's where I started -


There's not much here that you haven't seen before (styrene shed, styrene bunker, Cornerstone tank, GMM safety cage ladder, Plastruct stairs, wire hose, homebrew decals, various styrene strips and rods, etc). I do have to thank the DM&E for leaving half of their "THINK SAFETY" sign dangling crookedly off the wall. Pretty much completes the scene, lol.


It's not really obvious when you're standing there, but the prototype sits at a weird angle relative to the rest of the yard. And, nope, I just couldn't bring myself to situate my model in a similarly askew fashion (OCD being what it is).
Once in place, I made some paper templates and started plotting out where I might put the rest of the stuff -

I must say, not having that huge Birds Eye facility on the east (right) side of the yard is really messing me up. I feel like I have to cheat the stuff on the DM&E side more eastward just to fill up some of that open space. But of course that's going to dilute the western side and screw up the relative positions of the prototypical buildings that I actually am going to model. I sure wish I could think of something from the area that I could put on that eastern end; something that would make sense in my "yard in the middle of nowhere" situation. I dunno, maybe I just need to drive down to Waseca and have a look around.
06/09/20 - So, who needs to drive when there's Google Earth?
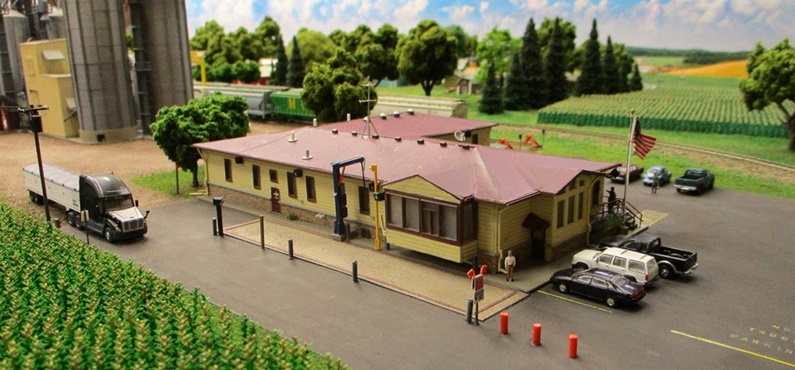
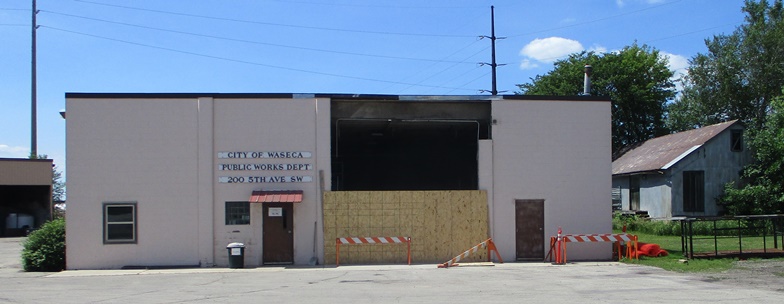
OK, I think we have a winner here. This building (part of the City of Waseca Public Works facility) is right next to the tracks and only a block from the yard. Better still, all
the doors are perfectly oriented for where it would sit on my layout. Better better still, it's the perfect size and shape (12" x 4.5" in N scale). And OMG, a flat roof for a change!
OK, it's perhaps not the most interesting looking building in the world. But it does seem like the perfect sort of public / non-commercial structure to occupy that nebulous empty spot next to the yard (thus allowing me to keep all the DM&E stuff on the west side where it belongs) -

FYI, the cigar box is a placeholder for my as yet unthunkabout electrical substation. The actual one in Waseca is way too big to fit in the available space on my layout, so I'll be basing mine on something smaller (whatever and wherever that might turn out to be).
06/12/20 - I swear, we live in a world of sheds....
Because, ayup, it's another shed

I actually started counting up how many sheds I've scratchbuilt on this layout, but I had to quit when I got into the 20's. Frankly, it was just too depressing to
contemplate!

As for my next project? Why, more sheds of course! Ah well, it's still better than dolphins and trampolines

Now that I'm using it on a more regular basis, I have to say that I'm becoming less and less enchanted with my RailroadBackdrops.com "Cheyenne Industrial North" backdrop. I think the main problem is that the sky looks kind of washed out and doesn't really pop like the sky on my trainjunkies.com "Just Corn" backdrop does. Vis -
Looking at my proto pics of the yard, it seems like all of those railcars actually do a pretty good job of blocking out everything behind them. IE, there are buildings back there, but all you can really see are treetops and sky.

In light of that, I think I need to go take another look at trainjunkie's selection and see if I can't come up with something that's basically just that - trees and sky.
06/14/20 - OK, this looks do-able
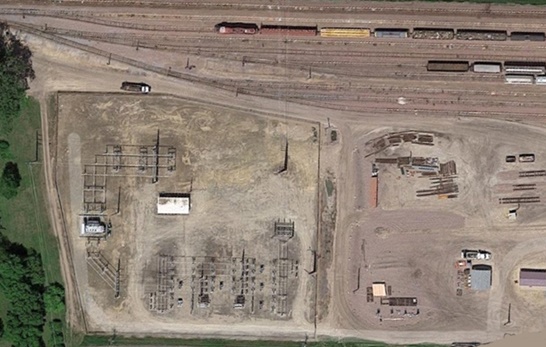
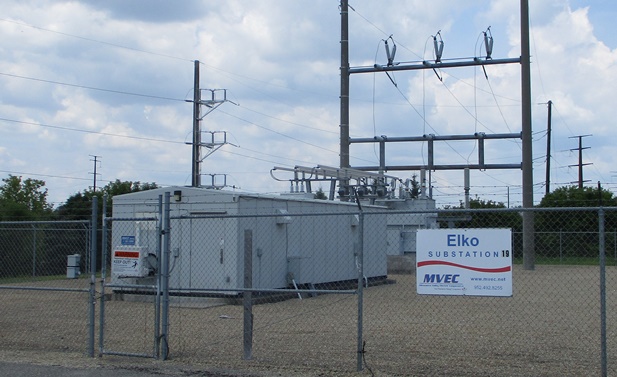
Xcel Energy has a nifty tool on their website that shows the locations of all of their substations, so it only took me a couple of minutes to find one that's going to
work in my yard situation. And once again, I remain completely gobsmacked by all the handy research tools we modern modelers have at our disposal!

Said substation is located near Elko (about a twenty minute drive from my house). And being out in the middle of nowhere, I shouldn't have any problems walking around the perimeter and taking photos. The area inside the fence is square and actually quite huge (as compared to the actual hardware contained therein), but I don't see any reason why I couldn't trim it down to something more like this -

That should fit quite comfortably in the available space (11" x 5"). Also, this one has the added benefit of being pretty simple looking (at least as compared to that monstrousity down in Waseca), so I shouldn't have to kill myself modeling it (always a plus).
In other news, I ordered up a new trainjunkies backdrop for my yard. To wit, this one called "Florida Forest" -

Yeah, I know. Florida? WTF? The thing is, it's the only one they had that depicted summer / non-pine foreground trees (and nothing else) in a non-mountainous
environment. So, I sure hope it works out
06/15/20 - Another "what was I thinking?" do over
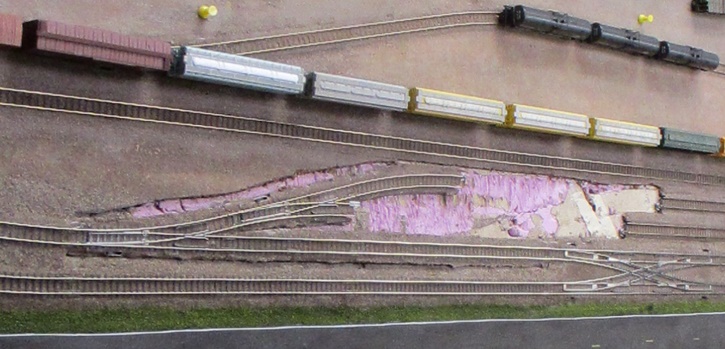
Back when I was putting down the track for the Waseca yard I opted (for whatever reason) to put the turnout for the eastern entrance right next to the double crossover (instead of further east). Why, you ask? Boy, I sure wish I knew, but the end result was that the first two "steps" of the yard ladder were both about a foot and a half shorter than they could've been. And as such, they wound up being both useless and stupid looking. I mean, what's the point of a yard track that can only accommodate six cars?

As I've been working on the yard structures I've been becoming increasingly aware of this weirdness, and yesterday I finally decided I'd had enough. IE, I tore everything out, flipped the mainline straight track to the western side of the yard turnout, sliced up the cork, and then moved everything eastward -
Next, I extended the two yard tracks -
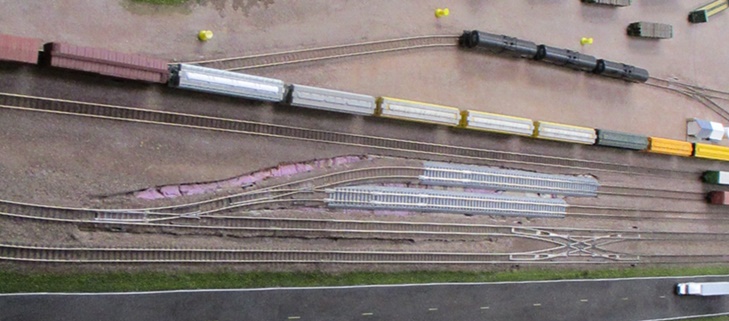
Finally, some ballast and dirt work and we're there -

It certainly looks (and functions) a hella lot better this way, so I can't imagine what I was thinking back when I first put down that track 
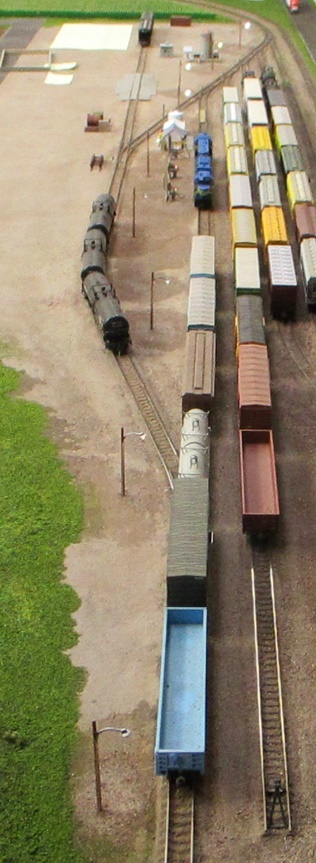
06/25/20 - Yard lighting
It's tough to get decent "big picture" shots of my yard. But take my word for it, there are now nine WS streetlights providing illumination for the rail workers. And I tell ya, it never ceases to amaze me how quickly a scene comes to life when you start adding a few details -
Unfortunately, I wound up with three lights that once again look more yellow than white, so WS's quality control is still a bit iffy on these things. At this point I'm not sure if I'm going to replace them or not, but me being me, I suspect I probably will (eventually).
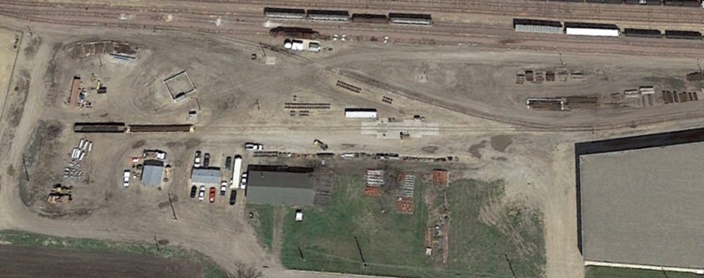
06/27/20 - Finished Fred Sanford's shed
Based on all the piles of random metal junk piled up in the lot, I'm assuming this guy is (was) some sort of scrap metal dealer. What a weird thing to have in a yard, eh? Anyway, although I haven't started on all the external detailing yet, the building itself is done. As pictured below, a WS streetlight worked out very well as a rooflight -


Three doors and zero windows, so this one was about as simple as it gets -


As for all the detailing? Well, that's another story


Yep, that's going to keep me busy for a good long time.
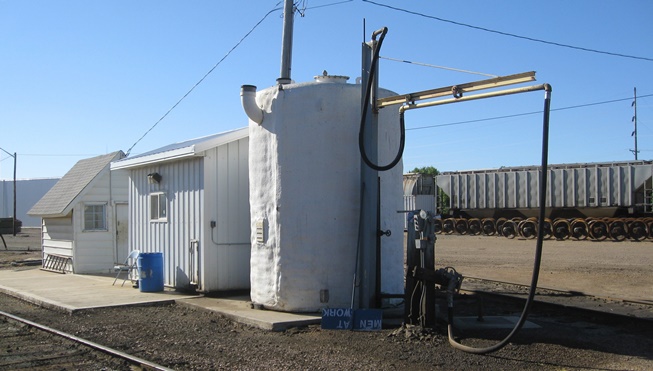
06/27/20 - Finished the fueling facility
This was another one of those projects that looked like it was going to be hopelessly complicated (vis'a'vis the pumping stations), but actually turned out to be pretty straightforward.


I'm told that the little thingies hanging on the rack next to the "MARKERS" box are EOT flashers, so I ordered up a set of MTL cast resin FREDs and stuck 'em on there -
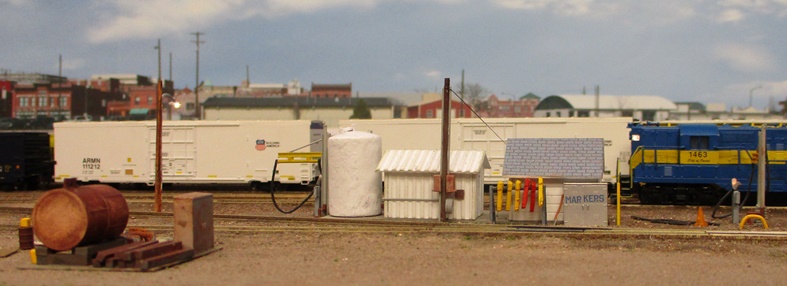

I put a thin coating of Bondo putty on the fuel tank to give it the appropriate "encased in concrete" look -

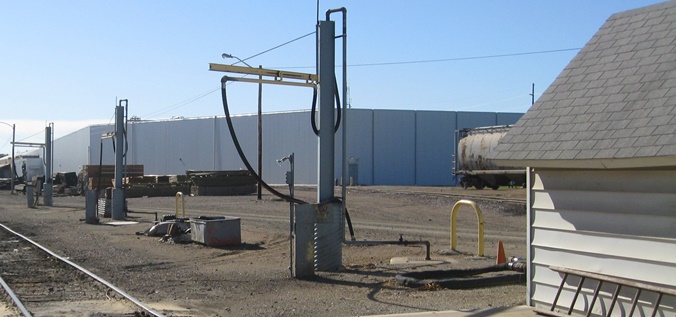
The pumps consist of various pieces of I-beam styrene and styrene rod. I made the bases by cutting up a small nylon screw (acquired from my LHS since hardware stores don't generally carry ones that are that skinny). The hoses are pieces of thin black wire. I used the tiniest Miniatronics bulbs I could find (1.2 mm) for the lights on top of the control stands (basically blending the wires right into the I-beams) -
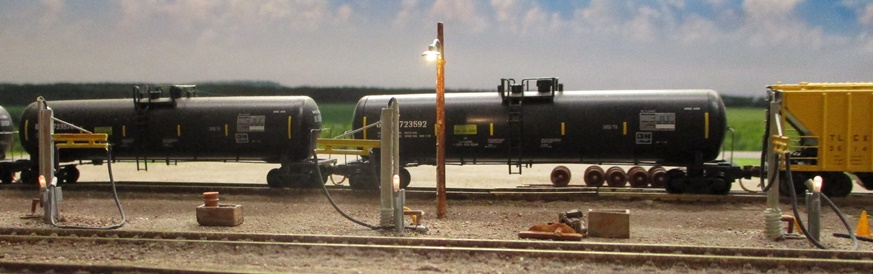
As pictured above, I did dip my toe into the generic yard detailing pool by adding some rusty wheelsets sitting on rusty rails. But at this point I think I'm going to go ahead and finish up the rest of the basic yard structures (office, garage and public works building) before I really get going on all the fun "junk laying around everywhere" detailing.
07/04/20 - Gorgeous holiday weather? Time to put the top down on the Wrangler and go for a little drive!
I needed to get some good reference photos of the Waseca public works building, the Elko electrical substation, and some sort of small, tree-lined lake. And so I did.
Handy Tip #3657 - When it comes to engaging in a little bit of minor league trespassing, I've always found major holidays to be the best time for doing so
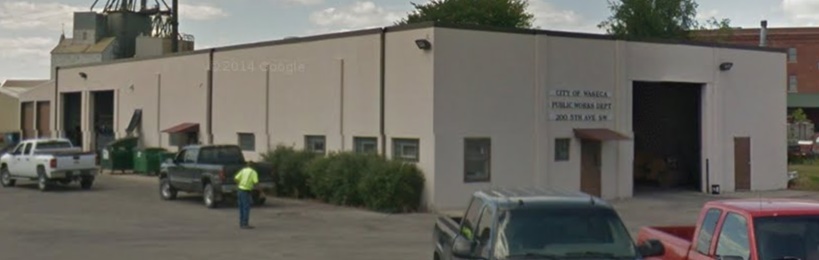
When I showed up in Waseca and saw all this, I'm thinking "Oh swell, they're tearing it down". But, as it turns out, it looks like they're just replacing the one overhead door -
If you're guessing that I was practically picked up and carried away by all the mosquitoes and deerflies, well, you're right!

In the meantime, my workshop is in lockdown mode while I await the arrival of a new mag-lamp. I tell ya, you don't realize what vital pieces of equipment those things actually are until they go on the fritz!