03/18/19 - Ballast, corn and soybeans
I came up with a somewhat quicker/easier way to do all this ballast tweaking. The results are more predictable and regular as well -
1 - Add the ballast to the sides of the roadbed (one pinch at a time with thumb and forefinger)
2 - Run a toothbrush over the rails to clear away any ballast that wound up on top of the roadbed
3 - Smooth out any irregularities in the ballast with your specialized ballasting tool (IE, your thumb)
4 - Use a large eye-dropper to apply copious amounts of "wet water" between the rails (said water eventually finds its way into the ballast and soaks it).
5 - Repeat step 4, this time using Scenic Cement
6 - After the ballast sets up, brush Mod Podge over the areas where you want turf instead of ballast (IE, where the ballast has extended too far away from
the roadbed)
7 - Use a shaker to rain turf on top of the Mod Podge
8 - After that all dries, vacuum up whatever didn't stick
Using Mod Podge for the turf instead of Scenic Cement does result in the turf winding up a slightly different color, and if I cared I'd go ahead and change the coloring by soaking it in Scenic Cement (as an additional 9th step). However, since all of that older (darker looking) turf is going to eventually be covered with static grass, I didn't bother. Oh, and yes, I did get started on the new corn field (obviously still a long ways to go there).
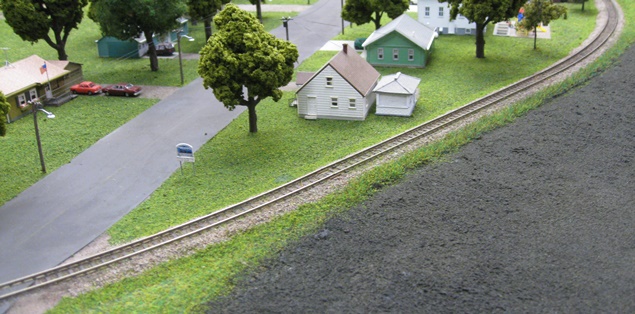
So, outer loop ballasting is now finished from the right side of the yard all the way down to the southern grade crossing -
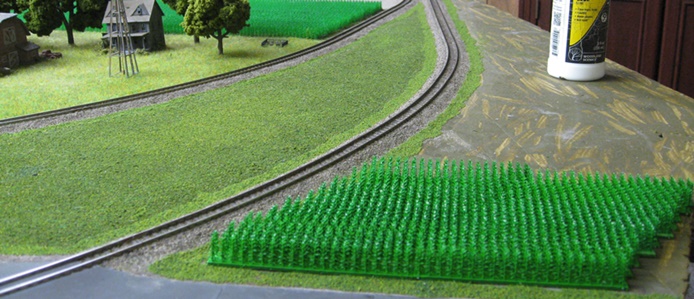
In other news, I went down to Michael's and found some Patins yarn that looks like it might work for soybeans -

The product line is "Classic Wool Worsted" (whatever that all means). The size is "medium", which is much thinner than the stuff I'd ordered up previously. The color (Jade Heather) is sort of a blue/green, which to me looks much more soybeany than Forest Green did. Now I just need to figure out a more effective (and less messy and time consuming) way of getting a coating of green turf to stick to the stuff....
03/19/19 - I have a soybean plan, I just don't know if it's a good one
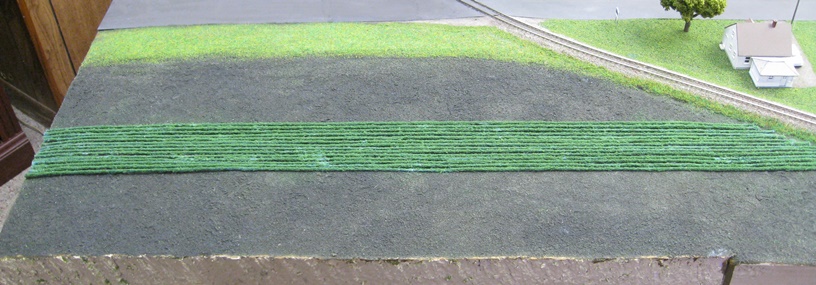
I decided that coating the yarn with turf prior to installation was going to be too much of a pain in the posterior, so instead I'm going to try doing it in situ. The first step is to get each row pinned down in the field (this is as far as I got before running out of pins) -
Once I finish all that, the final step will be to soak the yarn with diluted Scenic Cement (from a sprayer) and then use a shaker to add the turf. Unfortunately, my guess is that the green turf is probably going to wind up hiding my dirt base entirely (thus creating a boring "sea of green"). But I guess I'm not sure what (if anything) I can do to prevent that, so we'll just have to see what happens.
03/20/19 - Accidental discoveries
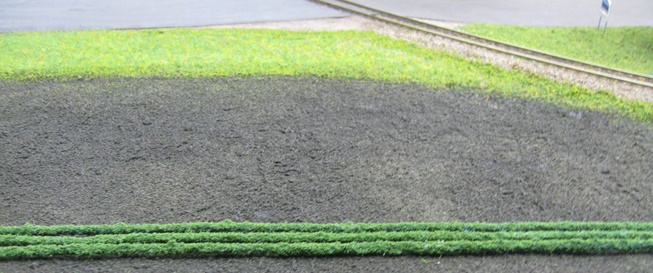
So, I spent a day wrestling around with this damned yarn and having just all sorts of problems. It's tough to get turf to stick to it, it's tough to get it glued down, and touching any of it (accidentally or otherwise) turns it into a big jumbled up bowl of spaghetti. Worse still, even unfinished I could tell that it was going to confirm all my fears and wind up looking like a big boring sea of green. So, I eventually decided to just pull it all up and start over. And what was left over was.... hmmm.... quite interesting -

As it turns out, the yarn actually functioned as masking. So, I serendipitously wound up with light rows of turf (the stuff that landed between the strands of yarn) and nice discernable rows of dirt (the stuff that was under the yarn). And right away I'm thinking, wow, that looks like a very convincing rendering of a "just sprouted" field of soybeans (no, not the mid-summer look that I'm after, but interesting nonetheless). Clearly it's the disernable rows of dirt between the plants that cause the whole scene to come to life, so now I'm thinking I need to start over and do this using some sort of masking.
03/24/19 - Soybean progress
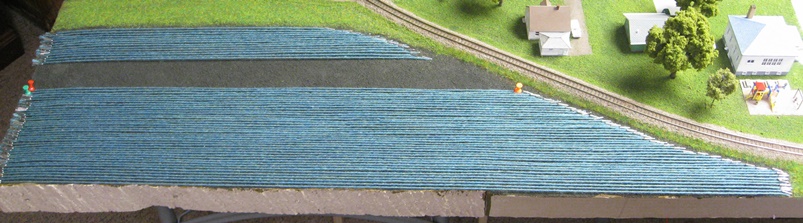
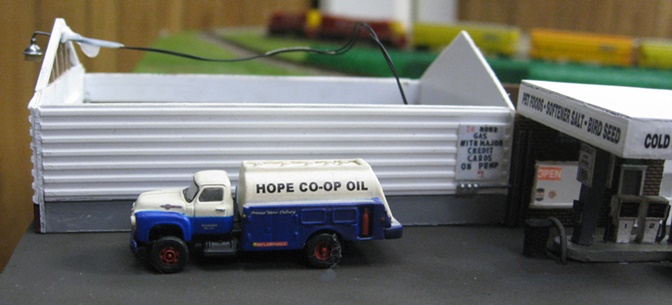
OK, so I eventually decided that putting the yarn back in the field and trying to apply turf to it there (using some sort of masking between the rows) just wasn't going to work out - the main problem being figuring out a way to get a coating of fine turf to stick (securely) to the rows of yarn, and then get the rows of yarn secured to the field. Applying Scenic Cement with a sprayer doesn't really provide enough adhesiveness (especially since it has to be diluted so as to not clog up the sprayer). So, I decided to go completely gonzo and fully soak the yarn in a bowl of SC instead. Which is all well and good, but how do you then get the turf on and have everything dry without sticking to whatever surface it's drying on? Well, my bright idea there was to string it up inside of a cardboard box (the ends of the yarn slide into little slits I cut into the ends). Once suspended, I then used a shaker to apply the turf (the box is doubly handy because it captures all the turf that doesn't stick, thus allowing it to be easily reused) -

This actually worked out great - the turf wound up firmly affixed to the yarn and the yarn itself stiffened up nicely (IE, all ready to be glued down in the field). So, now I can build the rows off the layout and then add them one at a time to the field (leaving some dirt in between as I go). The only problem now is that for this experiment I used the same "blended green" turf I've been using for grass, and if I go down that road the field isn't really going to be differentiated (color-wise) from the surrounding grassy areas (and thus wind up being a bit boring looking). So, I think I need to find some fine turf that's a little darker green than what WS uses in their blended turf. EG -

Unfortunately, WS only makes their dark green turf in "coarse" (as opposed to "fine") consistency, and coarse turf just doesn't work with the yarn. However, they do have another flavor of fine turf ("weeds") that looks like it might be workable. Now, I just need to get down to my LHS and put my eyeballs on some.
03/27/19 - Inching forward one bean at a time
So, I think this is going to work -
The "weed" fine turf seems to be a tolerable color for soybeans (sort of an olive green) and whipping up the rows (soak, string up, coat, dry) actually goes pretty quickly. However, I haven't really figured out a quick and easy way to get the rows glued down in the field. Basically I start by getting one end glued in place, and then once that bit dries I proceed to gradually get the rest of the row glued down (about six inches at a time). Any more than that and the glue gets to be a big mess, and I sure don't want a bunch of visible glue residue polluting my field. So, this is going to take me a while.
In other news, I finished another 3' of ballasting -

That finishes off the Hope half of the layout (and then some), which I guess makes me about 2/3's done overall.
04/23/19 - Ballast, corn and static grass
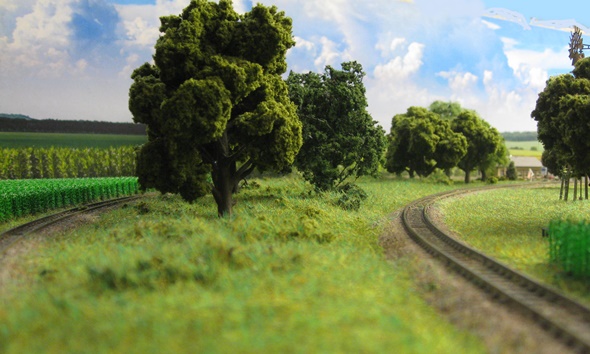
I finished adding static grass to that open area between the mains. Now all it needs are some trees and bushes -
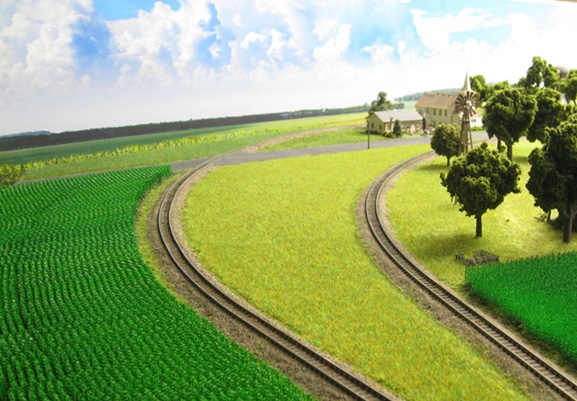
I also finished the cornfield along the edge of the layout (9 boxes of Bluford Shops corn, ouch) -

Lastly, I finished another 4' of ballast (basically leaving the double-track mains as the only areas still in need of ballast beautifcation) -
So, wow, that was boring. Time to find something a bit more interesting to work on.
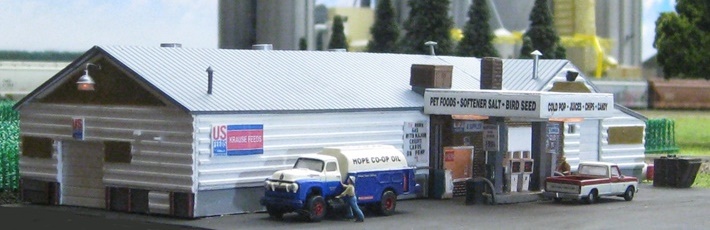
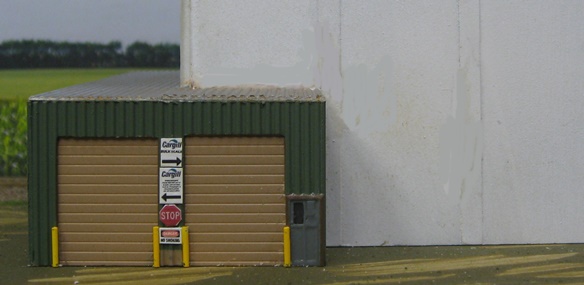
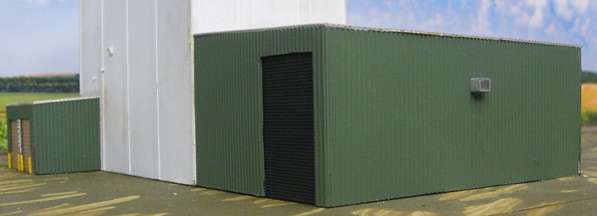
04/28/19 - Finished detailing the feed mill
Over on the east side I added a rock and a barrel underneath the platform and an electrical box (which I'm assuming operates the turnout) to the east wall -


On the south side I added a couple of wooden supports for the ramp guardrails, various weeds, and that dangling hose thingy underneath the overhang -
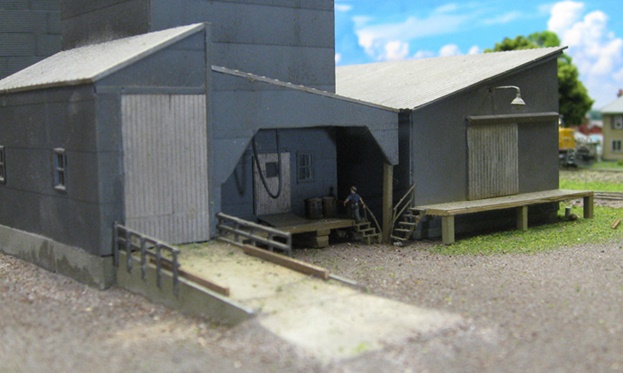
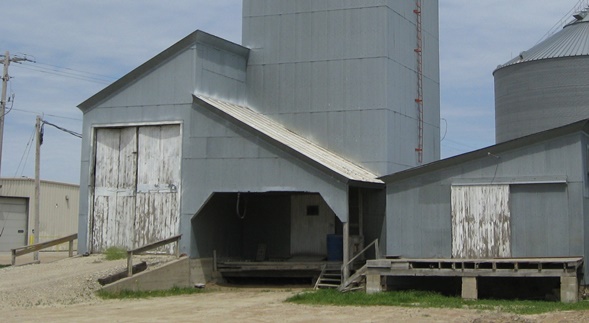
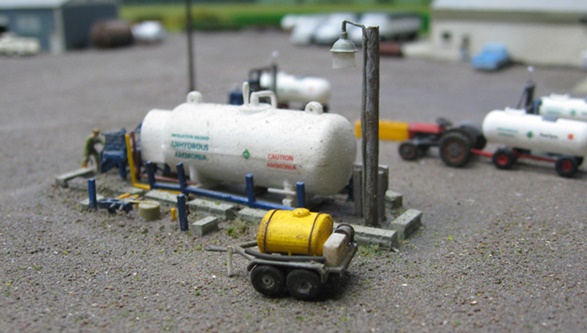
The junk on the west side seems to vary every time I take a new picture down there, so I just opted for a mix of interesting looking stuff from various eras - more weeds, some pallets, a couple of tires, more ramp guardrail supports, a long hose, a couple of barrels and a fertilizer tank trailer (courtesy of Shapeways designer "The Model Mechanic") -
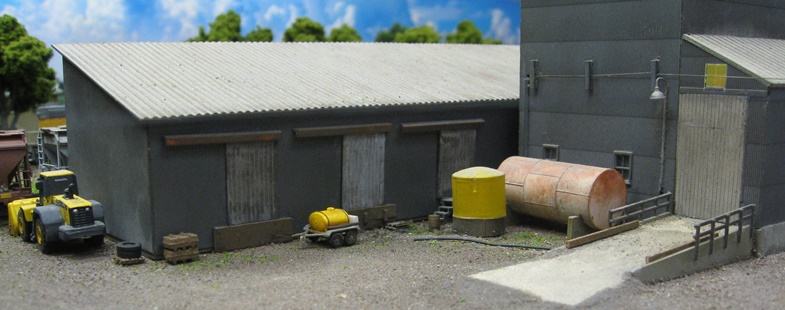

The tank trailers are pretty nifty and damned near spot-on perfect for what I needed. However, I did have to add some hoses, some tie downs and a jackstand to make them look a bit more like the ones at SunRich. Unfortunatly, one of them was missing a wheel (or maybe I just lost it), so I had to do a little improv there (vis'a'vis the monster offroad tires) -

So, that's that. Now I guess I really do need to get serious about maybe thinking about considering the possibility of perhaps looking into getting started on my scratchbuild of Krause's Feeds. Maybe.
04/30/19 - Ever had a really great/original idea, only to find out that lots of other people have already had it? Well, I did! 
Case in point - you know those "To Trains" signs you see at railroad stations? Well, I saw one in an old movie a while back and thought to myself "wow, that would be cool to have at the entrance to my train room" EG -

So, I started googling around to see what I could find, and.... as I'm sure you've already surmised, there are millions of reproduction signs out there (all specifically designed for model railroading geeks such as myself). And so, down the rabbit hole I went and eventually came across this UK-esque "faux distressed" metal sign on eBay that seemed a bit more fun than a simple "To Trains" sign -

So, get this - it turns out that the guy who makes these signs is the same guy who I bought my nylon fencing material from way back in 2006. He also sent me a pile of nifty little traffic signs that I still use to this day. And he's also the guy who bought my Scenic Ridge layout! I mean, talk about the mother of all coincidences!
So anyway, I absolutely love the sign. If you're in the market for cool RR-themed signs, I suggest checking out Wall Color Signs (or Dave's eBay store - "wall-color").
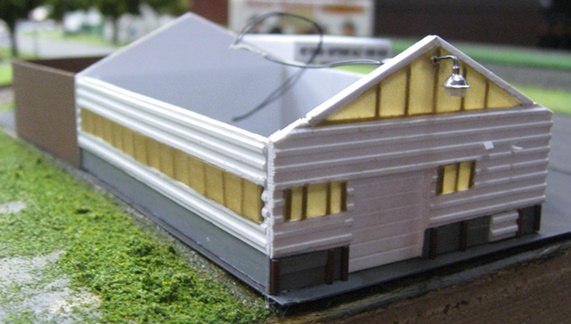
05/04/19 - Started work on Krause's Feeds
Yep, it's huge and it's complicated. But dangit, it needs to be built.

I decided that adding a foam strip to the edge of the layout (in a vain attempt to accommodate this thing in it's entirety) was going to wind up looking pretty dumb. Unfortunately, even scaled down by about 30% there's just no way the whole thing is going to fit in the available space. So, I think what I'm going to have to do instead is turn this -
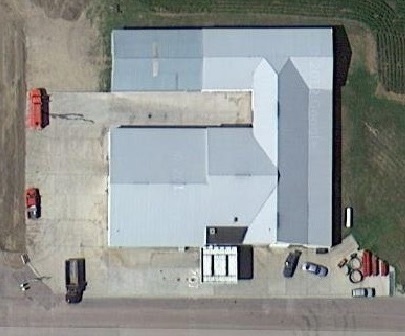
Into this -
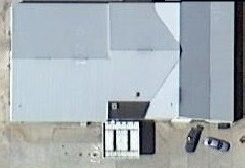
The lopped off stuff is just a lot of "more of the same" boring storage shed space, so I don't think I'm going to "shed" any tears over losing that

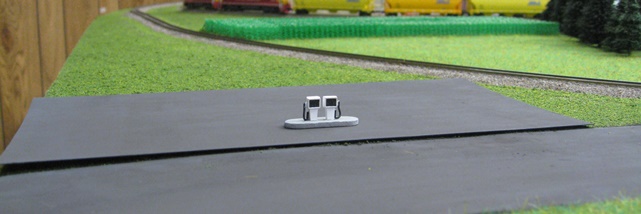
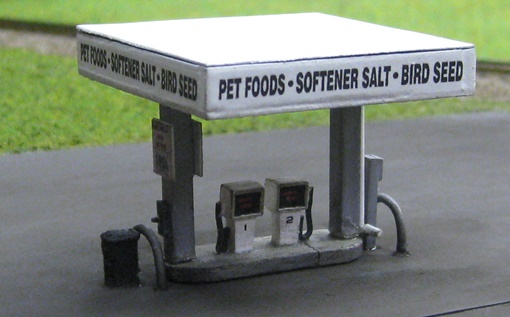
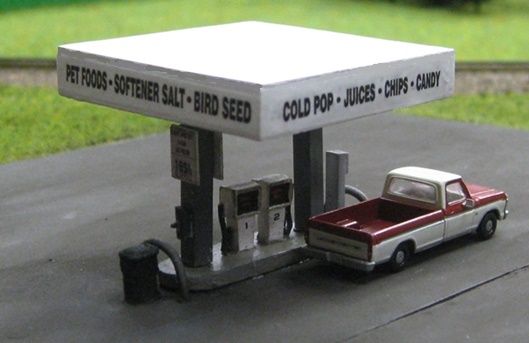
So far I have a base (approximately 8.75" x 4.5"), a fueling island (made from the ends of a popsicle stick) and a couple of gas pumps (leftovers from an old Cornerstone "Al's Victory Service" kit). Said pumps don't come with hoses, so I added a couple of my own (made from skinny electrical wire). I also painted the faces black and added some tiny little orange decals to simulate the numeric displays -
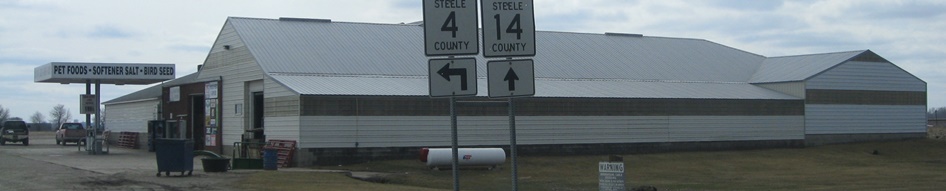
In looking at my scouting photos, it appears that one of the more ubiquitous details around this place are these temporary livestock pen dealies that are piled up everywhere -

So, I guess I'll be trying to make a bunch of those things at some point. But let's try making the actual building first, yah?
05/10/19 - Well, it was fun until it wasn't....
Ay yi yi, this stupid fueling island is giving me no end of trouble. I was all done detailing the concrete base and it looked absolutely terrific, but then I went to attach the roof to the supports, at which point everything went to shit. Y'see, I installed overhead lights inside the roof and so had to run the wires for said lights down through the (hollow) left support pillar. Unfortunately, I didn't realize that the bottom of said pillar had closed up (got all clogged with CA) when I glued it to the base. So, nope, those wires weren't going anywhere. Making matters worse, I basically destroyed the whole thing trying to fix the problem (which then required that I glue everything back together and touch up all the paint). And as you can see, it turned into kind of a mess -
OK, so things were a little crooked (not to mention a lot more grungy) than when I started, but I guess it was at least liveable. However, the next day when I went to turn on the roof lights for some blog photos.... nothing. Zip. Zilch. Nada. I mean seriously, what next??
I spent many hours dicking around with the damned thing and I'm still not sure what the problem was, but I suspect it's the super thin Woodland Scenics wires (scavenged from one of my streetlights) that I'd used to run through the support and up to the bulbs. The things are hair-thin, extremely fragile, and damned near impossible to solder. So, I'm guessing that they must've failed somehow. But whatever the case, I'm just going to bite the bullet and start over from scratch on the whole thing (this time using more traditional wiring). That island is really the focal point of the whole scene and the overhead lighting looks too darned cool to just give up on.
05/13/19 - OK, better
Still a little grungy looking, but good enough for me -


More importantly, the lights work now (yay!) -

I tell ya, wiring up this sort of overhead lighting is a major pain. To insure that the wires make it all the way through the structure, you basically have to
insert them through all the various holes and then do all the gluing at the same time (base to the ground, pillar to the base, roof to the pillar). After pulling
the wires tight, you then have to play Beat The Clock and hope you can get everything straight before the glue sets up. Very nerve-wracking! 
05/14/19 - OK, I admit it, I have no attention to detail.... 
Yeah, I just noticed that the front sign on the overhang is different than the two side signs. So, I had to retro-fix it -
Am I finally done with this thing?! Gad, I hope so!
05/18/19 - More progress on Krause's
Having a very limited amount of space to work with, I decided to start out with the most interesting part (the brick section in the middle) and then let that drive how big I make the adjoining warehouse sections. For this I finally got to use the brick sheeting that I bought on eBay a waaaaaayyyyy long time ago, and I think it worked pretty well. The only oddity is that it's not styrene (maybe resin or something?) so I had to use CA instead of plastic cement to glue it together. As pictured, my wall sign decals turned out a bit murky (I guess because of the brown background), but not bad enough for a do-over.


I decided I wasn't in the mood to mess around with a lot of (ugh) complicated interior detailing....


Shrinking and printing the prototypical signs for the main window turned out to be a fruitless exercise (just too small to really look like anything). So, I went with some generic gas station decals that I had laying around instead (except for the "OPEN" sign, which was simple enough to create myself) -

Now to start working on those warehouse walls....
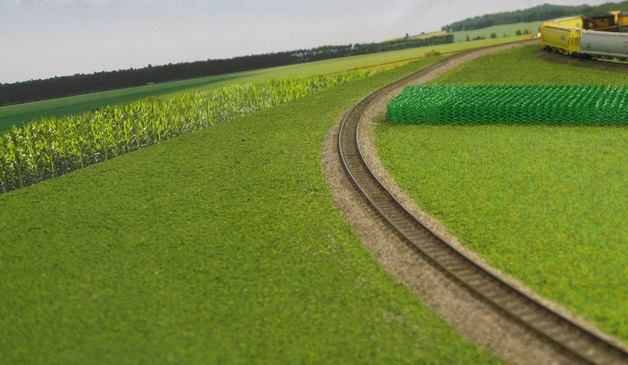
05/22/19 - More soybeans, more corn
I'm still plugging away on Krause's, but when I'm not, I'm also planting crops. Since my last soybean report, I've added about another ten rows. So, I guess I'm about 2/5's of the way done there?
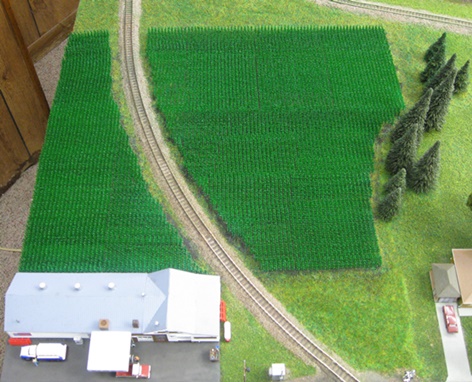
As for corn, I decided to extend that small, orphaned field all the way down to the back of Krause's (as on the prototype, except that my imaginary DM&E mainline slices it in two). This is as far as I got before running out of corn -

I don't know what the chemical makeup of that WWS static grass glue might be, but it's damned near impossible to get rid of. As pictured, I was easily able to remove the turf behind Krause's (where I'd used Scenic Cement), but the static grass on the other side of the tracks? No way man, that stuff wasn't going anywhere (and trust me, I tried everything short of lacquer thinner and a belt sander).
Fortunately, that's the one spot where I went with super short (2 mm) grass, so putting the new rows of corn right on top of it isn't going to be too much of a
distraction (vis'a'vis height mismatches). Actually, the real problem has been color-matching the new corn to the old. For whatever stupid reason, Tamiya
completely changed their "Park Green" spray paint from a dark green to a much lighter shade. So, I had to switch over to Model Master "Pearl Dark Green" instead
(the closest match I could find at my LHS). And, I dunno. We'll see what it looks like when I'm done, but I may eventually need to do some paint retro-fixing
there (and probably lose my tassels in the process  ).
).
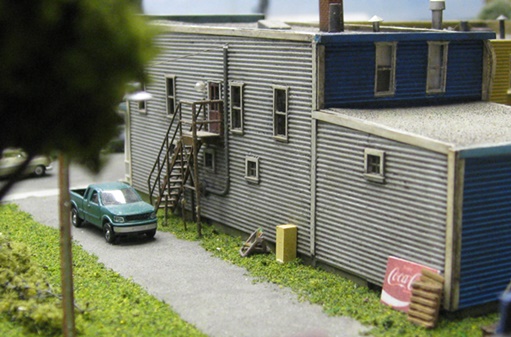
05/25/19 - Debigulating Krause Feeds
This warehouse section wound up seriously downsized (as compared to the prototype), but I think I got enough of the detailing right to capture the basic feel of the place -

I'm pretty sure that the window screens are clear on the prototype, but for whatever reason they tend to scan brown in daylight photos (maybe because everything inside is brown?). In any case, I decided to try to capture that look by using brown vellum paper for the openings. It's transluscent, but also quite rigid (almost like really thin styrene), so it filled the bill rather nicely -

Making all the various roof sections for this stuff is going to be a big nightmare (particularly the angled sections where the two differently oriented warehouse roofs meet up), so I think I'm just going to defer all that pain until I've finished actually fabricating and assembling the walls for the entire structure.
One annoyance I've run into is that the outer couple of inches of my foam base have become a bit, I dunno, warped? Saggy? Well, whatever the case, it's not flat - and with the end result being a non-flat parking lot for Krause's (which I had to run literally right up to the edge of the layout). For now, I've simply pried it up along the edge to free it from the glue and remove the bend. But later on, I'll need to make a more permanant fix (IE, fill in the empty space under the styrene so that it sits flat). Good times!
Lastly, I don't know what I was thinking with that coarse Evergreen ribbed siding. It kind of wound up looking like a log cabin, yah? For some reason I thought
that was the finest size available, but later on when I was digging around in my Giant Box O' Styrene Sheeting I found a piece of Plastruct ribbed roof sheeting
that would've looked a lot better. Darn
05/29/19 - Once again I have to ask, do people not get just how small N scale really is?
Case in point - I really wanted a modern Pepsi vending machine like this one for my model of Krause's -

And although I did find a promising looking set of variously branded soda machines on eBay (from seller "maeminiworld"), they turned out to be rather overlarge for my needs (around ten N scale feet tall!) -
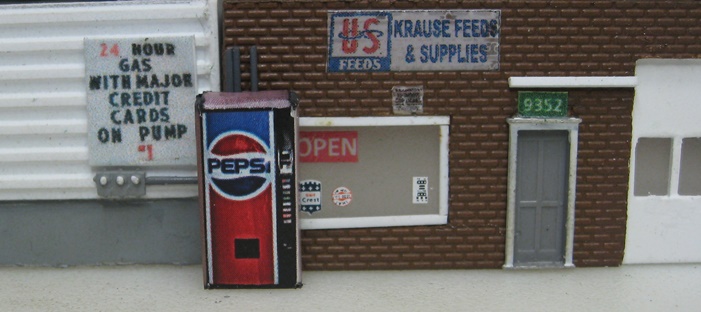
OK, I guess "my bad" for not paying close enough attention to the stated dimensions when I bought them. But anyway, Plan B was to go rescue the much more reasonably sized Woodland Scenics soda machine that I'd plunked down next to the antique store last January....

...and use that at Krause's instead -

My last job was to put a nebulous tan box in the vacated space next to the antique store. Said box actually matches the prototype photo better than the soda machine did, so win-win I guess -

I'm not sure what (if anything) I can do with those eBay soda machines, but since the experiment only cost me twelve bucks I guess I'm not too put out about it.
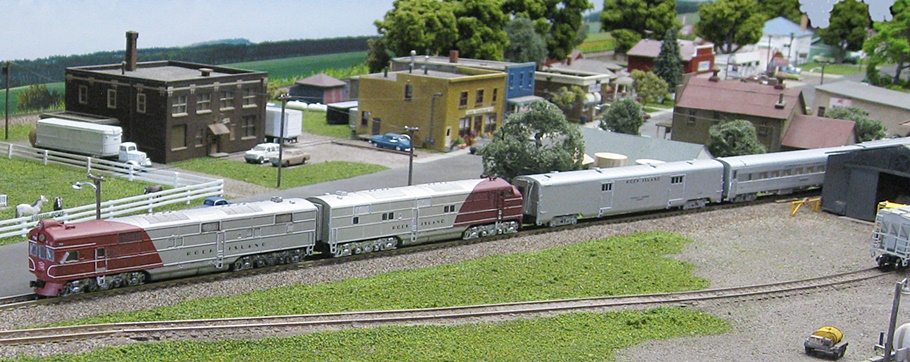
05/31/19 - Still chipping away at Krause's
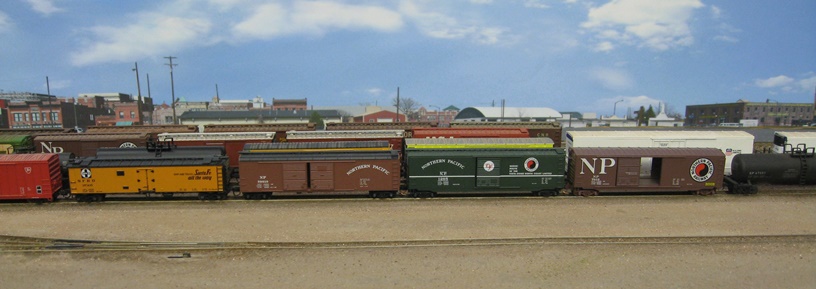
Nothing particularly interesting to report, so here's some train porn to tide you over instead

06/01/19 - Aha!
I have some random/longterm projects (ballast, dirt, turf, roads, et al) over on the non-Hope side of things that I occasionally work on when I'm bored with whatever it is that I'm currently doing (hello Krause's), and one of them has been to add some dirt to the edges of the yard cork to make a more gradual transition down to the layout base. And while doing so, I was once again having problems with the new Scenic Cement staining/discoloring the old dirt layer that I'd put down in the yard previously (same problem I had when working with the SunRich dirt layer) -

So, I'm looking at this stuff and wondering what to do about it, when it dawns on me to try sprinkling some dry dirt on the offending areas and then just rub said dirt around with my fingers. And blow me down if all the stains didn't just magically vanish when I vacuumed up the loose dirt!

So yeah, suffice it to say that I'm pretty pleased with myself this morning
06/02/19 - Trying to find a suitable photo backdrop for the Waseca yard
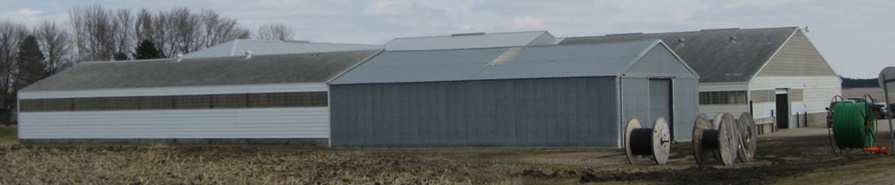
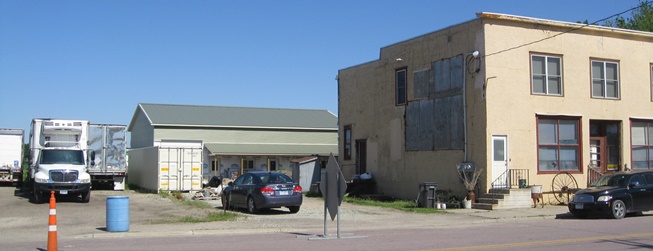
My "Just Corn" backdrop has been great for taking photos around Hope, but it's not really going to work for the area around the Waseca yard (what with said yard living in the middle of a medium-sized town). Unfortunately, finding a backdrop that's even close to what I want has been surprisingly difficult. The view north of the yard consists of a road and then several tree-strewn blocks of relatively modern houses, garages, gas stations and small businesses; all of which are (as one would expect) facing away from the tracks -
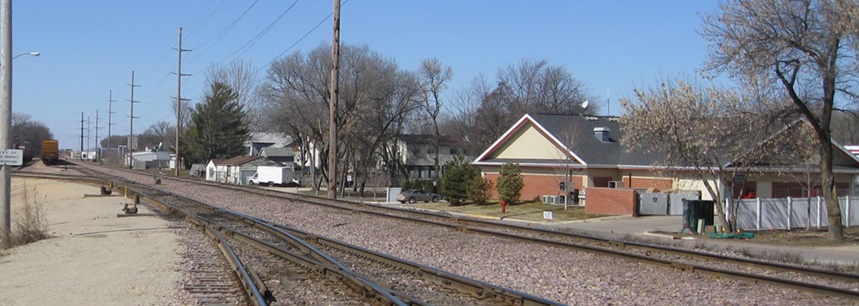
Unfortunately, I didn't find anything that really captured that look. There aren't many "small town" type backdrops out there at all, and the ones that I did find have only been interested in showing me the fronts of big buildings. Like, what, trains run right down the middle of Main Street now?
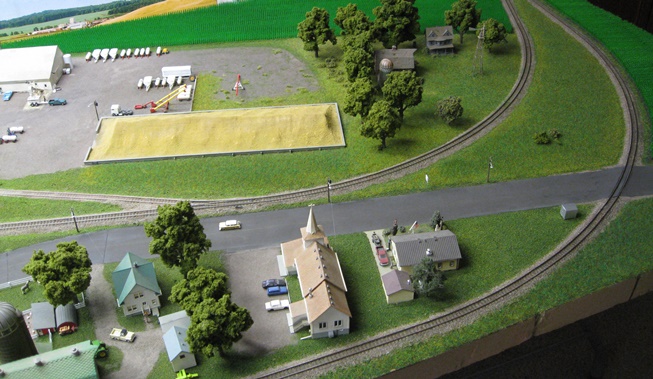
Anyway, not being able to come up with any better options I eventually settled on this "Cheyenne Industrial North" backdrop from RailroadBackdrops.com. It features a random smattering of forward-facing small town buildings and (ugh) a huge passenger station -
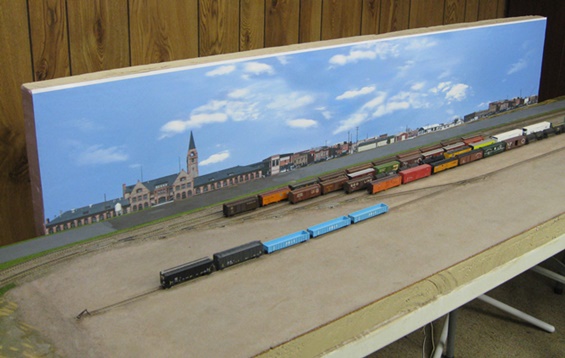
I guess it'll have to do for now, but I'm definitely going to be keeping my eye out for something more appropriate. And do feel free to send along any suggestions you might have!
06/07/19 - Darn these kids and their spraypaint!
Oy, what are you gonna do?

06/08/19 - More progress on Krause's
This section shrunk down rather nicely, although I'm still kind of bitter about the log cabin siding -


Despite my best efforts, I haven't been able to get my vellum paper "window screens" to fit 100% perfectly inside their corresponding wall openings (IE, there are a few gaps here and there). And rather than call attention to all that, I think I'm just going to skip the interior lighting on the two warehouse sections. They both have exterior lights, so that should be enough excitement in the lighting department.
Now for some roofs!
06/08/19 - Meanwhile, over in Waseca...
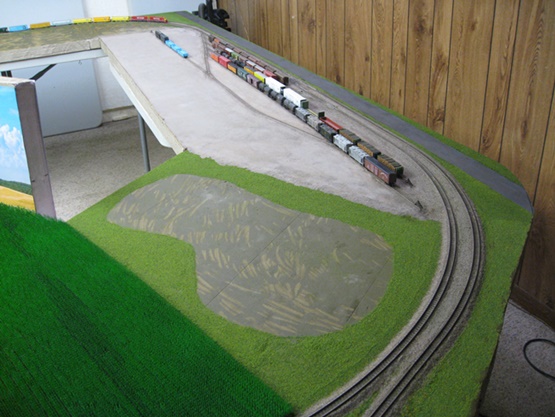
I finally finished all of the basic ground cover in and around the yard (turf, dirt, ballast) -

I left space for an eventual lake (well, a pond anyway) and also built a styrene road along the northern edge of the yard (and yeah, my wallet is already hurting when I think about all of the vehicles that I'm eventually going to have to put on that oh-so-very-long road).
I haven't quite decided if I'm going to bother with the yard access road (which would run along the southern edge of the yard). If I put one in it's going to have to be dead-ended on both ends, which would probably look a bit a weird. For now, I guess I won't worry about any of that until I've made some actual progress on the yard structures and details. But if it winds up making more sense to pretend that the road lives just off the edge of the layout, so be it.
06/09/19 - Meanwhile, down in Hope...
'Twas a glorious June day in Minny yesterday, so I decided to take the top off my Jeep and drive on down to Hope to see what the Hopies have been up to this spring. And as usual, it's been quite a lot.
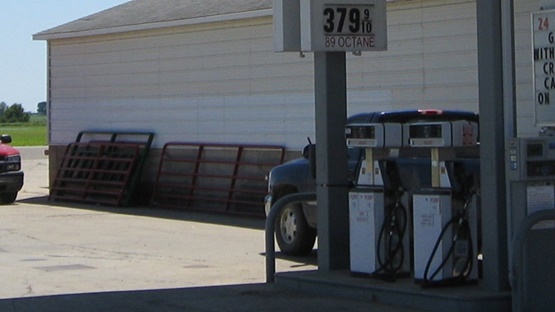
First off, Krause's completely changed their gas pumps around (hey, nice try, but I'm not biting) -

More intriguingly, they got rid of the old gray warehouse and replaced it with.... wait, what? A section of railroad track?! I tell ya, you couldn't make this stuff up if you tried!
OK, at this point I have no idea what they're ultimately going to put there. But if it turns out to be something cool and railroady like a caboose, I'm going to
be seriously lamenting putting a cornfield behind my truncated model of Krause's. That said, my model did just get a little more accurate now that
they've selectively compressed that warehouse, so it's not all bad

Meanwhile, changing elevator ownership seems to be a semi-annual tradition in Hope. And sure enough, it changed hands again (purchased by "Pipeline Foods" in February) -

Lastly, the little garden shed behind the hardware store got replaced by this monstrousity. And no, I can't even begin to imagine what purpose it might serve....
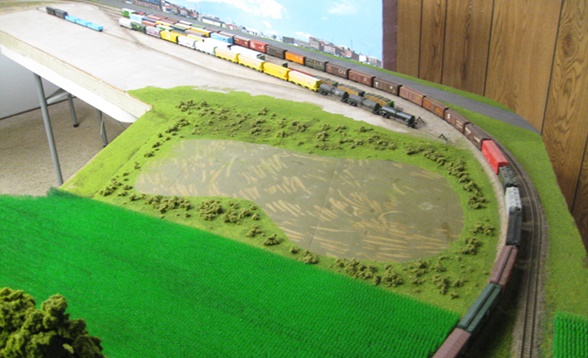
I also spent some time refreshing my memory vis'a'vis what the little lakes in southern MN look like (basically shallow little mud holes with lots of tall rushes along the shoreline and trees and brush right up to the edge of the water) -

For my lake, I think I'm going to (ahem) take the plunge and try out Woodland Scenics' new "Deep Pour Water" product (and since I like blue water, I'll probably try out some of their new water tinting products as well).
Addendum - it turns out that that track at Krause's isn't quite as interesting as I'd originally thought. My buddy Tom Cook contacted Krause's via their Facebook page and they told him that the UP is doing some work on the grade crossing up the road and asked if they could use that spot to prep the track. So, whew, my corn is safe.
06/10/19 - Static grass do-over
I decided I didn't like the look of the 4 mm "spring" grass that I'd used in my first few static grass forays (IE over by the bunker, around the abandoned farm, and between the mains up north of town). Personally, I think there's just too much yellow grass mixed in, which was kind of clashing with the rest of the layout -
So, before things progressed to the point where I wasn't going to be able to do anything about it, I went ahead and got out the layering spray spritzer and put some 4 mm "summer" grass on top of the spring grass -
I think it looks much better now, and the small areas where I left the spring grass alone (under the trees and along the track) made for some interesting variety. So, cool, now I can go ahead and get started on planting trees and bushes in that giant green void between the mains.
06/10/19 - For no apparent reason.....
....here's a recent picture of Spurgy's!

06/12/19 - A propane tank exchange for Krause's
I thought this would be a fun little detail for my model (well, fun to have, not fun to build) -
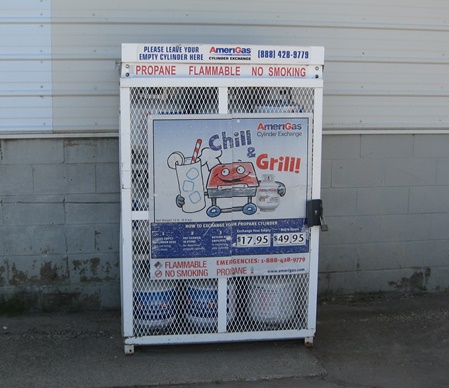
My original idea was to do the whole thing graphically (shrink down a picture of the whole box and stick it to a piece of styrene). Unfortunately, that didn't really work out (the resultant image being too small to really look like anything). So, Plan B was to build a box out of GMM "industrial walkway" and then stick debigulated versions of the signage to that -
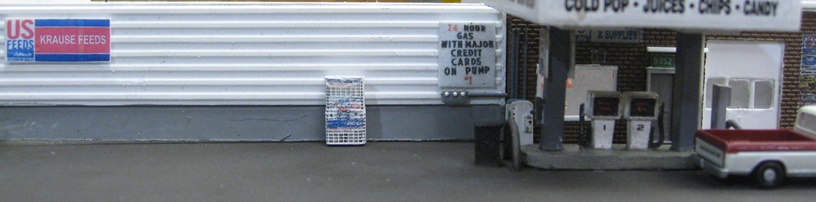
The graphics still don't really look like anything, but at least the meshed box looks like a meshed box. And yes, due to mental instability I did go so far
as to put some actual tanks inside the thing
Oh yeah, I also added a couple more "US Feeds" wall signs to the left warehouse. Chronologically, these are newer signs that never co-existed with the Krause Feeds sign over the main window (a sign which my model already has). But I figured, what the hey, I like signs and it's not like I haven't already taken a million liberties with this place.
06/13/19 - A roof for Krause's
Much to my surprise, this wasn't nearly as difficult as I was originally thinking/dreading. When you break it down, it's just five simple rectangles and two less simple triangles. So, I started by making the five simple rectangles. Then, once I had those glued in place, I started playing around making various cardstock cutouts for the two triangles (which I then used to make the actual roof pieces). Then it was just a lot of trial and error (sanding, filing, tweaking, adjusting, etc) until everything fit together more or less correctly -

So yay, that pretty much does it for all the heavy lifting on this model. Now I just need to add a few more small details and I'll be ready to glue it down and wire it up.
06/14/19 - Just about there
I finished adding all the roof doodads (vents, chimblies, A/C unit) and then got the whole thing glued down and wired up -

I got a good start on the detailing as well, but at the moment I'm in a holding pattern while I wait for some fencing (for the portable livestock pens) to arrive in the mail. But definitely nearing the end of the line!


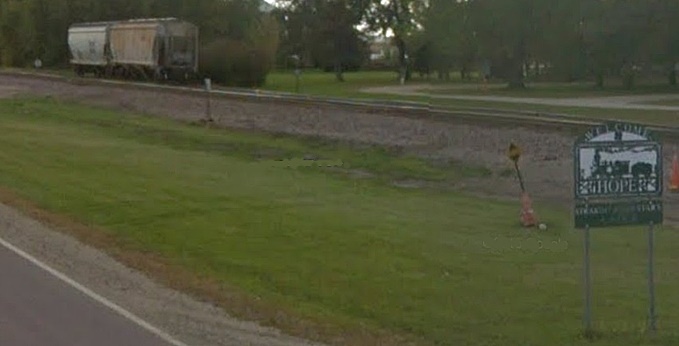
06/16/19 - Grade crossings details
I decided I wasn't going to skimp on the detailing for my grade crossings, so step one was to whip up a couple of UP-style trackside electrical boxes (using this box up the road from Krause's as my guide) -

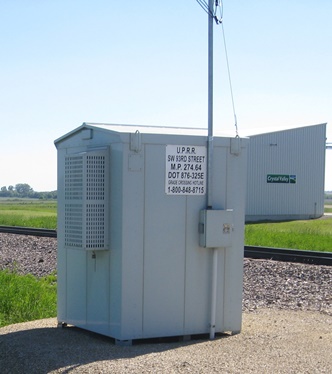
BLMA makes (well, made) boxes that are quite similar to the one pictured above. All I had to do was paint mine light gray and then add a few extra details (electrical conduits/boxes, decals, metal mesh boxes) -


Next up are the actual crossing gate/crossbuck/warning light details (and the associated electronic accessories to make said lights flash),

I'll also need to install (and wire up) some more utility poles so that I can run E-Z line to the masts on the electrical boxes. And of course I'll need to put some sort of RR XING graphics on the roads as well as some round RXR signs on the shoulders -

So, off to the backburner goes that project while I do some more shopping....
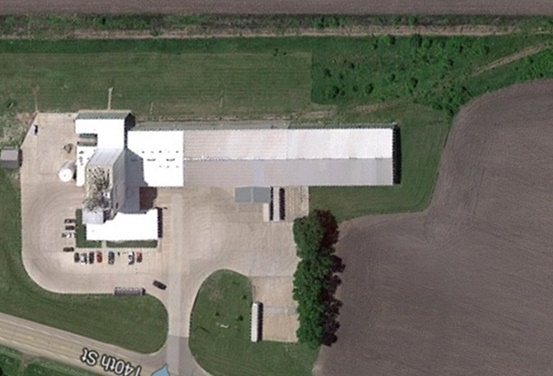
06/17/19 - More praise for Google Earth
I recently learned that Google Earth has a "measure distance" feature that should come in very handy as I move forward with my Cargill scratchbuild -
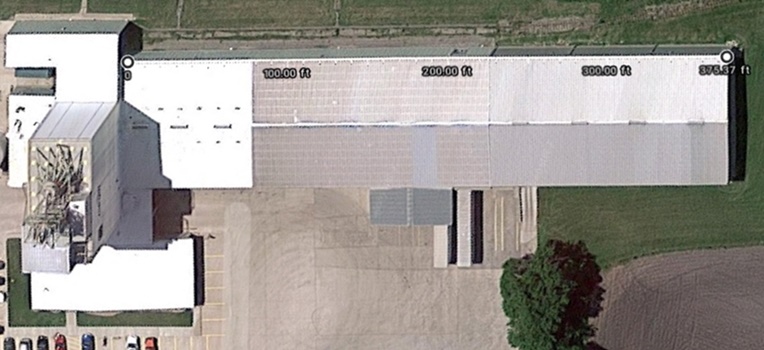
The way it works is that you right-click on a spot and select "measure distance" from the resultant pop-up menu. Then, you right-click on a second spot and select "distance to here", at which point the distance between the two points is displayed. This should allow me to get some fairly accurate lengths and widths for my walls (unfortunately, I'm still on my own as far as guesstimating heights goes).
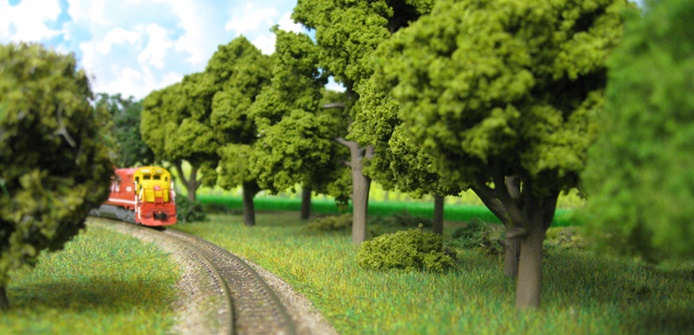
06/17/19 - More greenery
As promised, I planted some trees and bushes between the mains up north of town -

Not too bad I guess, but for some reason the whole scene feels just a bit "off" to me....

So far I haven't been able to put my finger on just what it is that's bugging me about about it...

Too many bushes? Not enough bushes? Too much variety? Not enough variety? Too much open space? Not enough open space? I dunno, I'm stumped....
I guess I'll just have to live with it for now and see if the lightbulb ever goes on.

06/18/19 - Addition by subtraction
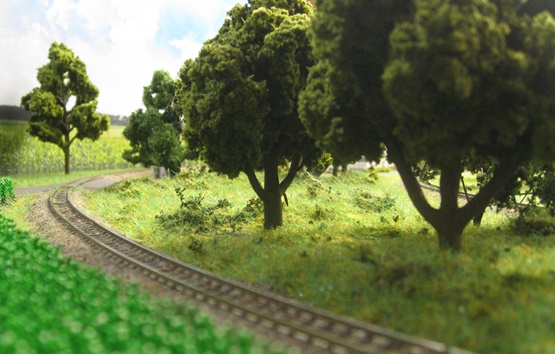
After cogitating on things for a bit, I decided that the basic problem with my "between the mains" scene was that it lacked the traditional "impenetrable wall of vegetation" one would normally see around a rural tree grove. Further, I decided that I didn't like the size progression scheme that I'd chosen for the trees (short, then tall, then medium). So, as an experiment I tried removing the two tall trees in the middle -

Well, suffice it to say that I think it looks a lot better this way. First off, the flow of open space from in front of the farm to the newly opened up space across the tracks really pleases my eye for some reason. Also, given that I now have two small/separate clusters of trees (as opposed to one giant grove), I don't think all that much additional vegetation is needed - maybe just a few more bushes and some longer (6 mm) static grass here and there, but that's about it.
06/18/19 - Krause's = Done!
This Slater's "Line Side Fencing" isn't an exact match for the real world stuff at Krause's, but it's certainly close enough for my purposes (especially since I got more than my fill of scratchbuilding fences up at Miller Farm).


Sorry about the ugly photos - frankly, I got a bit bored with having to relocate that danged backdrop every ten seconds 
06/19/19 - Another scenery do-over
After tweaking things a bit, this seems to be about as far as my talents are going to take me on this particular scene (this type of lush scenery not really being my forte) -

Apart from removing the two big trees and creating some open space, the major change here was to add a few more bushes and a few fallen trees branches....
....and then absolutely burying everything in 6 mm summer grass -
I also tweaked the trees by pushing their trunks deeper into the foam base, thus lowering all the branches -

I think it looks much better now, and definitely something I can live with.

So, whew! Now it's time to get back to making buildings (something I actually understand, lol).
06/22/19 - Uh oh
One piece of wall art begets another, which begets another, which begets another.... I tell ya, if I'm not careful here I may wind up down another rabbit hole

06/23/19 - Yet more praise for Google Earth
I was a little distressed when I discovered that the CP had torn down and replaced some of the old structures in the Waseca yard - mainly because I'd never bothered to save a screen capture of the old yard configuration and thus wouldn't have any sort of "big picture" guide to help me when I got around to modeling things in their pre-CP state. OK, I guess shame on me for not taking that precaution when I had the chance, but who expects a bunch of stuff that hasn't changed for decades to suddenly vanish overnight?

Well, the good news is that after a bit of research I learned that Google Earth does indeed let you travel back in time (using their free "Google Earth Pro" desktop utility), and before you can say "Peabody & Sherman" I was looking at Waseca as it was five years ago -

Amazingly enough, the utility can show imagery all the way back to 1991 (although anything prior to about 2012 is going to be pretty low rez, so not entirely useful).
06/23/19 - Finished detailing the grade crossings
Shoulder signs, road graphics, utility poles w/ E-Z Line, electrical boxes, crossing gates, whee! OK, do please ignore the non-lit vehicles - they're
just temporary placeholders to make the photos look more interesting 

The crossing gates are from NJ Int'l (wired up to Dallee Electronics "Flasher" boards to make the lights strobe). The road decals are from Summit Customcuts (and a
real pain in the neck vis'a'vis their propensity for forming air pockets  ). The rest of it you've seen before.

I did wind up compressing the spacing on things a bit, but that's just how we model railroaders roll, right?

So there ya go - a very fun and rewarding little project indeed. And now, back to the corn and soybeans (sigh).
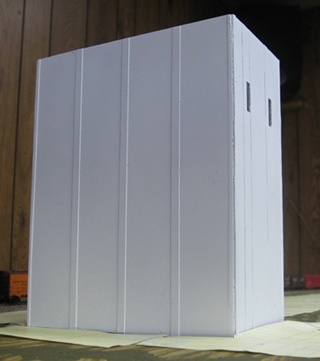
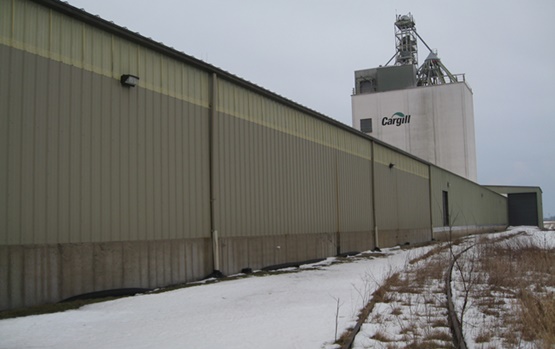
06/28/19 - Started work on the New Richland Cargill facility
Yep, it's bleepin' huge -

Fortunately I have a lot of space available, so I'm going to go ahead and build my model as close to scale as I can get it. The way I look at it, the bigger I make it, the smaller the inevitable fields of corn and soybeans surrounding it will need to be. Cuz, by golly. I've just about had it up to here with corn and soybeans!

I figured I'd start with the big white tower and then go from there. For the dimensions, I went with 5.5" x 3" for the length and width (based on measurements provided by Google Earth). And then just because it looked more or less "right", I guesstimated the height at 6.5". I used thin strips of styrene for the vertical "accents" (which I'm sure serve some sort of practical architectural function, I just don't know what it is). Some "L" shaped styrene strips would've been nice for the corners, but I couldn't find any that were thin enough. So, my bright idea there was to use the same strips I'd used on the sides instead. And of course that turned out to be a giant bitch (getting that stuff bent and glued not being a project I would remotely classify as fun). I had to completely re-do that front right corner several times and never did get it to look quite right. But hey, I guess three out of four isn't too bad.
Once I had the basic structure assembled, I then used Google Earth to measure all of the inter-connected substructures. And with said measurements in hand, I then whipped up some paper templates to use as construction guides (also helpful vis'a'vis making sure I wasn't painting myself into a corner with all this) -
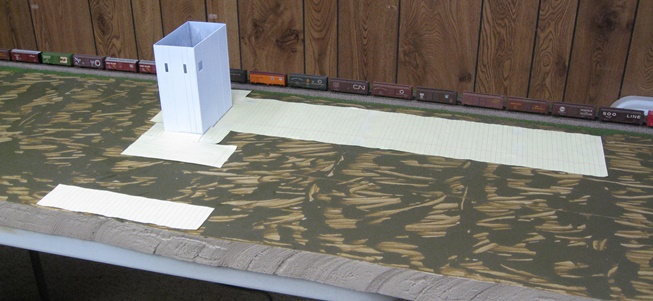
At this point it looks like I'm good to go. I'll probably have to shrink the road and the parking lot a little bit, but the actual facility appears to be fully doable in all of its glorious gigantitude -
I did briefly toy with the idea of tearing up the main and adding a turnout and functional siding, but eventually decided that A) I didn't have enough room, and B) it wasn't really going to be visible behind that long shed anyway. Fortunately, the CP abandoned this entire line shortly after it purchased the DM&E in 2008, so the prototype doesn't have a functioning siding anymore either (gee Cargill, how does that work??). OK, all that said, I may ultimately decide to lay down a section of "overgrown with weeds" track back there simply as a nod to history, but it won't be connected to the mainline in any way (IE, no turnout).
On a side note, I was muchly surprised to discover that this place has been around for a very long time. Google Earth Pro has images of it dating all the way back to 1991 (which is as far back as it goes, so it's probably even older). Weird, eh? It looks a lot newer than that to me....
06/29/19 - Crop reports and other miscellania
It finally dawned on me that since I'm putting down these soybean rows "middle out", I could actually be doing two rows at a time instead of just one. So, hurray, now I'm moving twice as fast (which is admittedly still pretty darned slow). In any case, I guess I'm about halfway done now?
I'm also just about done with that cornfield west of Krause's - which is a bit of a relief since I seem to have virtually exhausted the national supply of
Bluford Shops corn. Hopefully Craig will have made some more by the time I need it for the New Richland field(s)

Meanwhile, I was also getting ready to start experimenting around with lake water when I got a bit sidetracked (surprise, surprise). First off, I decided that the area around the lake was looking just a bit too angular, so I added some plaster cloth irregularities to the sloping transition that I'd built into the edge of the yard. And while messing around with all that, I decided I didn't like that inner edge of the base where the underlying table was sticking out (as shown in this picture from last year) -

So, I cut myself a little piece of foam and used it to fill in the gap. Then I figured I should get all the turf and bushes and static grass in place before I started messing around with the lake and got going on that. Then I decided I should probably extend the weeds and grass and whatnot up into the east end of the yard (since, unlike the prototype, there won't be a giant Bird's Eye food processing facility taking up that space on my layout) -
So, lots of disparate moving parts there and definitely all a work in progress. Still, it's nice to have a diverse array of options when one decides to head
downstairs and get something done on the ol' layout, yah? You just have to make sure you actually finish something every once in a while
07/01/19 - Finished with the corn (for now)
I gotta say, my corn fields do seem to be improving as I gradually figure out better ways to do things -
The main thing is to randomize the placement of the rows such that they don't look unnaturally uniform. It also helps to add a discernable lip of raw dirt around the edges of the field and then have the surrounding static grass occasionally grow past the dirt and right up to the corn. Basically anything that helps to make the scene look less manicured and more chaotic is worth trying. The only seemingly insurmountable hurdle is the corn itself, since the stiff plastic bases do tend to make everything look a bit more angular than it should (particularly at the corners).

In order to get the newer corn to blend in with the old/original field, I had to do several oversprays with the green paint that I'd used for the newer corn. And
although the end result of all those different layers of paint was a much darker shade of green than I would have preferred, I still think it looks OK. My only
annoyance is that it doesn't come close to matching either of my previous two fields

So, that does it for the corn (at least until I need to do something about the fields up in the New Richland area).
07/01/19 - Finished with the ballast work
Yep, the double track mains are all prettified now -

So, that's it for the ballast (always a happy day in the life of a layout). And yay, my giant bag of "this 'n' that" AR&M ballast actually lasted all the way to the end. Hell, I even have enough leftover for whatever touchup situations might arise down the line. Very handy that, because I seriously doubt I could ever recreate that exact same mixture.
07/04/19 - Another fun waste of money
It's amazing how cheap and plentiful old passenger timetables are on eBay. Case in point - I picked up this very sharp looking 1951 Rock Island schedule for a grand total of nine bucks. And of course, the very first thing I did when I got it was to cut it up and mount it (yikes, sorry collectors).

I sure "hope" you can see why!
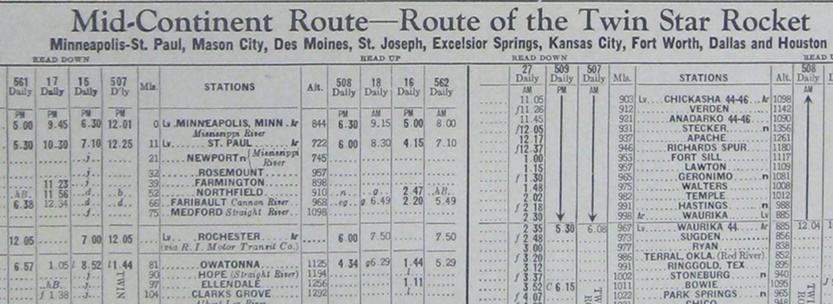
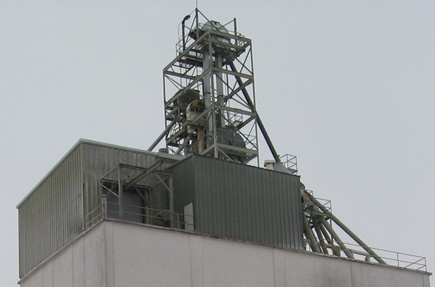
07/06/19 - More Cargill progress
I was kind of nervous about making that big fire escape on the south side of the building (vis'a'vis my ability to get it right), so I figured I'd bite the bullet and get that out of the way first. Fortunately, I think everything turned out quite nicely (thank you Plastruct). I did wind up having to compress that little shack at the bottom of the stairs quite a bit, but other than that things went together pretty smoothly. I must say, those vertical accent strips on the walls sure came in handy when it came to deciding where to put things on my model. Very happy am I that I added them!
I made the decal using a graphic I snagged from Cargill's website. For the weathering, I airbrushed on a light layer of alcohol mixed with just a smidge of Woodland Scenics "asphalt" (I would normally use India Ink, but when I went to grab my 20 year old jar I discovered that it had turned into unuseable goo). Anyway, to finish things off, I wet-brushed on some Bragdon powder drools running down from the platform supports. After that, I figured that simply handling the building with my grubby fingers was going to provide whatever other weathering I might need (and so it did) -

Based on all the water and gas mains and vents and whatnot, I'm assuming this is some sort of utility shed. In any case, all of that external detailing was certainly interesting grist for the modeling mill and I tried to replicate just about all of it on my model -


Funny story - I started out with my usual assortment of Evergreen plastic rod on this project (a grand total of four different sizes accumulated at various points over the years). But after I'd added that piece of "too thick" yellow piping to the front, it finally dawned on me that no one was forcing me to stick with what I happened to have on hand and that I could actually go get whatever I needed for each individual detail (duh). So, I sheepishly hied myself down to Ye Olde LHS and bought one package each of every single size they had. And suffice it to say, things turned out a whole lot better after that (again - duh).


Of course it's not always about what you can get at the hobby shop, as one does occasionally have to stray off the beaten path (hence the bendy straw up on the
roof )

Weathering on the shed is limited to a few Bragdon powder highlights on the walls and a whole lot of Bragdon slather on the foundation. From the "oops" department, I kind of forgot that much of this eastern wall is eventually going to get covered up by the adjacent "bulk scale" building (IE, I incorrectly built the gutter all the way along the wall). Oh well, nothing that an exacto knife can't fix....

I'm not sure what this curvy concrete wall is. But since it seems to be part of the storage tank, I think I'll worry about building it when I get around to the tank itself. And yeah, I'm a bit annoyed by the fact that half of the details I painstakingly built are eventually going to wind up hidden behind said tank. Grr!

I did get lucky on the paint (for a change). As it turns out, Tamiya makes a light olive green spraypaint ("Field Gray") that's a very close match to the walls of the prototype. Handy that, since I'm going to need to paint about twelve square miles of metal siding on this project before all is said and done.
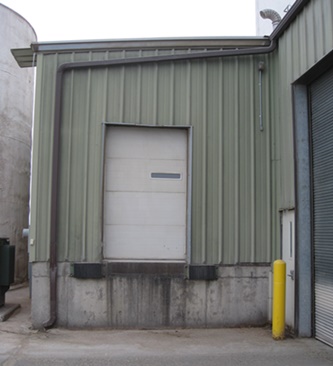
07/09/19 - Another piece of the Cargill puzzle
I love buildings that literally tell you what they are. Case in point - one of the signs on this place says that it's the "bulk scale" building.
Unfortunately, said signs are quite weathered and barely legible, so I had to create mine from scratch using Wordpad (I also made them a little bigger than scale so that they actually look like something) -

There's not much else to say about this one. The whole thing was pretty straightforward and there weren't many details to worry about -


Next up - the erstwhile railcar loading shed.
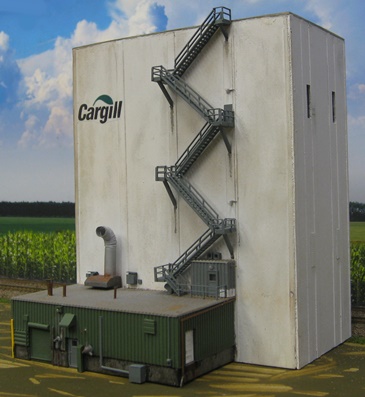
07/12/19 - Finished the railcar loading shed
Well, it's almost finished. I do still need to add a "CRAM-A-LOT" trash compactor (currently on its way from Shapeways) -


I didn't bother to put an actual light in that big light fixture on the western wall (for the same reason I'm not modeling a siding - no one would ever be able to see it). Apart from obsessiveness, I'm not even sure why I bothered with the fixture itself.

Meanwhile, there's been some exciting news from Uncle Pete - Big Boy #4014 is going to be rolling through Hope next Wednesday (on its way to St Paul for an overnight stay). It's scheduled to be there sometime between 9:30 and 10:45 AM, which is a bit of a wrench for me since I'll be at work. However, if I do manage to make it down there, this is where I'll be setting up shop. Definitely the money shot -
Hey, maybe I'll get lucky and come down with some sort of 24-hour flu bug
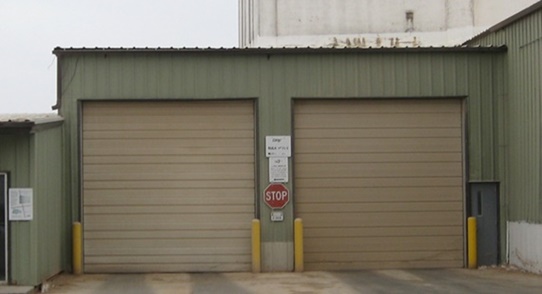
07/14/19 - A couple more sheds for Cargill
My gosh this thing has a lot of sheds. I'm losing count!


That bleepin' overhead crane damned near killed me, but after much cussin' and fussin' I did finally get it done -

Of course, that was the easy part. Next up - the jungle gym and the octopus.
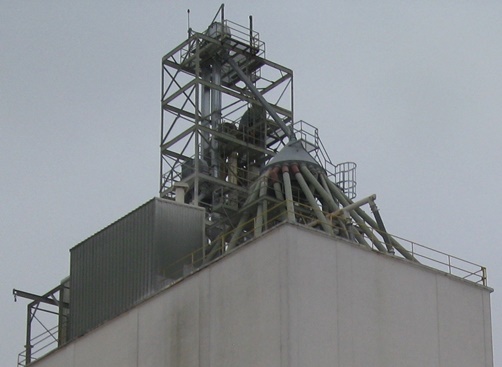
Um.... yikes?