
10/09/18 - Getting started on the Hope Schoolhouse
As mentioned previously, the Shapeways project to create a model/kit of this place didn't quite work out. I guess there are some things that can be rendered quite well in "FUD", but structure walls? Not so much. On the plus side, I was able to use Brian's 3D designs for the roof as a template for scratchbuilding my own roof. And since that was pretty much the only part of the project that I wasn't going to be able to do on my own, it looks like I can now go ahead and build this bad boy myself using good ol' styrene.
But oh my achin' cornerpunch - so many doors and windows!

Yeah, this is going to take me a while 
10/17/18 - Finished the world's most expensive cornfield
So, this is what 20 boxes of Bluford Shops corn looks like -

I think this stuff probably works best (or is at least a lot more cost effective) in a "just a few shallow rows along the backdrop" type of situation, so using it in a large 360 degree scene like mine was somewhat irresponsible (financially speaking). But what can I say? I really do like the look of it.
Well, I should say I mostly like the look of it. Frankly, the stock green color didn't look quite right to me, so I went ahead and painted it the same darker shade of green that I used on my other field (which may not be entirely correct, but it's certainly more pleasing to my eye). Of course, now that it's painted I'm kind of wishing I'd gone with fall corn here as well (since it would've given me tan tassels on the tops of the plants). Darn!

A thin perimeter of open soil around the edges of the field seemed like a logical inclusion, but when I scouted things out earlier in the summer I was surprised to find that grass and weeds grow right up to the corn. And so, that's how I modeled mine.

So, that's that. But enough with the corn already! My other fields (on the New Richland side of things) are definitely going to be soybeans and nothing but -

I'm thinking I should be able to conjure that all up using some sort of cheap WS ground foam product (thus giving my poor abused wallet a much needed break).
10/24/18 - This 'n' that
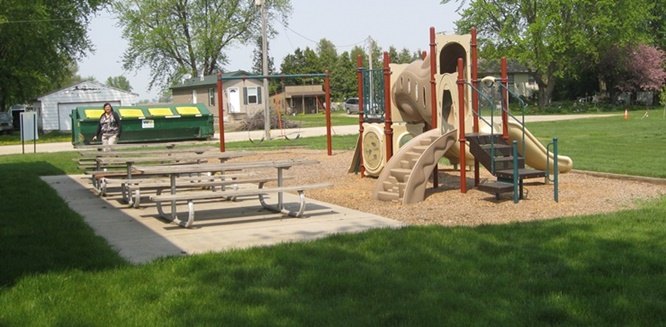
As work progresses on the schoolhouse, I've been kind of stumped as far as how I was going to model this little playground -
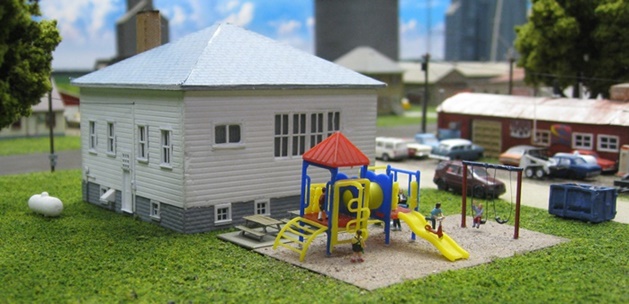
Well no worries now, thanks to this nifty little Chinese prebuilt I found on eBay -

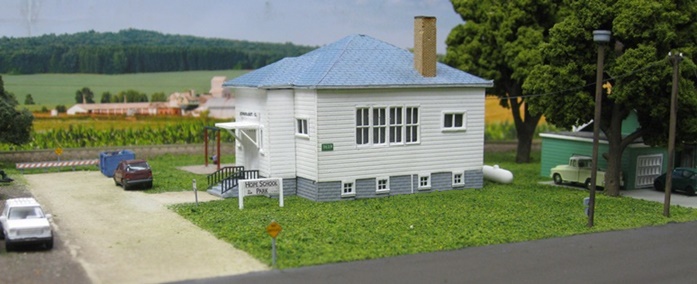
I wound up having to downsize the schoolhouse about 20% from its prototypical dimensions (any bigger and it would've looked really odd in the rather small lot that I saved for it). And since the playground equipment already seems a bit oversized (I'm guessing it's 1:150), I expect I'll be cutting it in half so as not to dwarf the school. But either way, it's just what I needed.
Speaking of the school, so far so good. However, at the moment I'm in a holding pattern waiting on some electric meter boxes from Model Tech Studios (I gave up trying to scratchbuild them myself because they always turn out too big).

I'm really liking the way this downsizing is turning out, and now I'm thinking I might be able to apply the same principals to the Krause feed store. If I build my model to, say, 70-80% of its prototypical size, I could conceivably place it in its correct position on the west side of the road.

Worst case scenario, I have to add a small (3-4") extension to the edge of the foam base there. But that shouldn't really be a problem - there's plenty of room in the aisle.
11/04/18 - Finished the Schoolhouse
There were a lot of moving parts to this project (mainly due to the complication of having a differently colored brick foundation with windows in it). And as such, there were more than a few "oops, gotta go back and do that over" moments. But at the end of the day I think it turned out pretty nice -
As pictured below, I did have to downsize the playground equipment a bit. The picnic tables came from Miller Engineering and the swings were a custom creation. And how about that crazy kid riding his little scooter down the slide? I hope he realizes that there's no hospital on this layout!
Additional details include a port-a-potty and a garbage can by the front steps. In the real world, the dumpster-thingy out by the road is one of those "six bin" deals (presumably the town's recycling repository). But not having anything like that on hand, I just went with a generic dumpster. So, I guess my version of Hope does "single sort" recycling.

Oddly enough, the gravel road in front of the school does have a bit of a different look to it as compared to the The Shop's dirt parking lot (particularly evident in satellite imagery). So, I used a light tan AR&M powder product there (instead of the gray/brown stuff I've been using everywhere else).

If you guessed that my civil defense siren is actually a tire rim from an HO scale humvee... wow, you have a very good eye!
Thanks to WordPad's resize feature, my signs turned out nicely legible -

The real world road takes a left turn here (heading off to a couple of houses). Unfortunately, that's all been sacrificed to the gods of "not enough room" on my layout and replaced by a dead end barrier/sign instead -

And lastly, yes, there is interior lighting (mostly non-bleedthrough for a change).

So, wow, that was a surprisingly painless (and fast) scratchbuild, so now I'm thinking it's time to tackle Krause's. Let's do it!
11/11/18 - Detailing the Fertilizer Building
There's a lot of interesting stuff going on outside the SunRich fertilizer building, what with all the assorted junk, vehicles, Ag equipment and whatnot. And to get the ball rolling, I started off by adding four more Junction Design (Shapeways) fertilizer spreaders -

I love how ridiculously easy these things are - basically just spray them white, handbrush the wheels black, and then add some decals.

Next up, ten more NH3 tank trailers (which, ugh, aren't nearly as easy).
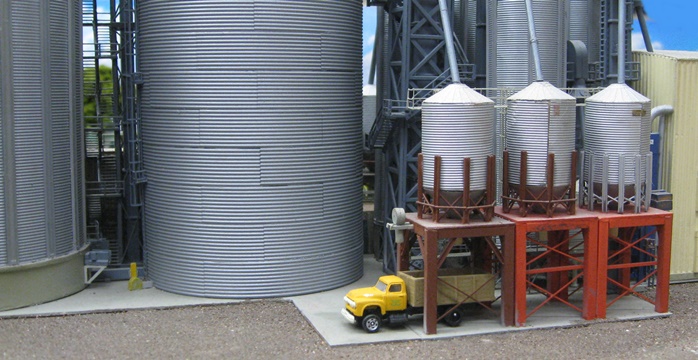
11/13/18 - More grain trucks
I can't seem to shake my obsession with these Classic Metal Works 1954 Ford "covered wagon" semis. Are they even grain hauling trucks? I have no idea, but that's what I'm using them for (painted white and with SunOpta graphics on the doors ala the more modern trucks actually found at the facility).

For variety, I also added a couple of smaller (non-trailer) trucks. These started out their lives as flatbed trucks (same CMW 1954 Ford prototype).
The original plan here was to convert them to grain haulers by removing the flatbeds and adding wooden GCLaser grain-style truck beds. Unfortunately, the GCLaser kits are extremely complex (not to mention woefully documented) and I wound up bailing after completely screwing up the first kit (handy tip - don't remove the sides and ends of the bed from the laser-cut sheet until you've first glued on the support ribs). Anyway, after my misadventures there, I decided to just make my own boxes out of styrene (which took about ten seconds and was much less irritating).
On a side note, I was poking around through my collection of elevator photos (looking for pictures of grain trucks) and came across this image of an MF tractor hooked up to some sort of portable conveyor -

Based on what SunRich Raquel told me (way back when), I'm guessing that this is how they move grain from the overhead dispensing bins into intermodal shipping containers (which do occasionally show up via truck).

Since I've already found a nice red MF tractor for the scene, I suppose now I'll have to build one of these things to go with it. And so, off we go on another tangent!
11/16/18 - The Massey Fergusons have landed!
This one gets a new NH3 tank trailer -

This one is evidently in need of some repairs -

And this one looks like it desperately wants a container loader -

11/24/18 - Oh come on, really??
So, I was googling around looking for some backyard sheds when I stumbled across this Blair Line bulk fertilizer plant kit -

Wait, what? The thing is practically identical to the one I killed myself scratchbuilding!

OK, so it didn't come out until 2016 (IE long after I'd already finished mine). But still, you can bet your bottom dollar I would've bought one if I'd had the chance!
11/25/18 - More detailing for the Fertilizer Building
So, I had absolutely no idea how I was going to make these IBC (Intermediate Bulk Container) pallet tanks -

Well, wouldn't you know it? It turns out there's a designer on Shapeways (Ngineer) who makes the very thing. I do so love it when the exact obscure item
you need drops into your lap from out of the blue! 

They're all one piece, so no assembly required. Painting the pallets brown was pretty simple, but the steel support cage presented a problem. Ngineer does supply some multi-step painting instructions, but I decided to take the easy way out and just use the side of a pencil lead to color them. The whole process was quick and easy and I think they turned out just fine.
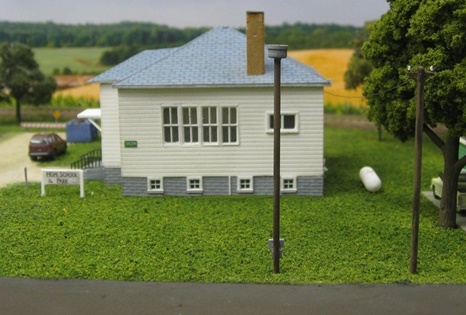
11/25/18 - Finally got a couple of streetlights wired up
These Woodland Scenics "Just Plug" streetlights are probably a bit more complicated than they need to be (or at least they are if you don't want to use WS's fancy wiring and invest in one of their expensive power supply systems). My first mistake was to assume that the streetlight LEDs could handle the same voltage that the LEDs in the Just Plug pickup I bought this past summer did. Unfortunately, when I hooked one up to my 12V lighting circuit it instantly went "poof".
Sadly, the packaging doesn't provide any voltage rating information... nor does WS's website.... nor does WS's technical support department (who basically just blew me off by saying that I should use their proprietary power supply system and stop bothering them). Complicating matters is the fact that the streetlight wires are supposed to hook up to an intermediate wire/plug arrangement that has a built in resistor (something I didn't realize right away, thus paving the way for my poofed light).
Now, I assume if I'd used the resistorized wire, things would've worked out better with my 12V circuit. But screw that - I don't want to use their wires, and I sure don't want to mess around with resistors. So, I checked around to see if anybody knew what the voltage rating for these LEDs might be, and the consensus was that they were probably 3V. So, I hooked one up to one of my adjustable low-voltage power supplies (with an initial setting of 1V) to see just how far I could push it. What I learned is that they don't light up at all until around 2V, and then get nice and bright at around 2.7V. So, 3V does sound like it's the max (although I'm content with the brightness I get at 2.7V) -


I also decided that that plastic box I'd used to house all of my lighting electronics was just too cramped and difficult to access. So, I punted it in favor
of a couple little wooden benches on the floor. Once I get around to adding some skirting around the base you'll never even know they're there 

So, cool. Now I can start planting combo streetlight / utility pole assemblies and get all those orphaned E-Z Line wires hooked up to something!
11/26/18 - Finished detailing the Fertilizer Building
Looking at all of the scouting photos I've taken of this place over the years, the level of "stuff laying around" has varied significantly. Some days it's neat and tidy, and other days it's a mess that would make Fred Sanford proud. So of course, I opted for the latter.

Job one was to add a bunch more NH3 tank trailers (since SunRich has them parked practically everywhere). Crammed together along the back edge of the layout as they are, I didn't bother with decals this time (applying custom decals to those things is hard work and I'm lazy).

Over on the north side I added a guy directing the loading operation, some pieces of sheet metal leaning up against the wall, a couple of pallets, a big Bag O' Mystery (some tissue paper wrapped around a crumpled up piece of newspaper soaked in white glue), some pallet tanks, a disused storage tank, and other generic bits of junk -

In addition to the pallet tanks out front, I also added a figure entering the door, some empty pallets, some rusty metal bars, and the box from a front-end loader -

I moved the dump trailer to the back (it's not a detail that actually appears at the site, but I had it sitting around in my junk box and figured it was now or never as far as getting it into play went). I also added a pile of disused wood -

Lastly, the south side got some pallets -

So yay, another project completed. But unfortunately, that was all too simple as compared to what's coming up - namely, the back side of the agronomy warehouse


Ay yi yi, I think I'll put that one off for a while.
11/30/18 - Finished the container loader
It is a container loader, isn't it? Well, whatever. I'm going with that.

Not a whole lot to report here. Basically it's just a lot of tiny little bits and pieces of assorted Plastruct rod glued together. Given the miniscule nature of the parts, I had to really simplify the design (as compared to the prototype), but overall I think I captured the basic look of the thing pretty well.

Of course since you can't even see it there behind the bulk conditioning plant, this may have been my most pointless project ever.
Good grief 

12/02/18 - Welcome to Hope!
My big debate here was whether I should make these signs closer to scale size or make them readable. I opted for the latter

Actually, it was kind of a pointless debate. I mean, yeah, they turned out pretty big, but it's not like they stick out like sore thumbs.

Looking at that picture of my road on the south end of town, it occurs to me that I should've added narrow dirt shoulders between the grass and the pavement. Dang, another missed opportunity!
12/04/18 - Keeping up with the Hopies
They added a Coca-Cola sign to their Post Office...

...and so I dutifully added one to mine -

As for those fancy-shmanzty roof vents? Oy, I don't know what I'm going to do about those...
12/05/18 - Trees, bushes and static grass for the abandoned farm
As mentioned previously, I thought that adding a layer of static grass to my abandoned farm scene would give it a nice "overgrown with weeds" look. And although I'm not 100% sold on the results, I guess the static grass genie is out of the bottle now.


There is a seemingly infinite (and confusing) array of options out there when it comes to static grass and static grass applicators (including building your own), but after spending some time looking around I decided to just go with an an all-in-one "starter kit" from Amazon. Said kit includes a Peco applicator, a bottle of WWS basing glue, a bottle of WWS layering spray, and four different bags of WWS static grass (4mm spring green, 2mm summer green and a couple of useless bags of brown/dead grass). 2mm grass is approximately 1 N scale foot tall (and you can do your own math on the rest).

The procedure seems simple enough - brush the surface in question with basing glue, fill the applicator's hopper with grass, clip the applicator's wired alligator clip to something in the vicinity of the glue (I used a nearby track rail), turn on the applicator and then shake it side to side over the glue (as close to the surface as you can get). In theory, the grass should be charged with static electricity as it comes out of the applicator and thus stand up straight as it lands on the glue. The last step is to vacuum off whatever grass didn't stick.
For my first experiment, I tried putting down some short (2mm) grass over by the small corn field on the south end of town -

TBH, the results did not thrill me. There didn't seem to be a great deal of "standing up" grass (most of it looked to me like it was just laying down flat). That said, it's not a bad look for an untended grassy area - it just doesn't really look like the grass is particularly vertical. So, I dunno, maybe I did something wrong. Or maybe 2mm grass is just too short to really look like it's standing up.

I went with the longer (4mm) grass for the farm, and one thing I noticed with the basing glue is that you want to avoid leaving spots where it's really thick and puddled up. Otherwise, it seems like these areas can wind up looking a bit blue/gray when the glue dries (which you can kind of see in the area between the barn and the windmill) -

Once again, the static grass makes for a decent non-manicured look. And better still, you wind up with some definite verticallity with this longer stuff -

If you really want a jungle, you can spray your grass with the layering spray and then apply more grass on top of it. But I decided I didn't need to go that far. As is, I ran out of usable (non-brown) grass just putting a single layer on these two areas, so the whole project is on hold for now. The WWS bags don't say how much material they contain, but whatever it is, you burn through it petty quickly. I did try using some Busch grass that I acquired at my LHS, but I didn't really care for the quality (it didn't seem to want to come out of the applicator as readily as the WWS grass).
I think the plan going forward is to use static grass for the non-tended (IE not lawn, not farm field) areas, which basically means a few small areas around the edges of town. And I don't see much reason to use the short stuff anymore. If I'm going to go to all the trouble of using static grass, I want it to look like I did.
12/07/18 - Abandoned farm detailing
A spooky old graveyard for a spooky old house seems like a no brainer, although it took a fairly odd sequence of events for me to get here.

For whatever strange reason, the "Paw of Bear" lasercut wood house kit I built back in 2016 came with this little sheet of old-timey tombstones (a free sample, I guess?) However, since I didn't really have any use for them I just tossed them into my box of leftover wood-kit stuff and promptly forgot about them. Well, fast-forward to 2018 and I'm digging around in said box looking for something else when I came across the tombstones. And of course the lightbulb goes on as I realize that these are just perfect for my abandoned farm scene. So, I colored them with some Bragdon powder, made a little wrought iron fence, and then glued it all down amongst the weeds -

So, cool, one more little oddball item out of storage and into play. Now I think just a couple more small details and I'll be able to cross this entire scene off of my to-do list.
12/08/18 - More detailing
I had one old-timey wagon leftover from back when I was detailing Slezak's shed, and adding it to the farm (sans a couple of wheels) seemed like a logical way to finally make use of it -

Better still, the extra wheels are exactly what I needed for the sidewalk in front of Hope Hardware -

A lot more detailing to go there, but at the moment I'm up to my ears in streetlights and utility poles, so that'll just have to wait.
12/11/18 - More detailing
I finished off my abandoned farm scene by planting a rusty old Ford Model A in amongst the weeds -

Said vehicle is one of those GHQ pewter kits that come with lots of bendy and flash-ridden little parts. But for my purposes I figured it would've been pretty well stripped down over the years, so I just tossed all of the annoying fiddly bits into my junk box. Then it was just a matter of CA'ing the body to the chassis and then Bragdonizing the hell out of it.
12/11/18 - Finished adding utility poles to the elevator complex
The non-lit ones are plastic trainset-style poles with all the extra arms trimmed off (my normal modus operendi). I only strung up a single pair of E-Z Line wires ('cuz really, that's about all I can stand). Evidently Berkshire Junction doesn't make the gray wires anymore, so I had to settle for black. Bummer that because I think the gray ones are easier to see. I added transformers to the poles that have building feeder wires hooked up to them (said white metal transformers coming from the Showcase Miniatures "Power Pole Accessory Pack") -

It's kind of weird that so few of these buildings have external (wall) wires. I guess it's all underground? In any case, it made my job a lot simpler as I only had to deal with two of them.

The white metal cross-arms on the WS streetlight poles also came from that oh-so-handy Power Pole Accessory Pack -

And.... the end of the line.

There are a couple more plain jane poles down on the south end, but it'd take some crazy gymnastics on my part to get decent photographs of them. In any case, basically just more of the same.
12/14/18 - Even more of the same
These prefab Woodland Scenics streetlights are such a godsend - especially in concert with the Showcase Miniatures crossarms. That said, I do wish they were just a wee bit taller. Oh well, can't have everything I guess. Anyway, four more wired up and operational -

These plastic telephone poles look about "right" to my eye (about half an inch taller than the streetlights). Although prototypically speaking I suppose they could stand to be even taller -

I was going to try to match my pole locations with the prototypical ones in Hope. Unfortunately, all of my various compromises (vis'a'vis how the the buildings sit relative to one another) quickly rendered that idea a non-starter. Instead, I simply started on the outskirts of town and plunked them down every 7" (with the occasional shift one way or the other in order to line up with the building wires).
Speaking of the building wires... Having that E-Z Line preinstalled lo these many years has left me with some rather problematic utility wires. Just kind of laying there on the ground in a tangle left some of them a bit kinky in spots. Also, they're bleepin' filthy. And to be honest, I don't know that they're really even worth all the effort. Frankly, they're damned near invisible. But I guess I'm married to them now, so I may as well just get on with it. Nine more lights to go!
12/17/18 - Yet more of the same
Six more streetlights wired up and ready to rock -

Three more lights to go, and then about 30' of E-Z Line to finish things off.
12/18/18 - Finished with the streetlights
Yay, no more fumbling aroud with wires for a while

I must say, these WS streetlights are awfully cool. I mean, they actually do light up the street, so they're not just window dressing. Now the question becomes, do I bite the bullet and add a bunch of WS "Just Plug" vehicles to the street? 'Cuz if I go with non-lit cars, it's going to pretty much blow the whole illusion that it's after dark. Decisions, decisions...

Anyway, I've also been slogging along getting E-Z line strung up hither and yon (glue a wire to a pole, wait while the glue sets up, extend the wire to the next pole, wait while the glue sets up, rinse, repeat). And since that's a very stop-and-start project, I decided to also spend some time revisiting the yard (IE getting more of the dirt layer put down) -

Now this is not the end of the dirt work. It is not even the beginning of the end. But it is, perhaps, the end of the beginning (to paraphrase a noted UK model train enthusiast, lol).
12/20/18 - Finished with the E-Z Line
Depending on where you're standing...


I would say that about 80% of this stuff is basically invisible about 80% of the time....


But if you really go nuts with it and put it freaking everywhere...


That visible 20% is just enough to make the whole effort seem worthwhile
In other news, I've never been real happy with this tractor and hay trailer. The tractor really has no place to go (or come from), so the whole scene has always felt a bit too static and staged to me.

So, I parked the tractor over on the other side of the barn and left the trailer behind all on its lonesome. Seems to work a lot better this way -


I had to add an ersatz jack to the trailer since (as was pointed out to me), farmer guy wouldn't be able to hook it up if the hitch was just sitting on the ground.
I also made some good progress on adding dirt and ballast to the yard area -

Basically just some fine tuning left there and then the Waseca yard will be open for business (IE, I then get to scratchbuild a bunch more structures, yay). Fortunately for me, I was able to get a lot of good pictures from back when it was still a DM&E (nee C&NW) facility. Once the CP took over, they tore down pretty much all the old stuff and made it all fancy and modern (yuck).
12/21/18 - More goodies for the post office
As noted previously, the Hope post office got updated with a couple of fancy new roof vents -

And now, so did mine -

Said vents came from The N Scale Architect's white metal "Dormers, Vents & Brackets" set and were pretty much exactly what I needed. The only small problem was that they weren't a very good fit for my steep roof, so I had to try to file them a bit to change the angles on the base. And the end result there was... well, not great. So, Plan B involved slathering wet globs of Bragdon rust powder into the cracks and crevices between the vent and the roof. And although not quite a perfect solution, the end results were more than good enough for me. So, my goodness, Bragdon powder! I've asked it before and I'll ask it again, is there anything that stuff can't do?
The weather vanes came from Ngineering's etched brass "Fancy Clock Faces, Weather Vanes & Signs" set. And yeah, they're "some assembly required" and thus a
gigantic pain in the ass. Put it this way - if I ever accidentally knock one or both of those things off, I sure as hell ain't gonna bother trying to put them back
on. Yikes!
Oh yeah, I also added a bicycle and a couple of trucks (based on the Google Streetview image above).
12/23/18 - Agronomy warehouse detailing
Evidently the back side of this building serves as SunRich's private scrapyard (since just about every piece of junk back there looks like it came off of one of the elevators at some point or other). Fortunately, this made replicating things pretty simple as I've been around the block more than a time or two with grain elevator detailing -

And here I thought I was done building bins, but nope. Fortunately, the one I had to duplicate was smooth-sided, so I didn't need to mess around with corrugated tinfoil this time around -

Not a lot going on out front the day(s) I took my photos; just a couple of pallets, a few boxes, the fork from a forklift, and a stack of IBC's -

I gotta say, I sure do love modeling junk. I mean, what, I'm going to screw it up and make it look less like junk? I don't think so, it's idiot-proof
12/24/18 - More agronomy warehouse detailing
I don't know the official name for one of these things, but SunRich seems to be using theirs as some sort of mobile trash bin for disused plastic jugs -

In any case, here's my version -

I think the sides on the prototype are screened in (with something akin to chainlink fencing or chickenwire), but since its not really visible in photos I decided to just skip all that. I also skipped trying to make the fancy angular flares at the top and bottom of the side walls. However, I did add the jugs (tiny little squares of white and yellow styrene).
Now it looks like I'll need a seeder to park next to it, so I guess I have another Shapeways hunting expedition in my future. In the meantime, I seem to be on a roll with the junk, so I think I'll move on over to the machine shop and start piling up some detritus there.
12/26/18 - Maybe change isn't such a bad thing after all...
As I've been working on adding detailing to the machine shop and agronomy warehouse I've become more and more aware of (and annoyed by) this large boring dead zone south of the machine shop -

In the real world, that's where SunRich's gigantic premium conditioning plant sits. But of course, I punted on adding that thing years ago - just not enough room. So, what to put there instead? More NH3 tanks (et al)? Ugh, seems like I've been there / done that with those things. So, without any better ideas I decided to pull up the latest images of SunRich/SunOpta on Google Earth to see if I couldn't find some inspiration there. And wow, I discovered a couple of very interesting things - first off, they added an extension off the south side of the machine shop (an office, as it turns out). Better still, they added a humungous propane tank behind the machine shop. Now that's some stuff I can work with!

The office should be pretty simple to add; just three walls, five windows, a door, a one-piece roof, and a bit of detailing -


As for the propane tank... wow, this was so meant to be. To wit - a few months ago when I was looking to get some small LP tanks to add to the various houses around town I accidentally ordered one from Shapeways that turned out to be ridiculously oversized for my purposes (like almost 4" long). Well, shame on me for not reading the fine print when I ordered it. But as it turns out, it's exactly what I need now -

Of course there's no place behind my machine shop to put it, but that's just fine by me. What I'm going to do instead is place it south of the new machine shop addition. Then it should just be a matter of adding a container truck or two rolling through the area and, ba-boom, no more dead zone.
In other news, I drove down to New Richland and took about a million scouting photos of this Cargill facility -

So, it looks like that's going to be my big scratchbuilding project for next year (thus allowing me to put off Krause's Feeds and the SunRich admin building for a while longer).