
05/10/18 - Finished the main drag (well, most of it anyway)
Boy oh boy, I'm spinning enough plates here to land a gig on the Ed Sullivan show. It all started as I was putting down a layer of dirt for the elevator complex, whereupon I noticed that the inner main in that area was a little "off" (crooked). So, I rewired one of my track feeder sections (the wires of which were preventing me from straightening out said stretch of track) and eventually got everything going where it should. However, said adjustments ate into the space I'd allotted for the buildings on the west side of the road, which led me to wonder if everything was still going to fit where I wanted it to fit. Well, the big deciding factor (and question mark) all along has been the road (up to now represented by a free-floating strip of paper, lol). So, I figured before I did anything else, I'd better get a permanant road in place and then reassess the situation.
Up to now I've always used Woodland Scenics products (Paving Tape, Smooth-It Plaster, and Top-Coat Pigment) for my paved roads. And generally speaking, I think they've turned out pretty well. However, things tend to get a bit "tall" with that system (particularly when you add sidewalks into the equation), and then you wind up having to put all of your buildings on foundations to keep them from looking stupid. So ultimately just a lot of messy and time consuming work. And since the road through Hope was going to be fifteen feet long (including some sections with adjacent sidewalks), I decided that it was time to try skinning that particular cat some other way.
Now, from what I've read over the years, one of the more common ways to conjure up roads is to use sheet styrene. However, I've always resisted going down that road (boom-swish) because a lot of the layout pictures I've seen show roads that just look too plastic-y to my eye (IE too smooth and too shiny). But then again, I've also seen pictures of styrene roads that were absolutely gorgeous looking, so I figured there had to be a way.... And yes, after a bit of research (along with some trial and error), the good news is that I did manage to cobble together a method that is both quick and simple (always my goal) and yet yields results that are more than passable.
I started by buying a big stack of 6" x 12" Evergreen sheet styrene. I went with .015" thickness, which seemed nicely thin and would allow me to add some sidewalks into the mix later on without winding up with something that looked like it was two N scale feet tall.
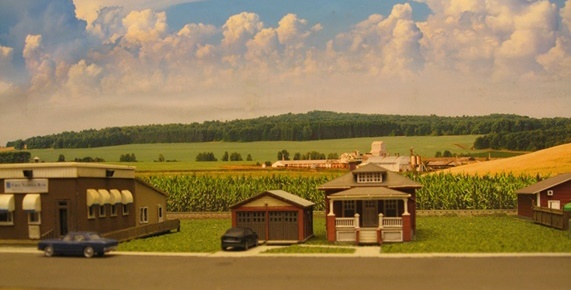
The first thing I did was to cut the sheets into 3" X 12" sections (3" seeming plenty wide enough for two lanes of traffic along with on-street parking). Then, I used a spraycan of Rust-Oleum flat gray primer to put down a base coat. The secret here is to hold the can a good 2-3 feet away from the styrene, which allows the paint to dry a little bit before it lands - thus resulting in a slightly coarse texture. I then finished things off with a layer of dull coat, and..... ugh, still too reflective. So, I then followed a suggestions I'd been given on nscale.net and airbrushed on a diluted layer of WS pigment (a mixture of Slate Gray and Asphalt for that faded tar look). And lo, this resulted in a truly flat finish (no reflectivity at all). However, it still looked just a bit too "perfect" for the real world. So, I finished things off by brushing on a bit of black Bragdon powder (as pictured below, I also used a ruler and a yellow pencil to add some double yellow lines). Once each section was completed, I then used white glue to fix it in place on my layout.
Eventually there will have to be grade crossings where the two ends of the road meet the outer main, but that's a plate that I won't need to get spinning for a while. For now, I have a pretty good idea where the buildings on the west side of the road will go. And although where they sit relative to their neighbors across the street probably isn't going to wind up 100% right, it should be close enough. As things stand, the road and inner main pinch together in such a way that I had no choice but to slide all the west-side buildings a bit further south to leave enough room between the buildings and the track (the same situation that led me to lose the larger Co-Op Oil building last year).

OK, so where was I? Oh yeah, dirt!
05/16/18 - Added a layer of dirt to the elevator complex
Arizona Rock & Mineral has an impressive line of "real rock" ballast and ground cover products. Unfortunately, the photos (or lack thereof) on their website make it somewhat difficult to know what exactly you're going to get when you order something. For my project, I decided to try several different "powder" products that at least sounded promising - Earth (#1090) and two different flavors of Industrial Dirt (Dirty and Standard, #1000). Given the rather ginormous area that I had to cover, the whole project wound up consuming nearly 10 bags of material (mixing Dirt and Earth in equal amounts).

Truth be told, the difference between "Dirty" and "Standard" Industrial Dirt seems to be minimal (both being a very light gray). On the plus side, mixing the Earth with the Dirt (either one) did get me a decent looking color. Unfortunately, I never was able to match the medium gray of the Highball Products Earth cover that I'd used on the storage bunker and the NH3 station. But oh well, I guess that's my bad for assuming that Highball was still in business. Suffice it to say, the next time I decide to use a given scenery product I'll make sure that I have all I'm ever going to need already on hand.
Both the Earth and Dirt products are advertised as being powder, but after I'd covered a small test area I found the texture to be a bit mixed (particularly the Earth, where I'd say about 10% of the bag wasn't particularly powdery, and thus too coarse to look like N scale dirt). What I eventually wound up doing was getting myself a fine mesh sifter (the kind you use for flour) and filtering out the bits that were too big.
For adhesion I used Woodland Scenics "Scenic Cement", which does do a nice job of locking the dirt in place. Unfortunately, it also tends to change the coloring of the dirt in seemingly random ways. For example, when doing an area I would occasionally wind up with a thin spot (or a spot that I'd missed entirely). So, I'd go back and put down some more cement (either with a sprayer or an eye dropper) and apply dirt to said spot. However, this would usually result in an obvious dark splotch in the otherwise uniform coloring of the dirt. Vis -

But then again, is that necessarily a bad thing? I mean, if the color and texture are too uniform and perfect it's not going to look real, right? Ultimately, I decided to just live with the splotches (for the most part). As for all the little tracks and trails found at the prototype...? Um, no, not gonna happen.
One other thing I learned tangentially is that masking tape doesn't really work as a way to cover up the gaps between the foam base sheets. In the past I've always used plaster cloth for that particular job, but it always winds up causing problems (too white, too hard, too lumpy, etc). Well, suffice it to say that tape has its own set of problems - the main one being that it comes unstuck the minute you get it wet (with, say, Scenic Cement). So, after struggling around with all that for a while, I finally went back and tore up all the tape and replaced it with plaster cloth.
I have to admit that I kind of wimped out on the siding track. Prototypically speaking, the ties should be almost completely invisible and the rails should basically be at the same height as the surrounding dirt. But to accomplish that I would need to either dig some sort of shallow trench for the track to sit in or add a layer of cork (or whatever) to the entire area around the track to raise it up to the height of the rails. Well, to heck with all that, said I. Basically I just painted the rails and ties, glued it all down, and then buried the ties in dirt as best I could.
My last little task was to add a Caboose Industries groundthrow to the turnout. Note that I kept all the paint, glue and dirt well away from the moving parts of said turnout (yeah, I learned my lesson in that regard years ago - you can either have a pretty turnout or a turnout that works, your choice).

Oh yeah, I also learned one other valuable lesson - do not build a small structure or scene on top of thin (.015") styrene sheet with the idea that you're going to glue the whole thing in place on your layout years later. OMG, the styrene sheet underneath that NH3 station was so warped that it took me literally hours of babysitting to get it glued down and flattened out (and the storage bunker wasn't much easier). As for the north elevator, the sheet underneath that one was large enough that warping wasn't a problem. Rather, it was just trying to move it around that turned into a disaster (basically all the various walkways, pipes and supports that were connecting all the various structures together came unglued). So, I just pulled everything off of the base and will (eventually) be situating (and reconnecting) everything right on top of the dirt (which, as it turns out, is more correct anyway).
The good news is that I didn't have many (well, not too many) problems with the south elevator. That entire complex sits on a big concrete foundation, so I used a very sturdy piece of styrene sheeting underneath my model when I built it. Consequently, moving it around didn't result in too many calamities.
So, that's that. And since I'm kind of digging being in scenery mode, I think I may spend some time planting some grass next.
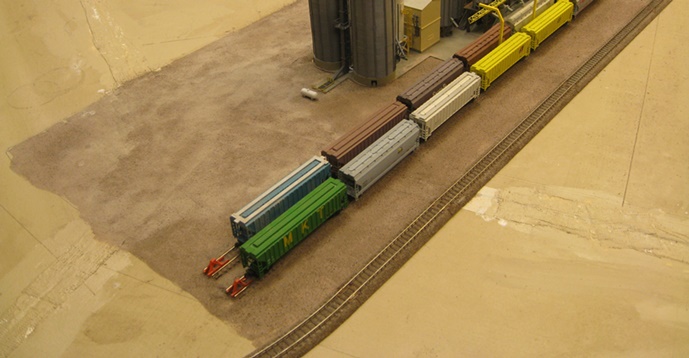
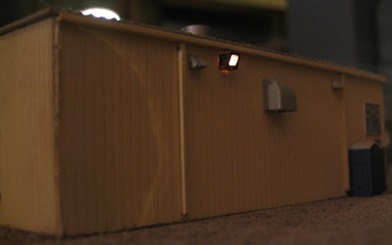
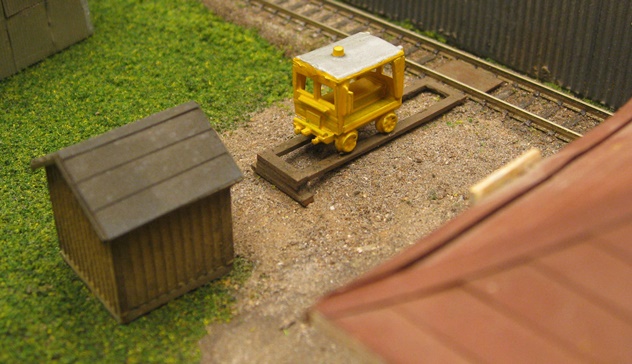
05/18/18 - What do you do when the trackmobile is in the shop?
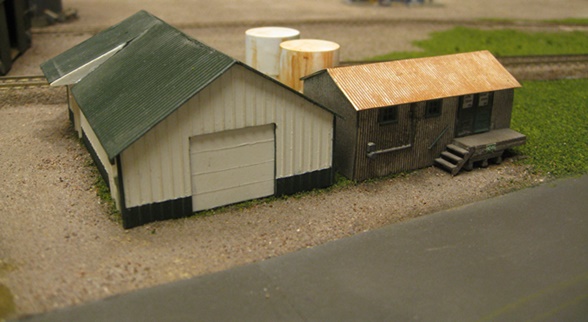
Well, evidently you use a front-end loader to move your hoppers around. Or at least that's what they do at SunRich -
In aid of that, I picked up this nifty little Komatsu keychain with diecast loader (currently available for about fifteen bucks from some random Chinese seller on eBay) -

For the price, it's really quite nice looking. All I had to do was hack off the keychain portion, touch up the wound with black paint, spray on some dull coat and then add a little Bragdon grime. OK, the axles aren't quite wide enough to straddle the tracks, so I guess I won't be using it to haul any hoppers around. But it sure does make for a great little trackside detail.

As for that storage shed? Ugh, evidently I never saw it with a hopper parked next to it before because I sure went way too tall with the front wall. How
depressing 
05/23/18 - More adventures in dirt
I'd like to get going on adding a layer of dirt to the yard area, so I ordered up another giant box of assorted AR&M products. I mainly went with what I already know (4 bags each of Earth and "Dirty" Industrial Dirt) but also ordered up a few other things just to see what they look like. What I learned is that "Gray Granite" (#1270) is virtually identical to the Dirty Industrial Dirt I've been using (basically a light gray), "Concrete Paving Material" (#1290) is a slightly lighter gray (almost off-white), and "High Desert Silty Earth" (#1070) is a light rust color (very southwest looking and completely useless for my purposes).
I was a little disappointed to discover that the bags of "Earth" I got this time around had a noticeable amount of whiteish material in them (not present in any of the bags I'd ordered previously). And although it mostly vanished once I sifted everything and mixed in the Industrial Dirt, I guess the word of warning here is that even when you order the same thing from AR&M, you might not really get the same thing (not exactly, anyway). I'm guessing they make this stuff up as they need it, so a given batch isn't necessarily going to be exactly the same as the previous one. Which, once again, probably makes it a good idea to order everything you need for a given project all at once.
05/26/18 - Let there be light!
As noted a couple of entries ago, I'm in the middle of doing a million different things all at once here (most of it revolving around putting down ground cover and getting the buildings, track, roads, sidewalks, etc situated in their "final" positions and then glued permanantly in place). And of course when it comes to buildings, "gluing in place" also means running wires for the various internal and external lightbulbs down through the base and on under the layout.
So, over the past few weeks I've generated quite the jungle of wires hanging underneath my layout. And as it happens, we also just adopted a couple of cuddly and fun loving little kittens (who immediately decided that said jungle of hanging wires was an irresistable kitty playground). So, before things got too far out of hand, I decided that I'd better get those wires hooked up to something and out of the reach of feline chaos.
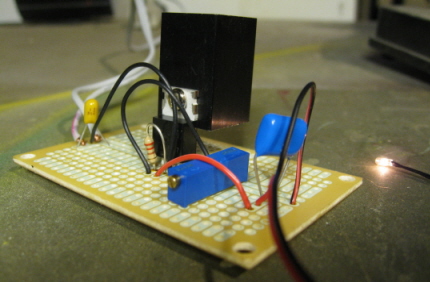
In aid of that, I picked up a couple of Miniatronics PDB-2's (one for the 12v lighting circuit and one for the 1.5v circuit). And yes, I'm sure there are cheaper options out there, but I just really like the user friendliness of these things when it comes to hooking up wires (especially since I'm laying on my back in dim lighting when doing all this annoying wiring stuff). Note the big red "12V" on the big-bulb board. Suffice it to say, frying a bunch of teeny exterior bulbs because I accidentally hooked them up to the wrong circuit is something I'd just as soon avoid!
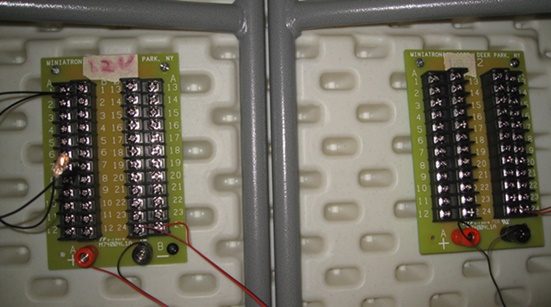
I'm still using the same two adjustable power supplies that I acquired/built back in my Shay Stadium days. Namely, a generic 2 amp power supply from Parts Express (for the 12v circuit) and a 1.5 amp power supply that I built myself (for the 1.5v circuit).

I generally prefer Miniatronics 12v / 50mA bulbs for interior lighting and 1.5v / 40mA for exterior lights. So, with 2000 mA available on the big-bulb circuit, I should be able to comfortably power 40 of the 50mA bulbs. And on the weeny side, 37 of the 40mA bulbs. If that's not enough to do the whole layout (and I suspect it won't be), I'll just add more power supplies as needed. As mentioned back in 2015, I stocked up on these cheapie Chinese low-voltage power supplies, so I won't ever need to build my own again.
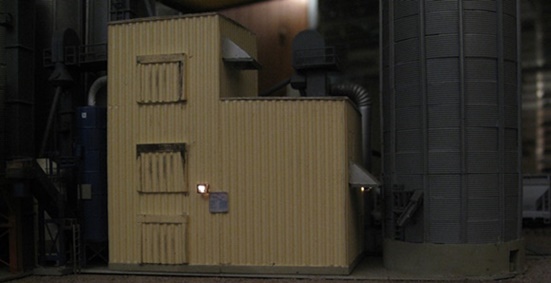
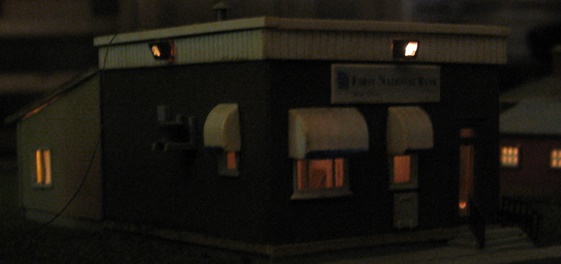
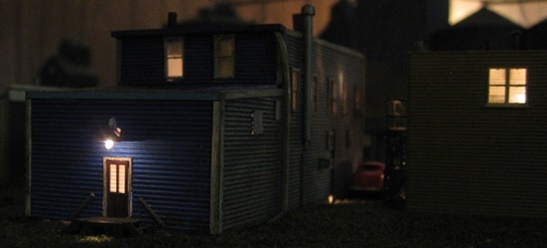
So, Finch's was the guinae pig. And, whew, no problems.
Looking at this photo, I'm half tempted to tear the roof off and add some interior details. And wow, how cool would it be if that Schmidt sign actually lit up? Hmmm....

Whoa, snap out of it Mark! Man, I really gotta stop inhaling chemical fumes so early in the morning....
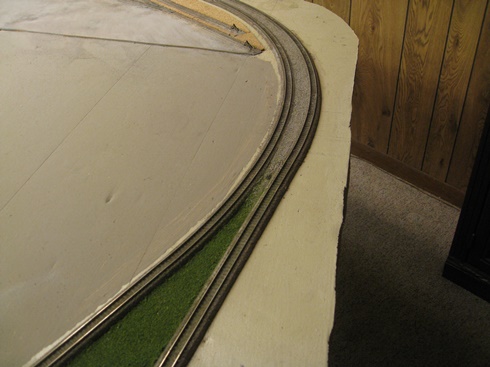
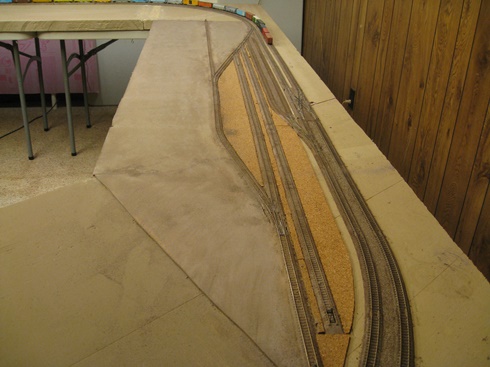
05/29/18 - Hiding the roadbed
I decided long ago that I was going to stick with Unitrack for my Waseca yard (mainly due to its size and complexity). The only problem with that plan is that Unitrack roadbed sticks out like a sore thumb when used in yard situations. Yards are flat, right?

So, what I needed was some sort of extra layer to raise the base up to the height of the ties on the Unitrack. And according to my trusty ruler, said layer needed to be about 3/16" thick. Well, ugh, that's annoying. Foam sheeting would've been ideal, but the thinnest I've ever seen is 1/4". IE, so much for foam.
Others have suggested simply using whatever ground cover material I'm going to use for the yard to make up the differences in height (IE, a 3/16" thick layer of dirt). But given the overall size of this yard (huge), yikes, that'd be a lot of filler. Still others have suggested using cork sheeting as filler material. And after a quick Google search, this seemed like the best way to go (what with the wide variety of different thicknesses available).
Now, I could've gone with actual 3/16" thick sheeting (it's certainly out there), but it also seemed just a bit spendy vis'a'vis shipping costs. So, I instead hied myself down to Michael's (local craft store) and settled on something that was at least in the ballpark (a couple of rolls of 24" X 48" X 5/32" sheeting). At the end of the day, I figured being 1/32" too short wasn't going to be enough to worry about. Then it was just a matter of cutting it up and gluing it down -

Being in full-on glue mode, I also went ahead and finished getting all the rest of my track glued down. Now it's just a matter of covering up the cork with dirt and seeing how everything looks.
Addendum From The Near Future - I learned a valuable lesson while applying the dirt layer to my yard; namely, don't skimp on the glue when you're putting down your cork! After slathering on the Scenic Cement and dirt cover last night, I woke up this morning to find that my erstwhile flat yard had suddenly developed a number of noticeable hillocks. Evidently there were a few spots where I didn't put enough white glue underneath the cork, and when faced with the watery Scenic Cement the cork sucked it in and expanded away from the base. Well, whoops! Fortunately, it was all pretty easy to fix. All I had to do was make some Exacto-blade slices in the offending mounds, squirt in some more white glue, and then put some heavy objects on top to keep things flattened out while the glue dried. So, yay, problem solved.
05/29/18 - More lights
No problems here...
So far, so good...


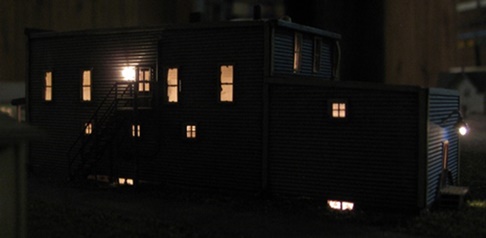
Uh oh, my first bulb that didn't light up (up on the left side of the first picture). Oh well, that's a pretty good batting average considering all the manhandling
these buildings have endured over the years and just how long ago I installed all the lights (sans any sort of testing no less). Hopefully it's just a loose wire
somewhere inside, 'cuz if the bulb itself is bad I don't think I'm going to bother fixing it
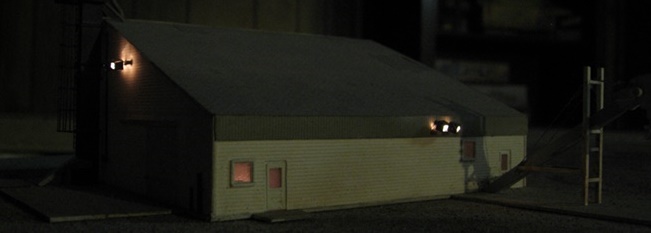

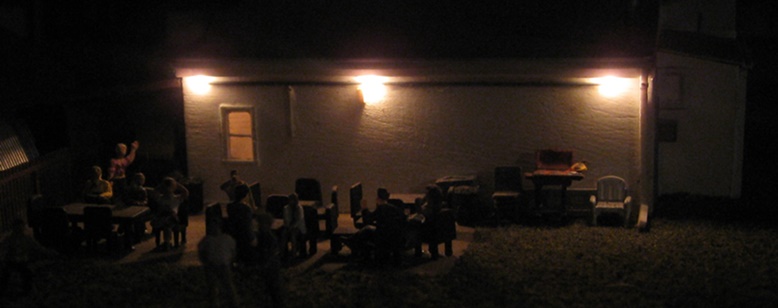
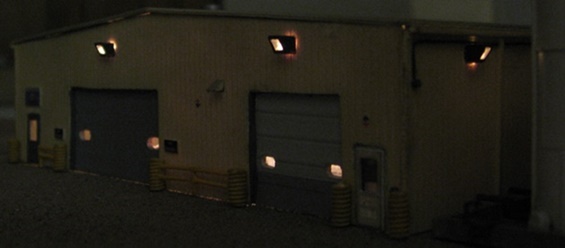
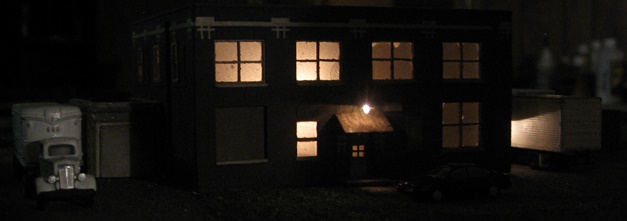
Not bad, but it looks like I'm going to need to add some extra ground cover around some of these bases - too much light "bleed through" from under the foundations.

I have to say, getting these "darkened room" pictures is quite a challenge. You can't really see anything besides the bulbs when the room is entirely dark, so what I wound up doing instead was to use a bit of indirect / ambient lighting (IE turn off the ceiling lights, turn on a portable floodlight, then point said floodlight at something other than what you're shooting).
Update - Yep, just a loose wire. All is well 

05/30/18 - More still

I gotta say, I'm having an awful lot of fun with all this. And the weird part is that I built all these structures so long ago that it barely feels like I had anything to do with it at all. Basically it feels like someone else did all the hard work for me and all I have to do is enjoy myself while making a layout out of it all, lol.
05/31/18 - And yet more


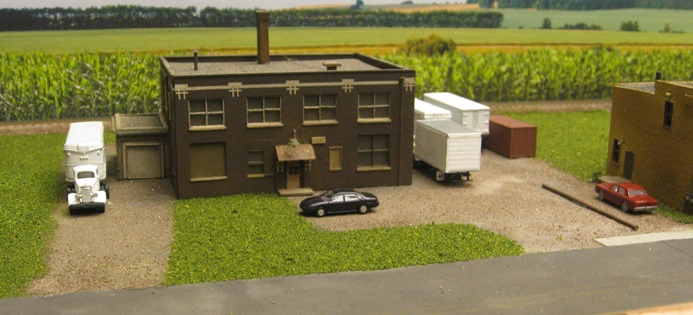
06/07/18 - A little machine shop detailing
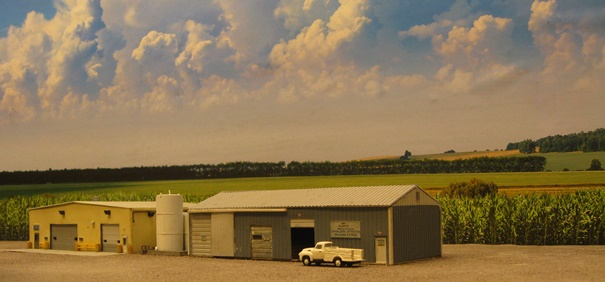
I'm not sure why I didn't do this back when I was building the model, but..... whatever. We now (finally) have concrete aprons for the front and back of the SunRich machine shop -

I can never seem to settle on a method for rendering concrete (or even remember what all I've done in the past). But since I've been playing around with sidewalks lately (where I went with a mixture of WS Pigments ala what I did with my road), that's what I used here as well. I started with WS Concrete, but since I've always found that to be just too glaringly bright, I mixed in a little bit of WS Stone Gray for good measure. And although this looked perfect in the jar, once I brushed it on and it dried it probably wound up looking a little more gray than I would have preferred. But oh well, it still looks like concrete to me (more or less), so I decided to keep it.
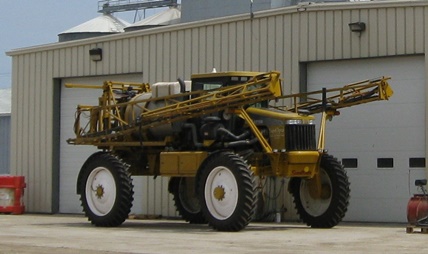
And what about those nifty little machines, you ask? Well, they're NH3 sprayers! (courtesy of Baldylox Designs on Shapeways

They're not quite the same prototype as the ones that SunRich uses, but when it comes to obscure Ag machinary like this I don't suppose beggers can be choosers. No assembly required (apart from gluing on the NH3 tank), so all I had to do was spray everything yellow and then handbrush the black and white parts.
In other news, I've finally capitulated to the kittens. Evidently "the honor system" is not something that cats really understand, so my next project is going to have to be a screendoor for the entryway to my train room. Sigh, Cats - 1, Mark - 0.
06/10/18 - Sidewalks, driveways, turf, and more lights
As alluded to above, I've been playing around with sidewalks for the last little while. And since Hope just doesn't have very many of them, it didn't take me too long to finish them off.
To match things up with the .015" styrene road, I went with .030" styrene for the sidewalks and .015" for the little dips in front of driveways. And as mentioned previously, I went with a mixture of WS Concrete and Stone Gray for the coloring. I did briefly toy with the idea of scribing little lines in the styrene (ala prototypical sidewalks) but eventually decided that it wasn't worth the effort.

As pictured, I finally (after nearly ten years) got tired of looking at all that bare foam and decided to start planting some grass (WS Fine Green Blended Turf held in place with WS Scenic Cement). I also made a driveway for Spurgy's (AR&M Dirty Industrial Dirt doing a very fine job of simulating dirty dirt). As pictured, I did add a few sprigs of Scenic Express "Buffalo Grass" to cover up a couple of bare spots, but at least for now I don't plan on going into full-on Scenery Mode (IE weeds, brush, bushes, trees, etc). I'll save all that for when I've finished with the basic ground cover.

Moving northward, the Spurgeon's got a nice driveway and sidewalk for their property -

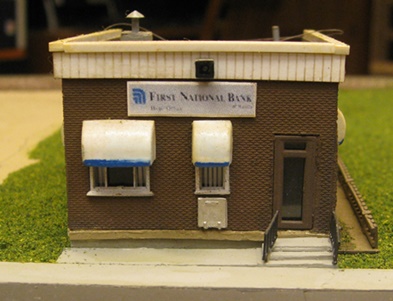
Next up, I had to repaint the bank steps to match the new sidewalk. I also had to add a section of concrete between the front wall of the bank and the sidewalk (not sure how I missed that back when I was building the bank, but whatever) -
And lastly, lights for everyone!

By my count that's 37 bulbs on the 1.5v circuit, which should be just about max amperage for my homebrew power supply. So, time to pick up another wall wart and put one of those Chinese wonderboards into service.
06/12/18 - More power for more lights
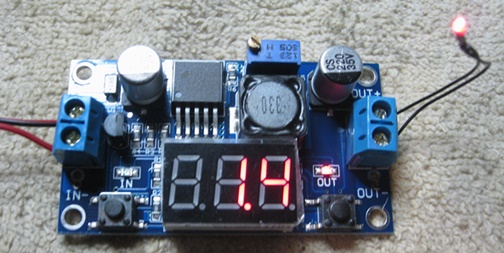
As threatened, I wired up one of those Chinese prefab low-voltage power supplies -

Yeah, I know. What a mess, right? Evidently my OCD takes the day off when it comes to wiring and electronics. Anyway, the "Antoble" AC adaptor I picked up from amazon.com has an output of 9 volts / 2 amps, so I should be able to comfortably power around 50 of the 40 mA mini-bulbs with it. But given how quickly I maxed out my other 1.5v circuit, I suspect I'll be needing to hook up at least one more of these before all is said and done (fortunately I have five of them squirreled away, so no worries there).
06/13/18 - Added a couple of Rock Island Geeps to the roster
My favorite online dealer (Hogtrainz.com, nee Brooklyn Locomotive Works) is currently unloading Life-Like GP18's for a mere twenty bucks each, and since one of the options was Rock Island, I decided to bite. These are the old "plastic chassis / open pilot / Rapido couplers" models from the 1990's, and so required that I add MTL pilots and couplers. And since Life-Like only made one roadnumber, I changed one of them from #1346 to #1347. And already having the decals out, I also went ahead and painted the numberboards white and put some actual numbers in there -
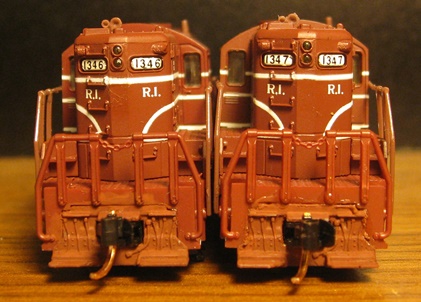
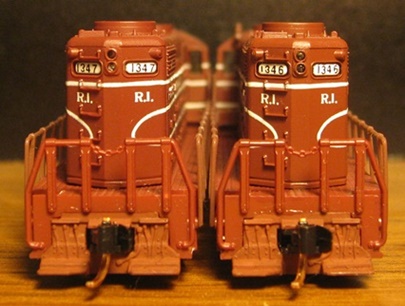
For the paint on the pilots I used an old (now very old) bottle of Floquil "Tuscan", which turned out to be a pretty close match for the Life-Like paint. For the decals, I used Microscale set #60-18 ("Rock Island Diesels 1963-1975). Since I was only changing one number (and not wanting to screw up the other three), I didn't use any chemicals to remove the "6". Rather, I just scratched it off using a small screwdriver and a toothpick. Worked out pretty good.

So, whee, that was fun. And given all the crazy expensive (and crazy finicky) DCC-Sound locomotives I've been dealing with lately, it's nice to be able to play with some cheap and simple-but-reliable toys for a change.
06/14/18 - More turf
There's not a great deal of greenary around SunRich (basically just in the areas where they never drive vehicles), so this was a petty quick job -

To achieve a less manicured look, I spread the turf around by hand instead of using a shaker (sort of rolling it around between my thumb and forefinger to get some clumpage as I rained it down). Then, I took a really big eyedropper and applied the Scenic Cement in large drops. As you can see, this created a lot of random open spots where the dirt layer shows through (y'know, 'cuz it's not a lawn). These will either just stay open or get filled in with weeds (or whatever) later on.

I gotta say, I am getting really tired of all these "to be dealt with later" strands of E-Z Line hanging hither and yon off of my buildings (like the one sitting on top of the feed mill storage shed in the above picture). Joyous will be the day when I finally plant some utility poles and get all that crap strung up and out of the way!
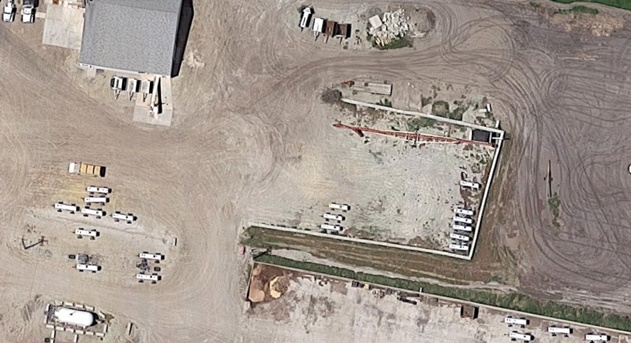
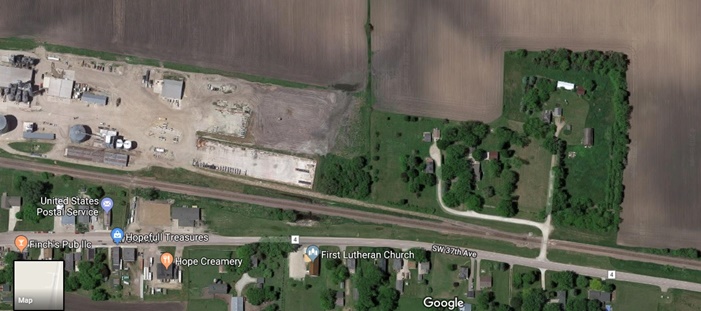
06/16/18 - In praise of Google Maps
I don't know when it was exactly that the "Street View" feature on Google Maps really took off, but I'm pretty sure it wasn't this awesome back in 2009 when I first started working on this layout.

I mean, seriously. I can't count the number of times this has saved me from having to drive down to Hope to scout out some detail or other that I'd previously neglected to photograph. What a time saver!
I've said it before and I'll say it again; what an amazing world we live in....
06/17/18 - In praise of letting somebody else do all the heavy lifting for a change
I haven't finished any new buildings since last July, so I guess it's pretty obvious that I'm bored to death with scratchbuilding. Fortunately, there really aren't that many structures left to do in the Hope section of the layout - basically just the SunRich admin building, Krause Feeds, "The Shop in Hope" (auto body/paint shop), and the old schoolhouse. I actually got a good start on the paint shop last summer and once I find some renewed enthusiasm for the project, I should be able to finish it off in fairly short order.
In the meantime, my newest bestest buddy Andrew has volunteered to do a Shapeways design of the schoolhouse (all I had to do was provide measurements and pictures) -

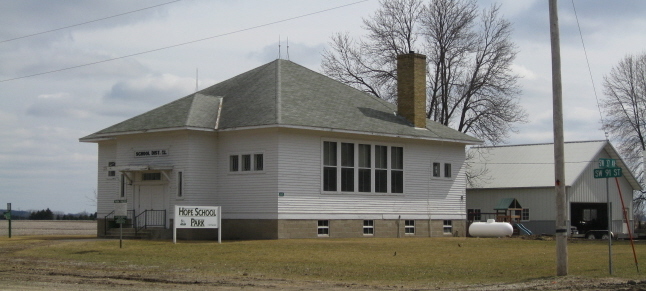
This is unbelievably good news for me because the very thought of trying to scratchbuild that fershlugginer roof was giving me nightmares. As pictured above, the design is coming along nicely. And suffice it to say, I'm very excited to see how it all turns out!
06/22/18 - Whipped up a portable backdrop
Now that I'm starting to add a bit of scenery into the mix, I figured it was about time to start using a backdrop for my layout photos (my train room walls being something of a detriment to realistic looking photography). However, the "walkaround" nature of my layout doesn't really lend itself to permanant backdrops, so I decided to instead build something portable that I could place wherever it needed to go for a given photo shoot (and then just store away until the next time).
Given that Hope is literally surrounded on all sides by fields of row crops, I figured I couldn't really go wrong with a backdrop that featured corn, blue sky and not much else. And what I wound up purchasing was just that - "Just Corn III" from trainjunkies.com. Not having much faith in my gluing skills, I spent the extra $$$'s for self-adhesive vinyl (as opposed to plain paper).
These backdrops are quite a bit larger than what I really need (80" X 24"), so the first thing I did was trim about 5" off the bottom and about 18" off the right side. Next, I peeled the plastic off the back and then stuck the backdrop to a piece of 3" foam sheeting (the same stuff I used for my layout base). I was mostly successful in my attempts to avoid air pockets, but did wind up with a few. TBH, I'm not fully sold on the "self-adhesiveness" of this stuff and may ultimately have to try something else if it starts to pull away from the foam. Fortunately, it's all easily swappable.

My bright idea for supports was to use the pedestals from a couple of cheap oscillating floor fans (Menard's was unloading them for $15 each, so not too bad). For mounts, I drilled holes up into the foam and then glued short pieces of PVC tubing inside said holes. The tubes then slide onto the fan pedestals (the heights of which are adjustable, so I can move the picture up and down as need be).

The end result is pretty good. However, the foreground corn seems awful darned tall to me (like "Land of the Giants" tall). I did order the N Scale version of the scene, so I don't know what the deal is there.
Replacing this image with a different one should be pretty easy, and I may ultimately decide to do so. But at least for now, it seems serviceable enough. Better than having to look at my grungy walls anyway.
Addendum -
OK, I take back what I said about the corn. Evidently it really can grow to ridiculous heights 

So, groovy. Now all I have to do is explain why my bunker is full of harvested feed corn during what is obviously the height of growing season. Uhhhhhh....

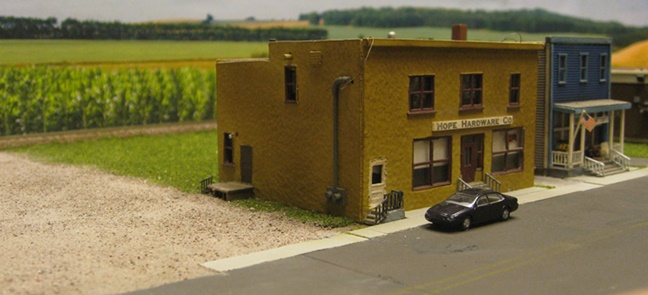
06/23/18 - Moving along up the block
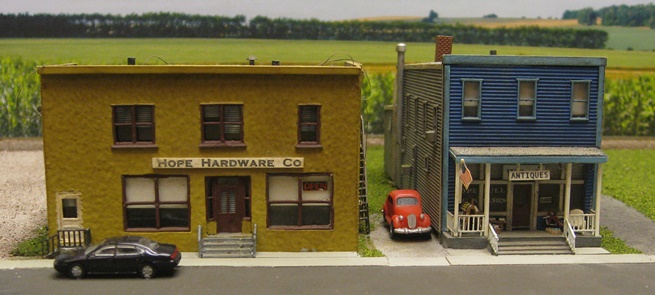
I got the hardware and antique stores all situated on their lots (along with the requisite turf, dirt driveways, etc) -
Once again I had to kludge up some concrete puzzle pieces between the sidewalk and the facades of the buildings (on either side of the two sets of steps). I honestly don't know what I was thinking when I built these models - was the plan to build foundations along the sidewalk and then put the steps right on top of those? You tell me, I have no idea.

I have a number of vehicles that (for whatever reason) never made it onto my last layout, so I decided to go ahead and put a few of them out on the street. That goofy old Dick Tracy coupe looks right at home rusting away next to the antique store, yah?
I gotta say, my carefully weathered road is really taking a beating, what with all the glue and turf and dirt and sweat and god-knows-what flying around. But for now I guess I'm just going to have to grit my teeth and live with it. If I clean it up today, it's just going to get messed up again tomorrow, so kind of pointless.
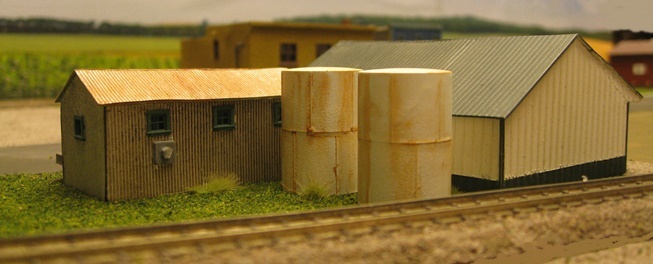
Wending our way across the street, I also got the Co-Op Oil buildings situated -
And yeah, I couldn't resist turning the clock back a few years and adding a couple of rusty old fuel storage tanks just for old time's sake. The prototype buildings are completely gone now, so I guess I'm free to do whatever the heck I want with my models, right?
Last but not least, more lights!


Coming up soon, I'm going to need to figure out just what the heck I'm going to do with my depot (vis'a'vis elevating it up to track level). Honestly, prototype pictures make it look like the damned thing is sitting up on jacks and ready to tip over backwards at any moment, and I don't think I want to go that route (not if I don't want it to look really stupid, that is).

06/24/18 - More ground cover
I finished planting grass on the west side of the road (from the Co-Op Oil buildings up to the outer loop of track). As pictured below, I also moved the north-end buildings around (yet again) and wound up blowing away "Mayor Mark's" house for about the third time. I really hate losing so many houses, but I also really want to give the Miller Farm its due and it felt like it needed just a bit more breathing room, so off to selective compression went Mayor Mark. Oh well, it was just an Imex pre-fab foobie anyway, so no big loss.

I'm saving the large open area (towards the top of the photo) for a field of corn. However, since the stuff I want to use (Bluford Shops) is currently out of stock
everywhere, that's a project that's just going to have to simmer on the backburner for a while (which is just fine by me since that particular project is going to
cost me a small fortune ).

In the real world, there are a couple of farms in this area. However, what the real world doesn't have is two curving mains of track cutting through the landscape. And as pictured above, trying to shoehorn a farm or two (along with the requisite roads) into the available space would be pretty challenging. Also, I decided years ago that I wasn't going to go traipsing around people's property in order to get the necessary scouting photos to build models of these farms. So, even if I wanted to put something there, whatever I modeled would have to be completely made up (which totally flies in the face of why I'm building this layout in the first place). So, I think what I'm going to do instead is just plant a large grove of trees there and leave it at that. Or who knows? Maybe I'll change my mind later on. It's not like I really need make any final decisions right now (since grass comes off just as easy as it goes on).
Continuing on towards the yard, I put ballast down between the mains (starting where they transition to double-track and on up to the double cross-over).
Speaking of the yard, I have indeed been working on getting a dirt layer put down there. However, it's a lot of work and I still have a ways to go.
I think I've pretty much given up on the notion of having some sort of logical transition from Hope to Waseca. In reality, the Waseca yard is situated inside of a rather large town (at least as compared to Hope). But I really don't have space enough to model anything resembling Waseca's "outskirts", so I think basically it's just going to be Hope, then Cornfield, then Yard. And in light of that, I think it's time to shelve any notions I might have had about adding all that interesting Bird's Eye stuff into the mix. I think I can adequately fake a "yard in the middle of nowhere", but a large industry? Not so much.

One nice thing I have going for me is that the west end of the yard borders the U of M's "Southern Minnesota Crop Research Center" (which features a bunch of fields of assorted row crops). So, no worries modeling that particular transition, since it really does sit next to a bunch of trees and farmland.
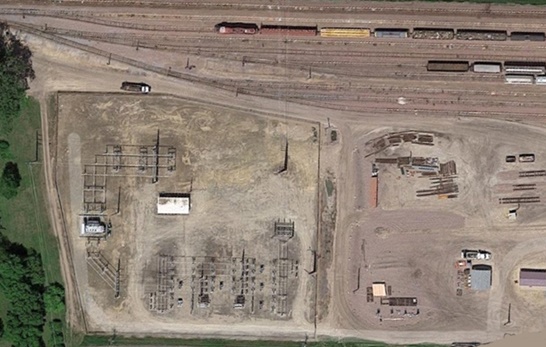
Even better, there's a rather significant electrical substation on the west end of the yard; something that should be quite interesting to add to my layout (in lieu of the frozen food plant).
06/26/18 - Added a grade crossing to the elevator
I believe that (back in the day) this used to be the main access point into the elevator complex, although based on all the weeds I doubt it's used anymore.

In any case, I added said crossing and my own (simplified) version of the safety gate. The crossing simply consists of some dirt "ramps" and then some styrene boards glued to the track -
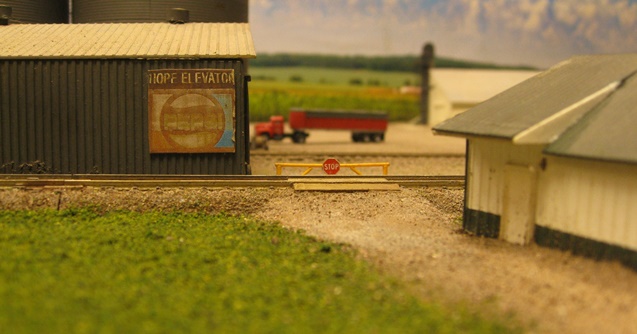
I also addressed a bit of an annoyance with that long shed. It doesn't really sit flat on the ground and I can't glue it down (if I did I'd never be able access the siding track for cleaning purposes). So, as a bit of a cheat, I put a concrete apron in front of the doorway (which serves to hide the fact that the floor at the opening of the shed is actually hovering a few inches above the ground).

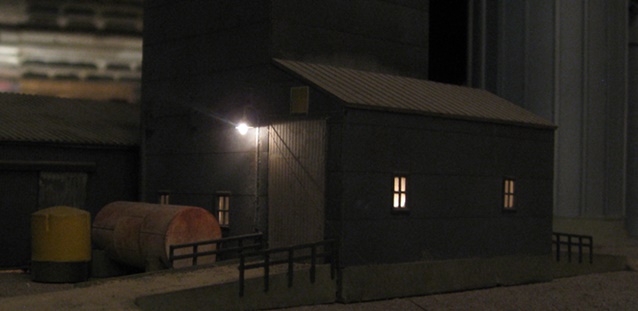
06/26/18 - Got the creamery glued down and wired up
I have umpteen zillion pictures of this particular building, but precious few of the surrounding property. So, thank you Google Maps, I couldn't have done it without you!
Once again I was fortunate enough to have a number of suitable vehicles already on hand. And given that the trucks at the creamery are a bit of a dog's breakfast (no two the same), the mish-mash of trucks and trailers I had at my disposal worked out very well. Basically all I had to do was paint them white and glue them down. I also added Hardware Store Guy's little parking lot separator (a wooden pole) and his shipping container (one of which everyone seems to have these days - cheaper than building a garage?)

I built this little storage shed way back in my Shay Stadium days but never did find a home for it.... until now! Huzzah!

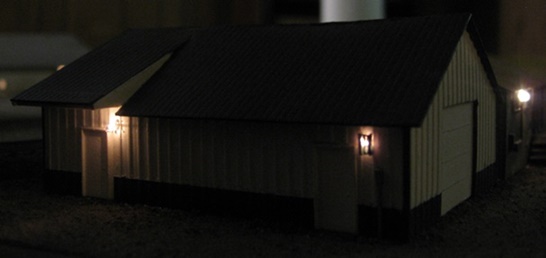
I was all prepared to go jump off a bridge if either of these two fancy wall fixtures failed to light up. But, whew, everything turned out fine. Also, I really like the "frosted window" look I went with on this building, and now I'm wishing I'd gone that route on some of my other ones (what with their lack of interior detailing).

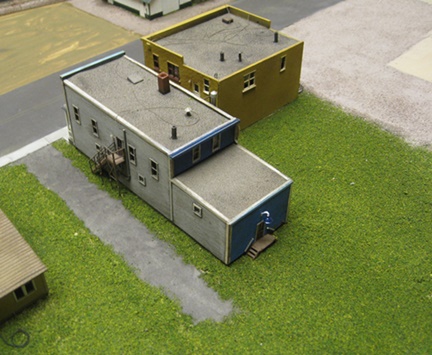
06/29/18 - Got Slezak's Shed and the Post Office glued down and wired up
Tell you what, it's getting harder and harder to take street level photos these days, lol.

I never noticed before, but it turns out that there's a little sidewalk and driveway skirting action going on over here. So, I dutifully added it.

The prototype has tons of interesting junk piled up out back, but I'm not quite ready to dive into all that just yet.

These were some of the first structures I built for this layout, and at the time I guess I hadn't gone completely berserk with the lighting yet (no external lights on these at all).

06/30/18 - More fun with lighting
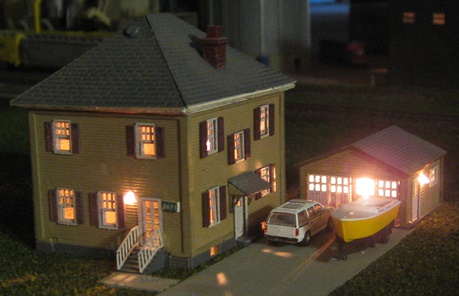
I wanted to get a nice pickup truck for the Miller Farm and ultimately wound up getting one from Woodland Scenics. What I didn't realize when I ordered it is that it's one of their "Just Plug" vehicles (for use with their "Just Plug" lighting system) and actually comes with preinstalled LED lighting for the headlights and taillights. Well, what the heck, I thought. Let's hook it up to the 12V lighting circuit and see what happens.

Tell you what, that's some amazingly realistic lighting right there; those headlights light up the area in front of the car just like the headalights on a 1:1 car would! I could definitely see adding a few more of these to my layout....
Addendum from the near future - I eventually learned that those Just Plug cars are designed for a 3V power source, which explains why the headlights were so insanely bright when I hooked them up to my 12V circuit. It's a wonder that they didn't just burn out.
07/01/18 - Got the depot situated
This turned out to be a pretty simple job. All I had to do was cut out a piece of cork big enough for the depot to sit on and then use a sanding sponge to bevel the edges.

Once glued in place and covered with dirt it makes for a nigh undetectable grade up to track level.

OK, if you're wondering about the Rock Island bus.... Well, I'm pretty sure such a thing never served Hope. Let's just say that certain people around here have
zero control over their buying impulses 
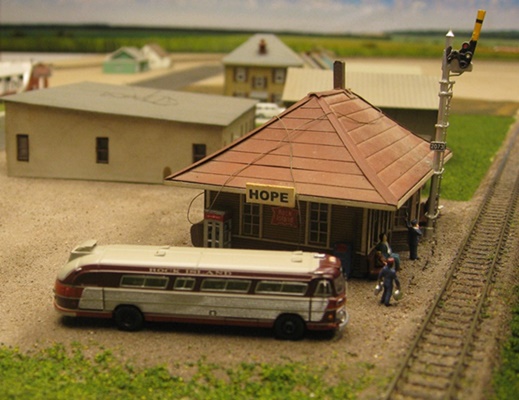
I think this is about the third time I've use an NJ Int'l semaphore tower on a layout. A very nifty piece of prefab trackside detailing!
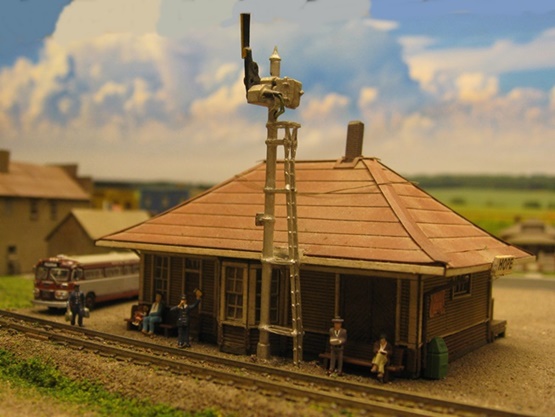
And yes, it's wired up and operational. Clear sailing to Ellendale!

I have precisely zero pictures of the prototype during its operational era, so I pretty much had to wing the detailing (always a recipe for trouble around here). But I figured it wouldn't be too far out into left field to add some benches, a few passengers and uniformed railroad folks, a couple of trash containers, a mailbox, a phone booth, a heating oil tank, a dolly and some assorted boxes.
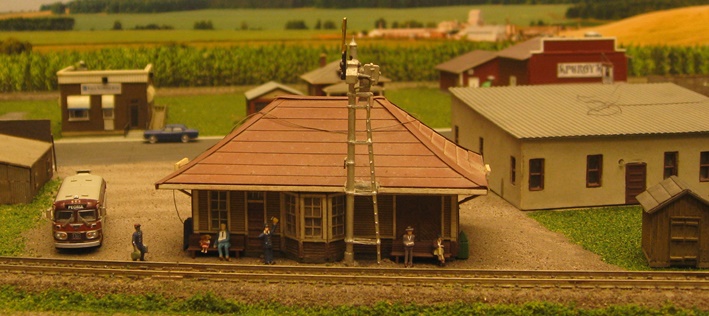
As you can see, my street plan has started to veer off into fantasyland (as compared to the prototype). The depot is actually supposed to be behind Klecker Garage (waaaaaaayyyy behind Klecker Garage), but obviously I don't have anywhere near enough room for that to happen. And as mentioned previously, the buildings on the west side of the street aren't quite lining up with their prototypical counterparts on the east side. But, oh well, so it goes. At this point my main concern is making a model town that looks nice. And as long as it's all still recognizeable as Hope, I don't think moving things a few inches this way or that to make a more aesthetically pleasing arrangement is going to get me into too much trouble with the prototype police. I sure "hope" not, anyway (nope, still not tired of that pun).


Anyway, now I just need to whip up a speeder set-off in front of the tool shed. And, hmmm... maybe even a speeder too?
07/03/18 - And sure enough, I added a speeder
I haven't the faintest idea what sort of MOW vehicles might've been used around Hope back in the CRI&P days, but a Railway Express Miniatures Heavy Duty Speeder seemed like the most expedient option. As pewter kits go, it was pretty easy to assemble and paint.
The set-off consists of a few styrene sticks glued together, painted brown, and then slathered with Bragdon powder.

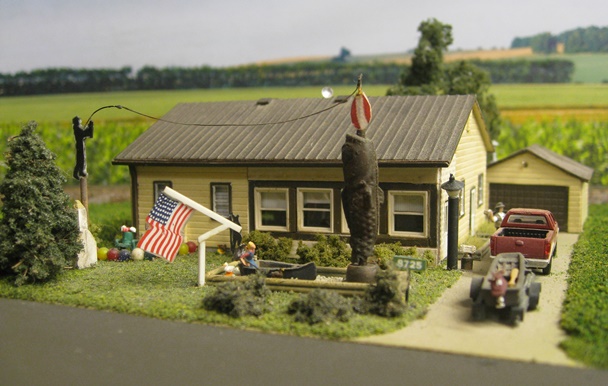
07/03/18 - Got the church and the Stockwell ("Fisher Dude") house glued down and wired up
If it's an N scale parking lot, you can bet that there's going to be at least one Kato "Toyota Crown" parked there. They're cheap, they're readily available, and they don't look half bad. That said, I did just finally notice (after placing what must've been my millionth one of these things) that the tires are silver instead of black. Uh, WTF? Well, suffice it to say, I pulled out a micro-brush and gave them a dose of black paint. And I suppose at some point I'll have to go fix the other ones that are still sitting out there with weirdo tires. What sort of rubber are they using in Japan anyway??
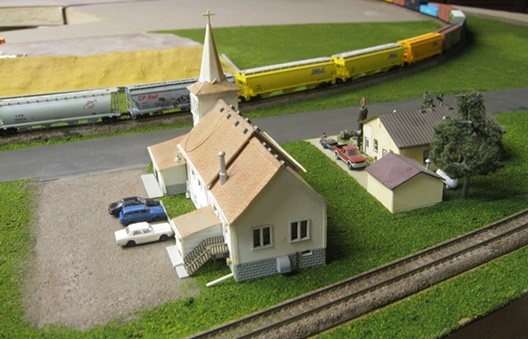
Apart from the vehicles, my only other addition (at least for now) was to plant some shrubs along the front wall, put a concrete "tire bumper" along the grass, and put some small sections of sidewalk in front of the doors.

As for Fisher Dude house, well... I guess I'm having some second thoughts about the wisdom of building these little dioramas off the layout. On the one hand, I'm sure it would've been a huge nightmare trying to install all that detailing in situ. But on the other hand, trying to blend the plastic base into the surrounding terrain is kind of a pain (you have to pile the turf on really thick to hide the edges of the styrene sheet). So, I dunno, pick your poison I guess?
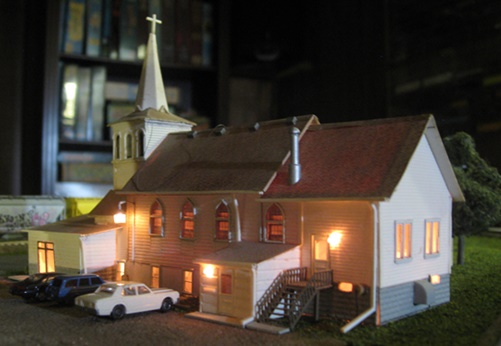
And then of course, there are lights -

I'm getting a little annoyed with myself on these white buildings. Back when I was cooking them up I should've been painting the interior walls black to prevent "glowing building" syndrome later on. But senility being what it is, I just plain forgot about all that. So now about all I can do is use lower wattage bulbs and place them such that they don't cause too much wall glow. But a certain amount does seem to be inevitable (although in the case of a church, maybe I can say that that was on purpose).
07/04/18 - Got the Klecker Garage and Shed glued down and wired up
This part of town has definitely become the heart of fantasyland on my layout, what with the service station (now a storage building), the depot (long gone) and Slezak's farm implent business (also long gone) all huddled together in one place. I'm not too worried about it, though - I think it's way more interesting this way.


And yes, there is lighting -


I will say, I am finding it increasingly annoying that most of my really interesting (and well executed) buildings are on the east side of main street, and thus facing away from the most logical place to view the layout. So, unless I want to crawl into the center space, all I ever get is the rear-end view of Spurgy's, et al.
In light of that, I think I need to detail the heck out of this service station to make it more of a showpiece. I just wish I had some better pictures of Klecker's from the 1930's and 1940's (back in its Mobilgas days). Still, I think I can make out just enough below to get the basics right. And by the by, that big open space between Klecker's and Slezak's is where they used to show outdoor movies back in the day (in the below picture you can just make out the wooden poles that people would sit on). That might be something fun to consider adding at some point....

Oh, and you may be wondering why Miller Farm hasn't show up in all this yet. Well, let's just say that fabricating miles of fencing takes time.....
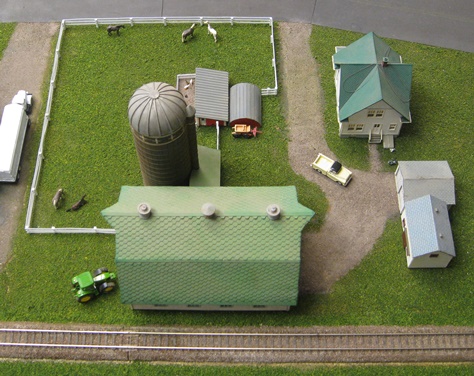
07/05/18 - Got the Miller Farm buildings glued down and wired up
As evidenced below, I went on a bit of a detailing spree with this one (relatively speaking) -
Yep, there's the "hey buddy, turn down the high beams" pickup mentioned previously -

I've been building N scale layouts for nearly 20 years, and as such I've amassed quite the collection of oddball stuff (as part of "mixed lot" auctions on eBay). And although I'll probably never be able to use all (or even most) of it, I do keep trying. Case in point - the old-timey buckboard wagon pictured below. No, you won't see one at the real Miller farm. But they do have horses, so I figured the Millers that occupy my layout also have a buckboard (I dunno, maybe they pull it out for the annual "Frontier Days" parade or something). In any case, it's out of my "maybe someday" box and actually in use, so... winning!

The John Deere tractor is by Wiking. And dargnarbit, yeah, there are certain angles where my fancy photo backdrop suddenly becomes useless.

The little pen in front of the chicken coop is supposed to be enclosed by a chicken wire and wood fence (with the wood painted white), but I didn't really have anything on hand that worked as chicken wire. I guess chainlink fence might've done the job, but painting etched brass is a big pain. And anyway, I didn't have any on hand. So, I instead went with some Atlas "hairpin" fencing (trimmed to half height and painted white). And yes, there are some actual N scale chickens and geese in there (more refuges from the "maybe someday" box). Based on their sizes, I'm pretty sure they won't be able to squeeze through the bars.

The horses were also liberated from the "maybe someday" box. Unfortunately, I still have about twenty more that will probably never find a home (not on my layout, anyway).

Building the large fence was a surprisingly time-consuming proposition (getting all those long strips of styrene glued together such that they were parallel and equidistant became something of a challenge). I went somewhat overlarge with the horizontal boards because I wanted to make sure I could include this detail -

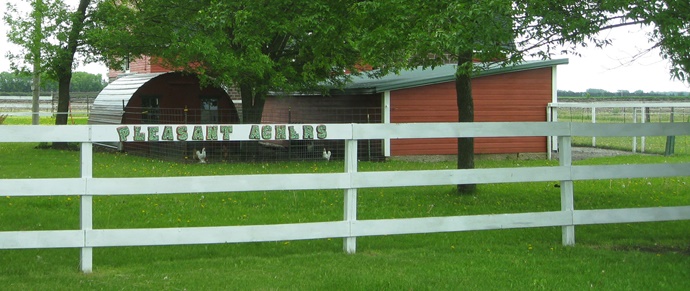
"Pleasant Achers"? Your guess is as good as mine as far as what that might mean. Either the Acher family purchased the farm from the Millers or the Millers are nice
people with a lot of health problems. Either way, it was a long way around the block for such a goofy detail - especially for one that literally no one
will ever see. I tell ya, half of what I do around here would be a complete waste of time if it weren't for web photos. So, thanks for checking in and
validating my existence
07/06/18 - Got the Schuler House foobie glued down and wired up
Actually, this doesn't even qualify as a foobie - it's just flat out wrong. But I had to do something with that Albion House kit after it got kicked out of the north end of town, and so.... here it sits. Oh well, at least it's interesting looking.

Meanwhile, in other fantasyland news.... I was revisiting "Memories of Hope" and found some interesting pictures of Slezak's farm machinary business that show exactly what he was building/selling there. And after a bit of Googling around, I found a picture of the very thing (evidently some sort of hay loader) -
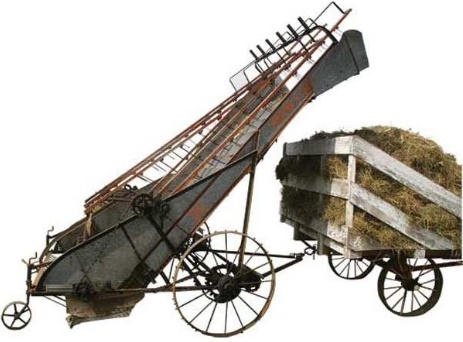
Obviously not something that anyone has ever made in N scale, but I think I can foob something up that should at least be in the same spirit. As is, that big open dirt lot next to Slezak's Shed is kind of boring and definitely in need of some detailing to liven things up.
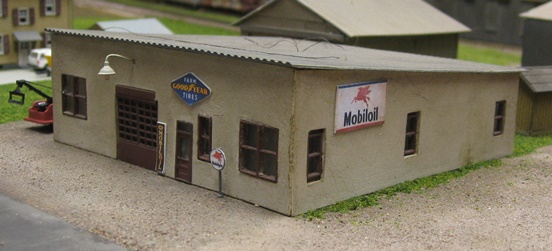
And speaking of livening things up, I got a good start on doing just that over at Klecker's (it's amazing what one can glean from a single lousy photocopy of a grainy old photograph). All of the graphics I used are images of actual period signs (from eBay, mostly) that I printed on my laser printer and then stuck to pieces of sheet styrene.

In the photograph, the big "Mobiloil" wall sign is actually sitting on the ground (leaning up against the front of the building and with a bunch of junk piled up in front of it). I don't know if they'd just taken it down or were in the process of putting it up (or just never got around to doing anything with it), but on my layout it's up on the wall where it belongs.
Next up, some old-timey gas pumps and other assorted goodies.
07/08/18 - Idle hands = Crazy Ideas
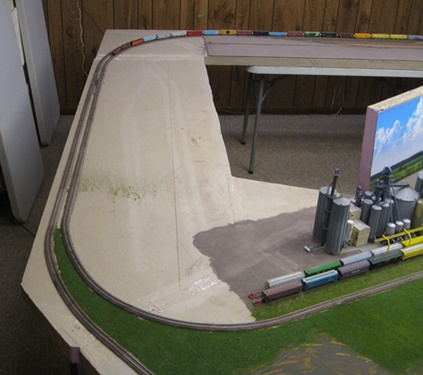
I plumb ran myself out of Scenic Cement and WS turf this morning, and since my LHS doesn't open for a few hours I instead got to spend some time just looking at my layout and pondering the future. Specifically, I started cogitating on just what I might do with this section (the one formerly slated to be New Richland) -
My original thought was to make it all farmland (and with maybe a family farm thrown in for good measure). But, my goodness, that'd be a lot of farmland - and frankly, not particularly interesting. But then I remembered this Cargill operation that I came across just south of New Richland a few years ago -

It's not served by the nearby CP (nee DM&E) rail line anymore (don't ask me why) and it's out in the middle of sweet bloody nowhere. So, I'm thinking I could go with my original idea of making this section "mainlines running through farmland", but also include the Cargill plant as something to break up the monotony.
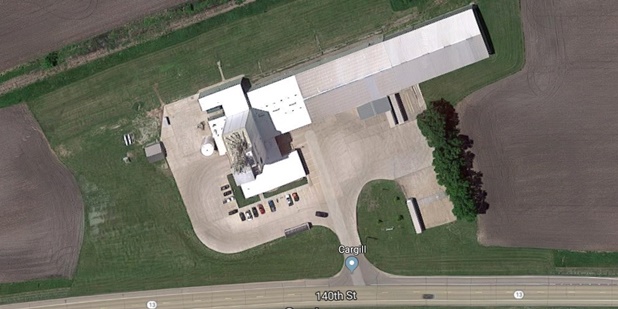
Of course it would be a completely insane project, but since when has that ever stopped me? Anyways, something to think about...
07/09/18 - Got the Karston House foobie glued down and wired up
For whatever reason, the prototype's sidewalk doesn't make it all the way out to the road. However, on my layout it does (I just thought it looked too weird the other way). And please do ignore the backdrop in my "twilight" photo - the building shadows do tend to spoil the illusion a bit, lol.

You may have noticed that my recent photographs are a little less murky than they used to be. Or maybe you didn't, but in any case I decided to swap out all of my "warm white" (IE yellowish) overhead lights for "cool white" ones instead. It's a bit harsh in real life, but it does seem to make for better pictures.
07/11/18 - More Ideas
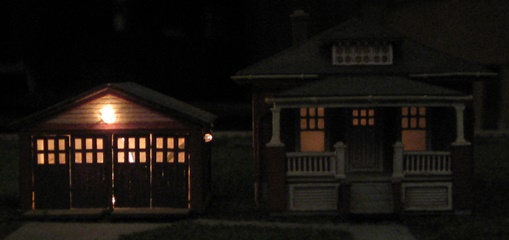
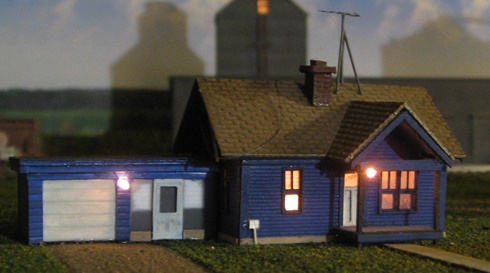
I spent a bit more time thinking about what I might want to do in that area off to the north of SunRich and decided that a huge, unoccupied grove of trees just wasn't going to be very realistic. In southern Minnesota (which not all that long ago was nothing more than a flat ocean of prairie grass), you generally only find trees where you find people (IE around farm buildings and in towns). However, not really wanting to invent another "going concern" farmhouse / barn scene (and all of the detailing that that would entail), I decided that I could do the next best thing - namely, an abandoned farmhouse and barn scene. EG -

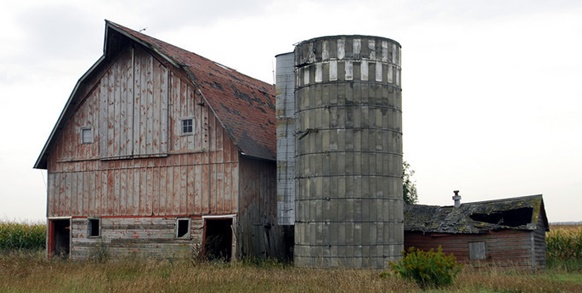
With the buildings, I can justify having the trees. And since the buildings are abandoned, I won't have to worry about a lot of extra detailing (not to mention roads). Better still, the buildings themselves should be pretty interesting looking (or at least I hope they will be). Anyway, we shall see.
07/14/18 - Finished detailing Klecker's
Yep, I basically sidled right up to the "way overboard" line on this project.... and then blew right on past it.

Well, what I can say? Woodland Scenics has an awful lot of cool detailing and I simply couldn't resist using damned near all of it. Wasn't it Mick Jagger who said that anything worth doing is worth overdoing?

This all started out when I was Googling around looking for some old-timey gas pumps, and what I eventually found was WS's "Sonny's Super Service" kit. Said kit is part of the WS "Pre-Fab Landmark Structures" line, and basically includes everything that comes with their "Fill'er Up & Fix'er" prebuilt; just with nothing painted and all of the detailing uninstalled. But for a mere $17, I figured it was worth it just to get the details
Well, long story short, once I had the kit in hand I took one look at all those tiny little details and decided that there was just no way in hell I was going to be able to do them justice (WS does a way better job of painting them than I could ever hope to). So, I bit the bullet, purchased one of the prebuilts, and then cannibalized most of the detailing from that. And I must say, I don't regret it for one second.

That said, I didn't totally wimp out on the project. As pictured above, I did replace all of the Phillips 66 graphics (on the pumps and on the road sign) with Mobilgas graphics. I tell ya, it's the little things that help me sleep at night, lol.
07/15/18 - The silly season is upon us
I was going through my box of leftover people figures trying to see if there were any that might actually be worth using in Hope, and the answer was "sure, why not". Case in point - this 9' tall Woodland Scenics cop and these scrawny Sheik-Of-Araby looking asphalt workers (also WS) -

I'll be damned if I know what the story is there, but I'll bet it's a good one. Next up, I try to find a place for my WS canoe people (sans canoes). Now, that should be interesting.