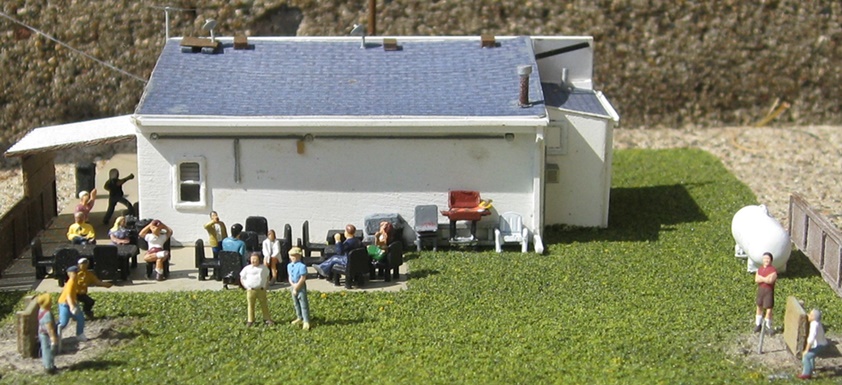
10/15/16 - Finished another Grain Bunker
As noted previously, this second bunker is quite a bit smaller than the first one I built -
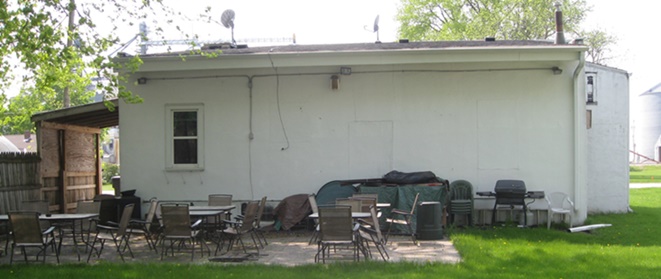
Like everything else around here, it has changed rather drastically since I first started scouting SunRich. Originally, it was comprised of skinny/braced metal wall sections, like so -

More recently, the old walls were completely removed and replaced by a double layered stack of concrete barricades similar to the safety barricades used around the NH3 tank. To wit -

The latter version seemed like it would be a little easier to build, so that's what I went with -

I probably could've saved myself a great deal of effort by just simulating the individual blocks (IE simply scribing lines on styrene sticks). But, no, for some reason I decided to fabricate each and every one of them individually. Meh, I suppose it does look a little more realistic this way since the prototypical blocks aren't 100% evenly placed.
Anyway, that's that. Now I just need to fill it up with a whole bunch of interesting ag equipment.
11/15/16 - Dipping another toe into the Shapeways pool
Given the somewhat obscure nature of the farming equipment required to complete my "storage bunker" scene, I wound up having to do most of my
shopping on Shapeways. And although the results were somewhat mixed, I did ultimately wind up getting what I needed.
The most common pieces of equipment (scattered hither and yon around SunRich) are their NH3 tanks and trailers. Vis -
The Shapeways kits I purchased were designed by CG N Scale (a rather prolific purveyor of cool
N scale stuff). The trailers are sold in five-packs, with each unit consisting of seven different parts. And although assembly is kind of a bitch
(particularly the wheels), the fact that everything is in pieces does make painting the individual parts different colors a lot simpler.
My original plan was to replicate most of the graphics found on the SunRich tanks, but I quickly abandoned that idea after running into a lot of
problems with my custom decals. Even using liberal doses of Micro-Set, it's just really hard to get tiny little decals to adhere to a curving surface (the edges
always want to curl up). So, after discovering that each decal was turning into a 15 minute project, I did the math (15+ decals per tank X 10 tanks)
and decided that most of my tanks were going to be plain white (I may eventually do a fully festooned "showpiece" tank to park next to the NH3 station, but that's
about as far as I'm willing to go).
Next up, I needed a couple of portable augers. EG -
I got mine from designer Walt's Trains and Things (who primarily does Z scale
stuff, but I was able to talk him into doing an N scale version of his Z scale auger). And although they're "OK", I did find that the auger tubes had a bit of
a curve to them (and unfortunately, I wound up breaking one of them when I tried to bend it straight).
Unlike the NH3 tanks, no assembly was required on these (the auger is one big piece, as is the hopper). Applying the two-tone "Westfield" paint job was
a bit of a challenge (all hand-brushing), as was applying the decals (once again, custom decals and curved surfaces don't get along very well). But at the
end of the day, I think they turned out pretty nice looking -
Lastly, I needed a couple of dry fertilizer haulers/spreaders. Vis -
The models I wound up using came from designer Junction Design and were definitely the easiest of
the bunch to deal with (no assembly required, easy to paint, and easy to decal) -
So, that's that. Now, please excuse me while I go finish putting together nine more NH3 tanks 11/17/16 - Finished detailing the Storage Bunker
As promised, I finished up some more NH3 tanks and then got everything glued down inside the bunker. And since I happened to have a spare semi cab
(sans trailer) sitting around doing nothing, I added that to the scene as well -
So, that just about does it for the SunRich elevator complex. Well, except for... oh yeah, that damned admin building. Ugh, I think that one's just going to
have to wait for a while. Right now, I think I'd much rather take a stroll back across the tracks and see about scratchbuilding the old
Co-Op Oil buildings.
12/01/16 - Finished the first (of three) Co-Op Oil buildings
Ahhh... so nice to get back to The Land O' Dilapidated Buildings - that wonderous place where sloppy scratchbuilding skills are an asset rather than a
liability! I'm not really sure what this particular building was used for back in the day, but it's clearly not used for anything anymore (what with the steps and
landing for the doors having been removed at some point during the last ten years) -
As for my model, I decided to go ahead and put the landing back on. Because...? Well, I dunno, just because. Do I really have to have logical reasons for
everything I do around here? There's not a great deal to report on the actual scratchbuilding. Basically I made the four walls and the roof out of plain styrene sheet and then covered it all
with Campbell foil corrugation. I then finished things off by adding a few details and decals and then Bragdonizing the heck out of it.
Oh, look, that's where the steps wound up. I guess they didn't travel too far, eh? And, hmmm... in looking at these pictures, it suddenly occurs to me that I
forgot to put in the window glazing. Guess I'd better go take care of that (and maybe take my brain medicine while I'm at it).
The Trail Assn guys moved a bunch of old shipping containers onto this property sometime in the past year. But apart from making it more difficult to get good
pictures of the buildings, I'm not sure what actual purpose they might serve. I'm also not sure if I'm going to bother replicating them on my layout (although given
my ongoing annoyance with them, I suspect not).
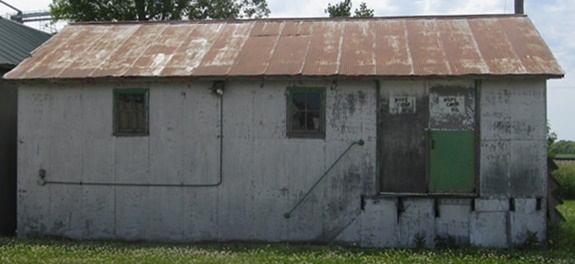
Next up, this place (I'm pretty sure there's a building back there somewhere behind the container). I'd really like to turn the clock back to 2001 here (back
when it was still
corrugated, had stairs and a landing by the rear door, said "Hope Co-Op Oil" on said door, and had large fuel tanks out back). Unfortunately, the photocopied pictures
I have from that era are really terrible and not much of a guide for modeling. So, I guess I'll just go with this more modern incarnation. If nothing else, it should
be quite a bit easier to build this way.
01/02/17 - Finished another Co-Op Oil building
For such a seemingly simple structure, this one certainly had its challenges. For starters, I had just one heck of a time getting the masking right on the
two-tone paint for the walls (those deep channels in the simulated metal siding wound up causing all sorts of nasty bleed-through problems).
The problem was that I'd assembled the walls prior to painting them (as is my wont), and so wasn't really able to get a good tight seal on the tape. So,
I bit the bullet, tore everything apart, and then applied the tape to each wall section separately. Fortunately, laying the wall sections flat on my workbench
allowed me to get into the crevices with the blunt end of a paintbrush and really get a good tight seal on the masking. And, lo, that's all it took.
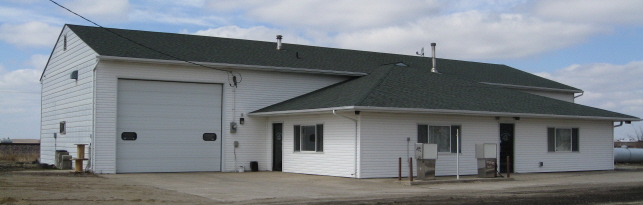
My other challenge was figuring out how to make that strangely angled section of roof over the rear door. And in retrospect, I think what I should've
done was build an odd angle into the rear wall right from the get-go. And if I'd spent any time at all looking at this particular picture, I probably
would have -
What I wound up doing instead was simply fabricating the walls and roof without the extra jog, and then trying to add it all in after the fact. Which,
at the time, didn't seem like it would be that big of a deal. But, man, creating those two little angled roof supports wound up taking hours and hours of
frustrating trial and error. What a pain!
Unfortunately, I have a feeling that all of that roof finagling is going to wind up looking like a cakewalk compared to what's next on my list. The roof
on this place gives me palpitations just looking at it... 01/03/17 - Then again, let's not and say we did
As I started working on cutting out the walls for that last Co-Op Oil building, I noticed that it was turning out to be awfully huge (ala the prototype).
So, before things got too far along, I decided to make sure that there was actually going to be room for it in its allotted space on my layout. And, whoops,
turns out there wasn't (not even close).
During this whole process, I also noticed that my buildings weren't quite jibing with their relative positions in Hope satellite imagery. So,
I spent a little time moving things around and wound up with even less space for that Co-Op building than before -
Moving all that stuff around wound up pushing a bunch of the east-side buildings quite a bit further northward - to the point that poor ol' Mayor Mark's
house got pushed right off the edge of the layout. So, I went ahead and relocated that one (Imex Levittown Jubilee) across town (now serving as a fill-in
foobie for the formerly skipped Schuler house).
So anyhoo, I guess I won't be constructing that last Co-Op Oil building after all. Which maybe isn't all bad, since I really wasn't looking forward to
building it in the first place.
04/23/17 - Finished the Krause House
My original plan was to just skip this house in the name of selective compression, but... As it turns out, I needed some shutters for a different project and
recalled that the Walthers "Cape Cod House" kit came with just the kind of shutters that I was looking for. So, I started flipping
through my photos of Hope houses to see if I couldn't find another spot for a Cape Cod house. And, lo, I came across the Krause's.
Apart from adding a few custom details, the main trick here was building that front entryway add-on. And the good news is that the extra (fifth) wall provided
in the kit (along with all the various optional dormer pieces) turned out to be just what the doctor ordered. So, all in all, a fairly painless kitbash to come
up with a very reasonable approximation of the Krause abode.
As far as a garage goes, I'm pretty sure there must be one someplace in the back. But since I can't see one in my photo, I'm just going to go ahead and say
there isn't. As things stand I think I've already duplicated that Atlas garage way too many times on this layout, so no garage for the Krause's (sorry).
05/13/17 - Turned the clock back even further on Slezak's Shed
It's funny the things that happen when you're twiddling your thumbs waiting for parts to show up in the mail. At the moment I'm about 99%
finished with my model of Spurgy's Bar & Grill (just need some wooden fencing in order to finish things off). Well, with nothing better to do, I decided to fly over
Hope in satellite mode to see where I would ultimately be placing said model on my layout. And, lo, I noticed that the storage building across the street (formerly
"Stafford's Toy Box") appears to have new ownership. It's now tagged as "The Shop In Hope" by Google, so evidently it was purchased by the guy who owns the custom
auto painting business down the street (also dubbed "The Shop").
Anyway, I decided long ago that I wasn't going to be modeling that building (opting instead to build Slezak's Shed and Hope Depot - the former occupants of the
lot and some of the first buildings in town). However, I figured I should at least note the change in ownership on my website. And while doing that,
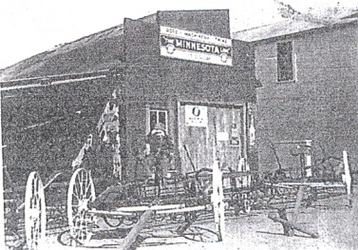
I got to looking at this old 1940s photo of Slezak's. "Hmmm... that sign sure does look cool", I thinks to myself.
Well, next thing you know, I'm thinking "why not add it to my model?" I mean, I'm already deep into fantasyland here, so why not go all the way? So, I started
Googling around for similar signs and actually come up with a couple of good examples -
Unfortunately, they didn't shrink down very well. So, I decided instead to make up my own sign using Word. And before you can say "Joe Slezak", it was done -
So, there ya go, a fun little diversion. Now, back to impatiently watching my mailbox...
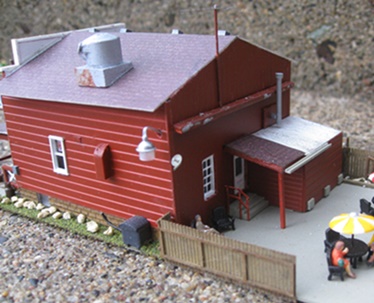
05/17/17 - Finished Spurgy's Bar & Grill
Scratchbuilds are like that proverbial box of chocolates - you just never know what you're going to get. Some turn out great, some turn out "meh", and
some, well... some you just pitch into the trash and start over. Fortunately, this one came together surprisingly well - maybe one of my best ever (if I
do say so myself). That said, I did wind up having to compress the side walls a bit (as compared to the prototype). A necessary compromise since I definitely
wanted to include the back patio and garage (as it is, the garage practically butts right up to the outer track loop on my layout).
The building itself is pretty basic, so not much to report there. Rather, it's all the little details that make this a fun and interesting model (brick
foundation, basement window, grease bin and hose, wall and roof vents, "Coors Light" sign in the window, electrical box, rocks and weeds, working
area light, satellite dish, roof antenna, road sign, milk jug, etc).
At first blush, the front porch looked like it was going to be a pretty scary project. But after simplifying things a bit (and also breaking it up into several
smaller projects) it turned out to be relatively straightforward.
As for the sign, I got lucky there. As it turns out, the proprieters have that exact same image in gif form on their facebook page. So, it was just a
matter of grabbing a copy, resizing it, and then printing it out on my laser printer. Additional details include tables and chairs, a couple of WS
"people sitting", an address sign, and more rocks (WS "talus").
The fencing around the back patio was evidently a "work in progress" when I took my original set of photos. Based on more recent photos (once again, facebook
to the rescue), it appears to be quite a bit more finished looking now. So, that's how I built mine (using some nifty lasercut wood fencing from Inter-Action
Enterprises).
Hey look, there are those precious shutters that I was so anxious to get last month. Good grief, talk about obsessive. Like I couldn't just make my own?
Additional details include wall and roof vents, a power line, some electrical conduits and a meter. I also went so far as to scratchbuild my own air-conditioner
(complete with an electric cord running to an outlet on the wall). Now that's obsessive. I think that's me sitting on the steps there, taking a
breather from all the lunacy.
Getting all of the patio furniture I needed was kind of an adventure. After rummaging around in my "Giant Box O' Details", what I came up with initially was a set
of garden tables and chairs leftover from an old Faller set (#272441). I also found two nicely painted umbrellas, but had no idea from whence they came. My guess
is that they were also included in that Faller set, but since said set is impossible to find nowadays I guess I'll never know for sure.
So, needing more outdoor furniture, I ordered up a Preiser set (#9554). And although said set included the additional tables and chairs that I needed,
the included umbrellas left a lot to be desired (being way, way, way bigger than the ones I already had - and thus destined to stick out like a
couple of very sore thumbs).
So, I then ordered up a different Faller set (#272905 this time), which fortunately included some more appropriately sized umbrellas (albeit unpainted, so I had
to take care of that myself).
Anyway, with all the furniture accounted for, I then went ahead and finished off the scene -
And yeah, I don't know what all that weirdo lumberjacky-looking stuff that's nailed to the fence is either, but I added approximations of it anyway (along
with a little rock and shrub garden). And once again straying into overly obsessive territory, I even made a little hanging flower pot.
As it turns out, that Preiser set included exactly what I needed to scratchbuild one of those outdoor space heater thingies. Basically I took one of the
little round tables, drilled a hole through it, and then inserted a short length of plastic rod through the center. I then stuck one of the umbrella bases on top of
that and then stuck the whole assembly into an old Atlas milk jug. Genius! Lastly (and leastly), I scratchbuilt a couple of garages. About the only bit of excitement here is that I did go ahead and wire up three area lights on the
front of the larger one. Oh, and if you're just now noticing that the side walls on the smaller garage are white in the prototype photo, well... I'm not falling for
that old trick again. Since these buildings were entirely white back in the "Straight River Inn" days, I can only assume that I caught Spurgy in "mid-paint" when I
took my photos and that the walls are now all red. Ha! Fool me once...
So, that's that. And now, since you can't go bar-hopping where there's only one bar, I guess my next project is going to have to be Finch's Pub. See ya there!
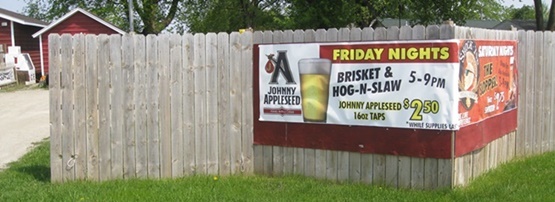
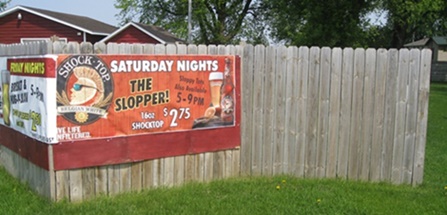
05/19/17 - Get yer Beer & BBQ!
I whipped up this signage for the vacant lot next to Spurgy's. And I must say, I sure do wish I knew how to shrink down these proto photos and still retain
their sharpness when I print them out. As is, they might pass the three-foot test, but no more than that...
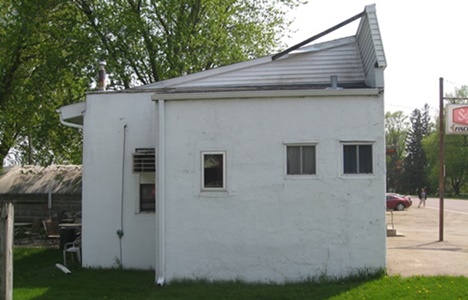
07/17/17 - Finished Finch's Pub
When I first saw this place back in 2009 (when it was still R&L's Pit Stop) I didn't really think it was going to make for a particularly interesting
model -
Ah, but that was before I discovered all the cool stuff going on out back (horseshoe pits, etc). I guess it's true - you really shouldn't judge a book
by its cover!
Looking at the front of the building, it's pretty easy to tell that this thing started out its life (nearly 100 years ago) as a small gas station. And you can
definitely tell that the indoor bathrooms (on the left side) were not part of the original structure -
And so, I built my model the same way (making the wall section where the bathroom addition starts a separate piece).
Evidently the "Schmidt Beer" sign out front has been around for quite a while (vis'a'vis the fading) -
So, mine is quite faded as well (not to mention fuzzy and blurry, but I guess I've spent enough time griping about my inability to convert real-world
photos into printable graphics). I went ahead and connected electricity (well, pseudo-electricity) to the sign by running some Berkshire Junction E-Z line
from the front wall to the signpost -
I did experiment around with trying to improve the look of my electrical conduits (the ones running up and down the wall),
but didn't achieve much success there. The plastic rod that I normally use (and wound up using yet again) always winds up looking too fat to my eye (despite the fact
that I use the smallest available diameter). So, this time around I tried using some super skinny brass rod instead. Unfortunately, the stuff is just a bitch
to paint (if you use a lot of paint it winds up too gloopy looking, and if you use less it tends to want to just come right off the minute you start handling it).
Getting the wire to stick to a wall isn't much fun either (again, more messy problems). So, at the end of the day I dialed back my ambitions and
went back to the plastic.
Now, I'd love to know what the story is behind that little bit of accent stonework on the right side of the front wall. A project that never got finished?
Some budding artiste's brilliant idea for classing up the joint? I guess at this point the real truth of the matter is probably lost to history...
Of course, I totally overthunk just how to go about replicating that particular bit of detailing - up to and including buying a sheet of really lame looking Faller
"Natural Stone" facing (basically a sheet of cardstock with some very HO-looking random rock graphics printed on one side). Well, after finally coming to my
senses, what I wound up doing instead was cutting an appropriately sized and shaped chunk out of a thin sheet of styrene and then using an Exacto knife to scribe
random rock shapes into it. I then finished things off by wet-brushing the individual rocks with some yellow and gray Bragdon weathering powder -
I made the funky window overhangs by gluing together alternating pieces of flat and round plastic rod. Additional details include an Atlas pickup,
some WS choppers ("Bad Boy Bikers" with the bad boys removed), a bench, a "butt" pot (no smoking indoors anymore), front steps with railings and a mud matt (a
small piece of sandpaper painted black), window blinds, "Lite Beer" window sign, "Finch's Pub" wall sign,
electric meter, conduits and utility pole wire, roof vents, mast antenna and satellite dishes, a couple of wall
lights, a Shapeways trash barrel, and that
brown "something covered up with a tarp" thingy (or in my case, a piece of styrene with some white glue glopped on and then covered up with a piece of painted
toilet paper).
And now, the excitement that is the north wall. Details include window drapes, a couple of chimneys, homemade shingles, an A/C unit, a brace for the front facade,
a gutter, a downspout, and yes, yet another morbidly obese electrical conduit -
As we wend our way to the back, things start to get interesting again -
As you can see, things are definitely hopping at the Spookshow version of Finch's (at least as compared to what was going on the day that I took the above
scouting photo). Details include tables and chairs (both stored and in use), assorted ridiculously expensive WS figures, a grill, some
Shapeways garbage cans,
another "tarp covered mystery", an LP tank, 3 wall lights (and associated portly conduits), a wall speaker, a gutter, a downspout and more Inter-Action wood fencing -
And lastly, we have the horseshoe pits -
Sorry, only the one game going on in my model. Although I suppose expecting WS to make more than one "Game of Horseshoes" set would've been asking a bit much - I
should just be happy with the fact that they actually have the one set. And if you're wondering - yes, I did consider trying to fabricate some N scale
horseshoes. However, once I got a load of the microscopic size of the one that the WS guy is getting ready to throw I decided to take the coward's way out on that
whole deal.
So, there ya go, "bottom's up" Now, what say we pay our bar tab and stroll on next door to take a look at "The Shop in Hope"?
07/19/17 - Finally, a way to make legible signs!
As followers of this blog are well aware, I've been lamenting for years my inability to recreate decent prototypical signage for my models.
My "method" hitherto has been to use a picture tool (currently PhotoScape) to crop the sign out of a photo and then resize it to N scale dimensions.
Once thusly manipulated, I'd import it into a Word document and then print it out on my laser printer. And as has been evidenced previously, the results have
been... well... not great -
Fortunately, I got a very handy tip from one my Facebook followers (hi Sandro). Instead of resizing the actual image file, you simply import it into
Word "as is" and then let Word do the resizing for you. This will allow you to print a smaller image while still retaining the original resolution.
The resultant printed images are much sharper than what I was able to get before -
The improvement on signs with a lot of small text is even more striking. I mean, wow, you can actually read the words (a very nice feature for
a sign).
So, now I suppose I need to go back and re-do every single sign I've ever done. That should be fun 07/21/17 - Spurgy's gets some sign repair
Now that I look at things, it appears that most of my remaining signs are too small to really bother with (IE, rejiggering them probably isn't going to
improve them to any appreciable degree). I guess I might re-do the post office sign at some point (if it ever starts to really bother me), but beyond
that I think I'm done. It's kind of a pain in the posterior to match the sizes of the new signs to the old ones (and installing the new signs in situ is
even more annoying), so probably best to just let sleeping dogs lie.
09/28/17 - Goodbye Hope Co-Op Oil, hello vacant lot Looks like I modeled it just in the nick of time!
10/10/17 - Ever wake up one morning and decide to throw your entire layout plan out the window and start over? Well, I did!
Here's the deal - over the course of the summer I finally reached the point where I could actually see some light at the end of the tunnel as far as my model of
the town of Hope goes (just four more structures left to scratchbuild). OK fine, but it also dawned on me that it's taken me damned near ten years to reach this
point and I still have all of the New Richland (grain elevator) and Waseca (yard) structures to build - which at this rate would probably take me another decade
to finish. So, with that in mind, I decided to completely eliminate the town of New Richland. IE, goodbye grain elevator and hello... uhh... I dunno? Rolling
fields of corn or something? We'll see...
Beyond simply vaporizing the New Richland siding, I also went ahead and downsized and reoriented all of the base sheets to provide a two-foot walkway buffer
around the entire layout (IE, no more crawling on my f'n hands and knees every time I need to go rescue a stalled loco). I also reoriented Hope to be the center of
attention (as it should be) -
Given the new "angular" positioning of the Hope sheet, I was able to add nearly a foot of extra space to the town (now a whopping thirteen feet in length), thus
allowing me to put some breathing room between some of the buildings that had wound up being crammed together a bit too tightly. The extra space also allowed
me to correct the positioning of some of the buildings relative to their neighbors (previously fudged due to size constraints).
Lastly, I moved my sad and neglected little yard off of its lonely little island and put it right into the roundy-round action -
In addition to allowing me to more correctly reproduce the actual Waseca yard configuration, I could conceivably also add the Bird's Eye Foods buildings and
siding to the festivities someday (although since the whole point of this exercise was to reduce the scope of my layout, probably not).
Now I just need to spend a few weeks running various trains around to make sure that this track plan is functionally viable. Then, I think I might just
get started on painting/ballasting the Unitrack and getting it glued down permanantly. Yeah, it's pretty obvious that I've become seriously bored with scratchbuilding
structures and am looking for something else to occupy my time. But that's the great thing about this hobby - there's always something completely different to
dive into when you get tired of whatever it is you've been doing lately.
12/26/17 - No operational problems with the track, so it's time to start making it look less Unitrack-y
Painting and ballasting track is always one of my least favorite chores, so I'm always on the lookout for the quickest and dirtiest way to go about it. And
after a few experiments, what I came up with is about as quick and dirty it gets. I take a given piece of track (with its joiners removed) and apply a liberal
coating of brown paint from a spraycan. I then sprinkle on a layer of ballast while the paint is still wet (being sure to run a fingertip along the tops of the
rails to clean the crud off). I then use a small paintbrush to clear the ballast off the ties. The end result, though not perfect, is quite serviceable -
The only problem with this method is that the ballast does like to climb up the sides of the rails. But since there's no glue involved (per se) it's simple
enough to clear away unwanted ballast with a small flat screwdriver.
The very last step is to use said screwdriver to scrape the paint off the ends of the rails (where the joiners slide on) and then put the joiners back. It
would be nice to paint the plastic joiners right along with the track, but since I don't want to risk screwing up conductivity, I just leave well enough alone there.
I may do some handbrush touch-up on them later on, but for now I'm not going to worry about it.
For ballast, I mixed up a variety of this'n'that from Arizona Rock & Mineral (mostly greys, but with a little pink and a little brown thrown in for good measure).
I don't know that I neccessarily captured what they're using down in Hope, but I guess it's close enough for my purposes.
I figure I can handle doing about 6-7 pieces of track a day, so this should take me quite a while. Which is actually just fine by me - it's a nicely mindless
task and I really don't feel like I'm in the mood to dive back into scratchbuilding anytime soon.
04/27/18 - Finished with the ballast
About halfway through this project I decided to go back and start touching up all of those unpainted plastic rail joiners. Unfortunately, I didn't really like the
way they were turning out (not really blending in with the ballasted roadbed). So, for the rest of the mains, I just went ahead and painted/ballasted the joiners
right along with the track. Fortunately, this didn't result in any calamities (vis'a'vis electrical conductivity), so whew.
That said, I did remain cautious with the turnouts and crossovers. For those, I put masking tape over all of the actual track and limited my spraypaint and
ballast to the roadbed portions of the Unitrack. Then, to finish things off, I carefully brushed paint between the rails and sprinkled on just enough ballast to
get the right look. And fortunately, this worked out very well - no sticky switches.
At this point I'd like to get the track glued down. However, there are quite a few moving parts involved here, and it looks like other projects
are going to have to happen first. For starters, I think I need to get some sort of base layer of turf/dirt put down before I lock the track down permanantly
(since I don't really want to be raining that stuff on top of the track later on). The track for the SunRich sidings is a special situation unto itself (being
basically buried in dirt that needs to match whatever I use for the rest of the scene). And then there's the Waseca yard tracks, where I will need to not only
bury the track in dirt, but also conceal the roadbed.
So basically, dirt is next up on the menu. But, oh swell, it turns out that the company that makes the dirt I've been using so far (Highball Products) went out of
business a while ago and their products are long gone. And although I still have a fair amount of their "Regular Dark Brown Earth" product on hand, it's
not going to be anywhere near enough to do SunRich and Waseca. So, at this point I've ordered up a bit of "this and that" from Arizona Rock & Mineral to see if
any of it's going to be a "close enough" match to what I've already used on the storage bunker and the NH3 station. Failing that, I may look into
using some sort of dry paver sand. But anyway, we shall see what we shall see...
BTW, you may (or may not) have noticed that I am no longer on Facebook or Twitter. My apologies for any inconvenience that this may cause, but I just don't
feel like I want to be involved with that sort of Big Social Media anymore (for reasons that should be obvious). I'll try to post links to new locomotive reviews
on nscale.net (as they become available), but as far as this blog goes, you'll just have to stop by every once in a while to see if there's anything new
happening. There won't be any announcements anywhere else.