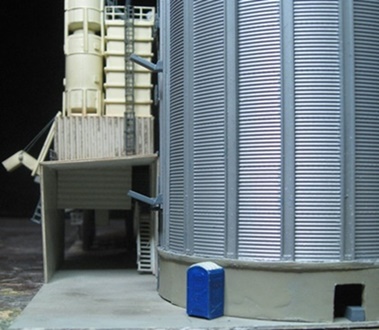
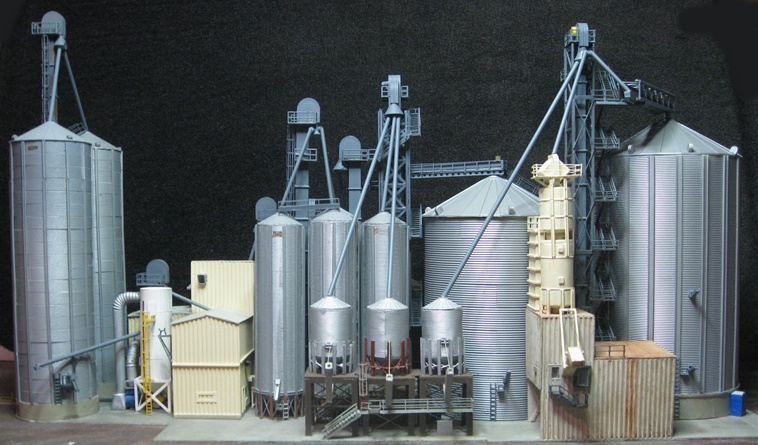
01/22/16 - Finished three of the South Elevator elevated hopper bins
Well, it took the better part of eight months, but I finally finished the first set of these little SOB's -
When I put together the basic bin guts (wood dowels, Campbell aluminum siding, resin tops and bottoms) last May, I figured finishing things up was going to be a pretty simple task. Of course, it hadn't really dawned on me that each bin (along with its little platform) was going to be comprised of 70+ individual parts! And, my oh my, all of those legs... I tell ya, getting everything to be the same length, symmetrical, equally spaced and then have the bins actually stand up straight was not a task that I would remotely qualify as fun. As scratchbuilding tasks go, I'd definitely rank this project right up there with the toughest I've ever attempted (which is kind of surprising, because it sure didn't seem like that was going to be the case going in).
It certainly didn't help matters that there are so many different colors of paint involved. I mean, the bins couldn't have been all silver?? No, some had to have rust colored legs. And then of course, the platforms were brown, the catwalk and stairway were gray, the ladder was maroon, yadda, yadda, yadda. Basically lots and lots of little paint projects (followed by painful "assemble the painted" parts fun and games).


Of course, given my ongoing issues vis'a'vis estimating heights, I had my usual travails making the trackside spouts. Fortunately, I was kind of half expecting this to be an issue again, so I just went with the flow and positioned the spouts such that they at least wouldn't interfere with the adjacent grain cars. No, if actually lowered, they won't wind up anywhere near where they would need to be to actually put grain into a hopper. But oh well, so it goes. They're solidly glued in place, so nobody's going to be moving them anyway.
That said, I did find myself a little bit of extra vertical space by replacing the adjacent Unitrack siding with some Atlas Code-55 track. The plan all along has been to eventually replace all of that elevator track with non-roadbed track, but up to now there hasn't been any pressing need to do so. However, now that that genie is out of the bottle, I suppose I should go ahead and do the rest of it (that is, if one can actually buy Atlas C55 these days).

Since there's a bit of interconnectivity between the three bins (vis'a'vis the catwalk and whatnot), I decided to glue everything onto a thin sheet of styrene for stability. Hopefully I won't regret that decision later on... Also, I did wind up leaving off a few of the smaller details (hey, at 70 parts per bin, enough is enough). However, I did go ahead and add the little drawbridge off of the catwalk. As pictured above, it wound up woefully low, so there's no way it's going to provide access to the top of a railcar. But too bad, I still think it looks cool.

So, that's that. Now on to the last three bins (hurray, no catwalks and no spouts!)

02/03/16 - Finished a foobie version of the Bass House
Although I'm nearly finished with the last set of elevated bins, I had to put that project temporarily on hold when I ran out of GMM industrial walkway (yes, in examining my scouting photos, it turns out that there were indeed some hidden away on the back side). Fortunately, my new Cornerstone "Ranch House" kit arrived in the interim, so I was able finish up that quickie project instead -

It's a nifty little kit with some nice detailing (and at $19, reasonably priced as well). I particularly like the little paper window inserts for blinds and drapes - something every house kit should include!
For the garage, I went with an Atlas "Barb's Bungalow Garage" laser-cut wood kit. Like their other garage kit ("Kate's Colonial Garage"), you get two complete garages with the package. And I did briefly consider bashing the two together to make a double garage (ala the prototype), but ultimately decided that scratchbuilding a custom ranchhouse-style roof for that was going to be too much of a PITA. So, sorry Basses, just one car for you.
I couldn't find any spraypaint at my LHS that quite matched the carmel color of the Walthers kit, so I just winged it (wung it?) with a can of Tamiya "Light Sand". As for the shingles, that turned out to be something of a disaster. The instructions suggest that you can change their color using weathering chalk, which I took to mean that I could accomplish the same goal using Bragdon powder. Unfortunately (and I think I already knew this), Bragdon and paper don't really get along and I basically just made a big mess of everything. But rather than starting over, I just painted over the whole fiasco with brown paint. So, oops, adios shingles.
Meanwhile, here's hoping Mr Postman shows up with my walkways and I can get on with finishing up the bins.
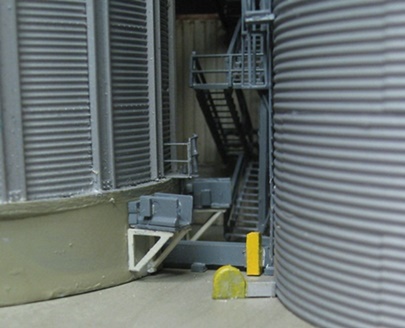
02/19/16 - Finished the South Elevator elevated hopper bins
Hallelujah, the bins are done!
Pretty much the same deal here as the last time (excepting no spouts, yay). I did decide to use some Bragdon powder to fade the paint on the platforms
this time around (and now I wish I'd done the same on the other three - it looks much better). Also, these particular bins had a couple of graphics (Behlen and
MFS), so I printed up and applied appropriate decals for those.
I'm not sure what the thingamajig is on the left platform, but I went ahead and added one anyway. Funny thing is, it doesn't appear to be connected
to anything. Maybe something leftover from a previous configuration?
I didn't have any particularly good pictures showing me what's going on on the back side, but as near as I can tell it looks something like this.
And once again, major kudos to GMM for their brass walkways and ladders. A major PITA to work with, but they sure do look nice -
So whew, that's it as far as all of the major pieces of this puzzle are concerned. Now I can finally start detailing everything and getting it all
glued down to a base.
And since things have gotten perilously close to the edge of the layout, I think I'm also going to have to add a little bit more foam to the base
down in that corner.
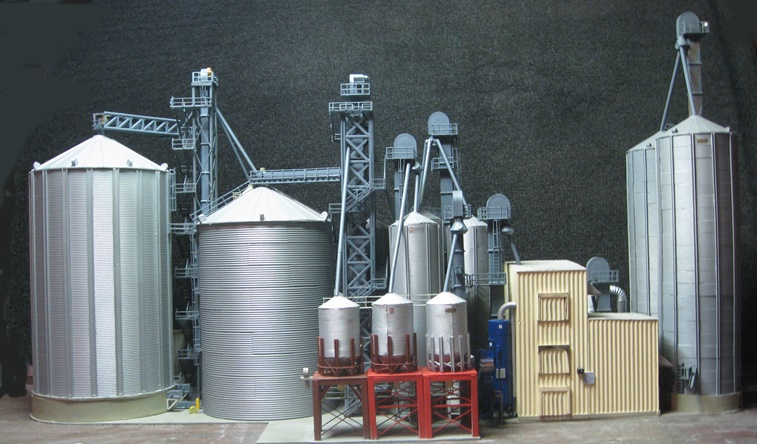
And so, we press on. My gosh, what a project this elevator complex has been so far - I think I've built entire layouts in less time!
02/21/16 - Replaced some track
Replacing the Unitrack on my SunRich siding with Atlas C55 didn't turn out quite the way I was hoping it would. Kato does make a "transition"
piece, but Code 80 (or whatever Unitrack is) to Code 55 is not a smooth transition (you wind up with speedbump). And although I probably could've
solved that with a file, the larger problem is that my LHS still hasn't restocked their selection of Atlas 55. So, for expediency's sake, I just went with
Atlas Code 80 instead -
I may revisit this later on, but for now the Code 80 will work fine as a placeholder. And should I wind up keeping it, I'm really not too
concerned about the look (since everything below the rails will be almost entirely concealed anyway). Vis -
03/13/16 - Whipped up an ersatz C&NW Minnesota 400
It's funny how modeling projects sometimes come and find you (instead of the other way around). If you may recall, a couple of years back
I pretty much mothballed the idea of modeling the C&NW's steam-pulled "Minnesota 400" heavyweight passenger train due to a lack of appropriate
motive power (opting instead to model the C&NW's "Dakota 400" streamlined passenger train). OK, no problem. But then "stuff" happened...
Y'see, during the course of dismantling (for review purposes) my new DCC-Sound MRC/Ajin 4-6-2, I somehow managed to screw up some of the wheel-wipers on the left
side of locomotive (the ones that contact the forward driver and the rear pilot wheel). Not surprisingly, this really degraded its performance (with lots of
stuttering and stalling suddenly entering the equation). Trouble is, I never did have any use for it to begin with, so the plan was to simply sell it once
I'd finished my review. But now that it was no longer "like new", I figured I'd likely be taking it in the financial shorts were I to try to
sell it. So... hmmm... what to do?
Well, I'd already done CRI&P and M&StL Pacifics, so I figured, what the heck, let's make it a C&NW. And then, since I already had a number of MTL heavyweights
sitting around doing nothing, I figured why not put together a Minnesota 400 consist at the same time? OK, AFAIK, the C&NW never used anything like a USRA
4-6-2 to pull the Minnesota 400, so the whole project was going to have to be a foobie right from the get-go. But, y'know, whatever.
My first job was to get the Pacific running properly again, and I accomplished this by removing the stock tender trucks (with their axle-wipers and
"half wheels live" pickup scheme) and then replacing them with low-friction / "all wheels live" Bachmann tender trucks. Then I stripped off the factory numbers and
graphics and replaced them with Microscale C&NW decals -
Now, I suppose if I ever wind up spending a bit too much time inhaling paint fumes, I could also use this abomination to pull my train around. Um, or maybe
not... At this point I'm not particularly proud of it, and although the C&NW eventually did use Class ES shrouded Pacifics to pull the Minnesota 400, it's
doubtful that they ever used any of their Class E-4 shrouded Hudsons (and even if they did, they certainly weren't re-purposed NYC J-3a's!)
Yet another "just so wrong" option would be my Model Power 4-4-0 (in lieu of a Class D 4-4-2). Just out of curiousity, does anybody out there have the over/under
on how many more decades it's going to be before somebody finally makes a nice/generic Atlantic in N scale? Helloooooo...? Bachmann...? Are you listening??
As far as head-end equipment goes, the few pictures I've seen of the early Minnesota 400 all show it with a combine up front. But hey, who's to say that they
never had call to stick a Baggage-Express car up front too? Nobody, that's who! So, mine starts with a Wheels of Time REA car (mainly 'cuz I already had
one all RTR in C&NW livery) -
As for combines, pretty much the only options out there in plastic-land are the old Lima/Model Power and Rivarossi cars. Unfortunately, neither of them
really look much like the combines that the C&NW used on the 400. Fortunately, I was able to score an old Pecos River Brass combine off of eBay. And although
based on an AT&SF prototype, the baggage and seating sections are at least similarly sized as compared to the C&NW's cars. In addition to adding paint and
decals, I also added couplers, window inserts, and some seats (scavenged from the wreckage of an old IMRC streamliner). Annoyingly enough, you can't access
the vestibule windows from inside the shell, so I had to use Krystal Kleer for those (no, I am not a fan of the stuff).
Due to the popularity of the train, the original 1936 allotment of two coaches was expanded in 1937. Now, I'm not sure exactly how many coaches were added,
but since I happened to have four cars on hand (one Bachmann and three MTL), it should come as no surprise that I'm saying they added two cars (for a total of
four). Note that it was after this expansion of the consist that the old Atlantics were replaced by Pacifics.
The Bachmann coach (left over from a Doodlebug project of yore) more closely resembles a C&NW prototype than do the MTL cars. But,
they're also stupid expensive if you want to acquire them ala carte, so I decided to just go with what I had on hand.
In addition to the combine and the two coaches, the original 1936 consist also included a cafe-lounge. And when the consist was expanded in 1937, a full parlor
was also added. So, to round out my train I added a Rivarossi dining car and a Micro-Trains parlor -
So, there ya go. Not exactly a project that I was looking to get into right now, but it is kind of nice to now have heavyweight trains for all three of my steam era
railroads. Maybe next I should try turning an old Rivarossi 4-6-2 into an Atlantic? That would pretty much guarantee that someone comes out with
a nice RTR 4-4-2, right?
03/31/16 - Finished up a foobie stand-in for the Viegut House
I decided to try out a "Paw of a Bear" laser-cut wood kit for this one (their "Ranch House #1"), and I guess I'd have to rate it "just OK".
Unlike most everybody else, POAB doesn't use adhesive-backed parts for the window, door, frame and trim detailing (IE, more opportunities for gluing disasters).
Also, I found the fit on the doors and windows to be a bit tight and, as a consequence, a lot of them wound up looking a bit smooshed and crooked.
Making matters worse, I didn't realize that this kit is available in two different versions - "garage on the left" and "garage on the right". And having
a 50-50 chance of ordering the wrong one, quite naturally I ordered the wrong one. So, the whole thing turned into a bit of a kitbash as I had to rejigger it
to have a right-side garage (ala the prototype).
I did add some extra prototypical detailing (entry landing, flagpole, shutters, flower boxes, gutters, downspouts, mast antenna, etc) to make it a bit more
interesting (and distract attention away from my sloppy assembly job). I then finished things up by adding yet another Atlas "Kate's Colonial" garage. And I sure
do wish there were other more appropriate garage options out there, but oh well. I guess I'll probably have to resort to scratchbuilding on the next one.
I think one more house ought to about do it for this side of the street. And after that, I suppose I'll have to finally get started on detailing the south
elevator (yikes).
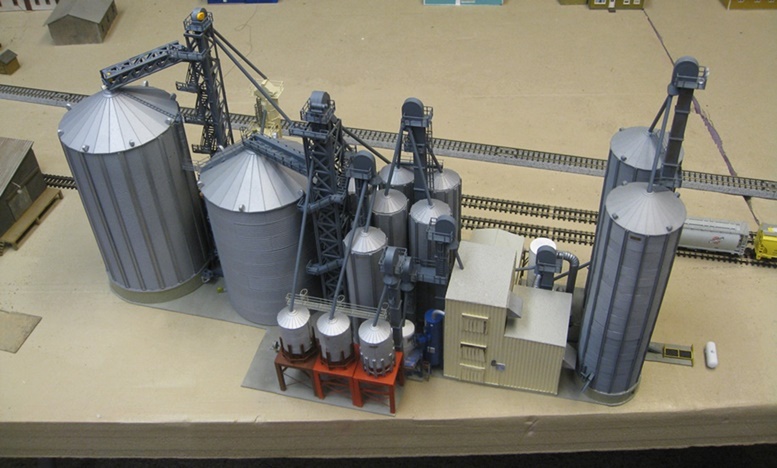
04/16/16 - A good start on detailing the South Elevator
I must say, this business of spending years modeling the same grain facility has definitely revealed a hitherto unknown pitfall of prototype
modeling - namely, the fact that the world keeps changing! As mentioned previously, I've taken literally hundreds of photographs of the SunRich complex over
the years (scattered over a dozen different trips), and every time I start going through them looking for details to model, I am inevitably surprised
by just how much this stuff is constantly changing. Seriously, when you're looking at pictures of a complicated morasse of elevator legs and
grain pipes and they're different in every single picture... ugh. Suffice it to say, I have to keep a lot of aspirin handy.
Case in point - I was using Google Earth to check out the positioning of some of the southside elevator bins and... wait, what?? A whole new big bin???
Are you kidding me?!?
Well, nice try SunRich, but I'm not biting. As far as I'm concerned, the clock stopped in 2015 and that stoopid bin is just an optical illusion!
Anyway, as I started in on finishing up this facility, my first job was to fashion a styrene base to hold everything together (painted concrete
gray and weathered with Bragdon powder). After that, it was time to start applying all of the little details that I've been putting off forever. And to
the end, I started with the tall bins on the south end of the complex -
For the bins themselves, I added the requisite chutes, ladders, and augers -
Up top, I added "MFS" decals, vents and walkways -
I built the elevator leg using parts from the various Rix grain elevator kits that I'd purchased way back in my "bin building" days. And although not exactly
the correct style (one large enclosure as opposed to two smaller enclosures), I figured it was close enough for my purposes (especially since I already had
all of the parts on hand). And no, I didn't even try to replicate all of the fine details. I mean, come on. At this point, I figure things will work out just
fine if I model all of the big stuff and just enough of the little stuff to capture the basic feel of the place. So, basically I added the safety ladders,
platforms, microwave dishes and a bit of rust and then called it a day.
Putting the finishing touches on this end of the facility, I also went ahead and added the truck dumping station -
Next up, all of the crazy stuff on the other side of the bins. And to that end, I started off by adding another (much smaller) leg. This one is
a bit of a mystery (IE really hard to get good pictures of), but I'm pretty sure there are two chutes coming out of it - one going to the roof of the
adjacent building and another one running over to trackside bin (next to its chute).
That was easy, right? Yeah, but now comes the "fun" part. I mean jeesh, talk about your plates of spaghetti!
This was definitely another one of those instances where you bite the bullet and just try to get enough of the small stuff in there to capture the essence
of the scene -
I built the large tank using Cornerstone Modulars (although since they don't provide any pointy bottoms, I had to cast that myself). As for all of the
furshlugginer ductwork, my bright idea there was to use bendy straws (hey, they're cheap and easy).
Last (and least), I added this "soon to be completely invisible" cyclone vent to the far side of the building. A total waste of time for sure, but I happened
to have the perfect parts laying around (Cornerstone Modulars yet again), so I couldn't resist.
So, that was fun. Now I suppose it's time to get all of those hopper bins (that I slaved over for so long) glued down and connected up to something.
05/02/16 - Continuing on with South Elevator detailing
As threatened, I went ahead and got most of the hopper bins detailed and glued into place. I also added a staircase and walkway to the trackside office and
then got that and the trackside bins glued down -
Next up, the other side and all of this crazy stuff next to the conditioning plant (and you're just going to have to take my word for it that I got the
detailing more or less right - it's very cramped back there and getting good photos of what's going on is pretty difficult) -
So anyway, first up - a couple more Rix elevator legs -
Next, another bin, a dispensing chute and then whatever the heck that blue tank thingy is -
Then another elevator leg -
Aaaaaand we wind up here -
So, here's where things stand so far -
I guess now it's time to start thinking about how I'm going to do all this crazy crap -
...not to mention all this crazy crap -
Ugh... now where did I put that giant bottle of aspirin? 05/14/16 - More South Elevator detailing
Adding the three main elevator legs to the central section of the complex turned out to be a major exercise in "fudging it". First off, the prototypes are
super complex (and at the same time, somewhat difficult to photograph), so right from the get-go it was pretty hard to figure out just what all was going on
up there. Secondly, my assorted bins didn't really wind up in the same relative positions (or the same heights) as the SunRich bins, so there were a few
instances where I simply wasn't able to connect the correct leg to the correct bin. But, y'know, you do what you can.
My first job was to build the main leg (along with its accompanying scaffolding and stairways) -
Since the prototype is super huge, I decided to use two Rix legs for the model (along with some fantasy-land detailing up on top). As for the
scaffolding, I went with Plastruct "truss" sections to save a bit of time (as opposed to scratchbuilding the whole thing myself). Unfortunately,
the cross members are a bit coarser than I would have preferred (as compared to the prototype), so the legs wound up being basically invisible inside
them. The Grandt Line stairs and railings that I used were also a tich bigger than they needed to be, making the overall structure somewhat larger
than I'd planned on (vis'a'vis the provided space). But despite the nitpicking, I think the whole thing turned out pretty decent looking overall.
Next up, I built the two secondary legs (also Rix). And since the one that I can actually see the bottom of has a light gray base and some faded
blue paint above that, I painted mine to match. Oh yeah, and if you're wondering what I did about all the ground level detailing (the stuff that
connects to the pointy bottoms of the hopper bins)? Ummm... no, nothing. In my defense, I did plan on at least attempting some of it. But honestly,
I just can't make any of it out in my photographs. So, off to the land of "out of sight, out of mind" it went.
So, as noted above, lots of liberties were taken. But, at the end of the day I think I wound up with at least a decent impression of the overall "rat's nest" nature
of the scene -
I must say, I really got the heights wrong on those elevated hopper bins. Now that I look at some of these "taken from half a mile away" photos, I see that I could
have easily gone another inch or two taller with them. Dang.
But anyway, good progress there. A little bit of detailing on the fat bins, one more big leg, and I think I'm done!
05/23/16 - Finished the South Elevator
Holy Hannah, it's done! First step was detailing the shorter of the two fat bins (IE, adding ladders, safety cages, platforms, walkways, vents, a dispensor spout,
and a loading conveyor). Then I had to spend a good long time building yet another gigantic tower/stairway/leg monstrousity -
Trackside detailing -
And yes, you can put your hands down if you're wondering just how that big conveyor actually gets grain into the bin - my scouting photos don't really give any clear
indication as far as how it connects to the leg, so I just foobed it up against the tower and called it good enough -
Next up, detailing the big bin (dispensing spouts and associated ladder/platform, a biffy and an auger) -
And then all of this jazz (blowers, auger, access panel platform, etc) -
And then more walkways/platforms, another ladder/safety cage and another conveyor -
Once again I basically fudged how the conveyor connects to the tower, but y'know, so it goes -
So, that's that. And it "only" took me three years Well, almost "that" anyway. As feared, the whole thing is damned near ready to fall off the edge of the layout. So, it looks like I'm going to have to add a bit
more foam base down in that corner.
But before I get on with all that, I have more "new stuff" to address - namely, the recently added "fall arrest" structure that I discovered on my most
recent scouting expedition. I tell ya, I can't take my eyes off these guys for a second!
05/26/16 - Finished the South Elevator "fall arrest" structure
Due to bit of good fortune, this project wound up being pretty simple. As you may or may not recall, way back in 2010 (has it really been that
long??) I built some tall vertical supports for the North Elevator conveyor using Traincat etched brass "radio towers". Vis -
So, back when I started on the South Elevator project I dredged up all of my various etched brass details (ladders, walkways and a couple of leftover radio
tower sections) on the off chance that I might need them. And although I didn't wind up having any use for the radio tower sections on the actual elevator, when it
came time to build this fall arrest thingy said triangular towers turned out to be just what the doctor ordered. And it's darned lucky that I had them sitting there
staring me in the face, because I seriously doubt I would've remembered them from six years ago!
With the towers providing most of the meat of the structure, all I had to do to finish things off was use some Plastruct square rod (2.5mm) to make the
support arms. As for the hooks, I did spend a bit of time Googling around for something suitable. But not finding anything that looked particularly promising
(and lacking any sort of patience), I just made mine out of skinny Plastruct rod (bent into hook shapes) -
Since this thing obviously can't stand up on its own, I glued the legs to a skinny strip of styrene and then drilled a hole through that so I can use a nail
to hold the whole thing in place (no, I'm still not ready to permanantize things by gluing stuff down to the base) -
On a semi-related note, I rejiggered the track leading up to the South Elevator sidings by swapping the straight and curved sections leading into the turnout.
This moved the sidings closer to the main and allowed me to slide the whole elevator complex further south (down where it belongs). It's still very close to the
edge of the layout and I may ultimately decide to tack on a bit of extra foam base in that corner. But since that's my "duckunder" area, I'm pretty certain that
I'd wind up spending the rest of my life bashing my head into it (thus sending shockwaves through Hope and freaking out the local citizenry). So, I dunno,
we'll see how I feel about it when I get into the scenery and layout detailing stage of things.
I seem to be on a roll with SunRich these days, so I should probably finish up the last couple of small projects I have remaining there (storage tanks and whatnot).
Frankly, anything that leaves this AYA mess on the backburner for a while sounds like the path of least resistance...
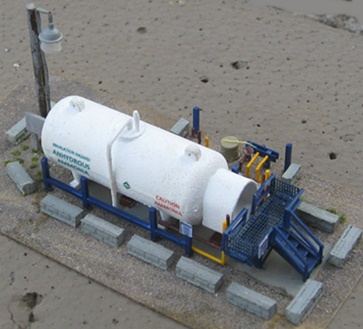
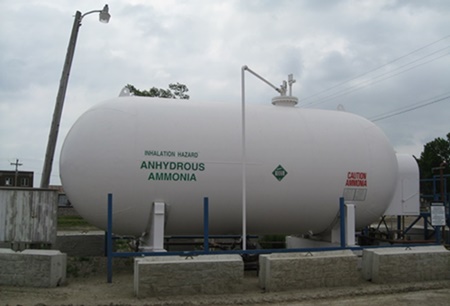
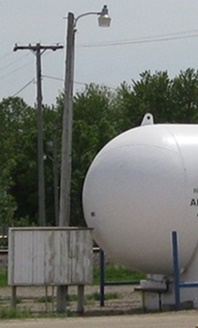
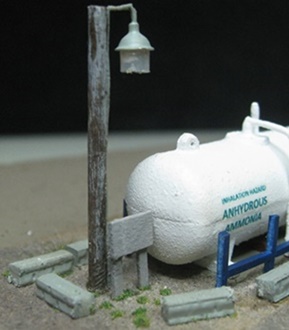
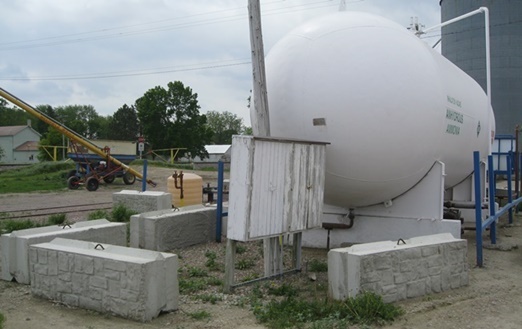
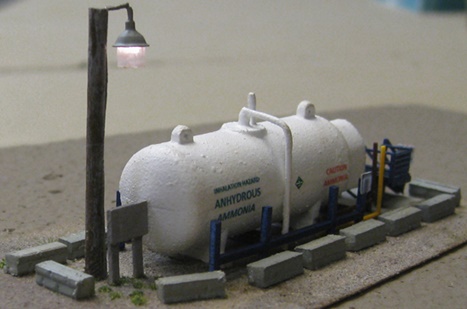
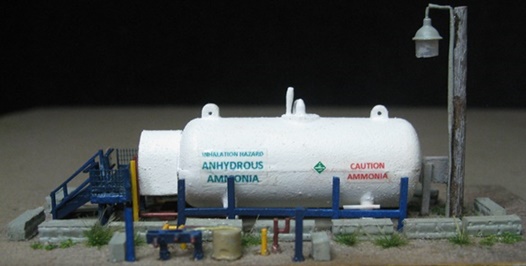
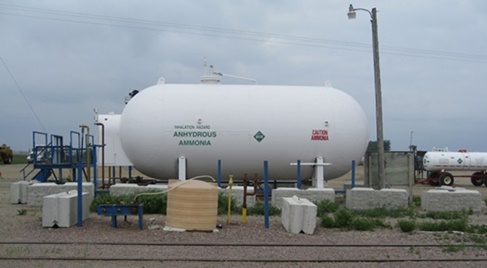
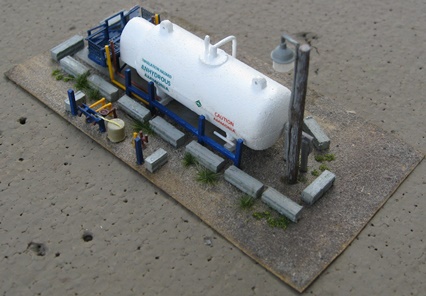
06/11/16 - Finished the SunRich NH3 storage tank
Whenever I start in on one of these "small" projects, I always delude myself into thinking it's going to be quick and easy - mainly 'cuz I generally forget that
even though the structure may be small, it still has a jillion parts (all of which are damned near microscopic). Case in point -
For this one, I started out with the tank itself (scavenged from an old saw mill kit that I'd purchased years ago and never used). Unfortunately, my white
spraypaint can went a bit fluffy on me so I didn't quite wind up with the smooth surface that I would have preferred. Ah well, what can I say? You live by the can and
you die by the can, but it still beats pulling out the damned airbrush all the time.
As usual, I did my best to approximate some of the small detailing (styrene pipes and valves and whatnot) without going full-on overboard with it. IE, no peeking
underneath the tank to see what exactly those pipes are connected up to, OK?
Apart from the diamond-shaped Microscale decals, I printed out all the rest of the various graphics on my laser printer. And although it would've been nice to
get them a bit smaller, when you're talking about two and three point fonts you eventually have to make some sacrifices to the gods of readability. As is, my tiny
little safety signs (shrunk down from proto photos) aren't much more than impressionistic blobs of text.
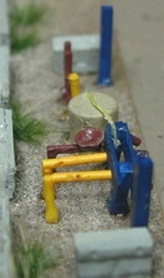
Speaking of "jillions of parts", I'm pretty sure that that blue platform wound up taking about a half-a-jillion all by itself. Yikes!
I made the little "box thingy" and light pole out of wood (colored with Bragdon gray). The concrete safety barriers are a recent addition ('cuz, y'know,
they can't stop changing things down there), so I went ahead and added those too (thin pieces of Plastruct brick glued to Plastruct square rod).
I made the light fixture using a Miniatronics "Lamp Shade With Bulb" (augmented with a frosty piece of Plastruct styrene tube). And as in the past, I made the
"arm" by simply stiffening up the wires with CA and then bending them into the desired shape. And yes, it actually lights up I really started driving myself nuts attempting to model all of the tiny crap on the east side of the tank (eventually reaching the absolute limit of
my skills as far as wrangling tiny little parts goes).
Somewhere along the line I came to the realization that I was trying to fabricate stuff that's not much bigger than a human hand and finally said "OK, enough is
enough" and called it a day. I mean seriously, sometimes I get so wrapped up in what I'm doing that I just lose all perspective... Since most of this stuff is just sitting on the ground, I decided to go ahead and glue everything down to a thin sheet of styrene and then make a little
diorama out of the scene (complete with Highball dirt and assorted weeds). It's been years since I've been able to do much in the way of scenery, so it's nice
to be able to mess around with it every once in a while.
So, that's that. Now I just need to finish off the rest of the station (oh yay, more platforms) -
06/17/16 - More SunRich storage tanks
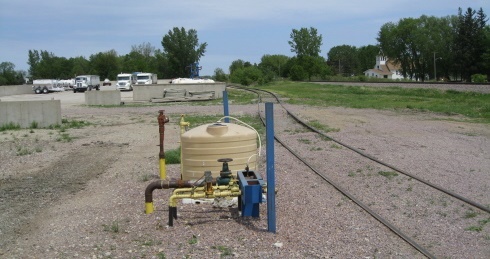
Up to now, I've been operating under the delusion that these were some sort of fuel tanks (what with them being connected to the Machine Shop and all). However,
after Googling the markings on the sides ("10-34-0" and "28-0-0"), it turns out that they actually contain a couple of different flavors of Nitrogen-based fertilizer.
So, that was my "learn something new every day" moment for this project. Of course, at my age learning something new generally means that I also forget something
old in the process. So, here's hoping I still remember how to brush my teeth this morning!
Not a great deal to report here. Basically I took some Cornerstone Modular storage tanks, added a few details, and then glued them down
inside of a styrene bunker -
Detailing-wise, there's quite a bit more going on behind the bunker than what I've modeled so far. However, I think I'm going to hold off on all that until I'm
more into the "gluing stuff to the base" stage of scenery.
Meanwhile, back to the NH3 platforms. Whee.
08/13/16 - Finished the first of two SunRich Grain Bunkers
During the warm weather months, SunRich's two grain bunkers are generally used for equipment storage (grain trucks, NH3 trailers, dry fertilizer spreaders,
augers, etc). To wit -
OK, all very well and good. But this particular bunker is f'n gigantic (my model wound up being 18" x 6"), so modeling it in warm weather mode was going to
require acquiring (and assembling... and painting... and decaling...) a whole lot of very expensive farm equipment in order to fill it up.
Well, "thanks but no thanks", I thought to myself. Instead, I decided to cheat a bit and model it in fall/winter mode (IE filled up with corn). Vis -
The bunker itself was a pretty straightforward scratchbuild (styrene base and walls painted gray and then weathered with Bragdon powder). And so, with the
basic structure assembled, I figured I was ready to move on. But then I noticed all of this craziness (ventilation holes, electrical boxes, wiring, blower
fans, etc) on the eastern wall. I mean, yikes, who knew grain bunkers were so complicated?
So anyway, I went ahead and added all of that (or at least a pared down version of it) -
And so, with the bunker proper finished, I next moved on to the corn. And since it's basically a mountain, I set about building it like I would any
other mountain. IE, start off with a big chunk of pink foam -
Next, I pulled out my WS "hot knife" and cut/melted the foam block into a more mountain-like shape -
Next, I cut out a paper template (sized to fit inside the bunker) and glued my nascent mountain to that. Then I laid on strips of WS plaster cloth in order to
get a properly sized/shaped mountain -
Now, since plaster cloth doesn't look anything like corn, my next step was to put on some sort of corn-esque finishing layer. And although I could've just
applied a smooth layer of plaster (which, scale-wise, probably would've been more realistic), I decided instead to go with WS fine turf for a more textured look.
But before I got on with all that, I first applied a coat of WS "yellow ocher" pigment to the plaster (which, fondly enough, turned out to be an almost perfect
match for the corn in my prototype photo) -
To get the turf to stick in place, I probably should've applied it before that first coating of pigment had dried. But it didn't occur to me to do so (doy), so I
sprayed on a second layer (using my airbrush) and then sprinkled the turf on top of that. Once the turf was firmly dried in place, I then made a couple of more
passes with my airbrush to get a uniform color (out of the bag, the turf isn't quite the same color as the yellow ocher pigment).
Lastly, I placed the mountain inside the bunker and then filled in all the little nooks and crannies along the edges with turf. And to get all of that to stay
put, I gave it the old roadbed ballast treatment (IE "wet water" and WS Scenic Cement applied with an eye-dropper). Unfortunately, at that point I couldn't use my
airbrush to color the new turf (not without getting the pigment all over my concrete anyway). So, I instead mixed up a diluted batch of pigment and then applied it
with an eye-dropper. And... finito!
Fortunately, the other bunker is maybe a third the size of this one, so I think I will actually use that one for equipment storage when I build it. And
the good news there is that I've managed to scrounge up some pretty cool ag stuff on Shapeways recently that should fill the bill quite nicely.
08/28/16 - Ever had one of those days? I tell ya, some days it just doesn't pay to get out of bed! Here I had just finished my foobie version of the "Hruby" house (a "Hruby Foobie", if you will)
and was getting ready to write my blog entry for it. But then, when I put my model and proto photos side-by-side I decided that I didn't like that unpainted
frame on the front door (since getting the paint and detailing right are pretty much the only arrows in my quiver when it comes to making these house foobies
look at least a little bit like the real thing).
Now, the reason I'd left it unpainted in the first place was because Walthers (in their finite wisdom) made the door frame part of the door itself - an annoyingly
cheap short-cut on their otherwise fine "Cape Cod House" kit. Well, given my handbrushing "skills", I really didn't have much faith in my ability to paint it without
making a big mess. And I guess I should've went with my gut, because once I dove back in I eventually did wind up making a big mess of it - to the point
that I finally had to try to remove the glued-in door in order to fix everything. And, well... one thing led to another, and I eventually wound up here (the
modeling version of a "rage quit") -
I have to say, crushing that diabolical little SOB into smithereens was actually quite satisfying. But of course, the downside is that I now have to build
another one (all the while gritting my teeth and chanting "model railroading is fun", "model railroading is fun", "model railroading is fun"...)
09/04/16 - Finished the Hruby House (again)
As you can see, I did get the front door frame properly painted this time around. And thanks to the lessons learned on my first go-round, there weren't any
other unpleasant "incidents" to report -
I have to say, this Walthers "Cape Cod House" is a pretty nifty little kit. I love the fact that multiple roof sections are included (allowing one to go with
two small dormers, one big dormer, or no dormers at all). Similarly, there are two different front wall options with two different door/window arrangements.
Consequently, one could easily use this same kit to model an entire post-war suburban neighborhood (just, y'know, vary the paint and detailing). The extra wall
section is also handy fodder for filling in unwanted doors and windows (I changed the extra side door on my model to a window - ala the prototype). I guess my
only complaint is that Walthers didn't include any paper window inserts (drapes, blinds, whatever) like they did on their ranch house kit. Ah well, I guess you
can't have everything.
Apart from the door-to-window switch, there wasn't much else to do here besides putting it together (and then not destroying it). I did paint the foundation,
the roof, the chimney, the door and the windows. Fortunately, the stock wall coloring was already pretty close to the prototype, so I left that alone.
Additional details include a porchlight, a house number placard, window blinds, roof vents, and some electrical boxes and conduits.
The garage/workshop/mancave was a fairly straightforward scratchbuild (four walls, two roof pieces, five windows, and three different doors). I also added
corner molding accents and a yardlight. Tamiya "Mica Red" turned out to be a nice match for the "not quite rust / not quite red" paint on the prototype -
I think that about does it for houses on this side of the street. In fact, that's pretty close to wrapping up the houses entirely since I think one or two should
basically finish off the other side as well. Good progress this summer!
To be continued...