11/03/14 - Finally finished the South Elevator surge bins
Well, lots of stops and starts, but they're finally done -
Fabricating all of those little "X" supports out of .020 styrene rod was a task that I just couldn't seem to work up the enthusiasm for, but once I finally did get going it turned out to be pretty simple and I was able to finish everything up in about a week. The really tedious part was getting all of the legs trimmed such that the bins stand up straight. And although a couple of them do still have a bit of a "Leaning Tower of Pisa" look to them, the lower spouts were starting to get scarily close to the ground so I decided to just leave well enough alone for now. At this point, I figure I'll be able to address the slight tilts once I actually glue them down to the (eventual) base.
For paint, I just mixed up some medium gray with a bit of silver and applied it with my airbrush. And although I don't think I quite captured the look of galvenized steel, I guess I at least came close. And in light of that, I went ahead and sprayed the rest of the bins as well (I also brushed the bases with Floquil "Concrete"). And don't those big skinny Rix bins just look "wonderful"? I tell ya, getting all of those skinny litle friggin' rings to line up is tough!

So, hurray, that's it for the bins (at least for now). OK, I still have to do the six elevated "dispenser" bins, but screw 'em, they can wait.
What I really want to do now is build that conditioning plant. Frankly, I need something that's going to be a little less challenging, and
that thing looks like a nice, simple scratchbuild (for a change!)
11/05/14 - Paying Hope a visit
I decided to drive down and take a gander at Hope's new grain facility. And the good news (I guess) is that there's just no way in hell I'm
going to be able to model that thing. OMG, the place is freakin' huge! I mean seriously, it makes the main SunRich operation look like
a pile of tinkertoys by comparison. Hell, the large bins alone would need to be the size of gallon paint cans!
So, that decision made, I decided to drive around town and see what else the pesky Hopies have been getting up to in my absence.
And as usual, I discovered that what they've been doing is mucking around with my town and making all sorts of changes. To wit - the post office
has these new vent/weathervane thingies up on the roof, all of Hope Creamery's old broken windows have been covered over with sheet
metal, and the Straight River Inn has been renamed ("Spurgy's"). I tell ya, I can't take my eyes off these guys for a second!
Speaking of Spurgy's - I finally decided to stop in and sample their menu. And OMG, if you ever find yourself in the neighborhood, do yourself a favor
and go order the steak sandwich. It's to die for!
Check out this old thermometer that they have screwed to the wall by the front door. I think the next time I drive down there I'm going to offer
the guy a hundred bucks for it. How cool would that look in my train room??
So anyway, that's that. Back to the conditioning plant.
12/01/14 - A bit of resizing
Getting the relative heights correct on these very tall elevator buildings is turning out to be quite a challenge. Case in point, the
conditioning plant -
At first, I decided that the best way to figure the overall height would be to create the three sliding doors, position them on a sheet of styrene
(in the same relative positions as in the above picture), and then cut the wall out of the sheet. And so, that's what I did. Unfortunately, I was doing
all of this scratchfinagling in
a vacuum, and by the time I'd finished the basic structure (and placed it next to the bins), it became quite clear that I'd gone way too tall with the thing.
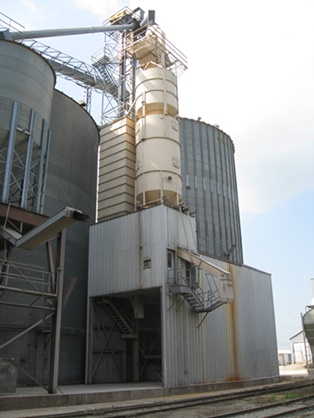
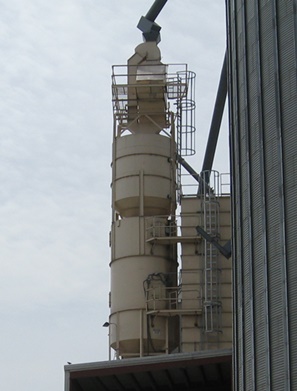
So, I went scrounging around through my hundreds of scouting photos and found one that pictured the whole place from about a half a mile
away -
Based on this very handy picture, I concluded that the plant needed to be about 2/3's the height of the surge bins and slightly under 1/2 the height
of the two tall bins on the south side. OK, great. But then, I took a closer look at my version of the two tall bins and realized that I'd gone way
too short with them. Ugh!
Well, you know me, I hate do-overs. But with this elevator complex ultimately destined to be the centerpiece of basically the whole layout, I
decided I just couldn't live with things being
so screwed up. So, I popped the lids off the bins and added three more rings to each of them (which also required extending all of the vertical ribs).
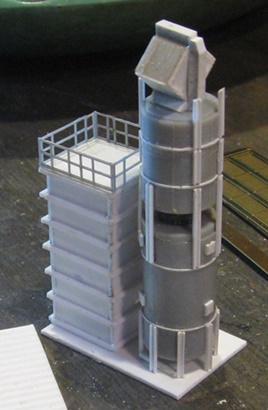
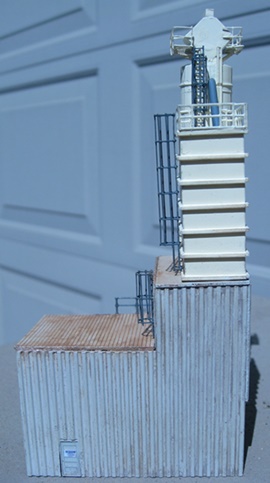
Then, I tore my nascent conditioning plant apart and made all of the walls about two inches shorter. And lo, I think we now have some pretty accurate
heights (well, close enough anyway) -
So, that's all straightened out. At this point, I figure about an hour to finish up the basic structure of the plant, and then, oh...
a year or two to finish all the external detailing? See ya then! 12/20/14 - Finished the South Elevator conditioning plant
Scratchbuilding-wise, nothing earthshatteringly innovative to report here. The main challenge was figuring out the relative sizes of all the
walls and how everything should fit together (since, scouting and photography-wise, much of the structure is basically inaccessible).
It's difficult to tell from satellite photos just what exactly is going on up on the roofs, but after a bit of informal forum polling I decided that
the flatish roofs are probably covered with light gray pea gravel (on top of tar), so I went with sandpaper there. Then, I simply used plain styrene for
the peaked roof. For paint I used Model Master "Light Ivory" for the walls, Tamiya "Light Grey" for the roofs, and Floquil "Concrete" for the foundation.
Detailing this thing turned out to be a somewhat confusing procedure. At this point I have around 30 photos of the prototype (taken over the course of three
different visits), and the detailing differs substantially from one set of photos to the next (IE, "where did that vent come from?" and "where did those
windows go??")
At the end of the day, I think I was able to match the detailing to my most recent photos (although since I haven't taken any actual new photos in over a
year, it's anybody's guess as to whether it matches the current state of the prototype). But as far as I'm concerned the clock has stopped, so go ahead SunRich,
change it all ya want. I'm done!
I was actually thinking of pressing on with some of the adjacent dryer detailing (tanks, legs, chutes, ductwork and whatnot), but I think I'd better finish the
other two "structures" that make up this complex first. That way I can get everything glued down to a base before I start delving into all the crazy spiderwebby stuff.
So, next up will be the little
trackside office thingy (a scratchbuild that I'm assuming will involve a couple of weeks of procrastinating and then about five minutes of actual modeling time).
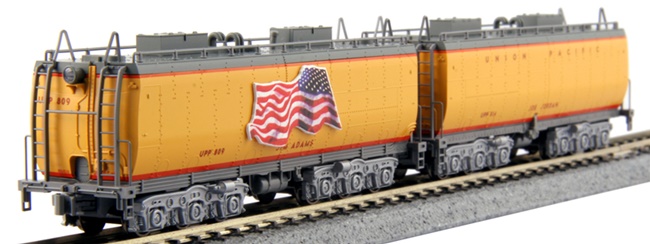
12/21/14 - UP excursion train update
I guess everybody knows by now that Kato did in fact come out with their own version of a UP excursion train (along with accompanying FEF 4-8-4 and
auxilliary water tender models). And I gotta say, as excursion trains go it's kind of a chintzy set (seven cars as compared to the thirteen car train that I modeled).
That said, I did decide to go ahead and pick up a set anyway. If nothing else, Kato's version of power car #207 is much more accurate than mine (correct
roof and underframe detailing, etc) -
Also, although their Kenefick business/obs car is not specifically correct for the consist that I modeled, it's certainly more correct for UP excursion trains
in general than the corrugated foobie that I was running -
The "post-rebuild" water tenders are (as one would expect) extremely well done and of much higher quality than my Shapeways models (sorry, James) -
I also kept the included Portland Rose coach and Columbine dome-coach cars. I then eBayed all the custom cars that I didn't need anymore (#207, Portland Rose,
Columbine, Business, and post-rebuild tenders). Additionally, I sold off the cars from the excursion set that I didn't have any use for (Dome-Diner,
10-6 Sleeper and Museum). And I'll tell ya what, I'm not too modest to admit that I wound up making a pretty penny off of the whole deal (while at the same time
netting a much nicer looking train My only real disappointment with the Kato set is that they didn't tool up a concessions car. Of all the custom cars in my original train, I'd say that that
model is easily the one of which I am least proud. Oh well, here's hoping that the original seven-car set flies off the shelves and that Kato then tools up a second
set that includes a quality version of Sherman Hill. Taking things a step further, my guess is that it would be ludicrously easy for them to tweak some of their
existing tooling in order to also include "new" Art Lockman and Howard Fogg cars. Then, toss in a few more coaches and I think you'd have
a very nice add-on set indeed. Of course, this is all predicated on how well the first set does, so we'll just have to wait and see...
12/26/14 - Finished the South Elevator trackside office
So, here ya go - a rundown tin shack. Um, yay? Yeah, OK, not much to get excited about here (other than the fact that it's done and I get to move on to more
interesting things).
As you can see, they once again went ahead and messed around with the detailing on me between trips (note the different doors). I opted for the older front
door since I liked the safety sign -
I'm pretty sure this thing started out its life with white walls, but I went ahead and sprayed mine with light gray just to get a headstart on the weathering.
I then finished things off with a lot of sloppy Bragdon gray on the walls and Bragdon rust on the roof -
Apart from the door I couldn't really tell (from my one and only picture) what else might be going on with the backside. So, I just put in a door and called
it a day -
So, that's that. And now for something quite a bit more interesting (drool, drool) -
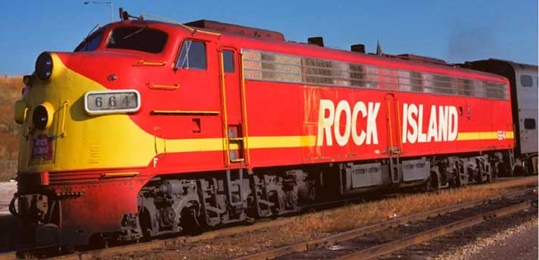
05/09/15 - Whipped up a Rock Island F7B
A way, way long time ago, Intermountain announced FP7 models in Rock Island passenger livery. Unfortunately, what they didn't announce at that
time were accompanying F7B units. Well, "this will not stand" was my reaction, and I sent them a bunch of photographs of F7B's in rocket-style
paint and begged them to do them. Well, much to my amazement, they actually did add them to their production schedule. Unfortunately, this was some weeks
(months?) after the original announcement and apparently they never did get enough pre-orders to justify actually making them. However, the good news is that they did
get enough orders for the A units (of which I purchased two). So, with those in hand, I decided to go ahead and paint up my own B unit -
As usual, color-matching the paint was quite a challenge. For the "aluminum" coloring, I mixed up a brew of Model Master white, gray and tan that turned out to
be a very close match for the IMRC paint. Next, I used some old tuscan paint for the fuel tank. And lastly, I mixed up various shades of Model Master reds and oranges
for the red stripes. And I guess that turned out OK enough, although I think I could've gone a little more orange with it.
Once I'd finished all the masking and painting, I was ready to rock and roll with the decals. Unfortunately, it turned out that the Microscale decal
set I'd planned on using (60-956, "Rock Island E & F Units Rocket Scheme") was all wrong for my purposes. Apparently said set is for an earlier
Rocket scheme as all of the little stripes are silver (as opposed to the black and white striping on this later scheme). So, at the end of the day
about all I could use from that set were the black letters for the sides and the white numbers for the ends.
For the striping, I pretty much had to make things up as I went along. On the triple set of white stripes in the center, I went with the skinniest set
of generic white stripes I could find from Microscale (1/64"). And although 1/64" sounds pretty darned skinny, I could've actually used something even skinnier.
But frankly, the idea of browsing through Microscale's hundreds and hundreds of road-specific decal sets in order to find something better just didn't
sound like much fun, so I went with what I had.
As for the super skinny black stripes, there's just no way 1/64" was going to fly. Fortunately, after 15+ years in this hobby I've amassed quite
the collection of partially used decal sets, and I eventually found some perfectly sized black stripes in an old C&NW set (60-51). The only tricky
part there was making the curvy parts - something I accomplished by simply drowning the stripes in Solvaset and then bending them into shape with
a toothpick before they got too gloopy.
So, that's that. Now it's back to work on that elaborate dumping shed. Believe it or not, I've actually made some good progress on it, but I kind of got
sidetracked by hockey season (you know me, just one obsession at a time over here). But with my beloved Wild now out of the playoffs, it's time to get back to
work on my layout.
05/20/15 - Finished the south elevator dumping/dispensing shed
As you may have noticed by now, I tend to follow a "straight line" design and construction strategy when it comes to my scratchbuilds. IE, pick a "Point A" to
start at, move on to "point B" when that's done, and then hope like hell that everything comes together by the time I get to "Point Z". What can I
say? It's just the way my brain works. Unfortunately, this somewhat blindered strategy tends to get me into trouble more often than not (and as you've probably
surmised by now, it certainly got me into trouble here).
For "Point A" on this project, I decided to start with the elaborate tanks up on top (figuring that whatever I came up with there was going to
determine the relative sizes of everything else). And with my options being somewhat limited, I decided that using Walthers modular storage tanks
was going to be the path of least resistance. Fortunately, the sizes and shapes worked out pretty good and I was able to put something together that
(at the time) seemed about right.
Once I had the two tanks I needed, I then went ahead and added the various structural supports and hatches and whatnot (believe it or not, the little
round seperator between the two tanks is a rubber tire from an HO scale Humvee that I happened to have laying around). With that all finished, I then moved on to
the walls and roofs. And with my recent struggles vis'a'vis the relative heights of the surrounding bins firmly in mind, I made sure that the tip-top of the
assembled structure was going to be the same height as the base of the tallest bin's cone. EG -
Basically, I measured the height of the tanks, the height of the adjacent bin, and then calculated that the walls needed to be "X" tall.
And so, armed with that number (whatever it was), I then cut walls out of ribbed styrene sheet in
sizes and shapes that more or less matched the shapes and relative proportions of the prototypical walls. I based the depth of the upper roof on the sizes and
positioning of the detailing (door, bay window and spout) situated in the middle of the tall section of the wall (hey, it all seemed like a good idea at the time).
With the top roof section now in hand, I then built the accompanying "ribbed box" that stands next to the tanks (matching its depth to the diameter of the tanks,
and its width to fill up the remaining space between the tanks and the edge of the roof) -
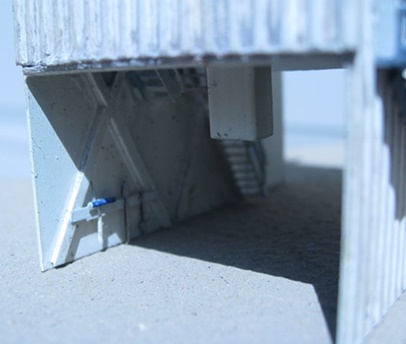
Next up, I punched out openings for the two doors, the bay window and the air-conditioner. Then, since you can actually see a little ways inside the thing,
I decided to go ahead and add a little bit of prototypical detailing to the interior wall (the one that's actually visible). And no, I did not kill myself trying
to replicate all of it. I may be crazy, but I'm not crazy enough to worry about modeling a lot of stuff that can barely be seen!
I briefly toyed with the idea of adding the overhead light, but eventually decided that dealing with the wiring was going to be too much of a pain.
That said, it should be easy enough to add a bulb later on should I decide that I need a million-and-one lights instead of a mere million.
I did go ahead and add a few tools, though (a couple of GCLaser shovels and a
scratchbuilt broom) -
Once I'd finished with all of that, I went ahead and glued the walls and roofs together and started work on the little walkway that runs around the top
of the tanks -
For this particular piece of the puzzle, I went with Gold Medal Models etched brass walkways and handrails. And although very nifty looking, they're also a
gigantic pain in the ass to deal with (especially when cutting them into custom sizes that they weren't really designed for). I tell ya, getting all of that
stuff CA'd together symmetrically was damned near the end of me. And I can't even begin to count the number of times I accidentally knocked some (or all) of it
apart or off of its supports. Frankly, it became a Herculean effort just to restrain myself from flinging the whole damned thing at the nearest wall!
Anyway, I eventually finished up with all that and then moved on to the paint (Model Master "light ivory" for the hardware and "light gray" for the walls).
Like the nearby office/shack, this structure probably started out its life with white walls. But once again, I decided to go with gray to get a headstart on the
weathering.
Once I'd finished with the painting, I glued the roof hardware to the roof and then CA'd on a few of the smaller details (A/C unit, doors, bay window and
the hand railing on the edge of the lower roof). Next up, I grungified the walls
with some off-white Bragdon powder, and then the roofs with some Bragdon rust (I also added some rusty accents running down the walls as per the prototype).
So far so good, but I received a bit of an unpleasant surprise when I sprayed on a coating of flat finish to dull the shiny paint and seal the
Bragdon. For whatever reason, my nigh perfect looking off-white powder suddenly became much darker and much grungier. And although I tried to fix it
the best I could while the finish was still wet (cleaning off the really dark areas with a small brush), I still wound up with a bit more wall weathering than
I would have preferred. Ah well, so it goes...
Now glued in place, my next task was to add some more detailing to the rooftop hardware (a spout connecting the two units along with a few caged ladders).
And once again it was me, Gold Medal Models etched brass, CA and the ongoing war between the thrain. Fortunately, ladders are bit easier to deal with than
walkways, so things moved along pretty quickly. Or at least they did up until my next "oops" moment.
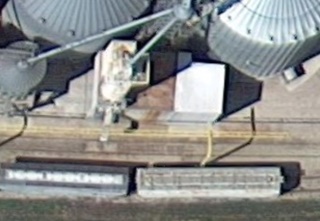
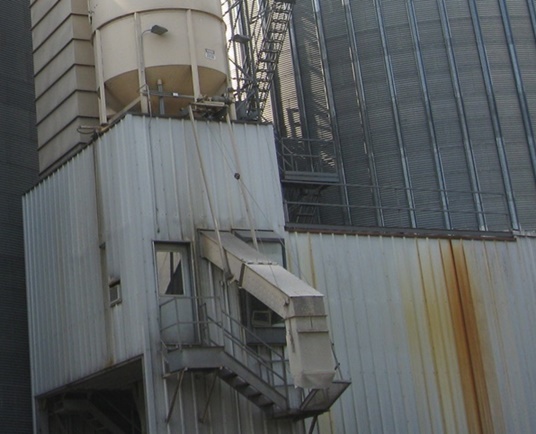
Here's the thing - given the nature of this building, it's kind of difficult to get nice pictures of what's going on up on top. In fact, this was
the best one I had at my disposal -
Hmmm, not a very good look. So, I then grabbed one of my "half mile away" shots and tried zooming in on that instead -
Aw crud, really? Yep, the back of the rooftop "box thingy" is flush with the top/rear wall (with a single ladder going from the lower roof up to the top
of said box). Ummmm, great, except that my rooftop box thingy was not at all flush with the edge of the roof...
Well, way too late to retrofix all of that, so I just made two separate/jogged ladders instead (along with adding the aforementioned spout). Oh,
and if you're wondering how one actually gets up on the roof (like I did). Well, you'd think there'd be a door on that upper wall, but as near as I
can tell there isn't. What there is is a ladder off of the elaborate leg stuff behind the building (something I won't be modeling until I've
finished with all of the basic bins and structures) -
Now, as you may have noticed, there are also a couple of funny shaped platforms extending off of said box thingy's ladder (providing access to a couple of
hatches on the tanks). But
already having had my fill of CA and etched brass (not to mention not having any idea how to go about making them or cramming them into the available space),
I decided to just send them off to the land of wind and ghosts (IE "welcome to selective compression") -
A few more "oops" moments occurred long after I'd actually finished the model. News to me, but Google Earth has really improved since the last
time I used it - providing much more detail and much closer looks than previously available. And it was during the process of updating some of my overhead photos
that I noticed that this building actually has an angular jog in the rear wall (oops). I also noticed that only half of the lower roof is rusty (oops again).
So, note to self - check the overhead photos before you build a model!
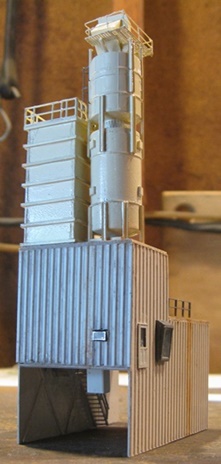
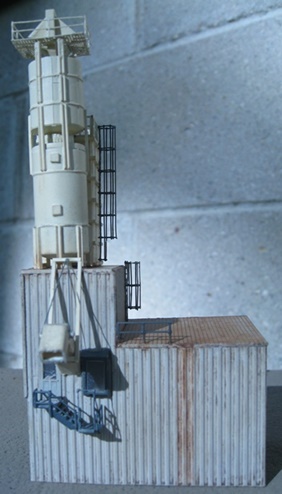
OK, so now we arrive at "Point Z" (and my biggest and baddest oops). I started out by painstakingly building that crazy
stairway/walkway thingy (styrene all the way this time, so not hugely difficult). Then, with that safely CA'd to the wall, I next made myself a spout (angled
to match the prototype) and
stuck that to the wall as well. And... oh shit! It suddenly dawns on me that this thing is used for loading hoppers on the adjacent truck. Well duh, right?
Except that the damned spout is hanging nearly a full inch too low! (IE, the first hopper to come along is going to crash right into it!)
Well, I'll be damned if I know where I went wrong with this thing. I guess maybe the walls needed to be a little taller and the roof hardware a little shorter?
Whatever the case, it was (once again) way too late to do anything about it. So, my bright idea was to simply shorten and re-angle the spout a little bit such that the
business end was elevated high enough to allow hoppers to pass underneath. Just don't look at it too closely, because if one were to tilt it into
"dispensing" position it wouldn't come anywhere near where it would need to be to actually put grain into a railcar.
In an attempt to further lipstick the pig, I added some wires for raising and lowering the spout (ala the prototype). Hey, anything to draw attention away from
the fact that the spout itself is completely unworkable, amiright? Oh yeah, and as you can see I also decided to skip the lights up on the track side of the lower
tank. The prototypical lights are mighty small, and I figured that adding a couple of my "giant box" lights would probably wind up looking pretty stupid.
But, who knows? Maybe I'll add some sort of mini LED's later on (y'know, several decades from now when I'm actually wiring things up).
So, there ya go. Yes, mistakes were legion, but at the end of the day I think it turned out pretty nice. That's the good news. The bad news is that now
it's back to the bins for me. IE, six of these complicated little bastards -
So, whee. See y'all in a few months 05/24/15 - The kid is on a roll!
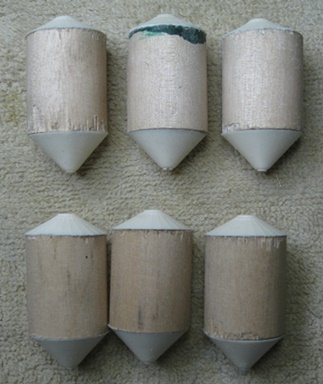
I'll be darned if this thing isn't actually starting to look like something. And after "only" two years worth of off-and-on modeling! I guess I find myself getting a bit more enthused about this project now that the end is almost in sight. And to that end, I was able to whip up the bones of
the remaining six bins in near record time -
I went with 3/4" wood dowel since that seemed to be just about right for the diameter (as compared to the 1" surge bins behind them). As for the tops and
bottoms, I was kind of dreading having to build yet another mold with which to cast them. But then it dawned on me that I could just use my existing mold (just,
y'know, don't fill it up all the way). Talk about your "duh" moments!
It looks like I have a nice long, rainy Sunday ahead of me. So, hopefully I'll be able to finish up with the foil and the CA and
then get on with the styrene detailing. I'm really looking forward to finishing these up and then getting everything glued down to a base so that I can get on with the
final details (although given all of the etched brass in my future, I guess maybe I should temper my excitement just a li'l bit).
07/04/15 - A new option for powering low-voltage layout lighting
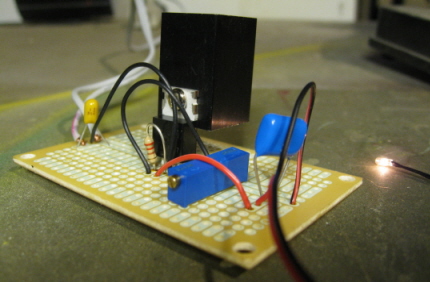
A few years ago, I wrote an article on how to build an adjustable low-voltage circuit board for layout lighting. Said circuit board was designed to take
the current from a standard high-voltage power supply (aka "wall wart") and throttle the voltage down to more useful levels (since many of the tiny bulbs we use for
exterior lighting are rated at around 1.5V) -
And sorry, if you didn't read the article then, don't bother looking for it now - it's gone.
Why, you ask? Well, because the Chinese now sell pretty much exactly the same circuit board (only better, cheaper and pre-built) -
Here are some of the technical specs (mainly for my own future edification, since the board itself doesn't actually come with any sort of documentation) -
- Input voltage range: 4 - 40V (DC)
Input from your DC power supply goes into the terminals on the left side of the board. The terminals on the right side are the output to your
lighting circuit. The black button on the lower left turns the voltmeter display on and off. The black button on the lower right selects either input voltage
or output voltage for the voltmeter display. Labeled LEDs above the buttons indicate whether input or output voltage is being displayed. Turn
the screw on the potentiometer at the top of the board to adjust the output voltage (clockwise = higher, counterclockwise = lower).
For the power supply (not included), I wouldn't recommend going much higher than 4 volts (since any voltage above and beyond what your bulbs need will have
to be dissipated as heat). Also, make sure that it has enough amperage to cover the total amp draw of all the lights on your circuit (also make
sure that the total amp draw of your bulbs does not exceed the 2 amp limit of the board).
I'm not going to try to post a link to the eBay listing where I got mine (obviously kinda pointless). But the ones currently available (for just $2.84!)
are listed as "Buck Step-down LM2596 Power Converter Module" (from seller "czb6721960"). Search eBay (or the web) for something like that and you should find
them. And many thanks to Paul Minard for tipping me off to these guys!
Oh, and as for larger (IE higher voltage) bulbs, I still have my adjustable 3-12V / 2A power supply from Parts Express (catalog #120-536) -
Meanwhile, back to the bins (sigh).
08/28/15 - Added a semaphore to the Hope Depot
As my Facebook followers have probably noticed, I've been deep down the European locomotive rabbit hole pretty much all summer. But I did find a few
minutes between locomotive research/review projects to add an NJI semaphore to the Hope Depot -
Pretty much all of the modeling credit goes to NJI here (since I didn't change the thing one little bit). Basically all I did is what the depot guys
did way back when - namely, cut a notch in the roof and then stick in the semaphore. But hey, it's something, amirite?
In the meantime, I'm still slogging away on the bins (stuck in the same spot that I always get stuck - namely, fabricating all those damned crossmembers).
But I imagine I'll get sick of locomotive research soon enough and be able to finally get them finished up (or not? who knows?)
Speaking of bins... as it happens, I was Googling around looking for appropriate manufacturers' graphics for my various bins (Brock, Behlen, MFS, etc) and
came across a bit of useful information on the Brock website. What I've been calling "surge bins" (the ones with the pointy bottoms) are actually
referred to as "hopper tanks" (or "stiffened hopper tanks" if they have vertical ribs). I think I got that surge bin term from the Walthers kit of the
same name (because it comes with a pointy-bottomed bin), but apparently the "surge" part of the kit actually refers to the rectangular hardware connected to
the bin that moves the grain around. And since none of the bins I've been modeling are so configured, they're not actually surge bins.
So, there ya go - some semi-useful trivia.
12/09/15 - One last trip for the Rock Island "Plainsman"
I recently wound up with a couple of Broadway Ltd E8's painted in the Rock's latter day (1970's) "Red/Yellow With Speed Lettering" scheme (purchased mainly
because I tend to shoot first and ask questions later when it comes to acquiring new locomotives that might conceivably fit in with what I'm doing on my layout).
Unfortunately, it appears that said scheme was never used on any of the passenger train locos that ran through Hope. So, ultimately (and reluctantly)
I wound up selling them.
The good new is that during the course of my research I found an interesting photo on page 81 of Greg Stout's most excellent "Route of the Rockets" book.
Said photo shows the very last "Plainsman" passenger train sitting in Minneapolis on July 7, 1969. The motive power consists of an E8A (#660) and an E8B (#617)
in ex-UP "Cities" livery. And since Life-Like did (once upon a time) release a Rock Island E8A/B set in said paint scheme, I decided to go ahead and acquire one
for myself -
The road numbers on the set (#657 & #615) aren't quite right, and I may change them someday. But for now, they'll do nicely pulling the Plainsman through Hope
one last time. According to Greg, the cars on the final train consisted of Baggage #4399, Dining Car #431 (Little Rock), Coach #361 (Spirit Lake), Coach #337
(Iowa City), Baggage #4329 and Baggage #4308. So, I cannibalized corresponding cars from my Twin Star Rocket and made myself a nice little train to run
through Hope. Definitely a fun little project (and typical of what usually happens when I pull out one of these books, lol).
In the meantime, I've also been plugging away on the last set of elevator bins -
Still a ways to go there, and to be honest I'm pretty damned sick of working on them. So, I'm taking a little break from all of that in favor of
working on filling in some of the housing blanks over across the tracks (kits and pre-builts, hurray!)
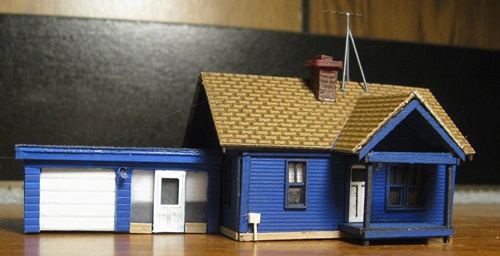
12/21/15 - Finished a foobie version of the Karston House
As mentioned (oh, several years ago), I'm not really interested in spending a great deal of time totally replicating (IE scratchbuilding) the
various houses found in Hope. "Close enough is good enough", that's my motto. And with that in mind, I whipped up an ersatz version of the
Karston house using a Branchline Trains "Stanley House" kit -
Since we Minnesotans do need our enclosed garages (otherwise our cars won't start in the winter, lol), I went ahead and scratchbuilt a
simple garage to go along with it. I also added some extra detailing just to make things a bit more interesting (window blinds, external lighting, utility box,
utility wiring, and a mast antenna). I did briefly consider enclosing the porch, but ultimately decided to just stick with my "close enough" rule and leave
well enough alone.
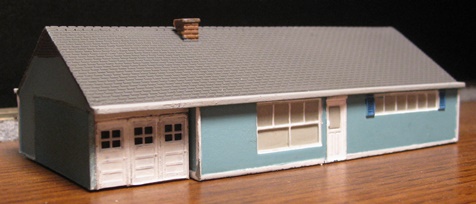
12/21/15 - Finished a foobie version of the Kaplan House
OK, I admit it, this is probably the low point of my efforts on this particular layout. Basically all I did here was take an Imex "Levittown Ranch House"
pre-built and add a wall and a garage door (to turn the car port into an enclosed garage) -
Sorry! I promise, I'll try a little harder on the next one.
12/30/15 - Finished a foobie version of the Sackett House
The Branchline Trains "Thelma & Stanley" kit comes with two somewhat similar houses, so I used the second one ("Thelma") as a
stand-in for the Sackett house -
Once again, I had to scratchbuild a simple garage to go along with the house. Additional detailing on the house includes gutters, a downspout, a chimney,
utility wires, some front steps and a handrailing. I decided to skip wiring up any external lighting this time around (for which I will probably thank myself
several years from now).
Satellite pictures seem to show a dormer on the rear roof, but you since can't see any of that in the one picture that I did take, I'm pretending
it's not there. So, that's that. Now, just a couple more of these quickie housing projects and I think I'll be ready to get back to the bins.
To be continued...


 )
)


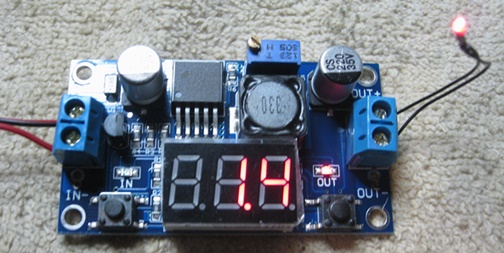
- Output voltage range: adjustable from 1.25V - 37V (DC)
- Output current: 2A (enough to light approximately 66 30mA bulbs)
- Voltmeter display range: 0 to 40V (error �0.1V)
- Input reverse polarity protection
- Output short-circuit protection
- Built in thermal shutdown function
- L x W x H: 6.1 X 3.4 X 12 cm
- Weight: 22g