02/03/13 - Finished "Fisher Dude" House
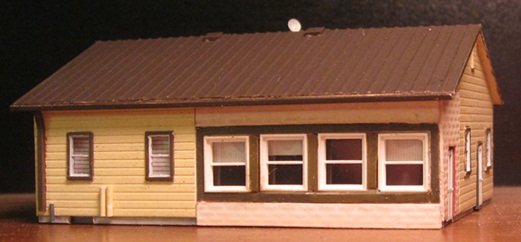
Despite my erstwhile rules banning such activities, I did decide to go ahead and scratchbuild this house. I mean, what the hey, as houses go they don't get much more basic than this -
Of course, nothing is ever as simple as it seems around here, and so I did run into some window problems right from the get-go. Namely, I couldn't really find any that totally matched the windows in that remodeled "faux-brick" section. Or, let me rephrase that - I did find some Plastruct windows that looked like they were going to work. However, once I actually got going, said windows wound up being a bit too large. Consequently, I could only fit four on the wall (instead of the prototype's five). Worse still, the overlarge windows forced me to make the south wall a bit taller than it should be (relative to the doors), thus making the whole thing look a bit more like a pole-barn than a house. And I guess it didn't help that I pitched the roof at a steeper angle than it needed to be (thus further accentuating the overt too-tallness of the whole operation) -

Still and all, I guess it didn't turn out too bad. The Plastruct bricks I used worked out quite well, as did the Plastruct styrene I used for the siding and the roof. No complaints about the Grandt Line windows and doors either. Floquil "Roof Brown" was a good match for the windows, doorframes, roof, gutters and downspouts. And although not a dead-on match, Model Master "Light Ivory" turned out to be at least "good enough" for the siding -

I didn't have any pictures of the east side of the house to work with, but it wasn't much of a stretch to suppose that it might look something like this -

I added what roof detailing I could actually see from my west-side pictures (vents, chimney and satellite dish). And although I'm sure there's probably more up there, that seemed like plenty enough for my purposes. Now I just need to build a garage and then I can get on with all that tasteful lawn decoration (including, yes, the world's smallest church and the "not there anymore" fish sculpture) -

02/09/13 - Building a Frankenalco (aka Rock Island RS-2M)
Boy, ya gotta love The Rock and all of the bizarro motive power they rostered over the years. Case in point - their fleet of five Alco "RS-2M's". Here's the deal - back in the 1950s, somebody over at CRI&P HQ decided that it would be a good idea to repower all of their RS-2 and RS-3 road switchers with EMD guts (sitting under GP9 long hoods). Well, funny story. After they got the bill for the first batch (five RS-2's and one RS-3) they freaked out and pulled the plug on the whole project. So, a bit of an abortive experiment for The Rock. However, the five RS-2M's did live on (with a couple of them lasting right on up to The Rock Island's demise).
As locomotive slice'n'dice projects go, this is a pretty simple one. Basically you just take an RS-2 (Kato or Life-Like will do, but I opted for Kato) and combine it with the long hood from an Atlas GP9 shell (readily available from the Atlas parts department) -

The first step is to saw the long hood off the Kato shell (right at the cab). Next, slice the long hood off the GP9 shell (right up to the forward-most fan). Now comes the tricky bit - the Kato chassis is a bit too wide to accommodate the Atlas shell. So, a bit of grinding on the chassis and filing on the inside of the shell is needed to get everything to fit. Once you've accomplished all that, glue the GP9 hood to the RS-2 cab and you're ready to roll.

When you're ordering your GP9 shell from Atlas, be sure to order an appropriate triple horn as well as a rear numberboard insert. And if you're like me (IE inept), you might as well order like 3-4 shells in case you screw up (OK, I admit it, it took me three tries to get the long hood right). But what the hey, they're certainly cheap enough.
Miniatures By Eric makes cast metal "spark arrestor" details that are a good match for the ones on the prototype. And while you're at it, you can also order a firecracker antenna from Eric (although I wound up making my own by cutting a small piece of insulation off the the thinnest wire I could find and then sticking a short piece of cat whisker inside it - yes, you heard me, cat whisker!)


Of The Rock's five RS-2M's (450-454), I decided I liked 451 the best (mainly because of the in-line "Rock Island" lettering). Others have stacked lettering, and still others have no lettering at all (at least in their 60's/70's paint schemes).


For paint I used Floquil "Railbox Yellow" and Floquil "Tuscan" (mixed with just a smidge of Floquil "Boxcar Red"). And despite my treacherous camera and its photographic trickery, this all wound up being a pretty good match for the colors Atlas used on their U25B and GP40 models. The decals are from Microscale (#60-18, Rock Island Diesels 1963-1975).


My masking and painting turned out pretty good (for a change), but I decided to grunge things up with a little Bragdon black anyway. I mean, come on, once an Alco always an Alco!
Speaking of paint, it turns out that there are indeed other options. I didn't realize it until after I'd finished mine, but these were originally delivered in the late 50s / early 60s "maroon w/ white stripes" scheme. No regrets, though. I definitely prefer the later scheme.

Funny thing about these beasts - even after the rebuild they were still run "long hood front" (just like when they were RS-2's). That must've been quite the strange sight indeed!
02/15/13 - The prodigal son returns
Wow, I never expected to see my old "Scenic Ridge" layout again - and yet, here it is, sitting in my basement -
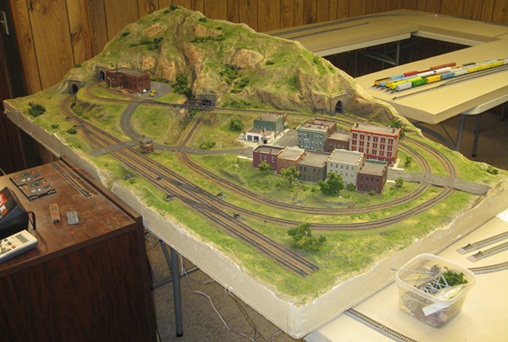
And this happened... why? Well, click HERE for the full story.
04/07/13 - Unitrack woes
Over the years I've read various reports that Unitrack will gradually lose its conductivity over time (resulting in locomotives noticeably slowing down through the affected sections of track). And after running trains on my Unitrack for a couple of years now, I can definitely confirm that this is indeed true. Now, I'm not saying that this isn't the case with other kinds of track (because it is). Rather, I'm just saying that Unitrack is not immune to the problem.
After Googling around a bit, I found a nicely informative writeup on the issue posted to the Trainboard forum (written by the inestimable John Sing). Apparently the issue boils down to the fact that corrosion will (over time) develop in the Unitrack joiners and on the conductive metal parts inside of Unitrack turnouts (and with the end result being voltage drops in the affected sections). Unfortunately for me, the only permanant solution to the problem (apart from soldering all the joiners) is to simply add more feeder wires. Not that I have a problem with adding more wires (per se), but since I'm still in "mock up" mode as far as the layout goes, I'd just as soon avoid going really nuts with the wiring at this stage of the game (especially since the prescribed solution is to have track feeders at least every two feet).
For now I was able to solve my recent "slow down" woes by simply adding an additional set of feeders to each of the main loops (up north of Hope). However, if the
problem starts to spread I may have to bite the bullet and get all of the track painted, ballasted, glued down, soldered and wired up more or less permanantly
(which basically flies in the face of how I normally prefer to build layouts - IE, build all the buildings first). But what are you gonna do? Being able to
reliably run trains is still Priority #1 for me, so everything else will just have to take a backseat to that mandate.
04/21/13 - Finished the "Fisher Dude" garage and lawn detailing
I decided to get all of this Fisher Dude detailing out of the way now (while I was still in Fisher Dude mode), so I basically built a mini-diorama out of
the whole scene (which I'll then just stick on the layout in, oh, twenty or thirty years).
Once I started examining my somewhat limited pictures of the prototype garage it looked like it was going to be a bit more complex than I'd originally thought.
Basically it looks like it was turned into a large workshop at some point (with the addition of a furnace and a large extension off the back with different siding
than the original garage). However, without having better pictures to work with, I decided I wasn't going to bother with any of that and basically just
scratchbuilt a simple garage along the lines of the Atlas kit. I did consider just using an Atlas garage, but the doors and windows of said kit
are completely wrong, and I figured if I was going to have to redo those, I might as well just build my own from the ground up. That said,
I did use my handy-dandy scan of the Atlas shingles for the roof (retinted to match the brown of the prototype).
As for all of that wild and wooly detailing, I did try my best to replicate just about every bit of it. As Mick Jagger says,
anything worth doing is worth over-doing, right? So, for starters there's a bicycle leaning up against the garage, planter
boxes on the south wall (with Scenic Express "buffalo grass"), a mailbox-on-a-milk-jug by the front door, a house number yard sign, assorted trees and
shrubs, a white rock by the front shrubs, an LP gas tank in the back yard, a climbing bear yard art silhouette, assorted chicken statues, etc.
I built the yard light by the front door using a short piece of brass tubing, a miniatronics mini-bulb, a white plastic ball (hollowed out with
my pin vise so that the bulb would fit inside), and a little plastic "cap" from my junk box. Unfortunately, the pole wound up looking a bit fatter
than I would have preferred, but that was the narrowest tube I could find that would still accommodate the wiring (and dang it, I just ain't a'gonna
put up with lights that don't, y'know, actually light up).
The flag and flag pole also wound up being a bit larger than I would have preferred, but my options (vis'a'vis the Microscale flag decal set I have) were
somewhat limited. The flags in said set come in two basic sizes, and going with the smaller size would've required that I build the pole out of
skinny brass wire (or similar). And after experimenting around with that (and failing miserably), I decided to just go ahead and unleash my patriotic fervor
(IE a super-sized flag on a styrene pole).
I used tiny plastic balls for the garden demarkation (actually painted bowling balls on the prototype). For the garden itself, I used some black
WS turf and a few tufts of buffalo grass. I made the flower pots using tiny pieces of tubular styrene with some Bush rose tops glued to the top.
One of them sits on an N scale patio chair (just with the back removed) and the other one is suspended in a brass wire hanger. I did try to make it
heart-shaped like the ones in the prototype pictures, but eventually just gave up on all that and made it a round loop (and yeah, I didn't even bother
trying to make that spinny metal flower sculpture thingy - I mean, jeesh, gimme a break).
I modeled the dollhouse-sized church by simply filing angled roof sections onto a couple of pieces of generic styrene (one for the base and one for the steeple)
and then gluing them together. And no, I didn't even bother with any of the detailing (siding, windows, doors, cross, etc), 'cuz, y'know, why kill yourself
over stuff that no one's ever going to be able to see anyway? Basically it's a simplistic impression of the prototype and not much more than that.
So, funny story about the church - after I'd painted it, I left it sitting on my workbench to dry (still in the alligator clip that I'd used to hold it).
Well, after a while I went down to check on it, and... the clip was empty and the church was gone! And I mean gone! Seriously,
I turned my workshop upside-down looking for that little bastard and it was nowhere to be found. Well, fast-forward a few hours and I'm back at
my workbench, dejectedly preparing to build yet another friggin' church. So, with Exacto in hand, I pull down my mag lamp in order to see
the dinky pieces of styrene I'm about to hack up, and... there's my church, sitting on top of the magnifying lens! Seriously, that clip must've snapped shut and
shot the church two feet straight up into the air (and thus onto my lamp). I mean, are you kidding me?! I swear, I couldn't replicate that feat in a million years of
trying.
Anyhoo... as for the centerpiece of the scene (the fish and boat), I built the box from generic tube styrene and then
filled it with white WS ballast. The boat is the front half of a
WS canoe with the rear end (and motor) of a WS fishing boat glued to the back. The "fisherman" is a WS "kid playing" figure with his arms re-bent at
bone-breaking angles (one reaching back for the motor and the other holding a brass wire fishing pole). I couldn't find any suitable duck decoy figures,
so I used WS chickens and geese instead (hell they're microscopic anyway, so who's to know?)
The fish proper is actually a piece of ersatz bait that I found down at my local sporting goods store (it being the only thing I could find that was
both the right size and more or less the right shape).
It's made out of some sort of translucent squishy/rubbery/oily substance, and as such, simply refused to be painted. So, I instead used some brown
Bragdon powder to color it (dang, is there anything that stuff can't do??) To provide some support, I rammed a short piece of brass tubing
down the fish's throat and right on out its rear end (ouch!) The base of the "trunk" is a styrene barrel (sawed in half).
For the fisherman silhouette and the lure, I just cobbed some graphics
off the internet and printed them out on my laser printer. I actually printed the fisherman silhouette on decal paper and then stuck said
decals onto some clear styrene (in order to provide some rigid support for the brass wire pole and E-Z Line fishing line).
The prototype line actually consists of Christmas lights (or somesuch). And although I did toy with the idea of actually adding tiny LEDs to my line, I
eventually decided that I'd already spent enough time on this project. I mean seriously, enough is enough.
So, that's that. And enough with the houses already! Blimey, what say we move on to something railroady for a change??
05/26/13 - Fixed up a couple of Hallmark brass E3's
This project was definitely not on my to do list, and yet... well, here we are. Here's the deal - it all started a few weeks back when Ron Bearden (noted N scale
locomotive guru) purchased a brass Oriental Ltd/Kumata EMD EA/EB set on eBay. And not surprisingly, he found them to be extremely wanting in the performance department
(although not surprising to me since I'd long ago assigned D's and F's to pretty much the entire line of Kumata N scale brass). Well, Ron being Ron,
he quickly found fixes for all of the various problems. But then, rather than calling it day, he next decided to go ahead and become the world's foremost
expert on Kumata brass locomotives (and then write up a great big article on their history and evolution, including how-to solutions for all of their various
performance problems).
Ron started out by going through all of my encyclopedia entries, and he eventually determined that the Hallmark E3/6 set that I'd tested years ago had been
remotored somewhere along the line (the original open-sided motors having been replaced with Sagami can motors). Vis -
Said discovery basically rendered my original review useless, so I had to start shopping around for a new set to review. Fortunately for me, somebody
had just listed a "custom-paint / not-running / sold-as-is" set on eBay (fortunate because all I really cared about was getting a picture of a stock mech, and
I figured that the crappy paint and mechanical problems would help keep the bidding down). And sure enough, I eventually won the auction for
a mere $128. So yay, mission accomplished, right? Um, not quite. As it turns out, these had also been remotored! (Kato motors this time) -
Gah, so I still needed to find a virgin Hallmark set in order to complete my review. And in the mean time, I also needed to get these running again (so that
I could resell them and not get screwed in the process). Well, the good news there is that I suddenly had ready access to the world's foremost Kumata brass
expert. And with Ron's help I was eventually able to get them running. And not just running, but running really well.
My first task was to figure out what shenanigans POG ("previous owner guy") had gotten up to that had lead the "A" unit to stop running. And as it
turns out, he had managed to screw up the insulated gear box. Normally, one of the gear boxes (the forward one) is insulated from the chassis
by way of a thin plastic gasket (between the chassis and the box) and four plastic bushings with flared collars (inside the screw holes). And after taking
things apart, I discovered that although the plastic gasket was still in place, all of the screw-hole bushings were gone (having been replaced by
some half-assed homebrew inserts). So, I got rid of all that crap and eliminated the middleman by simply replacing the metal screws with nylon
ones. At this point both my "A" and "B" ran about as well as a new/stock set would have run (IE a bit noisy, intermittant stalls and stuttering due to poor
pickup, and the occasional short-circuit/stall when one or both of the trucks would contact the shell).
The pickup problems were easily addressed by cleaning the wheels, the axles, and the axle pockets (wherein the axles rub and transfer current to
the truck assemblies). The solution to the noise problem was to simply lubricate all of the moving parts (the axles, the gears and the bearings). Once suitably
lubricated, my E's ran very quietly indeed (no, not quite "Kato E8" quiet, but certainly "Con-Cor E8" quiet). Note that it's important to use Conductalube
(or similar), otherwise you're going to foul the current-conducting axles all over again.
Fixing the short-circuiting problems (my most hated Kumata "feature") was also surprisingly simple. All one needs to do is add some shims (plastic MT
washers, for example) to the chassis-mount points on the shell. This will serve to raise the shell up slightly (relative to the chassis) and give
the trucks a bit of much needed breathing room.
Another problem typical of Kumata brass is that they tend to slow down rather drastically through curves and up grades (this due to the cheap,
low-torque motors). Fortunately for me, this issue had already been addressed by POG and his Kato motors (hey, thank goodness for small favors).
So, at this point the set was running very well indeed. And I started thinking, hey why not just slap on some Rock Island paint and hang on to them?
So, I proceeded to strip off POG's crappy custom paint... only to discover a whole new set of shenanigans. First off, three of the step ladder extensions
were missing (five if you count the uninstalled ones for the A unit that are supposed to be in goodie bag of spare parts in the box - but nowhere to be found in mine).
Next, part of one of the A's vent screens was broken off and missing. And lastly, there were two big gashes/holes in the A unit shell (one up next to the headlight
and one next to the left/rear window). Well, WTF? Did POG attack this thing with an icepick or what?!
Anyway, I pulled out my "Giant Box O' Spare Diesel Parts" and had at it. First off, I glued on suitable replacements for the ladder steps and the missing
piece of vent screen. Then, I used some spot putty to fill in / smooth over the holes in the shell. The latter took just a whole lot of trial and error
as I really couldn't tell how my repairs had turned out until I'd sprayed a layer of silver on top of them. So, it was fix, spray, strip and try again
for the better part of a day before I finally got something that I was satisfied with. As pictured below, not quite perfect. But eventually you just have
to go with "as good as I'm ever going to get it" (especially since I was starting to lose a lot of rivet detail what with all my sanding) -
After applying the circa-1959 paint and decals, it was just a matter of adding window and headlight inserts, couplers, and a bit of weathering (mainly just some
Bragdon black for
the vent screens). I did consider adding a working headlight to the A, but eventually decided that that would have to be a
project for another day.
OK, Kumata's shell detailing doesn't quite work for Rock Island's E3 #625 (only one headlight for starters). But apart
from the rivet counting, I think they turned out very nice. And thanks to Ron, they run great too. So, despite having come straight out of left
field, a very satisfying project nonetheless.
Addendum - after some more research, it turns out that the E3/6 with the Sagami motor that I'd originally reviewed way-back-when was stock after all.
So, kind of a wasted exercise. Oh well...
05/31/13 - Started work on the SunRich South Elevator
Well, no doubt about it, this beast has been the elephant in the room ever since I made my fateful decision to model Hope. I had no idea how I was going to build
it back in 2009, and things haven't really changed all that much in 2013. I mean, seriously, this thing is insane! The only way to photograph
it all at once is from deep space!
Ultimately though, I figured it'd be best to just view this as a series of small/separate projects (rather than as a single Gotterdammerung project).
OK, admittedly several thousand small/separate projects, but since that kind of thinking isn't going to get us anywhere, let's just put the blinders on
and move forward, eh?
At the end of the day, I decided that the simplest way to get started would be to build the four largest bins (the two fat ones on the north side and the two
tall ones on the south side) -
I opted for an HO Walthers Cornerstone Wet/Dry Storage Bin (#933-2937) for the northernmost bin. Said kit has the same sort of vertical ribs as the prototype
and is just the right size (diameter-wise). Unlike the other bin kits I've built, you don't construct this one "one horizontal ring at a time".
Rather, it is comprised of ten vertical sections (the upshot of which is that after I'd finished building the bin, I then had to pull out a saw
and cut a couple of inches off the top in order to get the correct height). I didn't much care for the overly steep/pointy top, so I replaced the stock
one with a Rix top (also HO, and a perfect fit). I built the concrete base by gluing together concentric rings of styrene strips (same as I
did on the north elevator bins).
The other fat bin doesn't have any vertical ribs, so I used a Rix HO bin for that one. The prototype doesn't have much in the way of a concrete foundation
either, so I skipped that step for this one. Next, I used N scale Rix bins for the tall ones on the south end. I added some "|_|" shaped Plastruct styrene
strips for the vertical ribs and more concentric strips for the foundations. As for all of the fine detailing, well, I think I'll just leave all of that in the
aforementioned "several thousand small projects" pile for now.
Next up I need to build the six smallish "surge style" bins in the center area, and here's where things start to get complicated. AFAIK, there really isn't
anything "off the shelf" that's going to be the correct size (approximately 1" in diameter). So, I guess I'll need to put on my thinking cap for this one.
06/08/13 - Bins, bins and more bins
As I've come to learn while working on this layout, there just aren't a whole lot of "off the shelf" options out there when it comes to N scale grain
bins. At present, the only ones that I know of are the 1.81" diameter Rix bins (which can be built to any height), and then Imex's pair of
1.5" diameter cast-resin bins (the flat bottom bin is 1.75" tall and the surge-style bin is 3" tall) -
Oddly enough, the HO guys don't seem to have it all that much better (although what they do have does serve to expand the options for N scale if one
doesn't mind the oversized corrugation) - the 3.25" diameter Rix bin (which, again, can be built to any height), the Walthers 5.5"
diameter "Big Bin" (any height), the Walthers 3.375" diameter / 12" tall "Wet/Dry Storage Bin", and the Walthers 1.5" diameter / 9" tall "Surge Bin".
Since I'd used N scale Rix bins for the two tall bins at the south end of the south elevator complex, I decided that the surge bins in the
center (the ones with the pointy bottoms) needed to be 1" in diameter (this based on the relative sizes of the two prototypes).
And my first bright idea was to try to downsize a Rix bin to 1" by building the individual rings with four sections instead of the usual six (and then heat-bend them
to the desired smaller diameter). Well, it seemed like a good idea at the time, but the glued joins between the ring sections are twice as thick
as the the rest of the walls and, as such, just don't bend particularly well. Worse still, the seams at the joins tend to want to pop open during the whole
bending process. And after spending a couple of hours dicking around with a single ring (which never did turn out all that great), I did the math and decided
that it was going to take me a million years to build bins this way and decided to try something else.
Next up, I went down to my local hardware store and acquired some generic PVC tube to see what I might be able to do with that (3/4" ID tube turned out to be 1"
OD, so a good start there). As for corrugating said tubes, there are a few options - one can either go with printed paper (such as sold by
Clever Models), corrugated styrene sheets
(Plastruct) or corrugated aluminum sheets
(Campbell).
Now, I've never been a huge fan of the paper stuff when it comes to siding. First off, you're basically stuck
with a single look (IE, no custom weathering). And second off, well, sad to say but I generally manage to screw up the paper in some fashion during the whole
gluing process (go look at any of my paper shingles for evidence of that). But personal ineptitude aside, I just think corrugation looks more realistic when
its 3-D (a look that paper is never going to totally capture).
I've also resisted the idea of going with the generic sheets of 3-D corrugation since you lose the "individual panel" affect that you get with the kit bins
(or at least you do if you're not interested in cutting and gluing hundreds of "all the same size panels" - a task that interests me not at all). However, after
applying vertical ribs to my Rix bins I noticed that that modification tended to hide most of the seams anyway. So with that in mind, I decided to go with
simple sheets of Campbell corrugation for my bins and let the ribs disguise the fact that there aren't any individual panels.
As for the bin tops and bottoms, well, that's where things start to get interesting. I started out by taking an N scale Rix bin top and
debigulating it down to 1" diameter. Next, I took an Imex surge bin and hacked a 1" diameter section off of the bottom -
OK great, parts enough for one bin. Now I
just needed five more sets (or actually eleven more if one counts the elevated dispenser bins). Unfortunately, the Imex bins are not cheap ($30 for a set of
two). And although the Rix tops are available ala carte (and for cheap), the idea of having to shrink down 11 more of them (a very labor intensive chore)
was not exactly giving me a case of the warm fuzzies.
So, clearly it had become time for me to try my hand at a completely new facet of the hobby - namely, mold building and resin casting (an
enterprise that, to me anyway, had always seemed like way too much work in the past, but which now looked like the path of least resistance).
As for how to proceed, well, there are apparently any number of different ways to go about this (especially amongst the "high end" guys). But since I
basically just needed to make a couple of cones, I figured I'd keep things simple and try whatever products my LHS might have on hand - in
this case, a box of Smooth-On "PMC 121/30 Liquid Rubber" (for the mold) and a box of Smooth-On "Smooth-Cast 320 Liquid Plastic" (for the models).
With said boxes of crazy-expensive chemicals in hand, I then went home and built a mold for my mold (a meta-mold?) by gluing the two bin pieces to a piece of
styrene and then building a little styrene box around them -
Next up, I read the instructions for the Liquid Rubber. And the first thing they wanted me to do was to prep my meta-mold with a
coating of "mold release agent". Which is all very well and good, except that they didn't bother to actually include any of that stuff in the box. So, it was back
to my LHS where I found a 2 oz bottle of generic "Mold Release Concentrate". Said product is apparently manufactured by Isle Labs, although the plain-jane
bottle doesn't
mention that fact anyplace. It also doesn't come with any instructions, so I was basically on my own as far as what do with it. The instructions for
the Liquid Rubber did say to apply a "liberal coating" of release agent to all surfaces that would contact the rubber, so for lack of any
better instruction, I pulled out a paint brush
and did just that. After waiting 30 minutes for the mold release goop to dry (or whatever it is that it's supposed to do during those 30 minutes), I then mixed the
two agents that make up the Liquid Rubber (1:1), stirred the brew for the requisite three minutes, poured it into my meta-mold, and...
...24 hours later, I had a rubber mold -
Next, I brushed some mold release onto the rubber mold, mixed up the two agents that make up the Liquid Plastic (once again, 1:1), stirred the goo thoroughly,
poured it into my mold, and...
...30 minutes later, I had a bin! (well, the bones of a bin anyway) -
One slight problem, though - I think I may have overdone it with the mold release when I prepped my meta-mold for the rubber (damned lack of instructions). The
bin bottom looks
very nice, but the bin top turned out a bit, I dunno, fuzzy looking? My guess is that I left too much mold release on said bin top, which in turn interfered with
the sharpness of the mold. No, it's not horrible looking, but now that I've gone through this process once and dialed down the scariness factor a bit, I think
I'll try making a second mold and see if that one doesn't turn out a little better.
Addendum from the distant future: although my bin building days are well and truly behind me at this point, I should note for posterity's sake that a new bin manufacturer
entered the fray in 2020. Namely - Iowa Scaled Engineering
06/17/13 - Bin progress
I made a number of new molds (experimenting around with various different ways of applying the MRA). And what wound up working best was first diluting it with
some water and then spraying on a light coating with my airbrush. Basically you want a light, homogenous coating that isn't going to show up in the mold nor pool
up in the bottom of the meta-mold and interfere with how the rubber sets up (IE, precisely the opposite of the "liberal coating" prescribed in the
instructions). So with that all figured out, I decided to eliminate the middleman and order up a spray can of
Smooth-On "Universal Mold Release" (something that would have saved me a great deal of time had my LHS actually had some on hand in the first place).
It shoots out a diffuse aerosol spray (think insect fogger) that's exactly what one needs for making molds.
That said, I did wind up with some tiny air pockets in my final mold (resulting in a few tiny pimples in my bin tops), but after spending the
better part of a week
building molds I figured I could live with that. However, my admiration has definitely increased for those intrepid souls out there building and selling
cast-resin locomotive shells and whatnot. There's definitely some major league "master modeler" skills going on there!
Anyway, with that whole business sorted out I then moved on to the siding. And I have to say, working with Campbell's aluminum siding is every
bit as painful as I remembered it to be (from back when I was building the post office). As I've bitched about (ad nauseum) in the
past, I really hate working with CA. And making matters worse, I discovered that the corrugation on Campbell's strips is in the exact opposite
orientation of what I needed it to be. The strips are 7.5" x 1.75", and I was thinking that all I'd need to do was to cut them down into pieces small
enough to wrap all the way around the bin (with two or three strips stacked from top to bottom to cover the bin). Ah, but not so fast! That would make the
corrugation vertical rather than horizontal. So, I instead had to line the strips up the long way. And only being able to bend them part way around
the tube while trying to get them CA'd in place made for one frustrating task (to say the least). Rubber bands helped a little bit, but they also
introduced their own set of problems (getting stuck to the CA, crinkling the aluminum, etc).
Anyway, after spending a day+ dicking around getting the aluminum glued down, I finally got the point where I could CA on some ribs (Evergreen "Channel" #261).
Here I decided to
save myself some time by extending the ribs down and having them also serve as legs. I then used bits of leftover channel for the horizontal supports
between the legs -
At this point, about all that's left on this one is to add some brass wire "X" supports to the legs (ugh) -
In the mean time, I think I'm going to pick up some sheets of Plastruct "PS-10" corrugation and see if that works any better than the
Campbell corrugation. If nothing else, it should at least be easier to paint.
Addendum - I've been advised that a better way to go about this whole casting thing is to build molds using a silicone-based mold material (such as
Smooth-On Mold Max 30). Being of a different chemical family than the urethane-based casting material, silicone-based molds do not require any sort of
release agent. So, definitely something to try out (and thanks for the tip, Bill!)
07/04/13 - Plotting a Union Pacific excursion train
I've always been a big fan of Athearn's uber cool articulated steamers (Big Boy and Challenger). Unfortunately, I've never been able to come up
with any sort of plausible justification for purchasing one for my layout (since the UP's steam days were well behind it by the time they acquired
the Spine Line).
Well, as luck would have it, it turns out that one of the UP's excursion trains (pulled by Challenger #3985) did actually pass through Hope back in June of 2002.
In fact, there's even a picture of it roaring past SunRich in "Memories of Hope" (said picture apparently escaping my notice the first time I went through the
book) -
Well, "woohoo!" thought I, and immediately set out to build a model of said excursion train (starting with, joy of joys,
one of Athearn's recently released 3985's) -
Thanks to Google, figuring out the rest of the consist turned out to be ridiculously easy (vis'a'vis this picture of a flyer commemorating the tour) -
So, that's where I'm at. Now it's just a matter of finding suitable cars ("just", he says). But anyway, here's the plan so far -
For the water tenders, I'm thinking that a couple of Con-Cor's gas-turbine tenders will work as "close enough" foobies (at least until something better
comes along) -
The good news there is that Con-Cor announced a new run of these models last year (which, according to
Con-Cor's website, will ship later this year).
The "Art Lockman" tool car started out its life as a baggage car, so the storage-mail car from Kato's "City of Los Angeles" set looks to be a nearly
perfect match (just need to add an extra window) -
Better still, the COLA storage-mail car is a perfect match for the "Council Bluffs" baggage car (just need to replace the 3-axle trucks
with 2-axle trucks) -
The "Howard Fogg" power/dorm/boiler car started out its life as a baggage-dorm car, so the baggage-dorm from
COLA looks like a good match (just need to add a couple of vents to the one side and replace the forward 2-axle truck with a 3-axle truck) -
The coaches ("Portland Rose", "City of Salina", "Sunshine Special", "Texas Eagle", "Katy Flyer") are no-brainers (IE, COLA) -
The "Columbine" and "Challenger" dome-coaches also come straight out of COLA (I'm sensing a theme here) -
Now things start to get difficult. The "Sherman Hill" concessions car started out its life as an RPO, so I guess the old Rivarossi smoothside RPO might
be a good place to start -
There really isn't an off-the-shelf equivalent for the "North Platte" business car, but since Kato's corrugated business car is available in UP paint I guess it
would be an OK stand-in (just with 3-axle trucks instead of 2-axle trucks). A more amibitious solution would be to use the Micro-Trains / Lowell Smith heavyweight
business car (since said car is closer to the actual prototype) -
Tougher still is power/dorm/storage car #207. Although since it did start out its life as a baggage-dorm, I guess a mangled up Kato
baggage-dorm could work (IE, add a 3-axle truck, stick on some vents, and rejigger the doors and windows) -
For car name decals, Microscale set #60-1056 has nine of them (Texas Eagle, Portland Rose, North Platte, Sunshine Special, Challenger, Howard Fogg,
City of Salina, Columbine, Katy Flyer). Microscale set #60-636 also has some of the names, but since they represent the 1947-1991
paint scheme the coloring is wrong.
As for where the other two names would come from (Art Lockman, Sherman Hill)... I guess I have no idea. My laser
printer, maybe? The good news is that there's a guy who has put together a custom decal set for the Council Bluffs car (flag and all). I won't post his
email addy here, but interested parties can reach him on Trainboard or Railwire (forum name "JDG"). From what I can tell, the decals are pretty sharp looking -
Two COLA sets should provide me with most of what I need (two storage-mails, two baggage-dorms, four coaches and two dome-coaches).
As for the fifth coach, I think I'll probably just go with one of the other manufacturers (Walthers, Intermountain or Rapido).
No, it won't match the Kato cars, but oh well. With the two COLA sets I'm already going to be eBaying an awful lot of unneeded cars, so screw
it. I sure do wish Kato sold their passenger cars as singles like everyone else!
Speaking of Kato, the hot internet rumor (that's been floating around for close to a year) is that they are supposedly getting ready to announce a full UP
excursion train set of their own (including a brand new 4-8-4 model). Take it for what it's worth, but there are a number of people who aver that the origin of
said rumor was an actual Kato sales rep. So, given that possibility (no matter how remote), I don't know that I'm going to be expending a huge amount of
modeling effort on this particular project. I think what I'll do for now is just pick up the two COLA sets (et al)
and then see what happens. If Kato really does a full-on excursion train at some point, great, I'll buy it. But in the mean time, a "good enough" mix of
proto and foobie cars will at least allow me to play with my new Challenger. Or hell, who knows? Maybe I will expend a ton of effort on these. I mean,
that would pretty much guarantee that a Kato set would be forthcoming, right?
07/20/13 - Progress on the UP excursion train
As threatened, I purchased two of the Kato COLA sets. Also, I decided to bite the bullet and get a four-car Kato UP smoothside set for
the fifth coach (since Kato's smoothside cars are actually based on UP prototypes, I figured I may as well shoot for some accuracy here). The good news
is that cannibalizing these sets (and then selling the leftovers on eBay) worked out a whole lot better than I was expecting it to. I was able to get between
$20 and $30 for each of those unneeded sleepers (et al), so at the end of the day I think the cars I actually kept wound up costing me about $6 each.
Not too shabby! Anyway, here's where I'm at so far -
Pretty impressive looking so far, although admittedly there wasn't a whole lot of modeling involved on my part (IE, Kato gets most of the credit). For
the most part all I had to do was strip off the as-delivered number graphics (using a smidge of 91% alcohol on a microbrush) and then apply the
requisite Microscale name/number decals. In addition to the Microscale decals, I also ordered up a set of JDG's
flag decals for the Council Bluffs car. And as you can see, they turned out very nice.
As for the "Art Lockman" decals, I whipped those up in a Word document and printed them out on decal paper using my laser printer.
I did expend a little bit of actual modeling effort on the Art Lockman and Howard Fogg cars (adding a window to the former and some vent grills to the latter).
The window frame came from the Tichy Train Group "Utility Windows" assortment and the grills came from an old Kato E8 shell I had laying around.
As for the North Platte car, I decided to just take the coward's way out on that one (going with a prepainted Kato UP business car as a foobie stand-in).
I swapped out the 3-axle trucks on the Council Bluffs car in favor of 2-axle trucks (as per the prototype). Similarly, I replaced the 2-axle trucks
on North Platte with 3-axle trucks. Lastly, I swapped out the forward 2-axle truck on Howard Fogg for a 3-axle truck. Kato's one-and-only
modern 3-axle passenger truck (61-RDO) is of their newer clip-on style, however with a bit of tweaking
they can be made to work on the older cars (the ones with the screw-on trucks).
First off, the holes in the 61-RDOs are a bit too tight for the old bolster mounts, so those need to be filed out some. Second, the bolster screw interferes
with the thick axles on the center wheelsets,
so those need to be replaced with something that has a thinner axle (I forget what I used - FVM or BLMA or something). I also found
the current conducting wipers to be a bit problematic when used on the older cars (they stick up too far and interfere with the truck's ability to pivot).
Trimming those down a bit solved the tracking problems for me. Oh yeah, and I painted them all bright silver (since Kato's idea of "silver" is a bit
underwhelming).
One note on Kato's various UP smoothside sets - the yellow paint on the cars in the older sets is not an exact match for the paint on the COLA cars (compare
my Sunshine Special car to the rest). No, it's not anything that I'll be losing any sleep over, but I'll bet it drives a lot of other people crazy.
Anyway, that's pretty much it for the easy stuff. Now to figure out what I'm going to do about Sherman Hill and #207...
09/27/13 - More progress on the UP excursion train
Wow, two months since my last entry? I guess I hate slicing and dicing passenger cars even more than I originally thought. In any case, I did finally manage to
cobble together the last two cars that I need for my train (excluding the water bottles, that is).
As previously surmised, a Kato COLA baggage-dorm made a good starting point for #207 -
I started by replacing one of the two-axle trucks with a three-axle truck. Next, I added some ventilation screens (scribed styrene with some skinny styrene
seperators). Next, I added some new windows and doors (by way of an Exacto blade, small files and a lot of cursing). I then had to fill in some unneeded doors
and windows (styrene cutouts for the former and Bondo putty for the latter). And although the Bondo worked better than my failed attempts at using Squadron
Putty (back on the CRI&P baggage-express cars), I still didn't quite get the results I would have preferred. I think if I ever have to do anything like this
again I'm going to try JB Weld instead (the preferred "Master Modeler" method for filling in windows, or so I'm told).
Also as previously surmised, an old Rivarossi RPO turned out to be an adequate starting point for Sherman Hill (although the foobie factor is admittedly
pretty high) -
Same basic procedure here (vis'a'vis adding and subtracting doors and windows). Same basic problems too (vis'a'vis the Bondo filler). Ever the optomist,
I also added some stirrups and handgrabs on the ends. Unfortunately, I just can't seem to get my handgrab holes positioned
symetrically, so they do tend to wander around all over the place. Maybe some day I'll try a jig... As for the klunky looking
stirrups, I eventually decided to just get rid of those entirely (after accidentally breaking them off more times than I care to count). Oh well, I figure
that since the Kato cars don't have them either they probably won't be missed (not by me, anyway).
So, that's it for the heavy lifting. Now to see if I can't mix up some paint to match Kato's UP yellow and gray (shyeah, right).
09/29/13 - Finished the last two excursion train cars
I finished painting and decaling #207 and Sherman Hill. Unfortunately (and despite my best efforts), the yellow didn't turn out quite right. Still and all,
given my well documented issues with color matching, I guess I can't complain too much about the results -
I really did give it the old college try though. As I was experimenting with the yellow paint (various mixtures of Model Master yellows and oranges),
I would spray each new brew onto a test
car and then do a side-by-side comparison with a Kato car. And I swear to God, after about six tries I thought I had a dead-on perfect match.
Unfortunately, after I'd finished painting the actual models and then consisted them in with the rest of the cars, it became clear that I'd gone a couple
of ticks too orange. I have no idea how or why that happened, but whatever the case, color matching apparently remains the impossible dream over here in
Spookshow world.
So, that wraps it up for the cars and the motive power. Now I just need a couple of water tenders and my excursion train will be ready to roll through Hope.
And on that front, there's a guy over on Trainboard who (with much encouragement from yours truly) has been working on a Shapeways model of a UP water tender.
So, at this point the race is on to see which happens first - the Shapeways model or the new run of Con-Cor turbine tenders (and no, I am not holding my breath
waiting for Con-Cor).
10/24/13 - Another M&StL diversion
I decided I needed yet another break from my "no end in sight" grain bin project, so I opted instead to build myself a little turn-of-the-century M&StL
passenger train (using some Bachmann 47' "old-timer" passenger cars and an Atlas 4-4-0 - stuff that's been gathering dust in my "round tuit" pile for like ever).
Of course there's not much out there vis'a'vis pictures and information re M&StL passenger trains circa the late 1800's / early 1900's. So, without having any
better ideas, I decided to just put together something along these lines -
Prototypically speaking, M&StL #136 looked like a decent enough match for the Atlas model. As for the coloring, well, your guess is as good as mine there.
For all I know, that thing is red, green and purple. But since there likely isn't anyone out there who knows for sure, I guess I don't really need
to worry too much about the color police on this one. In any case, I figured I could at least get the lettering and numbering right if nothing else -
Now, Bachmann's wood-sided "old-timer" passenger cars are strictly "trainset crap" if you ask me. But for better or worse, they're basically the only game in
town when it comes to cars of this type. Fortunately, they're actually not too far off from some of the cars used by The Louie -
Once again, coloring remained a mystery. But some of the guys on the Yahoo M&StL group speculated that Pullman green for the cars and white for the
lettering wouldn't be out of the realm of possibility. And so, that's what I did (hey, prove me wrong, I double dog dare ya!)
One thing I couldn't abide was how ridiculously high the cars ride (relative to the trucks). So, I filed the bolster mounts way down in order to get
a more realistic look. I also got rid of the truck-mounted Rapidos and screwed some MT couplers to the chasses instead.
So, that's that. And now, back to the bins. Or, then again... I do have some Athearn Overland cars sitting around here that are just crying out for some green
and yellow paint... Hmmm....
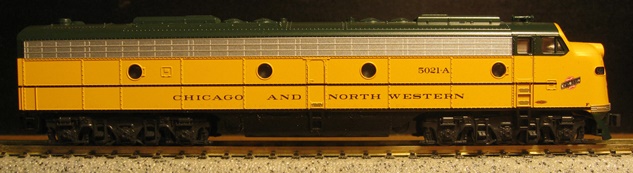
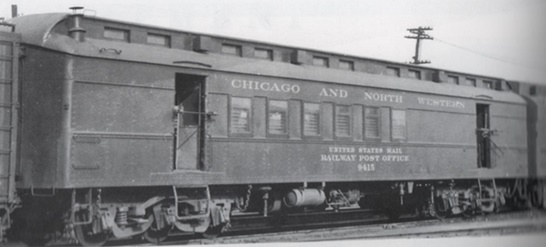
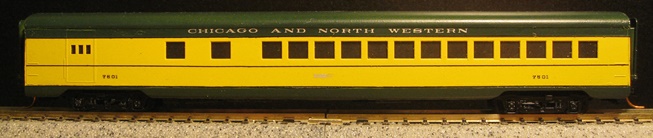
11/10/13 - More turn-of-the-century varnish
As threatened, I went ahead and drafted my Athearn Overland cars into the C&NW (hey, anything to avoid working on those damned bins). For paint, my
choices were either boring old Pullman Green or full-on C&NW Green and Yellow. Well, not really a choice after all. IE, I opted for the
more interesting green and yellow scheme (using this smoking car from the Mid-Continent Railway Museum in Wisconsin as my guide) -
With a paint scheme decided, I pulled out my precious (and ever-dwindling) supply of Floquil C&NW Green and C&NW Yellow and fired up the old
airbrush (and God help me when that runs out).
I really wanted to replicate the "C. & N.W. Ry. / The North Western Line" lettering of the prototype (instead of just going with "Chicago & North Western"),
but nobody makes any decals like that (not that I could track down anyway). Fortunately, I found a guy from Australia (Ted Freeman) who does
custom decals and he was able to whip up a set for me in fairly short order (thus making Ted my second favorite Aussie after Angus Young).
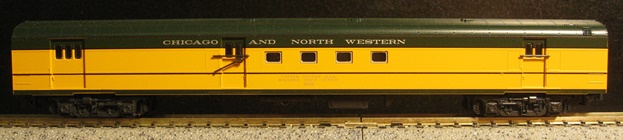
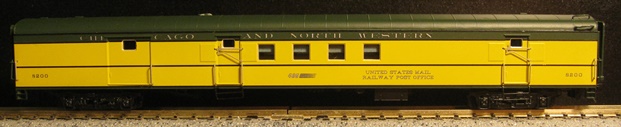
Funny story - when I was Googling around looking for applicable car numbers I discovered that Athearn actually released a set of their
Overland cars in nigh identical C&NW livery back in 2009. I tell ya, damned near enough to make a grown man cry!
Anyway, I didn't like my chances of actually tracking down one of those sets, so I decided to just press on with my project. But the good news in all of this is
that the Athearn set did provide me with some plausible cars numbers to use (assuming Athearn actually did their homework, that is). So, I went with 826 for the
combine, 2937 for the business car, and 3125 for one of the coaches. For the second coach, I used 469 (based on one of the few actual
prototype photos I was able to track down).
As for placing the numbers, I've seen photos where it's either one number in the middle of the car (ala what Athearn did) or numbers on each end of the
car (ala the smoker pictured above). But since I was going to be doing these one stinking digit at a time, I decided that I liked Athearn's way best.
For the actual decals, I was able to use the silver numbers from the Microscale "Chicago & North Western Cab Diesels" set.
I really like how these turned out, and overall just kind of a quick/fun little project. Unfortunately, at this point I literally have nothing left in
my to-do pile besides the bloody bins. So, until such time as
my UP water tenders show up in the mail I guess it's back to fighting it out with the corrugated aluminum and CA 11/24/13 - One step back, two steps forward.
As I was slogging through the process of gluing aluminum corrugation to my sextet of SunRich surge bins, I finally decided that I just didn't like the way
the cast-resin tops and bottoms had turned out (vis'a'vis the fuzzy mold). So, I went ahead and acquired some Smooth-On "Mold Max 30" and set about making
up a fresh mold -
It turned out that the Mold Max is a little trickier to mix up than the Liquid Rubber I'd used originally (what with Mold Max's mix ratio being 10:1 by weight, as
opposed to the Liquid Rubber's ratio of 1:1 by volume). Fortunately, my wife's Weight Watchers scale came to my rescue in that regard (thanks, honey), and
I wound up with a very nice looking mold indeed. Better still, the new castings I made were nice and smooth with very crisp lines. Better better still, no mold
release is needed for either process (making the mold or making the castings). So, definitely a better way to skin this particular cat (thanks Bill!).
So, long story short, I hacked off all of my previous castings and replaced them with new ones. Now I just need to finish up the rest of the corrugation
and detailing so I can get on to some less tedious scratchbuilding.
12/20/13 - Water bottles for a thirsty Challenger.
I tell ya, we modelers certainly live in amazing times. Case in point - back in July I posted an innocuous forum query wondering about the possibility of somebody
somewhere doing UP water tenders via Shapeways. And five months later... well, here they are!
As you can see, these models represent UP heritage fleet water tenders in their current "post rebuild" state. So, no, not exactly right for my 2002 version of the
excursion train. However, the good news is that the designer (my buddy James "Across the Pond" Norris) is currently working on designing a pre-rebuild
version (which I will no doubt also acquire as soon as they become available).
This was my first experience with a full-on Shapeways model (and "frosted ultra detail" - aka FUD),
so there was a bit of a learning curve there. The first thing to keep in mind is that the FUD comes
coated in some sort of waxy film that needs to be cleaned off before you can do anything with the models. And in aid of that, I tried soaking mine in Goo Gone and then
cleaning them up with a toothbrush. Unfortunately, after cleaning off all of the waxy residue I discovered that there were a bunch of stray vertical lines on
the sides of the shells. Vis -
I'm not sure what the deal was there, but from what I've read the quality of Shapeways models does tend to vary from one to the next.
Making matters worse, somewhere during this whole cleaning process both of the tender chasses got all warpy and bloated (and thus wouldn't fit inside the shells
anymore). Which isn't to say that I didn't try to force the issue (and then break them into several pieces as a result). I'm still not sure
what it was that caused all the warping and bloating, but my guess is that it had something to do with the fact that after I'd removed the wax
I rinsed everything in water (in order to get rid of the Goo Gone). And based on my later experiences with the flag pacards, I just don't think FUD likes water
very much (but more on that in a moment).
Anyway, having basically wrecked my first pair, I decided to go ahead and order up two more (hey, I'm stubborn). Fortunately, things went much more
smoothly the second time around. For starters, I opted to use Bestine to clean up the shells (instead of Goo Gone). And since there was no Goo Gone smell
to get rid of, I didn't need to rinse them in water afterwards. And lo, everything cleaned up nicely and with no warping whatsoever (IE everything fit
together perfectly). Better still, I didn't have any of those goopy vertical lines
this time around. On the downside, I did have some fairly noticeable horizontal striation (which, I guess, is just par for course and an expected result given how
Shapeways builds these things). As for what to do about it, the brightest idea I could come up with was to simply use a lot of paint -
I probably could've lost the horizontal lines entirely with a little more paint. But as you can see, things started to get a bit goopy looking around the rivets,
so I eventually had to back off and call it "good enough".
Another issue I encountered with the FUD is a bit of, I dunno, fuzziness? As pictured above, said fuzziness is particuarly evident on the truck sideframes.
And unfortunately, I couldn't really conceal it with paint (not without losing all of the fine detail, anyway). However, I've since been told that it might
be possible to smooth things out by attacking the fuzz with a toothbrush and toothpaste. And since I plan on doing another set of these, I guess I'll be
able to test out that particular theory soon enough.
As pictured below, the flags on "Jim Adams" are not painted directly on the sides of the tender. Rather, they live on placards that are themselves
attached to the sides -
And yes, the Jim Adams kit does come with FUD flag placards. Unfortunately, I just don't think they really work. Correctly scaled down from the
prototype, any placard wouldn't be much thicker than the decal itself. And of course, there ain't no way to render anything that thin in FUD. So,
as delivered, the placards are pretty thick and klunky looking. Still, being keen to give them a try, I sanded mine down as thin as they would go and
then stuck on the flag decals (from Microscale set #87-1150) - whereupon said placards immediately warped out of all semblance of flatitude. "Well,
so much for the placards", I thought to myself. IE, I decided to just stick the flag decals directly on the tender and get on with my life (figuring attractive
and inaccurate beats out ugly and prototypical any day).
In addition to the placards, the kits also come with toolbox details (for the top) and ladder and headlight details (for the ends). All the rest
of the detailing is built right into the shell -
Unfortunately, what they don't come with are handrails for the top (presumably because something like that would be impossible to render in FUD).
So, I had to figure out a way to do those myself. And my bright idea was to buy some Kato SD80/90 sidesills and cannibalize the handrails from
those. Well, it seemed like a good idea at the time... Unfortunately, when drilling the holes for the stanchions you literally have no margin
for error. IE, if you're off by even a micron, the stanchions won't go in. So, after drilling a bunch of not-quite-right holes (and then trying to fix them
by making them larger... and larger... and larger) I eventually decided that pre-fab handrails weren't going to work. So, I filled in all of
the giant craters with Bondo putty and started over.
Next up, I tried making my own handrails using .02" Evergreen styrene rod. And although quite a bit more work (vis'a'vis fabricating all of the tiny
little all-the-same-height stanchions), I at least didn't have to worry about 100% accuracy when it came to drilling the holes. And although the end result isn't
anywhere near as nice as the Kato handrails would have been, I guess they didn't turn out too bad.
I mixed up the yellow paint using the same basic ingredients I used on my earlier passenger cars (Model Master Deep Yellow and Model Master Marker
Yellow, along with a smidge of red and gray). And oddly enough, this time around I came up with a mix that much more closely matched the yellow on
my Kato cars. For the gray, I used Model Master Engine Gray with a smidge of grey primer thrown in to lighten it up. And once again, this turned out
to be a very close match for the gray used by Kato. The decals were a mix of home brew (laser printed) and Microscale (#60-1056 and the aforementioned
#87-1150). Once painted and decaled, I finished things off by sticking on a couple of Micro-Trains brakewheels and some Micro-Trains 1015 couplers.
So, all in all a fairly successful first exposure to Shapeways for yours truly. And now that I've gotten all of my mistakes out of the way, the next set should
turn out even better (or at least one would hope so).
06/02/14 - More UP water tenders
Wow, six months since my last entry? I guess I've been taking something of a break from modeling and didn't even realize it. No worries, though. I've been
playing with trains since I was but a wee lad, and it seems that I always do come back eventually Anyhoo, Mr Norris did finally release his "pre-rebuild" UP water tenders on Shapeways a couple of months ago, so I went ahead and did up a set for
inclusion in my excursion train. One major improvement James made this time around was the addition of handrail stanchion holes, so I didn't have to freehand
those myself. Another slight difference is in the way the ladders are rendered - basically on "keychains" of four. I'm not sure why the change, but I
did discover that one has to be very careful about how one goes about dissecting said keychains. Sadly, I wasn't nearly careful enough with mine and wound up breaking
off a number of the steps (which were just all sorts of fun to fix).
Other than that, pretty much the same deal as with the previous two tenders. That said, I did discover something new about FUD this time
around that I didn't know before. Here's the deal - I had just finished
applying the yellow layer of paint to the pair and then set them aside on my workbench to dry... at which point I managed to knock one of them
over onto its side (thus getting a bunch of workbench crud stuck in the as yet undried paint). "Oh wonderful, back to square one", I thought to myself, and
then stuck it into a bath of 91% alcohol in order to strip off the paint. Well, fast forward a couple of hours and this is what I found -
Uh... WTF?! Well, apparently FUD and alcohol don't get along very well (to say the least). And although it's hard to believe that paint is a one-way trip on
Shapeways
models, I still haven't found out what sort of stripper might actually work on them (not without warping the hell out of the FUD in the process, that
is). Yes, there seem to be a
lot of theories out there, but so far I haven't come across a suggested solution that's actually been proven to work. So, feel free to enlighten me!
In any case, I had to order up a replacement tender and start over (ugh). Fortunately, James offered to jigger up a custom option for me where all I had to
pay for was a new shell (and with no additional markup for the seller). So, at least some good news there. Unfortunately, Shapeways still seems to be
all over the map in terms of the quality of their models (IE, the replacement tender I received was quite a bit fuzzier in spots than either of the original
two I'd ordered). No, not bad enough to return, but definitely of lower quality.
When it came time to apply the decals, I wasn't really sure what Microscale decal set might work best for the large "UNION PACIFIC" lettering.
Fortunately, my buddy Ted (teditor@bigpond.com)
volunteered to do up a custom set for me (which also included the stripes, the numbers and the small "UP" lettering). And as you can see, everything turned
out great -
I briefly toyed with the idea of adding handrails to the end ladders (ala the prototype), but eventually decided that that was going to be beyond
my skills (IE, wind up looking like crap), so I bailed on that notion.
So that's that. And I think at this point I'm pretty much done with Shapeways models - or at least I am until such time as
they refine the process to the point where the
quality is more consistant.
In the mean time, I have some new Kato, Intermountain and DPH passenger cars that are just begging to be included in a model
of the C&NW's "Dakota 400" passenger train, so... see ya in another six months (or maybe even sooner 07/05/14 - Modeling the Chicago & North Western's "Dakota 400" passenger train
Being a big fan of the C&NW's iconic "400" trains, I was quite pleased to learn that one of them actually served one of the towns
on my layout (Waseca). The C&NW inaugurated their "Minnesota 400" passenger train in 1936, providing service between Mankato, MN and Wyeville, WI
(where passengers could then catch the main "Twin Cities 400" train to/from Chicago). And as a steam-pulled heavyweight passenger train, this would have been
a pretty neat project. Unfortunately, N scale doesn't currently have anything even remotely like a C&NW Class D 4-4-2 Atlantic
or a Class ES Streamlined 4-6-2 Pacific. So, without the requisite motive power, kind of a non-starter for me.
The streamlined version of the Minnesota 400 made its debut in 1942 (still pulled by streamlined Pacifics). In 1950, service was expanded to Huron, SD
in the west and Chicago in the east. In concert with the expanded route the train was redubbed the "Dakota 400". The new
train was pulled by a pair of EMD E7's (and later on that same year, by a single E8). The train originally consisted of
a tavern-lunch-counter (#7502 or #7602) and four coaches for its entire run. A parlor car (#6500-6516) brought up the end of the train between Chicago and Mankato.
West of
Mankato, the parlor was replaced by a Pullman sleeping car (making the Dakota the only 400 train to offer sleeping accommodations). A 48-seat diner (#6955)
provided expanded food service between Chicago & Elroy. Additional coaches and a second parlor rounded out the consist south of Elroy.
Service on the Dakota 400 was ultimately extended to Rapid City (in 1955). However, it wasn't long before ridership (and revenue) declined
to the point that the entire route west of Mankato was dropped (in 1960). No longer travelling through South Dakota, the train received a new name -
the "Rochester 400". This train generally consisted of a single E8, two coaches, an ACF diner-lounge
and a parlor. A tap-cafe occasionally replaced the diner-lounge after 1961. Passenger service along this entire route was ultimately discontinued in 1963.
Consists on the Dakota 400 changed frequently over the years (with various cars and services being added and subtracted). For example, for most of 1950 the parlor
car was extended all the way to Huron (instead of being left behind in Mankato). At the same time, the second (Chicago-Elroy) parlor was discontinued.
In 1955, dining car service was extended all the way to Mankato (AC&F cars released from City-train service). Cafe-coach #7000 operated
between Mankato and Huron.
The sleeping cars were originally 8-2-1 heavyweights. In 1958, the heavyweights were replaced by 6-6-4 streamlined sleepers. In 1960,
the sleepers were changed to 16-1-3 cars. Coaches were (for the most part) standard 400-style cars, although three ex-C&O Pullman-Standard coaches were added to the
Dakota 400 pool in 1957. The tavern-lunch-counter cars were eliminated in 1957 - replaced instead by heavyweight RPO's (and by streamlined RPO-express cars the
following year).
And then of course you have all the different paint scheme variations to consider - the "full" C&NW green/yellow, the "simplifed" C&NW green/yellow, and
the UP-esque "City" train scheme. Honestly, one could spend months trying to figure out what cars in what paint schemes would make up a "correct" consist for a given
date/location. And then there's the problem of actually acquiring (and/or building and painting) models of said cars. I tell ya, model railroading ain't
for sissies!
Anyhoo... here's what I came up with for my train -
My original plan for the motive power was to go with a pair of BLI E7's (released with DCC & Sound a few years back). Unfortunately, I only bought
one of them when they first came out, and adding a second one now looks to be the impossible dream. Seriously, I've been monitoring eBay for close to
a year now and not a single one has showed up there (new, used or otherwise). So, on to Plan B - get an old Life-Like C&NW E7 and mount the shell on a DCC-equipped
Kato E8 power chassis (a perfect fit, surprisingly enough). Well, no such luck as those appear to be just as scarce as the BLI E7's. Jeesh,
don't you C&NW modelers ever part with anything??
Anyway, what I did have was an old Life-Like C&NW E6 shell (mounted on a Kato mech). So, I figured I could use that as a temporary fill-in until
such time as I tracked down another E7 (hey, who's to say it
never happened?) Well, funny story - just as I'd finished speed-matching my E6 to my E7, I heard a loud
POP come from the E7 - at which point actual smoke started pouring out of its exhaust stack. Unfortunately, this was not a "really cool yet undocumented"
Paragon2 decoder feature. Rather, it was simply said Paragon2 going up in smoke. Which is bad enough in and of itself, but it also took the shell with it
(melted the bejeezus out of it). So great, now I have exactly zero E7s for my train...
OK, so on to Plan D... a single Kato E8 (recently released in C&NW livery) -
I've also seen pictures of the Dakota 400 being pulled by a pair of Fairbanks-Morse Erie-Builts (I guess when all the EMD units were in the shop or something), so
my Life-Like E-B dyanmic duo is another option (at least until such time as I track down some E7s) -
And if I'm feeling really crazy, I could even use my custom-painted Erie-Built "B" unit in lieu of one of the A's. However, since the C&NW never actually
rostered any such units, that's going to have to remain our little secret -
As noted above, the head-end equipment varied depending on the year. Prior to 1957, the first car in the train would have been a tavern-lunch-counter
(either #7502 or #7602). And although no RTR models of said cars are currently available, Des Plaines Hobbies does make a kit version of #7502 (DPN-1500).
As you can see, mine is still a work in progress, so my train is going to have to reside in 1958 for the time being -
Starting in 1957, heavyweight RPO's replaced the TLC's in the consist -
Unfortunately, there aren't any RTR options out there for these cars either. However, I guess if one's tolerance for foobies is high enough, a Micro-Trains
RPO could be used as a stand-in. I'm also told that JnJ Trains did actually sell brass car sides for a C&NW RPO at one time or another. However, since that firm
is long out of business, said sides are probably not a particularly viable option at this point. So, on to Plan B...
Starting in 1958, streamlined RPO-Express cars were often used in lieu of the heavyweights. And the good news here is that Kato's recently
released C&NW smoothside RPO is a dead-on match for the C&NW's ACF-built RPO's #8225 and #8226 -
Kato didn't go so far as to number or name any of the cars in their C&NW sets, so I went ahead and added "8225" decals to mine.
Now, as to whether or not #8225 ever actually saw service on the Dakota 400...? Well, that's probably a question that can't really be answered at this point
in history. But whatever the case, I seriously doubt that anyone could actually prove that it wasn't. Another question is whether or not these cars
ever sported the paint scheme offered up by Kato. Originally in UP colors, these cars were in fact repainted green and yellow. However,
I've only seen pictures of them in the latter day "simplified" scheme (IE, yellow letters, black numbers, and
no horizontal black lines). As for mine? I dunno, I guess I'm just going
to adhere to the old "you can't prove a negative" axiom and leave it as is.
Of course, if you're annoyed by Kato's livery scheme (or their overly orange interpretation of "C&NW yellow"), you could always go with an
Intermountain/Centralia RPO (#8200) instead -
As you can see, it's a very pretty and finely detailed model (and leave us not forget the interior lighting). The only downside is that the shell is
a bit off as compared to the prototype (the windows aren't quite right and the end doors are a bit misplaced). But still, a decent option if one isn't prone to
sweating the small stuff.
Now, I've never actually seen a picture of a Dakota 400 that included a baggage-express car. Still, I guess if one isn't afeared of a little
science fiction, it probably wouldn't be stretching credulity too far to include an Intermountain/Centralia baggage car in one's consist. If nothing else,
it's certainly a good match for C&NW #8900 -
Intermountain/CCS really knocked it out of the park vis'a'vis the coaches. They're gorgeous, they're available in multiple numbers, and
they're absolutely correct and accurate for this train. Heck, they even did the ex-C&O cars -
The dining car is a piece of cake if you were lucky enough to pick up Kato smoothside set #106-5012 "way back when". If you did, you
already have one of the ex-City ACF diners all done up in C&NW livery and ready to roll -
Of course, said Kato sets are impossible to find nowadays, so I was stuck with using the car from the more recent green/yellow C&NW set. And although the model
included therein is correct vis'a'vis the prototypes (dining cars #6956-6959), the paint scheme is (once again) likely all wrong. There simply isn't any photographic
evidence to support the supposition that these cars were ever repainted in anything but the later "simplified" green and yellow scheme.
So, I had several choices (none of which thrilled me all that much). I could strip and repaint the car in the correct paint scheme (ugh). Or, I
could put correct number decals for the prototype (EG #6959) on a likely incorrect paint scheme and then dare the prototype police to prove me wrong. Or, I
could put correct number decals (#6955) for the paint scheme on what would now be an incorrect car (#6955 looks nothing like these ex-City cars).
Well, at the end of the day I opted for "Plan B". IE, I put #6955 style decals on my car (to match the paint scheme), but went with #6959 (to
match the model's prototype) -
In my quest for a parlor car, I noted that the prototype bears a striking resemblance to an IM "400" coach (just with six fewer
windows in the main seating area and three extra windows in the drawing room area - one of which is round). So, I decided to try transmorgrifying an IM
coach into a parlor. And although
things started out promisingly enough (I used resin to fill in the unwanted windows - an experiment that worked out like gangbusters), I eventually ran into
my usual problems cutting and filing the new windows (the first one wound up way too big during my futile attempts at making it symmetrical).
Fortunately, it was right around this time that I learned that Des Plaines Hobbies actually sells a C&NW parlor car kit (DPN 1503) -
On the downside, the model has two too many windows in the main seating area (22 instead of 20) - a problem I wish I'd noticed before I'd
finished assembling and painting the thing (coulda just filled in the offending windows with resin). Oh well...
These DPH kits are made of styrene and consist of an American Limited "core" (roof, ends, floor, undercarriage details, skirting,
diaphragms and trucks) along with custom DPH car sides. And
as far as kits go, well...
let's just say I've seen better. One problem is the lack of instruction vis'a'vis all the little doodads that are supposed to go underneath the
car (water tanks, brake equipment, generators, battery boxes, etc). Basically all the "instructions" tell you is to go track down prototype pictures
and/or diagrams and figure it out for yourself. Wow, really? Thanks a lot, DPH. Fortunately for me, my cars are all skirted so all that stuff is pretty
much invisible anyway. And in light of that,
I just used one of my IM coaches as a template and arranged the doodads underneath my car in a similar fashion. Lame, I admit.
But I just didn't really feel like spendng a lot of time hunting down the requisite prototype information (especially since all of that detailing
is basically invisible unless you're holding the car upside-down).
Undercar details aside, where I really had trouble with this kit was installing the floor. According to the instructions, you're supposed to assemble and paint
the roof, ends and sides first. Then, after you've put the window glazing in place, you're supposed to finish things off by "snapping" the floor
assembly in place. Yah, well, good luck with that. The only place it really "snaps" into place is on the ends. And despite the metal weight, the floor
is very bendy - and thus damned near impossible to
get seated properly. Basically the thing will bend in the middle and go in too far relative to the ends. And with the roof on, there really isn't
any easy way to push it back down. I eventually wound up gluing some vertical supports to the center of the car so that the floor had something
to push up against. And no, not a particularly elegant solution. That's why on my as yet unfinished TLC car, I decided to assemble the sides, ends and floor
first and save the roof for last (after I've painted the carbody and installed the window glazing). And, well, I guess we'll see how that worked
out when I actually finish it...
My supply of Floquil C&NW green and yellow paint finally died of old age, so I had to mix up my own paint for this car (with the goal being
to match the IM cars). And amazingly enough, I think I came pretty close. Letter and number decals are from Microscale set #60-859 (now back in
print). The black stripes are from Microscale set #60-51.
Technically speaking, one would've never seen a sleeping car on the Dakota 400 in Waseca. But I decided to go ahead
and pick up an IM 6-6-4 anyway (American Buffalo). Y'know, for those "let's pretend" train sessions (and you can stop your sniggering at any time!)
For further information on C&NW passenger cars in general and 400 trains in particular, I recommend checking out "The 400 Story" (Jim
Scribbins), "Chicago & North Western Passenger Train Equipment" (Patrick C. Dorin), "Chicago & North Western Passenger Trains of the 400 Fleet"
(John Kelly). Also, the Nov/Dec 2007 issue of N Scale Railroading contains a very good article on modeling the Dakota 400 (written by the inestimable Bill Denton).


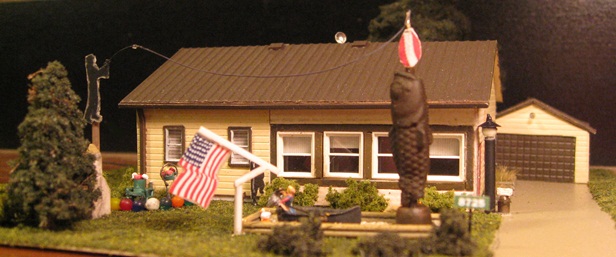


 ).
).

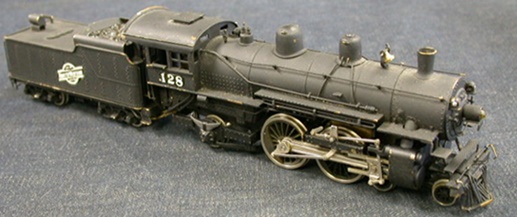
(E8, RPO, Coach, Coach, ACF Diner-Lounge, Coach, Parlor)