07/17/12 - Finished the Spurgeon House (well, sort of)
Calling this Atlas "Barb's Bungalow" kit a "stand in" for the Spurgeon house is probably a bit more than it deserves. Although in my defense, based on the one picture I took of the house way back when, I originally thought it was at least "bungalow-esque". However, after acquiring the kit I decided to drive down to Hope to get some pictures of the south side of the house (just to get a better lay of the land). And it was at this point that I discovered that it's actually sort of "T-shaped" (with peaks on the front and two sides). "OK, no problem" I thought, "I'll just use the kit for a different house". Well, nice try Mark, but after looking at all the rest of the houses in town it turns out that there's nary a bungalow in the bunch. I mean, seriously, a bungalow-free town? Whod'a thunk it??
As for other house kits, there really isn't anything available "off the shelf" that's even close to the prototype. And of course, trying to bash something together would violate all of my rules about not going too crazy worrying about 100% accuracy on these houses. Now, if this house were located anyplace else in town I suppose I could've just punted it in the name of selective compression. Unfortunately, as the only house "downtown", it's not anything that I could really skip (not without losing a major landmark, that is). So, I decided to just build the damned bungalow anyway and hope that copying the color scheme of the prototype would at least somewhat ameliorate its utter non-Spurgeonness. Of course, the problem there is that the kit doesn't have a peak on the front, so there really wasn't anyplace to apply the cream-colored paint. Argh!
So, at the end of the day, barely even a foobie. But I guess that's what you get when you're not interested in scratchbuilding houses. On the plus side, the (yet another) Atlas "colonial garage" kit turned out to be a decent enough stand-in for the Spurgeon garage. And in aid of that, I even went so far as to add the two light fixtures of the prototype (one on the front and one by the side door). As for the house, my only real contribution there (apart from the paint) was to put blinds in the windows -
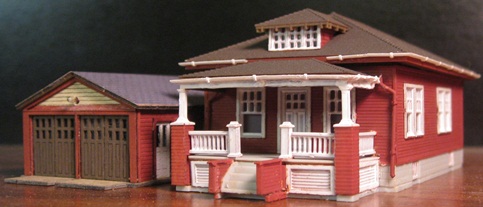
One note on the bungalow kit - I do not recommend going with a custom / multi-color paint scheme when putting one of these little brutes together! The thing has a million parts (particularly the porch), and trying to glue all that together after you've pre-painted the parts is a major exercise in frustration. Unfortunately for me, the only tool in my toolbox (vis'a'vis making the kit look more like the prototype) was the custom color scheme. So, I was pretty much stuck. But if you're fortunate enough not to have to worry about prototypical colors, I definitely recommend going with the stock coloring. Hell, I'd even recommend eliminating the middle man and simply buying one of the pre-built kits. You have my word, I won't tell a soul!
08/10/12 - Finished the SunRich Fertilizer Building
As far as scratchbuilds go, this one was about as easy as it gets - four walls, two roof pieces, and only four openings to punch (two windows and two doors). And although at first blush all of that detailing (vis'a'vis the various legs and spouts) looked like it was going to be a bit complicated, it actually turned out to be pretty straightforward.

The "in" (vertical) leg consists of a Rix grain elevator kit, a Gold Medal Models brass ladder/safety cage assembly, and various bits of styrene detailing. As on the North Elevator, I made good use of some dissected Bachmann crossing gates for the various elevator "motors" -
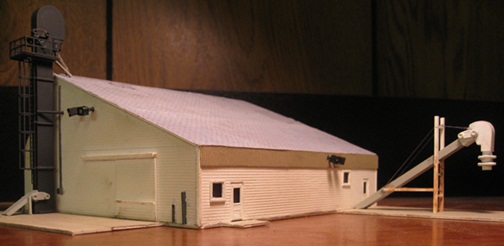
I built the "out" conveyor/spout using various bits of generic styrene. Also included in the festivities are a mangled Cornerstone rooftop blower for the elbow, another Bachmann "motor", and some EZ Line for the support wires. I guess the only part that didn't turn out so hot are those washers I used to simulate the telescoping spout. I did scour my local hardware store for just the right size of washer, but sadly those were the best I could come up with.

Fortunately for me, the large end-wall doors were closed on the day I took my scouting photos, so I didn't need to worry about any interior detailing. Better still, this allowed me to simply glue the doors directly to the walls (and not bother with cutting any openings first). The exterior lighting consists of Minitronics bulbs with CA-stiffened wires glued inside of styrene boxes. I made the shingles using some scanned Atlas garage singles (pasted into a Word document and printed out on my laser printer). Apart from some rust on the out-conveyor supports, I didn't bother with much in the way of overt weathering (figuring that my "grubby finger" grunge was weathering enough for this relatively new looking structure).

So, another fun SunRich building taken care of. Now I think it's time to stroll back over into town and take a whack at "Fisher Dude" house. Now where did I leave my tackle box...?
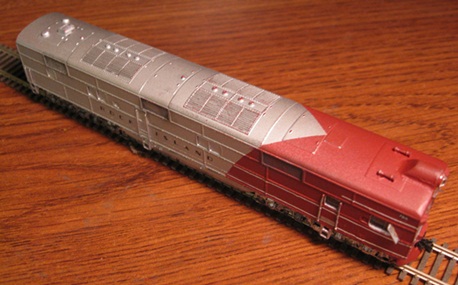
10/15/12 - Built a Rock Island AB6
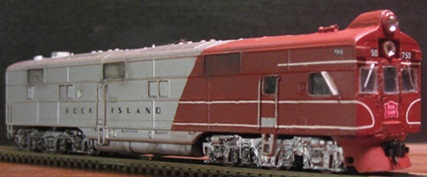
For those of you unfamiliar with the Rock's weirdo "AB6" units (#750 and #751), these were custom built by EMC back in 1940 for inclusion in the newly streamlined Rock Island "Rocky Mountain Rocket" passenger train (service between Chicago and Colorado). The train had to be split into two sections in Limon, CO - with one section continuing on to Denver and the other section going to Colorado Springs. The AB6's functioned as "B" units into Limon, and then continued on as the head-end power for the jaunt to Colorado Springs.

As for why the Rock didn't just go with normal "A" units for the whole thing, I have no idea. I guess somebody over at CRI&P HQ decided that that would mess with the aesthetics of their train or something. But whatever the case, it's a really interesting looking locomotive, and one that I just couldn't resist modeling (despite the fact that they never ran anywhere near Minnesota).
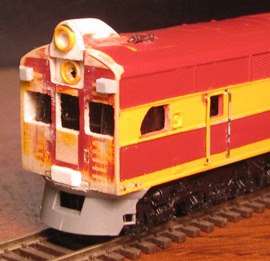
EMC built their AB6's by modifying standard E6B units. However, at the time I started in on this project BLI had yet to release their E6B models. So, I went with one of their E7B's instead (powered and equipped with DCC sound). And so, how exactly does one go about turning a BLI E7B into an AB6, you ask? Well... I don't know the "right" way, but here's the "spookshow" way -
1 - If your E7B is decorated, you'll first to need strip off what paint you can. Unfortunately, in the case of BLI's models, this won't be much. As opposed to traditional paint, BLI uses some sort of powdercoat/plating scheme. So, apart from the lettering and handgrab paint, the stuff just doesn't budge (and believe me, I've tried everything). Fortunately, painting right over the top of their stock colors doesn't seem to cause any problems (vis'a'vis losing shell detailing). So, I guess just think of it as a very robust coat of primer?
2 - Remove the diaphragm from the "front" of the shell, fill in the diaphragm holes with Bondo putty, and then sand the end smooth (IE, lose the handgrabs).
3 - Remove the forward/side hand grabs and fill in the holes with putty. Carefully remove the forward step-ladders and set them aside (you'll need them later).
4 - Use an Exacto knife to slice off the vertical rivet lines underneath the forward windows, then sand smooth. Remove the window inserts from the forward windows and set them aside.

5 - Cut and file holes for the "new" forward/side windows. I scavenged the window inserts from a Life-Like E6 cab to use as a guide (and later, as the actual inserts).
6 - Cut and file holes for the cab-front windows (two large windows on either side of a smaller door window). And here's hoping you're better at creating symmetrical window openings than I am. In my usual back-and-forth tweaking, mine eventually wound up quite a bit bigger than they should be.
7 - Sand the top/front edge of the roof so it's not quite so squared-off.
8 - Cut and file a hole for the lower headlight and then glue in a headlight insert. For mine, I sliced the headlight bezel off of a BLI E7A shell and then glued it to a thin piece of styrene (which I then glued inside the AB6 shell).
9 - Create an upper headlight housing. For this, I used a short piece of Evergreen plastic tubing, the other headlight bezel from my aforementioned E7A shell, and a bell shaped "front" fabricated from a thin piece of styrene.
10 - Install the upper headlight. For this, I sliced a thin channel in the roof and then filed the front edge of the roof deep enough that my bell-shaped housing would sit flush with the rest of the cab front. Lastly, apply a bit of Bondo putty to the sides and end of the plastic tube (where they join up with the roof) and sand smooth.

11 - Add the air horns (once again, salvaged from the E7A shell).
12 - Add anti-climber and marker light details (I just fashioned these from generic styrene).
13 - Decide on a pilot. Now, I should have been able to get this from my E7A shell. Unfortunately, the used shell I got from BLI didn't actually have one (d'oh). And since I'd already mangled the hell out of it, I couldn't really send it back to BLI for a replacement (re-d'oh). So instead, I decided to order an E8A shell from Kato and saw the pilot off of that. Unfortunately, the coupler hole in said Kato pilot is way too small for a BLI coupler, so I had to saw the coupler off of the forward truck.
14 - Install the pilot. For this, I first filled in the open space underneath the door (I just glued in a small piece of styrene and then sanded it flush). Next, I glued the pilot to the shell and then filled in the gaps between the curving pilot and the squared-off shell with Bondo putty.
15 - Add handgrabs to the (formerly) forward/side windows to create new side doors. Once again, these were salvaged from the E7A shell. And here's hoping that your drilling skills are better than mine!
16 - Add handgrabs to the front door (once again, scavenged from the E7A). Glue the previously amputated ladder steps underneath the new side doors (you did save them didn't you??)
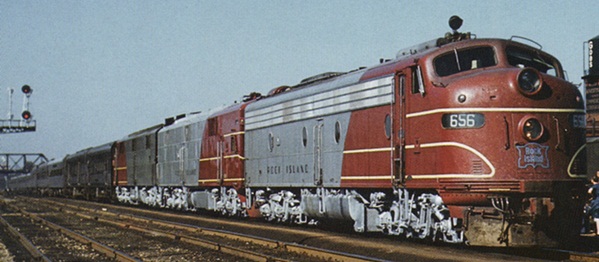
17 - Apply your beautiful paint and decal scheme. I had originally planned on going with the late 50's scheme pictured at the top of this entry. Unfortunately, all of my front window filing shenanigans didn't leave enough room for that row of "triple stripes". So, I instead opted to go with the circa-1960 scheme (basically the same, just without the row of triple stripes) -

I also opted for simple "decal" numberboards (figuring that my odds of successfully cutting holes for actual lit numberboards were pretty slim).
18 - Install the side window inserts and the headlight lenses. As for the cab-front windows - since I didn't have any ready-made inserts, I first tried using Krystal Kleer. Unfortunately, these turned out a bit "wavy" looking. So, I bit the bullet, removed the klunky Krystal Kleer (KKK??) and fabricated inserts out of clear styrene instead. Once I had some workable windows, I then added windshield wipers (thin pieces of brass wire painted silver).
19 - Create windscreens for the side/forward windows. For these, I cut small pieces of clear styrene and then painted the edges and bottoms silver (the bottoms being rearview mirrors, or so I'm told). To install them, I used an Exacto to cut narrow channels in the shell and then glued them in place with CA.
20 - If you cut off your stock coupler, now's the time to replace it with something else. For mine, I sliced the coupler mount off of a Kato E8A coupler mount / headlight bracket and glued that to the pilot. I had originally planned on using a Kato knuckle coupler (held to the mount with a Kato coupler clip). Unfortunately, the Kato coupler turned out to be way ugly (sticking out way too far), so instead I just screwed a Micro-Trains Z scale coupler to the mount and called it a day.
At this point, my AB6 doesn't have working headlights (although I may decide to address that some day by adding an LED to the chassis someplace). Also note that some of the above instruction may vary depending on what era you're planning on modeling and how obsessed you are with accuracy. Strictly speaking, my circa-1960 model should have a bunch of roof modifications in order to be "master modeler" accurate (recessed radiators, assorted extra plumbing, etc). As for me, I decided to take the coward's way out on all that and just let sleeping dogs lie -
For a real article from a real modeler, I suggest checking out David Street's treatise in "Remember the Rock" magazine (Vol 7, No 2). He built a much more ambitious (not to mention more accurate) AB6 than I did (albeit in HO scale). His model is based on the AB6's mid-1960's configuration (when it ran in Chicago commuter service).


I gotta say, I'm pretty disappointed by how sloppy my modeling looks in these photos (especially since these are the most flattering photos I could get). Nevertheless, I really do think it looks pretty terrific in person. In fact, this may well be my best and most ambitious locomotive hack jab to date (not that I've done all that many of them, but you get what I mean). Now, how in the world guys like Bill Denton can crank out amazing models that also look absolutely flawless in ultra-closeup photography is beyond me. What do I gotta do to acquire such skills, sell my soul to the devil??
So, um, anyhoo... Potential sulphur and brimstoney deals aside, I think it's definitely time to get away from locomotive models for a while and move on to other (easier) things.
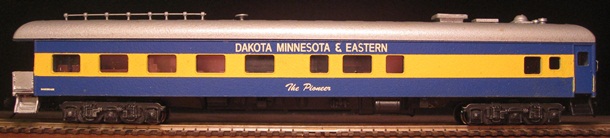
11/05/12 - Built a couple of DM&E coaches


Fearing that I was starting to turn into one of those guys who has umpteen bazillion unfinished / never-started projects gathering dust on his workbench, I decided to cross a couple more non-layout related to-do's off of my to-do list. Fortunately, as compared to that AB6 project, a lot of these other models are suddenly seeming a who lot easier and more do-able (y'know, like swinging three bats in the batter's box makes one bat feel like a toothpick).
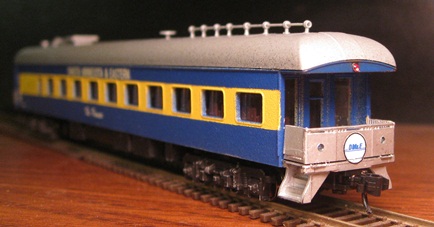
Anyway, I've been wanting to make a model of the DM&E's business/excursion train ever since I learned of its existance. Said train consists of two ex-CP "2200" coaches (Plum Creek and Silver Lake), and MOPAC's ex-#8 business car (The Pioneer) -


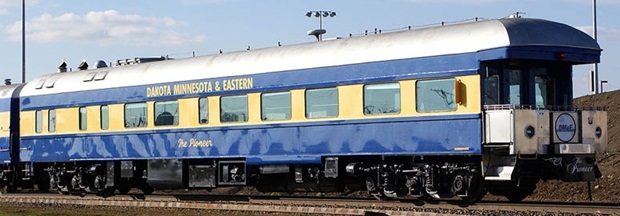
Surprisingly enough, it is now possible to build very accurate models of those ex-CP coaches (thanks in some part to my own badgering). The resin-cast bodies and underframes are made by Geoff Gooderham (and available from Central Hobbies in Vancouver). The decals are made by Highball Graphics (a custom run made for me, but now apparently available for general distribution). The CP "Type 1b" trucks are made by Panamint Models (by way of Shapeways). These too were developed based on a lot of pestering from yours truly (and with much of the actual research being provided by Tim Horton).
Now, I'd never dealt with a resin kit car before, but suffice it to say, it's nothing like simply stripping and painting a mass-produced plastic car. A lot of the windows require filing and de-flashing, you have to Bondo-fill (and then sand) all of the little airholes and other shell irregularities, and you have to install your own handgrabs. And speaking of handgrabs, I'm embarassed to admit that after spending the past 10+ years building models, I'd never even heard of a "pin vise" until now -

When it came to making tiny handgrab (or other) holes, I used to use either a Dremel or a needle (the former of which rarely found the intended start point, and both of which always made holes that were about three times bigger than they needed to be). Well, faced with the prospect of making tiny holes for sixteen different handgrabs (per car), I decided to at long last figure out a better way to do it. And, well, it turns out that the simplest and cheapest solution was the above-pictured pin vise. I mean, chuck in the desired bit, put the tip where you want a hole, and then twist? Blimey, what could be simpler??
So, that was the majority of the heavy lifting. In addition to the handgrabs (the little ones being BLMA and the larger ones being custom fabrications), my other contributions were to add chassis weights, window glass, brakewheels, American Limited end diaphragms and Micro-Trains couplers (chassis mounted 1015's). As for getting everything put together, the only tricky bit there was with the trucks - namely, the fact that the chassis rode a bit too high on them and that one of them wouldn't fit on the provided bolster pin socket once the vestibule steps were attached. The solution to the latter problem was to slice off the socket, drill a new hole a few millimeters further away from the steps and then glue the socket back in place. As for the height problem, a bit of judicious filing on the truck bolsters and the chassis took care of all that.
Addendum - I'm told that Panamint now has revised versions of the Type 1b trucks that work better with the Gooderham 2200 coaches (offset bolster and lowered height).
The colors on the prototypical coaches are a bit lighter as compared to DM&E's normal blue and yellow locomotive scheme. And although I spent a lot of time mixing different colors of paint, I don't think I got either shade quite right. Still, given my nigh color-blindness, good enough for my purposes I guess. Now I just need to do the Pioneer business car (which will be based on the soon-to-be-released Micro-Trains / Lowell Smith model).
In addition to the coaches, I also managed to get these two Bachmann locos off of my "round tuit" list by finally adding them to my M&StL steam roster -


Apart from stripping the old graphics and adding new decals, not much modeling here. However, I did go ahead and replace the oversized "USRA medium" tender on the 4-6-0 with a more suitable looking "USRA short" tender - a somewhat arduous procedure since Bachmann (for whatever stupid reason) decided not to use pin/socket connectors for the motor/headlight wiring in their 4-6-0 tender. IE, I had to clip the wires off the medium tender's decoder board and then re-solder them to the corresponding pins on the short tender's PC board. Thank you very little, Bach-Man!
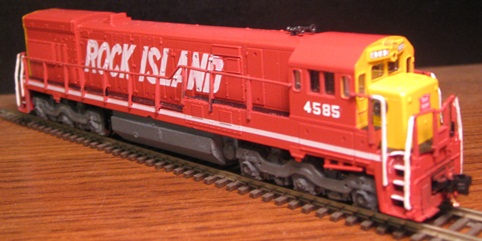
12/06/12 - Rock Island U30C's come to Hope

I've been spending a bit of time over the past couple of weeks refining my various locomotive rosters (eBaying stuff that I decided I didn't really need, acquiring other stuff that I decided I did need, and installing decoders like the huns were at Digitrax's door). And as part of my ongoing "actually do the to-do list" effort, I decided to finally finish up a Rock Island U30C project that's been sitting around here for a while. For whatever strange reason, the Kato parts department actually sells decorated Rock Island U30C shells, and since The Rock apparently liked to run their small fleet of U30C's in A/B pairs, my idea was to use one of said shells to whip up a mate for my already rostered #4598 (the only number Kato ever sold).
The shell is from the late 80's "open pilot / truck-mounted couplers" era, so my first task was to install Micro-Trains pilots and couplers. Next up, I removed the numbers from the sides of the cab. And I really have to hand it to Kato for making this so easy. The paint they use for their graphics strips off readily using a Q-Tip soaked in some 91% rubbing alcohol (and at the same time, the super tough paint they use for the underlying colors remains entirely unaffected).
For the power chassis, I purchased a BN unit from the more recent "DCC Ready" run (and with said BN shell then going off to eBay to help defray some of the costs of this project). The old shells do work with the newer chassis, but not without some minor modification. First off, the lighting/numberboard inserts are quite different between the two releases (each having been specifically designed to work with their respective chasses/lightboards), so I had to make sure to swap the ones from the newer shell into my old Rock Island shell. Apart from that, there are also a couple of raised areas inside the center of the old shell that tend to get hung up on the newer version's lightboard, so I had to file those down a bit in order to get a good fit with the new chassis.
Once everything was put together, I finished things off by applying number decals to the cab and to the numberboards (#4585). So, funny story. At this point I'm putting my new consist on the rails in order to enjoy the fruits of my labors, when... I finally notice that my new U30C has black handrails/walkways, whereas my old one's are gray. Well, WTF?! Apparently some weisenheimer somewhere along the line decided to swap out the stock black handrails on his in favor of gray ones (and then subsequently sold it on eBay that way - lucky me).
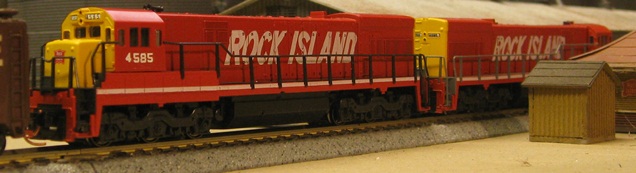
OK, so now it was time to figure out which was correct. And in aid of that, I googled up some prototype pictures... only to discover that both are wrong, and that the handrails should in fact be red. I mean, really? Come on, Kato! So, anyway, yeah... time to repaint both sets of handrails red. And of course, nobody makes red paint that's going to be a perfect match for Kato's choice of red, so... time to once again go all mad scientist and mix up my own paint.
Now, my issues with color-matching are well documented, so I really have no good explaination as to how I managed to come up with such a perfect paint match this time around. I guess the model railroading gods were smiling on me that day, because my trial and error mixture of Floquil "Soo Line Red", "Reefer White" and "Reefer Orange" wound up being dead-on perfect. In fact, it looked so danged good that I decided to go ahead and paint the black MT pilots red right along with the walkway/handrail assemblies. Then, after that all dried, I went back and repainted the walkways black and, being on a roll, went ahead and painted the handrail ends and step edges white, and then the trucks and fuel tank SP "Dark Lark".
So, all well and good, but now (after looking at those prototype pictures), I wish I'da also ordered up a couple of snowplows from Kato so I could've really finished these things off. I tell ya, you get one thing off the "to do" list only to add two more! Sheez, what a hobby...
12/14/12 - More fun with Rock Island red

Figuring I'd better hurry up and make use of that magic red paint before it rots on me, I went ahead and got myself a Kato SD40-2 and painted it up in Rock Island livery. So, hurray, my U-Boats now have somebody new to play with. I also took the opportunity to fix up my Life-Like GP18 a bit -

I don't know what the brain wizards down Life-Like way were thinking when they went with that super light gray coloring for the trucks and fuel tank, but whatever the reason, a little Dark Lark quickly swept all of their shenanigans under the rug.
On a side note, I did go ahead and pick up a couple of Kato snowplows for my U30C's. Unfortunately, I couldn't figure out a way to get them to work with my MT pilots and couplers. Any way I tried to mount them basically prevented the couplers from pivoting properly, so I eventually just gave up. Oh well.
12/17/12 - Finished up the DM&E "Pioneer" business car

These Lowell Smith / Micro-Trains SP&S business cars are really nice models, but unfortunately they really aren't much of a match for the DM&E's (nee MoPac) business car. It has one too many vestibule doors, the windows are all wrong, the trucks are all wrong, and most of the detailing is wrong (or entirely absent). But still and all, as foobies go I guess it's not too terribly bad. It's certainly a step up from my original idea (going with a Kato corrugated business car).

I did modify the car a bit in order to ameliorate at least some of its overt foobiness. First off, I removed the slatted side-gates from the end-platform and replaced them with solid gates. Next, I added some BLMA handgrabs to the ends of the car and a pair of non-operational marker lights to the obs platform (drilled a couple of holes and filled them in with Krystal Kleer). Lastly, I added a bunch of roof doo-dads that more or less approximate what's up on top of the prototype (or at least what's visible from from my ground-level pictures). I did consider adding those curving roof side vents, but couldn't really think of a good way to do them. Eventually I just decided that "nothing at all" would probably look better than "half-assed".
For trucks, I replaced the original MT Commonwealth heavyweight trucks with some more modern Kato "GSC 61-RDO" roller bearing trucks. This required drilling new bolster pin holes (since the original holes left the trucks sitting too far away from the ends of the car). I also had to file the bolster mounts underneath the car down a bit to get the car to sit lower. Once on the rails, I discovered that the "fat axle" Kato wheelsets in the center of each truck were rubbing against the bolster pins, so I replaced them with some Fox Valley (I think, or maybe BLMA) wheelsets with skinny axles.
I did consider modeling that black "coupler cozy" thingy underneath the observation platform, but ultimately decided to leave it off. I do have the decals for it, but from what I understand it's only used when the car is parked (to prevent overly zealous switch crews from moving the car around when they shouldn't and knocking all the China off the shelves).

So, there ya go - an N scale DM&E passenger train. I wonder if I'm the only person in the world who has one?
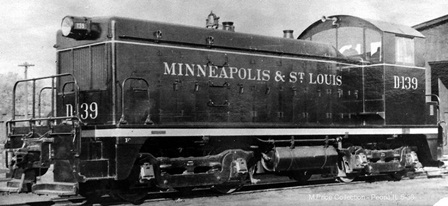
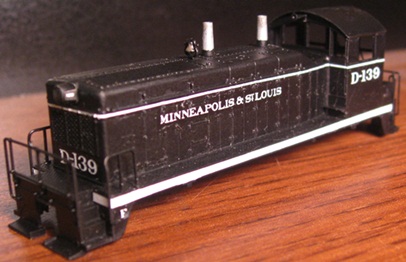
01/02/13 - Whipped up an M&StL NW2
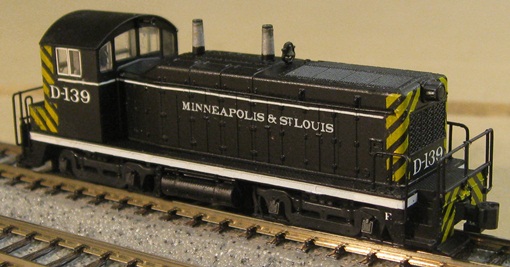
I figured that the odds of Kato ever doing an M&StL NW2 were pretty slim, so I decided to take a whack at doing one myself. I mean, basic black? How tough could it be, right?
Well... right off the bat I screwed up by purchasing a PRR NW2 instead of a C&O NW2. In my defense, I figured that stripping the paint off a model that was already black would simplify things quite a bit. Unfortunately, what I didn't realize is that the exhaust stacks on the PRR model are all wrong for an M&StL NW2. The M&StL's NW2's had the "as delivered" short stacks (ala the C&O model) and then, circa 1942, added extensions -

Rather than start over with a C&O model, my bright idea there was to simply paint the top 3/4's of the stacks silver (to simulate the extensions) and leave the bottom 1/4 black. OK, still not the right shape, but I don't suppose there are more than a dozen guys on the planet who'd notice the difference anyway. I also went ahead and painted the bell Floquil Rail Brown.
Deciding on a decal scheme took a bit of cogitating as there are a number of options. The Louie's pair of NW2's were initially delivered with numbers D-139 and D-740. Circa 1956, D-139 was changed to 100 and D-740 was changed to 101 (and still later on, to C&NW 201). The initial numbering scheme is kind of interesting insofar as it represents the month and year the engines entered service (and with the "D" standing for diesel). The second numbering scheme riffs on the NW2's horsepower (1000). As for mine, I decided I liked the month/year scheme and went that way.
As for the paint and graphics, I had two options - either the "as delivered" black w/ white graphics scheme, or the post-1942 black w/ white graphics and yellow end-stripes scheme. And after deciding that the early scheme was just a bit boring, I decided to go with the later scheme.
After stripping off the PRR graphics, I sprayed the whole thing with Floquil Engine Black and then set about applying the decals. The "Minneapolis & St Louis" came from my ever-dwindling supply of Oddball "M&StL Box Car" decals. The white stripes (sill and body) came from a generic Microscale white stripe set. I applied the "D-139" and "F" decals one character at a time using Microscale's "White Roman Letter/Number" set #70001 (and from the "desperate times call for desperate measures department", I used the crossbars from three "H" decals for the hyphens) -
As for the yellow herringbone stripes... well, kind of an adventure. Nobody makes any out-and-out M&StL switcher decals in N scale, so I had to find a set from another railroad that I could use instead. And after browsing through Microscale's online catalog, I decided that their Reading set (60-708) looked the most promising.
Once I got down to it, the main tricky bit with the Reading stripes is that they're not quite wide enough to cover the cab end all at once. So, you basically have to do the middle first and then add on extensions to get the stripes out to the edges.
Another tricky bit is fitting stripes around the radiator grill and the cab/nose numbering. As it turns out, I just wasn't skillful enough to pre-cut decals such that they would neatly surround those areas. So, what I did instead was Solvaset all the nearby white decals in place and then lay oversized stripe decals over the entire area. Then, after the stripe decals had dried, I used a really sharp Exacto blade to cut away the stripes that wound up in no-stripe areas. A sharp blade is important because the dried decals tend to be pretty brittle and you risk losing more stripe than you really want to if you don't have precision control over your cuts.

One problem with the yellow stripes is that the underlying black paint changes their hue a bit (pushing them a few ticks towards green, oddly enough). And if I were more ambitious, I probably would've double-striped everything to get a more correct shade of yellow. But me being me, I figured that there were too many opportunities for screw-ups there, so I just left well enough alone.
Two sets of Reading decals were just barely enough for me to get this one model done, and if I were to ever do this again (for, say, an Atlas S-2) I'd order
three just to be on the safe side. Of all the various decals on the sheet, the only ones that really work for an M&StL switcher are the GP39 and GP40 decals
(4 decals in total).
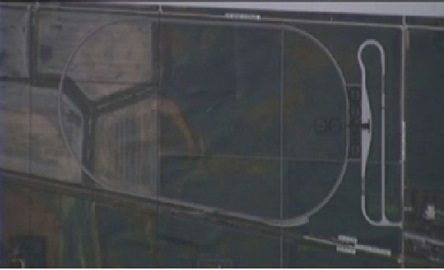
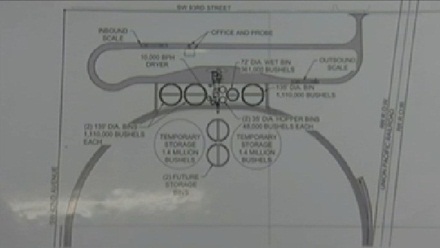
01/17/13 - They just can't seem to stop meddling with my town!
Boy oh boy, and I thought it was annoying when SunRich moved in a new grain dryer... Well, apparently those were the good old days because now the town has
gone ahead and green-lit an entire new grain elevator operation - complete with a giant loop of track!
Apparently they're putting it on the south end of town (across the road from the SunRich admin building), which is fortunate for me because that's literally
the only place where I have any room at all to expand my layout. But day-ohm, this thing is going to be freaking huge!
Honestly, this is getting a little crazy. I suppose next they'll be building a steel mill and an intermodal terminal down there...