
01/11/12 - Progress on the Hope Lutheran Church
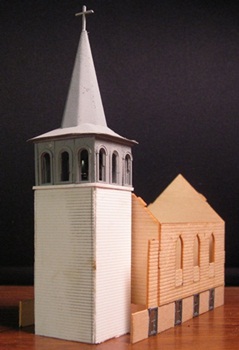
Man, I have been working on this thing (on and off) for months. However, the good news is that although there's still a looooooong way to go, I think I've finally gotten over the hump. I started off by using a Blair Line lasercut-wood kit for the main/original part of the structure - this because it was about the right size and shape and had the right kind of pointy-top windows (sorry, no, there's just no way I was going to be able to cut those myself and have them come out right). The only modification I had to make was to debigulate said windows a bit by gluing in some filler scraps. Once the walls were glued together, I then used some more wood scraps to build the "concrete" foundation and then added some styrene windows for the basement. And, well, so far so good. But then came... the dreaded steeple! Gah!!
The first part of that particular slog was to build the belfry - which basically boiled down to finding some suitably sized/shaped window frames, making styrene rectangles for the "walls", and then cutting and filing the weirdo openings for said window frames (a task which took me, oh, a month?) Unfortunately, as I was building this monstrosity I never bothered to plunk it down next to the nascent church in order to see how the relative sizes were matching up. So, it wasn't until I'd actually finished the thing that I realized I'd gone way too big with it. Aargh!
Not wanting to start over from scratch (and thus have to remake all those friggin' window openings), I used my Chopper to cut each wall into three pieces, sanded each piece as small as I could get it, and then glued the pieces back together. And although the end result is still a bit too big as compared to the church proper, I guess it's at least livable. So, next up? Yikes, the steeple...
First off, I knew there was absolutely no way I was going to be able to fabricate the thing myself. As I learned back on the SunRich grain dryer, complex geometric shapes just ain't my strong suit. So, I once again enlisted the aid of my buddy Peteski, who took my desired dimensions and put together some nifty cut'n'fold graphic templates for both the steeple and belfry roof. Vis -
Pete suggested that I simply print them on my laser printer and then build the steeple out of paper. And as it turns out, that was indeed the easiest way to skin the cat. But, of course, it took a series of failed attempts on my part before I eventually reached that conclusion -
First failed attempt - Right from the get-go, I was quite certain that if I went with paper for this project I would inevitably wind up sticking a misplaced elbow into the mix somewhere down the road and crumple the whole thing into wretched oblivion. So, I decided to try traditional styrene first. IE, I printed out the templates, cut out the individual surfaces, traced them onto styrene, and then cut out the corresponding pieces. Ah, but the gluing together thereof? Hurm, not much luck there. The tolerances of Pete's finely crafted templates are such that any variations from the original dimensions at all resulted in a whole bunch of stuff that just didn't go together. So -
Second (and third) failed attempts - OK, so tracing onto styrene didn't work. My next bright idea was to run the thinnest piece of styrene I had on hand (.015") right through my laser printer and then cut and glue the individual pieces together from that. First try? Same "it just ain't fitting together" problems. Second try? Ugh, the styrene sheet got jammed inside of my printer and actually started melting (fortunately, no permanent damage). OK, so enough of this crap. On to Plan D -
Fourth failed attempt - Resigned to the fact that I'm simply not craftsman enough to hand-render this stuff in styrene, I decided to give the paper route a try. And lo, all goes well- at least for a while. But, as I'm gluing the various tabs and whatnot together, I eventually get the relatively flimsy printer paper shapes crushed up and discombobulated to the point that everything looks like crap. Crikey, next!
Fifth (and final ) attempt - OK, so this time I print out the templates and then spray the paper on either side with a good soaking of Krylon Crystal Clear. Then, once said spew had dried and stiffened, I cut out the templates, performed the various folding exercises, glued the tabs together, and, well- ta da!
OK, yah, it's still a bit decrepit looking. But fortunately for me, the 90+ year-old prototype isn't in much better shape (thankfully, the saving grace of modeling old buildings). But mediocre modeler decrepitude aside, I think it's going to work out OK. Now to get back to some nice simple wall construction (for a change) and finish up this beast!
02/05/12 - Another Rock Island detour
I decided that my doodlebug fleet needed a representative from the Rock Island contingent. And yeah, AFAIK the Rock never actually operated any gas-electrics in Minnesota. But hey, since when has that ever stopped me?

Fun stuff, but I guess it's time to get back to the church. Either that or an AB6 (moohaha!)
02/20/12 - More progress on the Hope Lutheran Church

I finally finished fabricating and assembling all of the various walls. And although there's nothing particularly noteworthy to report in all of that, I guess I can say that this structure is turning out to be somewhat novel insofar as it's the first building where I've seriously intermingled wood and styrene parts. Why styrene? Well, although I did start out with wood for the guts of the thing, I just find it a lot easier to deal with styrene - especially when it comes to cutting door and window openings (scribed wood being somewhat fragile and prone to splitting when faced with Exacto blades and suchlike). Fortunately, white glue seems to do a very good job of holding wood and plastic together, so there doesn't seem to be any downside to mixing the two materials together as needed.
The round window on the belfry tower turned out to be a bit of a challenge. I used a drill to cut the opening, and although you'd think it would've come out perfectly circular, it turns out that it's pretty hard to wield a hand drill and get that sort of accuracy when punching through scribed styrene (or at least it is for me). My first attempt was decidedly not round, so I grabbed a larger bit and tried again. And although it wound up more circular than before, I still had to go in there with various files in order to "fix" the parts that weren't quite as round as they could be. And although it did turn out "good enough", it also wound up being a bit larger than I would have preferred. But, oh well, better that than starting over I guess.
As you can see, the prototype has a fairly mundane "wheel" window (well, what would one expect from a church in a town of a mere 100 souls?) -

Unfortunately, it's tough to get a good "straight on" shot of said window (not without a jet pack, anyway). Worse still, the colors don't really show very well from the outside. Worse worse still, I couldn't find any decent web pictures of similar windows to use for my model. So, figuring I was basically free to use any damned window I wanted, I opted for total insanity and went with a picture of the 17th century Rose Window from Strasbourg Cathedral in France (shrunk down to the requisite size and printed on my laser printer). Take that reality!
Once printed, I glued the image to a thin piece of styrene and cut it out with a pair of scissors. And of course, the so-called "roundness" of my hand-cut window insert didn't really jibe with the alleged "roundness" of my hand-drilled window opening. So, I did a little judicious filing here and there (to get things to fit together as well as they were ever going to fit), and then allowed the white glue I used to fix it in place to fill in the remaining gaps. And, well, "not too bad" I guess. On the other hand, I'm not sure how my N-scale Lutherans are going to react to such an ostentatious "gift from above". Probably put them right off their hot dish...

Anyway, roofs, shingles, a bit of detailing, and I think I can call it a day on this baby.
03/04/12 - Finished the Hope Lutheran Church (click the link for side-by-side comparisons with the prototype)
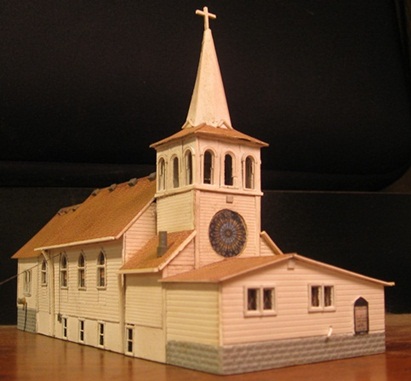
Hurray, it's done! And although it took forever to finish, I think it actually turned out pretty nice. For a change, I didn't skip a single detail of the prototype. And as is generally the case, all of that extra detailing does tend to grab the eye and distract one's attention from the stuff that didn't turn out quite as well as it should have.
Major kudos to my buddy Peteski, who once again helped me out with his computer expertise. I wanted to use one of my scouting pictures to generate a graphic of the shingles (that I could then spit out to my printer). Unfortunately, the perspective is all whacked out in said pictures, so all of my attempts at cropping a usable image were for naught. So, I shipped one of my pictures off to Pete, who then worked his magic on it and sent me back a full-page graphic of perfectly prototypical shingles. How awesome is that??
With the various roof pieces in place and suitably shingled, it was then simply a matter of applying the aforementioned detailing (gutters, downspouts, chimneys, vents, various utility conduits and wires, light fixtures, printed window inserts, etc). I even went so far as to put a bell in the belfry (although you can't really see it, let alone photograph it). My bright idea there was to use an O scale steam locomotive bell and an O scale brakewheel (for the "ring the bell" thingy).
This time around, I found an easier way to build the "area light" for that south wall (as opposed to the way I built the one for the "big bin"). Instead of fabricating the entire fixture and running a bulb inside, I took one of those Minitronics "bulb with shade" dealios and simply glued a short piece of frosted tubing to the shade.

I was initially going to use another one of my RSLaser wooden staircase/landing things for the back door. Unfortunately, it's not really the right size (not wide enough). And after mangling a whole sheet of RSLaser parts in a vein attempt to bash a correctly sized staircase, I decided to just make my own. I started by slicing and dicing some Plastruct stairs into something wider, added a piece of scribed styrene for the landing, and then finished things off with some generic handrails.
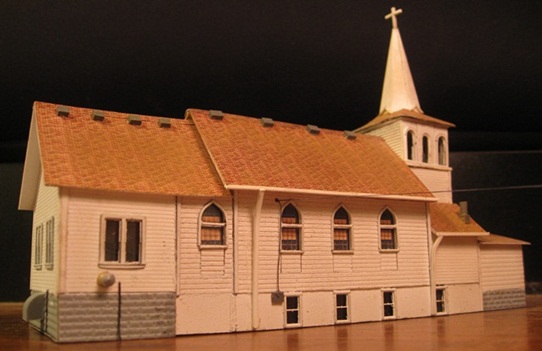
I guess my only regret is that I kind of wussed out on the steeple. The steeple on the prototype has these interesting "fish scale" looking shingles (or whatever) where most of the paint has peeled off. And although it would have been nice to capture that look, I decided that I didn't want to risk screwing up my steeple by attempting to glue on similar looking shingle graphics (the prospect of having to rebuild that thing being too horrible to contemplate). I did grungify it a bit with some Bragdon grey, but that was about as far as I was willing to go. Ah well, so it goes. The way I figure it, were I to actually go to all the trouble of replicating that peeling paint look, some wiseguy down there would only foil my efforts by repainting it.
So, that's that. Now I think I'll whip up a few quickie houses and finish up that north end of town (well, as "quickie" as it ever gets around here anyway).
03/04/12 - OK, so it's not a coal shed
I came across this interesting picture of Hope Depot in the recently published (and most excellent) "The Rock Island in Minnesota" (written by John C. Luecke) -

After asking around a bit, I learned that that little platform between the rails would have been used for getting a speeder on and off of the tracks, and that the wooden beams extending from said platform would be where said speeder would have been parked when off the rails. I'm further told that what I originally thought was some sort of coal shed is most likely a tool shed (based on its proximity to the speeder platform). So there ya go, my ignorance counter has ticked down a few notches.
03/11/12 - Finished Mayor Mark's House (click the link for side-by-side comparisons with the prototype)
Yep, this project consisted of me pulling out my credit card and buying one of Imex's prebuilt "Levittown Jubilee" houses. Talk about taking the coward's way out!

Actually, for a foobie stand-in it's not too awfully far off from Mark's house. And although I did toy with the idea of building an extension onto the garage (ala Mark's house), at the end of the day I figured my time would be better spent elsewhere. Let's face it; as houses go, there just isn't anything particularly interesting about this one.
This is my first experience with an Imex product, and I'm actually pretty impressed. The cast resin structure is nicely rendered and finely detailed, and the paint is neatly applied. Overall, well worth the ten bucks (or whatever it was) that it cost me. No, I wouldn't want to build an entire town using Imex structures. But used as "one here, one there" fillers/timesavers, they're certainly more than adequate.
03/12/12 - Modeling the M&StL North Star Limited
My goal is to eventually model a heavyweight passenger train for each of the three roads that operated in the towns on my layout during the steam era (C&NW and M&StL for the Waseca loop and Rock Island for the Hope loop). And since Model Power (for whatever strange reason) actually makes a model of one of more iconic M&StL passenger steamers, I figured the North Star Limited would be a good train to start out with.

Information about the North Star Limited is pretty, well, limited. However, after a bit of research I learned that in its later days (1920s and 1930s) the NSL consist generally went something like this - 4-6-2, head-end cars, chair cars, cafe-lounge, Pullman sleeper. So...
The motive power for my train is a Model Power semi-streamlined Pacific (M&StL #502), which I upgraded with Bachmann tender trucks, a decoder and Z-scale couplers -

There aren't many pictures of the NSL out there, but the few that I have seen generally show one or two head-end cars (either a baggage/mail car or an RPO and a full-baggage car). Opting for the largest possible consist, I started things off with a Micro-Trains heavyweight RPO. The windows are bit off (3-3 instead of 4-2), but otherwise it's a decent enough stand-in for #750 -

I had to kind of wing it on the decals since the only picture I could find of an M&StL RPO was pretty blurry. But I think they went something like this -
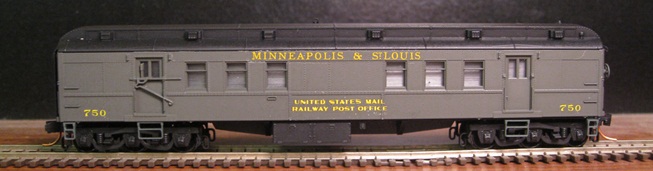
The yellow "Minneapolis & St Louis" came from the Microscale M&StL diesel set. The numbers came from a generic Microscale "yellow letters and numbers" set. All the rest came from Microscale's "Central of Georgia" set #60-1126 (oddly enough, the only Microscale passenger set I could find that matched the yellow of the Minneapolis & St Louis decals).
For the full-baggage car, I used the Wheels of Time model. At 70', it's 10' longer than the prototypical #394. But still, a decent enough stand-in otherwise. And no, the decals are not that crooked. My stupid camera tends to go all fish-eyed on these close-up shots, making things look way more skewed than they really are -


Unfortunately, nobody makes anything even remotely like the M&StL's 70' wood-sided chair cars, so I had to build #854 on my own -

My bright idea here was to graft a couple of Athearn Overland sleepers together (that model having more or less the right kind of windows), and then splice on the vestibules from a Micro-Trains heavyweight coach -
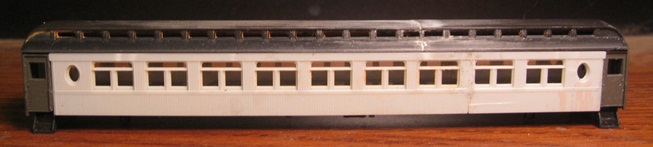
To get the correct length, I wound up with one too many sets of paired windows. But oh well, so it goes -

According to old M&StL passenger timetables, the Pullman sleepers used on the NSL varied over the years. Prior to the emergance of all-steel cars, a combination wood and steel 12-1 was used. Circa 1930, all-steel 12-1's were used. And right before the demise of the NSL (1935), 8-section buffet/lounge cars were used. Well, good and bad news there. The good news is that Micro-Trains actually makes an all-steel 12-1. The bad news is that nobody (and I mean nobody) seems to know the names of any of the all-steel 12-1's that Pullman assigned to the M&StL. What I did find out is that at least one of the earlier wood/steel 12-1's was called "Albuquerque" (this from a derailment report) and that the later 8-section cars were called "Propeller Club" and "Circumnavigator's Club". Unfortunately, nary a sliver of information about the steel 12-1's.
So, stymied in my attempt to find a correct name, I pulled out my set of Microscale Pullman sleeper names and grabbed one ("White Bear Lake") that at least had a Minnesota connection. Annoyingly, White Bear Lake wasn't a 12-1 (said decal set being completely bereft of 12-1 names). So, right car, wrong name. Oh well.

That's where things stand at the moment. I still need to build another chair car (#395) and a cafe-lounge car (either Marshalltown or Mason City). Sadly, getting all the Athearn sleepers I need for these bash jobs requires tracking down four-car sets (each of which includes a single sleeper) and then dumping all the excess cars on eBay. So, a slow, tedious (and expensive) process to be sure.
03/23/12 - Painted an M&StL SD7
I recently learned that The Louie actually rostered a couple of SD7's back in the day. And as was their wont, they ran them in two completely different livery schemes over their relatively brief lifespan - grey, yellow & black as-delivered and red & white later on. But since I really liked the look of the as-delivered scheme, I decided to go that way -

I started by adding a winterization hatch (as per the prototype). I also played around with adding all-weather windows to the cab (available in etched brass from Gold Medal Models). Unfortunately, I apparently don't possess the skills necessary to bend a tiny little piece of flat brass into a non-mangled box. So, after wrecking a bunch of them I decided to just punt on that whole deal. It's always going to be summer on my layout anyway, so what the hey?

Unfortunately, I think I wound up biting off a bit more than I can chew with this particular paint scheme (vis'a'vis all the fancy masking). So, once I'd finished I decided to conceal some of the slop by pushing the calendar forward and few years - IE, sticking on "300" decals (as opposed to the original "852"), and then weathering the heck out of it.
And yeah, If I ever get around to doing her sister, I'm definitely going with that simpler red & white scheme...
Addendum from the distant future - Well, this is embarrassing. It's turns out that what looked like black in my reference pictures is actually supposed to be dark green (a fact that I eventually learned when Atlas released their own SD7's in the same paint scheme). D'oh!

04/09/12 - The North Star Limited is ready to roll!
As threatened, I spliced together a couple more Athearn Overland sleepers for cafe-lounge car "Mason City". The only difference between this car and my previously built chair car is that the tops of the arched windows have been covered up (ala the prototype). I wonder why they did that, anyway?

Apart from the above diagram, there aren't any pictures of Mason City or Marshalltown out there (not that I've been able to find, anyway), so I had to take my best guess as far as how best to cover up the window openings. I've seen pictures of similarly rebuilt cars belonging to other railroads where the arches were covered up with slatted wood and others where the coverings were flat and featureless. As for mine, I ultimately decided to go the slatted route and fabricated tiny little filler pieces out of scribed styrene. Unfortunately, these wound up a bit raggedy looking, and if I had it to do over again I think I'd go with small pieces of strip styrene instead (much easier to get uniform shapes that way).

Since building these Athearn "franken-cars" was turning out to be such a time and money consuming venture, I decided to try something a little different for the final chair car - namely, going with an old (1970's) Western Railcraft wood-sided coach kit (scrounged up on eBay). And jeez, what a major exercise in frustration that turned out to be. Said kit basically consists of some etched brass sides and ends and a few pieces of balsawood (out if which you're supposed to fabricate the base, the roof, and all of the detailing). I tell ya, they must've had some real modelers in N scale back in the 70's, 'cuz I sure don't see anybody buying anything like that these days. Then again, since I've never actually seen any completed kits show up on eBay, maybe people weren't buying/building 'em back then either.

Having said all that, things were actually going along pretty smoothly... at least until I decided to deviate from the instructions and stick on an underframe built from leftover Athearn parts. In my defense, I was thinking that this was actually going to save me some effort down the line. Unfortunately, using white glue to stick said plastic underframe to the balsawood base was a huge mistake. The minute the glue touched the wood. the whole thing instantly warped out of all recognition. And in the process of trying to fix things, I basically destroyed the whole car. Um, oops?
Suffice it to say, at this point, the idea of going back to buying (and then destroying) another MT coach and two more Athearn sleepers in order to build another frankenstein chair car was sounding really tedious and expensive - especially after wasting so much time and effort on that damned kit car (not to mention the fifty bucks it cost me). So, I instead started looking around for the easy way out.
My first thought was to skip having a second chair car entirely and go with a business car instead. I mean, who's to say that the M&StL never hooked up their "Twin Cities" tail-end observation/business car to the NSL as part of a consist that included only one chair car? Nobody, that's who! So, I started comparing pictures of Twin Cities to my MT heavyweight observation car just to see how big of a blasphemy this was going to be. And what I noticed was that the early pictures of the TC car show it with wood sides, whereas later pictures show it with all-steel sides. Well, hold on there Matilda! If Twin Cities received the steel-sided treatment, who's to say that First Class Coach #42 didn't get the same treatment somewhere along the line? Nobody, that's who! (Yeah, this is how my mind works when I start to get all lazy on a project).
Anyway, after comparing one of my MT paired-window coaches to the diagram for M&StL Coach #42, I decided "yep, close enough for me" -

And one quickie decal job later, my consist was complete -

So, y'know, liberties were taken. But at the end of the day, I think it's a pretty decent train. And given the scant historical/photographical information available, my guess is that the Prototype Police will likely give me a pass. I mean, when you're trying to model an entire passenger train based on a handful of pictures that look like the one below, a certain amount of slack must be granted, eh?

So anyway, that's that. Time to get back to Hope and build some more houses.
04/23/12 - My new Life-Like GP60 is all patched up and ready to roll with The Borg.
I pre-ordered this model (for encyclopedia review purposes) so long ago that I'd actually forgotten it was coming. But as it turns out, DRGW GP60 #3155 fits in quite nicely with my roster of post-CNW UP diesels. I don't know whether or not LL/Walthers picked #3155 for this reason, but after the UP's acquisition of the DRGW, DRGW #3155 became UP #1901. And based on pictures found on rrpicturearchives, it's been seeing service across pretty much the entire UP system right to this day -

Life-Like did a really beautiful job on this model, so all I had to do was apply the UP "patch" decals, re-decal the numberboards, paint the handrails white, paint over the side/rear numbers, add a couple of details (sunshades and a snowplow), and then age the whole thing a bit with a coating of flat finish -
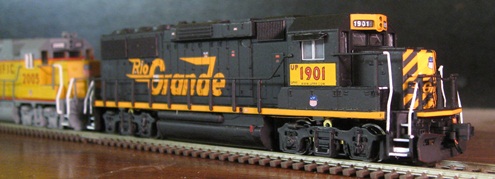
I don't know what it is that I find so appealing about these patch jobs, but whatever it is, it sure gets my modeling juices flowing. Fortunately for me, the DME has more patched-up / second-hand locomotives than you can shake a stick at. So, definitely something to look forward to there.
05/04/12 - Finished the Krause House (click the link for side-by-side comparisons with the prototype)
As foobie stand-ins go, this one (Branchline Trains' "Albion House") matches up with the prototype pretty well. No, it doesn't have the distinctive attic dormer of the Krause house, but other than that it's pretty close -

Assembling this kit was a bit more frustating than usual, as all the various parts seemed to be just a little bit "off" as far as how they fit together. In fact, although I had actually planned on building it with the supplied porch (despite the fact that the Krause's house doesn't have one), I eventually gave up on that because I simply couldn't get it to go together properly. And I sure wish I'd made that decision up front, because hiding all the little "porch holes" in the front wall (with Squadron Putty) would've been a hell of a lot easier had I done it before I'd put the whole damned house together...
Apart from leaving off the porch (a decision I'm now going to claim I made in the name of prototypical fidelity), I also added a few prototypical details to further Krause-ize my kit - namely, a satellite dish, roof and wall vents, additional shutters, a wall light by the front door, steps and handrails, and a street number placard.
So, that's that. Now I guess my N scale Krauses need a garage.
05/06/12 - Finished the Krause House garage
I don't have any pictures of the other side of the house (and hence, the garage), but since I'm not going for 100% prototypical replication here anyway, I figured my second Atlas garage would work just as well as anything else -


The only twist was that the garage didn't quite cover up the first story windows on the house, so I had to pull all that stuff off and then board up the openings with some leftover wood scraps.
At this point, it looks like I'm only going to have room for one more house up here on the north side (Fisher Dude House, natch). So, wow, that means I just knocked seven houses into "selective compression" oblivion with a single stroke of my pen. My apologies to the Herzogs, Fischers, (other) Krauses, Meschkes, Kilcoynes, Heises and Srsens!
05/21/12 - Finished the SunRich machine shop (click the link for side-by-side comparisons with the prototype)
This was a relatively simple scratchbuild, although the garage door windows did turn out to be a bit of a bitch. The openings are way too small for a cornerpunch, so I had to freehand them (cut the holes with an Exacto blade and then file them larger and larger until they were the desired size and shape).

My problem is that I find it extremely difficult to make any two openings exactly the same size. The second one will usually wind up a titch larger than the first one... at which point I'll try to fix the first one, only to have it wind up a titch larger than the second one (and on and on back and forth). In fact, I screwed up the windows on the rear overhead door so much that I wound up only having enough room for three (as opposed to the prototype, which has four). Oops!
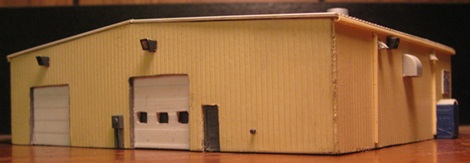
As structures go, this one is pretty bland. However, it does sport a decent amount of interesting detailng (area lights, signs, gutters, downspouts, vents, a port-a-potty, and various bits of electrical foofarah) -


Those safety bumpers/barriers were also a bit of a pain to fabricate - a nightmarishly diabolical combination of nylon screws and various fiddly bits of styrene that just didn't want to go together symmetrically. Although looking at them now, I guess they did wind up looking OK. On the other hand, what was I thinking with those overhead doors? Seems like I could have made them a good half inch taller? Dunno what my thought processes were there (or if any actual thought was ever part of the process to begin with).
As I continue to shoehorn models into my N scale version of Hope, I've definitely reached the point where I'm pushing up against the annoying limitations imposed by my 4' X 8' space. I've already had to send seven north-end houses to the selective compression dustbin, and now it looks like I'm going to have to similarly vaporize the SunRich "premium conditioning plant". As things stand, I'm barely going to have enough room for a downsized version of the south elevator -


More annoyingly, I've also had to move the shop and the agronomy warehouse about a foot north of where they should be just to keep them from falling
off the edge of the layout.
I must say, the fact that the railroad facilities and the town proper aren't parallel does make for a more interesting looking model railroad,
but it's sure making it hard for me to cram everything I want into the available space. And once again, I have to laugh at "three years ago" Mark (the guy
who thought he was going to fit all of this onto a table-top roundy-rounder).
06/06/12 - More heavyweights
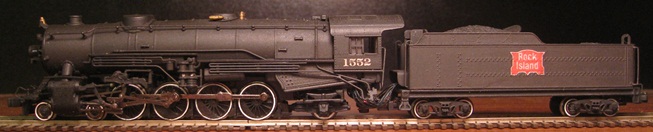
Continuing along with my heavyweight passenger train project, next up is the Rock Island "Mid-Continent Special" (service between Minneapolis
and Houston - by way of Hope). For the motive power, I have my choice of passenger steamers - a Model Power 4-6-2, a Bachmann Heavy 4-8-2 or a Bachmann Light 4-8-2
(and I promise, one of these days I will put a correct number on that Heavy Mountain).
As with the North Star Ltd, actual pictures of the MCS in action are pretty scarce. But based on the few photos that I have seen, head-end equipment seems to
have generally consisted of a couple of baggage cars and an RPO. So, for the baggage cars I used a couple of Wheels of Time models (70' and Harriman-style).
And since these were actually factory-painted in Rock Island livery, I'm assuming (or at least hoping) that they're more or less prototypically
accurate -
For the RPO, I went with the only game in town (Micro-Trains). Unfortunately, said MTL car doesn't look anything like any of the Rock Island RPO's I've
seen pictures of (the doors and windows are all wrong, as is the roof). And although mangling car-sides isn't in my repertoire (yet), I figured I could
at least do something about the roof (namely, steal the roof off one of my Wheels of Time Harriman coaches, chop it down to size, and then stick it on
the MTL car). The gold heavyweight-style Rock Island decals are from an outfit called "Oddball Decals". Unfortunately, said set doesn't include any actual
car names (but more on that rant in a moment).
Finishing up the head-end festivities, I decided to also whip up an express reefer (an Athearn car stripped, repainted and festooned with Oddball decals) -
Based on Rock Island
timetables from the 20's and 30's, the actual passenger equipment used on the MCS was constantly changing. Well, no surprise there. But hell, it even varied depending
on what direction the train was headed ("eastbound" or "westbound"). So, coming up with the rest of the consist was a bit of a challenge.
However, at the end of the day, I decided to just settle on a consist more or less based on the
through car equipment listings in the August, 1932 timetable. To wit -
- Coach Equipment (westbound to Dallas / eastbound from Kansas City)
I decided that for my train "coach equipment" was going to mean "two coaches". So, I went ahead and
applied Rock Island decals to the couple of Bachmann doodlebug trailers I had sitting around doing nothing. I'm told that Rock Island heavyweight coaches
were generally numbered in the 2800-3200 range, so I went with 2827 and 2897 (picking random numbers because I didn't want any wiseguy rivet counters throwing
their prototype pictures in my face) -
OK, so now it gets complicated... the timetable shows the MCS as having a club car when leaving Mpls, but a chair car on the return trip. Well, whatever.
Nobody makes a model of either of those, so I decided to just grab an MTL coach and call it a chair car. For decals, I went with "DELUXE CHAIR 3112"
(based on a picture of said car I found on Passenger Car Photo Index). I used a Microscale
Pullman gold lettering set (applied to the car one stinking letter at a time) -
As for getting a meal, the MCS had either a dining car when leaving Mpls or a cafe-parlor car on the return trip. So, I opted for an MTL 28-1 Parlor car.
Now, at this point I really have no idea if the CRI&P's parlor cars were actually 28-1's (never having seen a picture of one). I also don't know
if they actually said "Cafe Parlor" on them or not. However, throwing caution to the winds,
I decided to follow in the footsteps of my chair car and identify the Cafe Parlor as such (although for all I know, Pullman 28-1's didn't
actually sport cafe facilities).
What I do know about Rock Island's cafe-parlor cars is that (according to the knowledgeable folks on the Yahoo RITS list) they had 3500-something numbers,
so I put 3512 on mine -
So, on to the sleepers. And here's where I really wish MTL would get into the decal business. I mean, they sell all these painted/no-name cars,
but they don't go so far as to provide anything in the way of actual name decals (and thus allow us modelers to finish the job). Even more
unfortunate is the fact that the OddBall heavyweight decal set doesn't include any car names either.
Fortunately,
I was able to come up with some correct names on my own. And although I still had to apply them one bloody letter at a time, they were at least the
right bloody letters for a change. According to the folks over on the RITS list, Pullman ran these 12-1's in Rock Island trains -
Acme, Amerene, Amesbury, Amidon, Angelo, Anita, Argo, Aspern, Avon and Callisto. As for my car, I went with the shortest name possible (for
obvious reasons) and opted for "Avon") -
Pullman-owned 10-1-2 sleepers operated on the Rock Island had names in the "Fort" series (Dodge, Gibbons, Jay, et al). I opted for "Fort Jay"
for mine -
MTL doesn't actually make a 14-section sleeper, so I had to diverge from reality a bit (more) here and instead go with a 3-2 Observation car.
Pullman-owned 3-2 sleepers operated on the Rock Island had names in the "Golden" series (Gate, Grove, State, et al). I opted for "Golden Gate"
for mine -
For future reference, I also learned these other Pullman-owned / CRI&P-operated sleeping car names from the RITS list -
- Buffet-Dormitory-Lounge - 8 cars named after on-line cities (Pratt, Meade, Muscatine, et al)
So, there ya go. The Mid-Continent Special rides again. OK, once again probably not the most accurate set of Rock Island cars ever assembled.
But hey, good enough for Spookshow, Inc. And now, back to the buildings. Whee!


- Club Car (westbound to Des Moines)
- Chair Car (eastbound from Dallas)
- Dining Car (westbound to Manly)
- Cafe-Parlor (eastbound from Kansas City)
- 10-1-2 Sleeper (to/from Los Angeles)
- 12-1 Sleeper (to/from Dallas)
- 14-section Sleeper (eastbound from Des Moines)


- 14-Section / Plan 3958A - 12 cars named in the "Prairie" series (City, Creek, Grove, et al)
- 8-1-2 / Plan 3979A - 20 cars named in the "Rock" series (Gap, Isle, Land, et al)
- 10-1-1 / Plan 3973A, 15 cars named in the "Island" series (Home, Rest, Rose, et al)