
04/29/11 - Finished the Miller Farm barn
Being more than a little burned out on scratchbuilding, I decided to take a break from all that and go with American Model Builders' "Country Barn" wood kit for this project. I mean, what the hey. I figured one barn is pretty much the same as the next, and all I'd really need to do to replicate the Miller Farm barn is match the colors. But of course, in model railroading nothing is ever as simple as it seems. 'Cuz when I started zooming in on my scouting pictures of said barn I discovered that the first "story" is actually comprised of large brown bricks (rather than wood painted brown). I mean, really? Are you kidding me? Who ever heard of a brick barn for crying out loud? Not me, that's who!
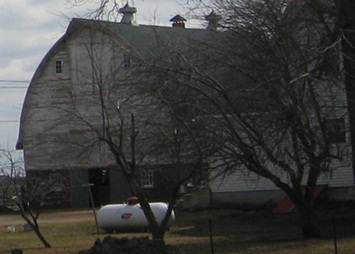
I did toy with the idea of sticking a layer of styrene brick around the lower walls, but the existing doors and windows would then all need to be moved/modifed... and then I'd need to add the little side annex of the prototype... which means I'd need to drive down there and take a bunch of better photos... and, yay, now it's basically another complicated scratchbuild. Well, to hell with all that I eventually decided. A barn is a barn is a barn, so let's just keep things simple here.
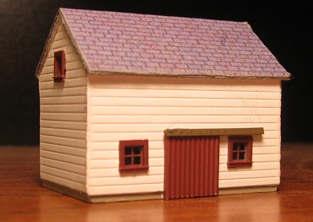
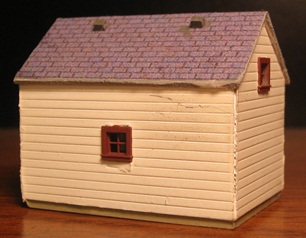
So, I painted the roof shingles Floquil Dark Green, everything else Floquil Reefer White, and then put it all together. And like the rest of AMB's wood kits, it was a bit time consuming (particularly the one-row-at-a-time shingles). But then again, it was also nicely mindless (at least as compared to scratchbuilding). Once assembled, I finished things off with a layer of Bragdon gray on the walls and Bragdon green on the roof.
The AMB kit comes with an optional cupola for the roof (and nothing else in the way of roof detailing). And here I decided I had to stray from the kit a bit. Minnesota barns just don't have cupolas (not that I can ever recall seeing, anyway). So, I decided to punt on that and instead go with roof vents that approximated the look of the prototype. Unfortunately, I couldn't really find any that looked right, so I had to scratchbuild my own (a project that took about 10 times longer than building the actual barn). Still, I think the effort was worthwhile as it captures the look of the prototype pretty well. OK, I'm still annoyed about the lack of brick walls, but I guess at the end of the day the overall look is "close enough".
As I suspected, there really isn't enough room on the layout for these farm buildings (not if I want to capture their "sprawled out" look, anyway). Also, there's precious little space between the mains for the road, the church, and the houses north of the farm. However, I think I have a solution to that problem. If I slice a 6"-deep section of foam off the west side of the 8' X 4' Hope sheet and relocate it over to the east side, I can then slide the outer main further away from town. Which should, hopefully, leave me plenty of space for the farm and everything else. Well, that's the plan anyway, so we'll see.
05/11/11 - Finished the Miller Farm house

I decided to go with the Atlas "Kim's Classic American Home" kit for this project. No, not a dead-on match for the Miller farmhouse, but it seems to capture the basic look of the place pretty well. Apart from putting it together, my main contribution to the project was to paint it (Floquil Dark Green on the roof, Floquil Boxcar Red on the chimney, Floquil Reefer White on the walls, and Floquil Reefer Gray on the foundation). I also put blinds in the windows, glued a length of Berkshire "utility wire" to the north wall, and added a couple of chairs (one occupied) to the porch. Feeling lazy, I didn't bother with any sort of exterior lighting (figuring that the interior lighting shining through all those windows would be "wow" enough).
Before I start slicing and dicing the foam, I figure I might as well finish up the rest of these farm buildings (just to see how much space I'm going to need). So, I guess the silo next.
06/10/11 - Finished the Miller Farm silo and shed

The only silo kit I could find that had the right kind of domed top was this AMB "Farm Silo with Shed" kit. Unfortunately, it's based on a wooden stave (rather than brick) prototype, but oh well. The silo is actually cast resin (one piece for the dome and one piece for the silo proper). Also included are a plastic fill tube, a ladder, and a small lasercut wood shed designed to connect to the unloading chute on the silo.
The prototypical silo doesn't have an external ladder or fill tube, so I assumed all of that stuff lives inside the brick conduit that houses the discharge chute and simply left them off of my model. I painted the silo Floquil Roof Brown and the dome Floquil Old Silver. I used some generic Microscale stripe decals for the iconic stripe and cross design around the top.

Unfortunately, the included discharge shed doesn't look anything like the rather ornate shed of the prototype. But at the end of the day, I figured some sort of shed was better than no shed at all. So, I painted it to match the barn (green roof, white everything else) and stuck it on to the silo. I finished off the festivities with various shades of Bragdon powder.

Oh yeah, and from the "I can't take my eyes off them for a second" department, I discovered on my most recent scouting trip to Hope that the barn has been completely repainted! I mean, come on, really?! Fortunately for me, the new color "scheme" is so freaking ugly that I was tempted not at all to replicate it. But jeez, these people really do need to leave their town alone until I've finished modeling it. I mean, who do they think they are anyway??
06/12/11 - Finished the Miller Farm garage

I went with an Atlas "Kate's Colonial Garage" kit for this one. No, it doesn't look a great deal like the prototype (vis'a'vis the location of its various doors and windows), but good enough for my purposes I guess. I see from my old aerial photograph of the farm that the garage did (at some point) have double front-doors (ala the kit), so it at least has that going for it. Unfortunately, the access door is on the wrong wall (and is going to eventually get blocked by another shed). So, my apologies to the farmers for making access to their garage that much more difficult.
I was kind of surprised to discover that this kit is actually laser-cut wood (pretty much the same deal as AMB's kits). I thought Atlas building kits were strictly styrene? Anyway, the kit comes with parts for two garages, so I guess somewhere along the line another one of these is going to spring up elsewhere in Hope.
I didn't spend much time worrying about making the kit more prototypical - a garage is a garage, right? For paint, I went with gray for the foundation and white for everything else. Once painted, I glued it together, stuck on the shingles, brushed on a little Bragdon powder and called it done. The shingles are actually one big piece of paper (as opposed to AMB's "one row at a time" insanity), so kudos to Atlas for eliminating that bit of annoyance from my life.
I think that about does it for kits for a while. Fortunately, the chicken coop and the rest of the sheds look like pretty simple scratchbuilds.

On an unrelated note, I also added a Kato 2-8-2 to my M&StL steam roster. Yeah, just another non-prototypical foobie project for yours truly. However, I mention it here because I discovered a neat trick for doing the large tender decals on M&StL steamers - namely, that the round logo from the nose herald decal in Microscale's HO M&StL "EMD F Unit" set is exactly the right fit for an N scale steam tender. So there ya go, Louie modelers - another arrow for your quiver.
On an even more unrelated note, I must once again sing the praises of this Unitrack. Blimey, the stuff never needs cleaning (or practically never, anyway). Seriously, I've been running trains almost daily for the past four months, and it was only in the past week that I finally had some dirty track issues to deal with - and then, only because I was test-running a new diesel (a Life-Like GP20). Said diesel's wheels were absolutely slathered in that wheel-blackening crap (which eventually transferred from the wheels to my track). But once I got out the old Bright Boy and cleaned the crud off, that was it - back to flawless running. I dunno what sort of metal Kato uses in this stuff (or how it compares to other manufacturers' track), but it is clearly less prone to corrosion. And given the size of my layout, that sort of reliability is definitely a major selling point!
07/25/11 - Finished (allegedly) an M&StL bay window caboose
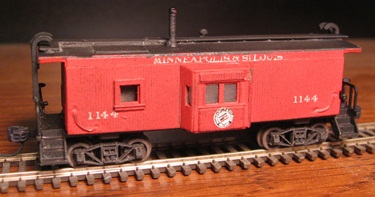
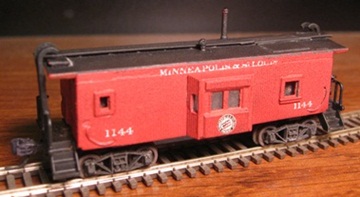
Ever start out having "one of those days", only to have it turn into "one of those months"? Well, I sure did - and I even have the photographic evidence to prove it! It all started when I decided that I needed a second M&StL caboose for my empire. And since I already had a wooden cupola caboose, I further decided that a wooden bay window caboose was the next logical step - y'know, basically a fun and simple little kitbash to squeeze in before embarking on more Hope scratchbuilding (shyeah, right).
Well, long story short, the project turned into a complete disaster (and one that I really should've just chucked into the trash). Basically everything that could go wrong did go wrong. But by the time days had turned into weeks, I decided that I really wasn't interested in starting over, so I opted instead to just finish the damned thing and get on with my life. I mean, if nothing else it does roll. And hell, it even passes the "twenty foot" test (well, the "thirty foot" test anyway).

In the mean time, I guess an M&StL bay window caboose will have to remain on my "maybe someday before I croak" to-do list. However, given everything I learned on this one, here's hoping that next one turns out a whole lot better. And if not? Hellooooooo basket weaving!
08/15/11 - Finished the Miller Farm chicken coops

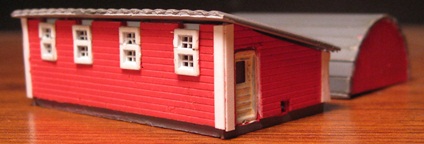
I scratchbuilt the larger of the two structures pretty much the same way I've been scratchbuilding everything else lately. However, since I couldn't find any windows that completely matched the prototype, I wound up custom-making some by gluing together pieces from two different windows (kind of klunky looking in my picture - but trust me, they're small, so ain't nobody gonna notice). The rest of the building is pretty simple - two layers of styrene for the walls (one scribed, one plain), a piece of scribed styrene for the roof, and some styrene strips for the corner accents. I don't have any actual scouting pictures of the east side of the building, but I figured there must be at least a couple of doors there (one for chickens and one for people), so I went ahead and added those. Paint is Testors "flat red" for the walls, and Floquil "reefer gray" for the roof and the foundation (I didn't bother to paint the corner strips since they were white already). Things turned out pretty clean looking (for a change), so I decided to eschew weathering entirely - finishing things off with some clear inserts for the windows, and then a layer of flat finish.
I was originally thinking I'd be kitbashing the "quonset coop" using one of the available quonset shed kits out there (Rix, et al). But since said kits are way too big as compared to what I needed, I eventually decided that trying to modify one of them would likely be a big pain in the ass. So, I instead opted to give scratchbuilding a go. The "bright idea" portion of the proceedings was how I made the end walls - namely, taking a quarter, tracing it on to a sheet of scribed styrene, and then cutting it out. Then, I simply folded it in half until it snapped and, voila, quonset walls. Next, I glued a couple of styrene sticks between the walls to form a base, and then finished things off by gluing on a series of styrene strips for the roof. And wow, what initially seemed like it was going to be a hugely complex project wound up taking less than an hour to finish.
Of course, it wouldn't be a spookshow quonset coop without at least a couple of glitches and compromises, right? First off, given the miniscule size of the western wall (already crowded with two windows and a people door) I didn't even bother with a chicken door (my apologies to the chickens). And once again not having any idea what the eastern wall might look like, I decided to cheat and just leave it blank. And of course, it wasn't until I'd actually finished the project that I finally noticed the aerial photograph I have of the farm (where two windows are clearly visible on said eastern wall). Ah well, so it goes...
Anyway, that's that. Now it looks like just one more shed and I'll be pretty much finished with the farm buildings.
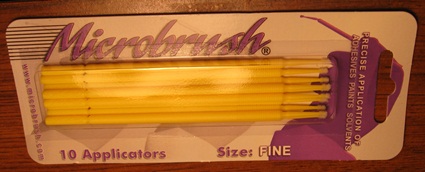
I haven't done one of these "Tools" sidebars in years, but I really must take some time out to sing the praises of these Microbrush applicators. It took me years to find just the right "fine" paintbrush. But as is generally the case with traditional brushes, it eventually died on me (a bristle here, a bristle there, it adds up). And not having any luck finding an adequate replacement, I decided to give these Microbrushes a try. And wow, I just couldn't be happier with them. Whether you're painting a tiny windowframe or gluing together miniscule parts, these applicators (available in small, smaller and smallest sizes) are the perfect tool for any eyeball-straining job. Better yet, they're super cheap (a couple of bucks for a package of ten). Better better yet, they're disposable. Finished a project? Toss the brush into the trash and get on with your life! All in all, these are some of the handiest modeling tools I've come across in years.
09/10/11 - Finished one of the Miller Farm sheds
This was a pretty simple scratchbuild (mainly 'cuz I didn't expend much effort trying to get the windows right). I tell ya, if you want huge/ornate windows, your options in N scale are legion. But small/simple rectangular or square windows? Ugh, not so much. Even the absolute smallest and simplest windows I have (Tichy Train Group "work car windows") wound up being a bit overlarge for this particular building. Worse still, they're also square (as opposed to the windows on the prototype, which are rectangular). But, oh well. At the end of the day it's just a generic shed, so who really cares?
So, anyway - two layers of styrene (one scribed, one plain) for the walls, and a couple of pieces of flat styrene for the roof (and wonder of wonders, I somehow managed to get the peaked walls right this time, so the roof actually looks good for change). I used Floquil Reefer White for the walls, Floquil Concrete for the foundation, Floquil Box Car Red for the windows and sliding door, and Floquil Rail Brown for the sliding door track (I also went back and repainted the garage windows Box Car Red, since they currently match the windows on this shed).
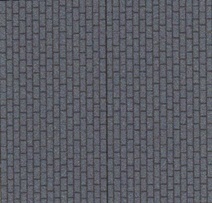
Speaking of the Atlas garage, I really like the simplicity of its shingles (IE, cut out a single piece of paper, fold it in half, glue it to the roof, and get on with your life). And although I still have one of those shingle sheets (for the second garage that comes with the kit), it turned out to be a little too small for this particular shed's roof. So, my bright idea was to scan said sheet, crop and resize the shingles from the scan, paste a bunch of copies of said image into a Word document, and then print it out. And, bad-a-bing, I now have a huge sheet of shingles (out of which I can cut whatever sized chunk of shingles I might need).
Here's the graphic if you want to use it for your own buildings -
At this point, I guess I'm about done with the farm. There's one more shed next to this one that I may get around to some day (it being kind of interesting looking). Unfortunately, there's just no room for the three eastern-most structures (the pole barn, grain bin and small shed). So, it looks like those are going to have to be my first official victims of selective compression.
In the mean time, I finally got around to moving things around a bit -
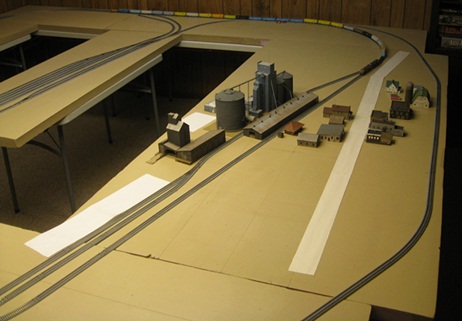
My original idea was to glue 6" of additional foam to the eastern edge of the layout (providing space such that I could move the outer loop of track further away from town). However, after spending some time actually thinking about the problem, I decided instead that it would be a lot easier to just slide the entire sheet (and underlying table) 6" to the east. Not only did this allow me to rejigger the track further east, but it also retained a measure of stability vis'a'vis the edge of the layout (which is already hanging out 6" over the edge of the 3'-wide support table).
After mocking up some paper road templates, it now looks like I'm going to have plenty of room up on the north end of town for the church and at least couple-three houses (which should be plenty enough for my purposes). The only downside is that I now have absolutely no room for the SunRich "Premium Condition Plant" (not unless I want to glue additional foam onto that interior corner - and lose a lot of aisle space in the process). But that's a problem to worry about 15-20 years from now (y'know, when I actually get around to finishing the SunRich complex). As for now, I think it's time to take a whack at that church.
Addendum - I was going through my giant "Box O' Windows" and I'll be damned if I didn't find some that would've been the perfect size and shape for this shed (namely, Tichy Train Group's "4 Pane Small Windows"). I don't know where they were hiding when I was digging around in there before, but oh well. I guess next time I'll have to look a little harder...
10/02/11 - Wired up the DM&E yard for operations
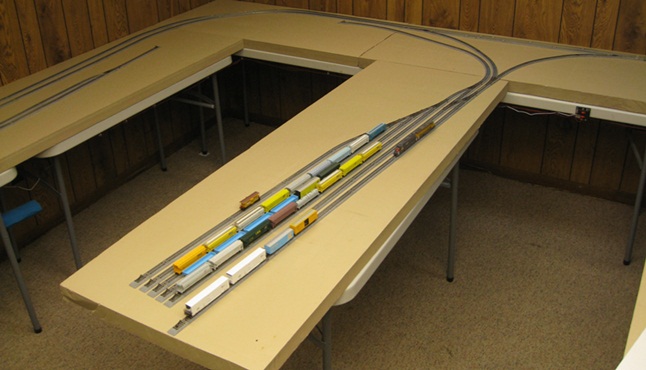
I decided I was getting tired of having to relocate all of my freight cars back to their display cases whenever I found myself in the mood to run some passenger trains. So, I finally got off my keister and made the Waseca yard operational.
Up to now, the main thing that's been preventing me from finishing this seemingly simple task has been the wye at the yard throat. Basically being a reverse loop situation, what I needed was some sort of auto-reverse module to flip-flop the electrical polarity of the yard tracks to match the polarity of whichever branch of the wye my incoming (or outgoing) train was taking.
Well, funny story. It turns out that there's no such thing as an auto-reverse module for DC-powered track. Rather, all of the commercially available auto-reverse modules are designed to work strictly with AC power (IE, DCC layouts). And since I've designed my layout to run both kinds of locomotives (DCC and DC), an auto-reverser just wasn't going to work. So, I opted instead to go with a simple Atlas "Twin" reversing switch. And although not as elegant as an auto-reverse module, it does accomplish the same goal. It also has the added benefit of working with both DC and DCC power.
I imagine at some point I'm going to be building a nice control panel for my yard. But for now, I'm still throwing switches by hand. So, I just screwed the Twin to the support table up in that general vicinity. I mean, what the hey? Since I'm still in "mock up" mode, I don't see much point in getting all fancy with the wiring just yet.
Once I got everything wired up and tried to actually run a train into the yard, I quickly realized that my wye track was a total disaster. What looked "do-able" back when I was forcing all this stuff together was now exposed for the unworkable mess it really was. IE, under closer inspection, all the ugly kinks and gaps where the track simply wasn't going together properly were now revealed for all to see. So, I pulled out my box of Unitrack and experimented around with different pieces until I found combinations that fit together smoothly in that wye situation. And lo, after much trial and error, I finally got a wye that my trains can zip in and out of with a nary a hitch. Hell, I even managed to break down a train and get it distributed out over the ladder tracks without any difficulty (although I did wind up extending that curvy offshoot a bit further west - having finally figured out what it's there for).
So, that was a fun diversion. Now, back to the church...
10/08/11 - The Golden State rides again!

OK, the Rock Island / Southern Pacific "Golden State" passenger train (Chicago-to-LA) never ran anywhere near Hope (per se). However, starting in the 1930's, winter-weary Minnesotans could book a ticket on a Golden State Pullman in Minneapolis and ride it south (through Hope) as part of the Mid-Continent Special (later, the Twin Star Rocket) and then hook up with the full-on Golden State in Kansas City. So, couple that with the fact that there are now (finally) enough factory-painted cars in Golden State livery out there to put together a decent train, and I rationalized that there was reason enough (however tenuous) to put together a model of that gorgeous and inconic train for use on my layout. Hey, if nothing else, it'll be good for the economy, right?
Like most large cross-country passenger trains, consists varied from year-to-year (or week-to-week, for that matter). They also varied depending on what part of the country the train was actually in at any given moment (what with cars being picked up and dropped off at various points along the route). However, not wanting to get too bogged down in all of the niggling details, I decided to just use this 1950s picture of the Golden State rolling through Illinois corn country as the basis for my train -

Based on what I've read, the consist of said train should go something like this -
- E7A & B
- RPO/Baggage
- Baggage/Dormitory
- Three coaches
- Coffee Shop
- Two sleepers
- Diner
- Three sleepers
- Observation
For the head-end power, I used a pair of Life-Like E7s in Rock Island "Rocket" paint (a scheme that I've always found a bit ugly, but which does seem to work really well with the Golden State colors). My Life-Like E's use old (plastic-chassis era) shells mounted on the newer all-metal / split-frame chassis. So yeah, super smooth runners and super strong pullers to be sure.
For the head-end cars, I started with a Con-Cor smoothside RPO. And although the above picture doesn't appear to show a full baggage car, I also acquired one of those for occasional inclusion in my train (also Con-Cor). Unfortunately, Con-Cor never sold any of their corrugated cars in Golden State paint, so I had to do the Baggage-Dorm myself -
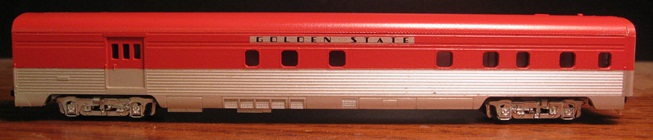
I had to go into full-on mad scientist mode for that red (or is it orange?) Golden State coloring; starting with Floquil "Soo Line Red", and then mixing in various drips and drops of Floquil "CN Orange" and Floquil "Reefer Orange" (and even a smidge of Floquil "Reefer Gray") until I got something that approximated that faded southwestern "is it red or is it orange?" look of the factory-painted cars. And although it turned out a little darker than I would have preferred, it's not too bad (especially given the fact that I'm pretty much hopeless when it comes to accurately matching colors). Fortunately, when it comes to railcars, my undies don't get too bunched over slight variations in color. In the real world (where cars have to deal with the sun and the elements) colors rarely retain their original paintshop hues for long. Consequently, finding an entire passenger train where the colors on every single car look exactly like all the rest is something that only happens in the fevered fantasies of anal-retentive modelers.
Anyway, once I'd finished applying my "close enough" paint, I finished things off with a few decals - Microscale set 60-1186 for "Golden State" and Microscale set PS-4-1/16 (1/16" silver stripe) for the background (no, I was not about to try to paint that).
None of the higher-end passenger car guys (Intermountain, Rapido or Walthers) have done Golden State coaches yet. So, I went with Con-Cor for those as well. However, since they all have the same name (Golden Nugget), I had to rebrand a couple of them. And not having any luck removing the Con-Cor lettering (not without also removing the underlying silver at the same time), I went ahead and just resprayed the cars with silver. The graphics (Golden Lute and Golden Bell) came from the aforementioned 60-1186 set -

I used a Con-Cor diner (Golden Banquet) for the "coffee shop", followed by a couple of Intermountain 4-4-2 sleepers (Golden Hour and Golden Sunset). Next up came an Intermountain Western Diner (Golden Chalice), followed by a Con-Cor sleeper (Golden Crest) and two Intermountain 6-6-4 sleepers (Golden Dome and Golden Locket). I then finished things off with a Con-Cor observation car (Golden Outlook). Yes, Con-Cor (as is their wont) also sells a Golden State "fantasy" version of their ubiquitous mid-train dome car. However, even I wasn't loopy enough to try to include that particular abomination in my train.
So, OK, more credit card than actual modeling here. But given the effort that's already gone into the #$%@! church, I figure I've earned the respite. And speaking of the church, ugh, I guess it's time to get back to work on that. I mean, I don't suppose the thing is going to finish itself (although I sure wouldn't bitch if it did).

