
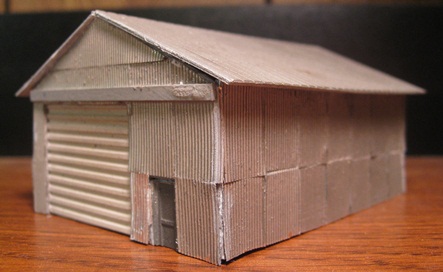
06/18/10 - Finished the SunRich Agronomy Warehouse (click the link for side-by-side comparisons with the prototype)
This building was a pretty simple scratchbuild (at least as compared to all that north elevator craziness). I started by creating the front wall from Evergreen sheet metal siding; the dimensions of which I based on the size and positioning of the various doors. Then it was simply a matter of sizing the remaining walls to match the front, cornerpunching the openings, fabricating some doors, and then gluing them in. Given the complete lack of windows, I didn't even bother going the whole "two layer" route on this one. As on previous buildings, the little sliding door track thingy is a piece of U-shaped styrene.
I cropped the "Notice - Authorized Personnel Only" signs from photos of the prototype, printed them on laser printer paper, glued them to some thin styrene, and then glued said styrene to the doors. And as usual, they wound up being a bit oversized. But I guess my preference is still legibility over scale fidelity. Same basic procedure for the "Hope Elevator Recommends Stabilized Nitrogen Because It's Best" sign; however, owing to the fact that the only way I could get a picture of said sign was standing right underneath it, the whole thing wound up looking like some sort of crazy Escher painting. Thanks loads to the SunRich employee who decided to park a trailer right in front of the sign the day I was down there taking photos. Skewed lettering aside though, I'm really liking this method for making signs - much simpler and much less annoying than trying to print and apply custom color decals.
Speaking of decals, I ordered up some Microscale "Hazardous Material Placard" decals for the little warning signs over the doors. Unfortunately, the set didn't include anything like the signs found on the prototype. So, I just grabbed a couple at random and stuck 'em on. And my apologies to any future firefighters who might meet with their untimely demise due to my sloth and inexactitude.

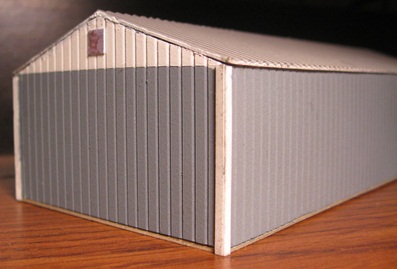
Owing to the two-tone paint job, I did have to do a bit of mask-painting. And since I didn't want to try to paint an assembled building, I decided to spray first and glue later. And yeah, as always seems to be the case, I made a big mess of it. I tell ya, some day I'm going to figure out how to glue painted styrene together without screwing the pooch. For the corner "accents", I glued on thin strips of white styrene (which, unfortunately, created yet another opportunity for glue/paint chaos). Oh, and yeah, my roof doesn't really line up with the walls in a couple of spots. So, something else for the to-do list - "learn how to make peaked roofs and walls that go together". Although to be fair, close-up photography isn't doing me any favors here. It actually looks a lot better in real life.
Not much else to report on the end walls - a couple more signs, some electrical foofarah and that's about it.

For the back wall, I wired up another "box style" area light. And like the one I built for the north elevator dump shed, this one wound up looking crazy huge (although, once again, it actually looks a lot more reasonable in person).
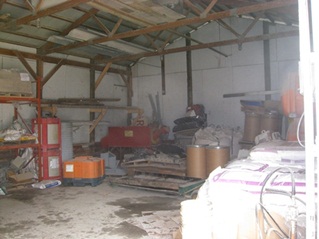
Speaking of crazy, I came this close to repeating my "long shed" interior detailing madness. Yep, somebody at SunRich left a door open and I just had to stick my head inside and take a peek. And before you can say "obsessive compulsive disorder", I'm sitting here plotting and planning just how I'm going to go about duplicating that mess - piece of junk for piece of junk. Fortunately, I came to my senses pretty quickly and decided that "junk is junk", so why waste a lot of time worrying about the particulars? I mean, jeez, we're talking about a building with a tiny little half-inch opening. Best to save all that OCD madness for the eventual exterior detailing (y'know, the stuff that people are actually going to be able to see).

For paint, I went with Testor's "Intermediate Blue" on the walls, Floquil "Reefer White" on the doors and trim, Floquil "Bright Silver" on the roof, and Floquil "Concrete" for the foundation. The prototype is fairly pristine looking, so I didn't bother with any overt weathering. Figuring my glue/paint adventures represented more than enough in the way of decrepitude, I simply finished things off with a coating of flat finish.
So, another piece of the SunRich puzzle falls into place. Unfortunately, I'm still stuck with my Shay Stadium layout, so I haven't been able to get started on all that mocking up that I've been going on about. I have posted Shay's "For Sale" status on this website, so hopefully one of the guys who expressed interest in purchasing it in the past will reemerge and take it off my hands. Failing that, I dunno. Maybe I go the eBay route once again (yuck). In the mean time, I think it's time to get back to main street - maybe take a whack at the bank or something.
06/20/10 - Mocking up Hope
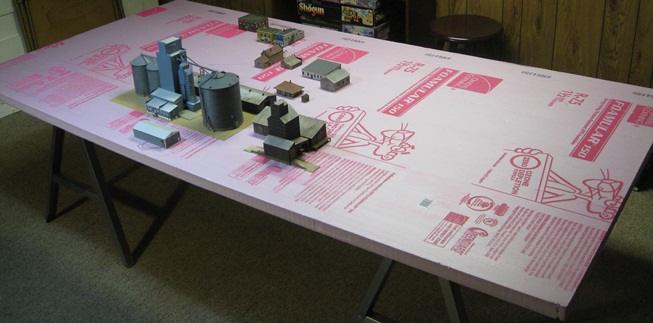
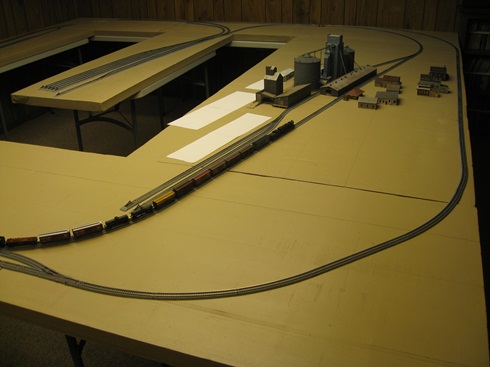
Although my basement situation (vis'a'vis Shay) is preventing me from getting started on a full-blown benchwork mock-up, I decided that I could at least pick up an 8' X 4' sheet of foam and see how the so-far Hope situation is playing out. And I guess as this point, so far so good. I used the various satellite/airplane photos I've acquired as a guide and placed all of the buildings more or less where they need to go (relative to each other). I didn't make any effort to compress things, but even spread out there still appears to be plenty of space in which to replicate most (if not all) of Hope.
For sure I'm going to have to lose a lot of the houses (at least half). But then again, that's been my plan pretty much from the get-go (although back then it was more about laziness than anything else). Also, there's going to be precious little room to do much in the way of farm fields on the eastern and western edges of town. But the way I figure it, there will be plenty of space for that sort of thing elsewhere. But wow, that meta-shed. Now it really looks oversized. I mean like HO-scale oversized. Hell, you could fit the entire depot inside of it. I'm definitely going to have to tear that thing apart and chop it down to size (ugh).
Anyway, it's good to no longer be working in a vacuum. Now that I can literally see how much space I have to work with, I should be able to avoid any nasty surprises in the future as I continue along with the buildings. As for my original plan to somehow fit all of this on top of my pool table, wow, what was I thinking? Talk about a non-starter...
It's funny, here I am just over a year into this project and I've lately been feeling that I just haven't accomplished a whole hell of a lot over that time. But now that I look at what I have done - assembled together in one place - it occurs to me that, building-wise, I've actually matched what I did on Shay (or very nearly so). And there sure aren't any prebuilts in Hope (or, for that matter, scratchbuilds in Slackjaw). So, although progress has been relatively slow, I guess I really am getting somewhere with all of this. Good to know, as I can use all the encouragement I can get.
07/08/10 - Let there be (more) light!
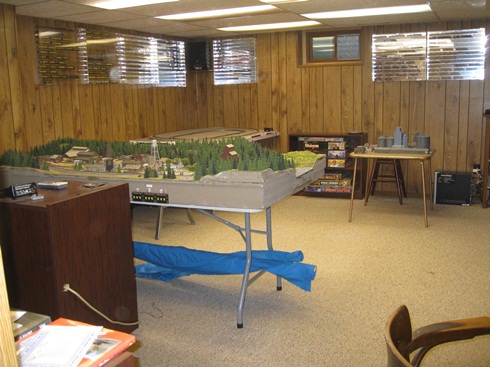
I finally got around to addressing my room lighting situation. As pictured above, I removed the old pool table lamps and then added a bunch more fluorescent panels to the ceiling. I put two 32 watt / 4-bulb fixtures on the existing circuit (more or less covering the area in the middle of the room vacated by the lamps), and then added a second circuit with four 32 watt / 2-bulb fixtures on the west side of the room. The second circuit has its own switch, so I don't need to have everything turned on all at once if I don't need all the light.
I really had no idea how many lights to go with, so I basically just stuck a fixture into every other ceiling panel and hoped for the best. And fortunately, things turned out just about perfect - the room is now nice and bright without crossing over into tanning booth territory. So wow, now I'm really ready to start thinking about benchwork... Or, well... almost. I still need to do something about Shay Stadium (sigh). Whatever happened to all those guys who were lining up to purchase it last year? Y'know, when I wasn't actually looking to sell it yet??
Oh well, enough whining. Time to go build something.
07/11/10 - The Tootin' Louie rolls into town

I've always been a big fan of Bachmann's "doodlebug" model. What can I say? Despite the noisiness, I just think they're really cool. And since the M&StL actually used gas-electrics to pull their passenger trains through Waseca, Albert Lea, et al, modeling one seemed like a de rigueur project for the Hope layout (not to mention a nice break from scratchbuilding).

The coach is a Con-Cor Budd lightweight. I have no idea how accurate it might be (vis'a'vis the M&StL), but good enough for my purposes I guess. The black "Minneapolis & St Louis" decals are from Microscale's "M&StL F-Unit" set.
I built the doodlebug trailer using a Micro-Trains troop sleeper (ala the prototype). The brass sides and doors are from an etched brass kit (made by Redball and distributed by Model Railroad Warehouse). And sorry, but apparantly I got the last one. I got the marker lamps from Miniatures By Eric - although I'm not sure they were really worth the effort. Basically they're tiny little blobs of white metal that only bear a passing resemblance to actual marker lamps. I did briefly toy with the idea of adding handgrabs, but ultimately decided that I didn't want to risk screwing up my one and only shot at those brass sides (my drilling skills not being particularly noteworthy).
The red "403" and "Minneapolis & St Louis" decals on the trailer are from Microscale's "M&StL Locomotives, Red & White Scheme, 1956-1960" set. As for the red "Baggage" and "Railway Express Agency" decals, ah, therein lies a tale. Since I've never really had much success printing color decals using my cheapie inkjet printer, I decided to see if I couldn't find some suitable red passenger car decals tucked away in Microscale's vast catalog. And unfortunately, the closest thing I could find were some decals from a Union Pacific set. Unfortunate because the font (sans serif) was all wrong, as was the red (too dark). Well, that wasn't going to fly, so I decided to make my own graphics using a word processor and then give my inkjet printer one last chance to redeem itself. And as suspected, it failed miserably (decals so faint as to be barely legible, and the color looking nothing like the color on my computer screen).
Well, it was at this point that I decided that I really needed to just bite the bullet and get myself a color laser printer - something I've been putting off for a while in vain hopes that somebody would come out with one that I could use to print white decals (y'know, white letters and numbers for locomotives and rolling stock). It seems odd to me that this isn't a standard feature on laser printers (or at least a readily available add-on feature). But really, since the demise of the Alps printer, it's just not something that's easily accomplished. So anyway, figuring it was high time I abandoned those particular hopes, I hied myself down to Office Max and picked up the cheapest printer I could find (as it turns out, a Brother HL-3040CN for $240). And before you can say "Tootin' Louie", I had myself some nice looking red decals.

I used Floquil Bright Silver for the 'bug and the trailer. For the candy-cane striping, I painted the nose Floquil "Signal Red" and then applied the white/clear stripes from the aforementioned Microscale "1956-1960" decal set (a refreshingly simple paint scheme, I must say). The "Minneapolis & St Louis" decals on the 'bug came from the same set, and the rest (United States Mail, Railway Post Office, GE-26) came from my new printer. I then finished things off with a layer of gloss coat.
So, whee, a fun little diversion. But now, I guess it's back to the buildings for me.
07/12/10 - More lousy baggage-express cars

I went through about five of these stupid things and these two were the "best" of the lot (with the rest winding up in the trash). I still don't know what the secret is (vis'a'vis fashioning perfectly square window fillers), but I can definitely say I know all the ways that don't work.
My first bright idea was to remove the window inserts and then glue rough-cut styrene squares to them. Once the glue dried, I used my Exacto knife to trim them to size. Using the original windows as a guide was supposedly going to get me a perfect fit, but unfortunately, such was not the case. I still wound up with tiny little gaps here and there... which required Squadron Putty... which made a mess... which made me angry... which made me consider switching hobbies... gah!
My next bright idea was to leave the window inserts in place and fill in the excess space with WS Realistic Water. And no, that didn't work either as I simply couldn't get a smooth/flat surface with the stuff. So, for the next one, I chucked the window inserts entirely, applied masking tape to the outside of the car, and filled up the inside with epoxy resin. Unfortunately, the resin pretty much ignored the masking tape and oozed out all over the place - making for a huge, unpleasant mess. So, for the next one I followed the same procedure, but this time sprayed primer inside the car to seal up the masking tape. Well, mission accomplished - the resin didn't ooze out the windows and air vents. Then again, it never really hardened properly either. I let it sit for a couple of days, but when I removed the tape it slowly started bleeding out the vent openings. I still don't know what I did wrong there, but at that point I'd about had it up to here with sticky/messy resin and moved on. Fun fact - did you know that resin will attract every ant within a ten miles radius? Whee!
My last idea was to try using Squadron Putty instead of resin. And although I took great pains to get the openings completely filled up, when it came time to remove the masking tape there would inevitably be little cracks and crevices where I didn't get enough putty squashed into the openings. So, right back to where I started from - adding putty from the outside and making a big, sloppy mess of things. Ugh!
So, I dunno. I don't usually throw in the towel on projects, but this one just plain has me stumped. And after wasting a hundred bucks on troop sleepers, I think enough is enough. Time to move on to other things.
Speaking of other things, I did go ahead and chop the Klecker "meta-shed" down to size -
Thanks to my adjustments, it wound up even more decrepit looking than before. So hurray, almost as run-down as the prototype. A few more mods and I'll be right there!
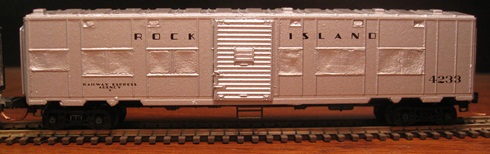
07/31/10 - More Rock Island diesels
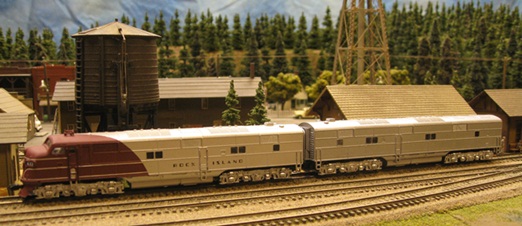
I took some more time off from buildings in order to add these PCM E7's to my Rock Island roster. These units started out life in UP paint, and what I discovered about PCM/BLI models is that their factory paint is impossible to strip (and believe me, I tried everything). So, I basically had to airbrush right over the factory paint. Fortunately, I think they turned out OK. Silver paint (as it turns out) is nicely opaque.
Speaking of buildings, I have actually been puttering around with a model of the Hope Bank over the past few weeks. Unfortunately, progress has been even more glacial than usual. To be honest, I'm just flat out bored with buildings and am really itching to press on with other things (benchwork, track, etc). Still no luck selling Shay, though. So, basically I'm stuck in layout-building limbo (or is it pergatory? I dunno, I'm a little fuzzy on my religious dogma). I guess I'll give that potential buyer (I know you're out there somewhere) until the end of the month to surface, and then it's on to Plan B (eBay).
08/10/10 - Another Rock Island diesel joins the roster (IE, more stalling)

Rock Island had numerous paint schemes for their freight diesels over the years, but I think I like their simple early-50s black and red scheme the best. Unfortunately, when it comes to Life-Like's BL2, said scheme is only available on their old "plastic chassis" version. Well, "this will not stand" says I, and then proceeded to modify the shell from one of said older BL2's such that it could be mounted on one of the more recent (and better running) all-metal / split-frame chasses.
The big challenge here is the couplers (truck-mounted on the old BL2, shell-mounted on the new BL2). And the solution was to simply chop the pilots off of the new shell (along with prying off the coupler clips). Once removed, I sanded the pilots as thin as they would go and then glued them over the top of the "gaping hole / no prototypical detail" pilots of the old shell. I finished things off there by CA'ing the coupler clips to the old shell and then plugging in the MT's. The only other needed mod was to pull the long lighting tubes out of the old shell and replace them with the smaller plastic inserts from the new shell.
So, yeah, another obvious stall from the main task at hand (y'know, the freaking layout). But, in my defense, I will say that I have actually been plodding along with my model of the Hope Bank. OK, the going has definitely been sloooooow, so I guess it's pretty obvious that I've basically hit the wall with structures (and the scratchbuilding thereof). Basically, if I can work up the enthusiasm to cornerpunch a single window opening during the course of any given day, I'm chalking it up as a major victory...
Given my waning interest in buildings, I guess it shouldn't come as any surprise that I've now expedited the "let's get rid of Shay" project by going ahead and listing it on eBay. Unfortunately, the auction ends in a couple of days and, at this point, there doesn't appear to be much interest (although to be fair, with eBay you can never really tell how things are going to go until the last second has ticked off the clock). But regardless of how that all turns out, I've definitely turned the page on Shay and will be getting it out of my life (one way or another) in fairly short order (long-term storage, whatever it takes). Yeah, I was really hoping to use the cash-infusion from the sale to help pay for that mountain of Unitrack I'm going to need, but oh well. Sale or no sale, the "let's do something else on this layout" train is ready to leave the station, and I am beyond ready to get on board!
09/17/10 - Pretty much hitting the wall over here...

Wow, a month+ since my last entry? My oh my, I guess I really have hit the wall over here.
Anyhoo... as pictured above, I have indeed been "working" (lo these many weeks) on a model of the Hope bank. However, what should've taken about three days to complete has somehow turned into the model railroading equivalent of the Manhattan Project. Why? Well, as near as I can tell I seem to be gradually sliding into one of my periodic "bored to death with model railroading" phases. And for that, I cast the Finger O' Blame in two directions - my as-yet-unsold Shay Stadium layout, and my recently purchased '93 Trans Am -

But fear not weedhopper, all is not lost! First of all, my current Trans Am obsession is almost certain to be short-lived (the danged thing just doesn't have enough problems). And more importantly, it looks like I might have actually found a serious buyer for Shay. Yes, the eBay listings were fruitless, and the looky-loo / no-spendee email guys have been numerous. But the great state of Nebraska may just have yielded up a dude who has both the cash and the will to drive the requisite nine hours in order to put said cash my hand. And should all this driving, cash-exchanging, and Shay-removing actually transpire, I'm hoping that the subsequent Hope track-laying and benchwork-up-mocking will serve to rekindle my model railroading blood-lust. And if not? Well, then I guess I'll see y'all in a few months (or years, or whatever).
10/04/10 - Addendum
Well, the Nebraska deal fell through (dude ultimately decided that Atlas Code-55 track was not for him). So, I guess my next step is to figure out a safe place to store Shay (I'm thinking maybe the basement in the building where I work). In the mean time, I'm kind of enjoying my time away from model railroading and plan on extending this hiatus for the foreseeable future. Oh, don't worry, I'm sure I'll be back. I just don't know when.
12/13/10 - Back at work!
OMG, "Shay" is finally sold and out the door. And major kudos to "Jim" of Monteray, CA for finally putting an end to my long national nightmare. Dude paid almost as much for shipping ($1000) as he did for the layout itself ($1500), but he seems to be pretty excited about the purchase, so hopefully a win-win situation for all concerned (and here's hoping that the chimps at UPS manage to deliver the thing in one piece).
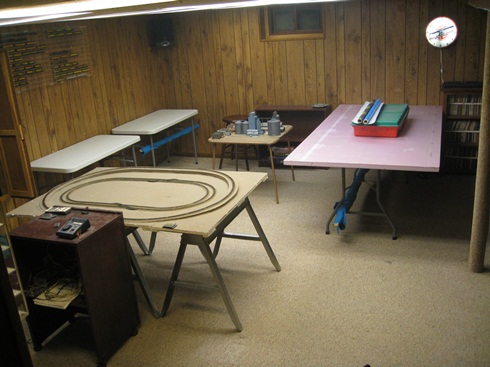
In the meantime, I finally took some fledgling steps vis'a'vis benchwork mock-up (cheap folding tables from Office Max, as it turns out), and wow... Suffice it to say, it didn't take me long to come to the conclusion that my original plans were completely unworkable. First off, I was way too ambitious with how much of the room I was going to allow this monstrousity to take up - basically leaving zero room to maneuver around outside the layout. So first things first, I need to scale the whole thing back by at least a foot in all directions (and most likely lose the center peninsula in the process). As for that "duckunder", ugh, what a non-starter. Yeah, it all seemed quite plausible on paper, but once I saw what I was setting myself up for (vis'a'vis all of those thousands of trips, crawling back and forth under the benchwork)... well, no way. Ain't gonna happen.
So, at this point I basically have two options - either completely redesign the layout such that it incorporates an access aisle (and lose a lot of desireable features in the process), or build in some sort of liftout section. Naturally, I'd prefer to go with the latter. However, since I have literally zero experience with liftouts I guess I need to go do a little research first before committing to anything. Stay tuned.
01/02/11 - Finished mocking up the benchwork

After a bit of checking around, it sounded like building a liftout wasn't going to be all that big of a deal (well, I sure hope so anyway). So, I had my buddy Nick rejigger the layout plan a bit in order to include an obvious place for one. This basically eliminated Albert Lea (and its yard), but oh well. To be honest, Albert Lea is a bit outside of my comfort zone anyway (vis'a'vis its distance from where I live) and I wasn't much looking forward to having to make a bunch of trips down there in order to scout out all the little details.
And as long as we were in rejigger mode, I also had him streamline the western side of the layout to include just one town (an expanded New Richland). Fortunately, the overall size of the layout remained essentially unchanged, so I was able to keep my beloved dual mains (and their super broad curves). Better still, this new plan eliminated all the grade changes and over/under crossings of the original (and hence, much easier to mock up).

I have to say, Nick really went the extra mile on this plan - even so far as coming up with a prototypically plausible justification for the whole thing (not that I really needed it, but what the hey). Anyway, here's Nick -
"The keys are the DME acquisition of the ICE, CP's subsequent takeover of both the DME and the ICE, and CP's eventual acquisition of much of the track in and around Albert Lea. As a result, CP's Dec 2010 spreadsheet of elevators served by DME/ICE shows direct service to Hope! Of course, some mental gymnastics are still required to justify the proposed plan. So, here goes -
"The DME interchanges with the ICE at Owatonna. ICE continues on the Winona sub to Winona, MN. The Mason City sub then takes us to Mason City, IA. Finally, what I will call the Fairbault sub (I couldn't find the real name, but that appears to be the northern terminus) runs through Albert Lea up to Hope and beyond.
"The green track is the DME Waseca sub. The blue is the ICE Winona and Mason City subs. The orange is the ICE "Fairbault" sub. Owatonna is represented by the double crossover NE of Waseca. Albert Lea is represented by a single crossover arrangement in the SE corner of the layout. So, with this plan you can reach Hope from Waseca in either of two reasonably prototypical ways - leave Waseca southbound, through New Richland on the Waseca sub, then cross over to the Fairbault sub at Albert Lea. Or, leave Waseca eastbound and cross to the ICE at Owatonna, then proceed through Winona and Mason City, again crossing to the Fairbault sub at Albert Lea. Or you can always just use a magic flying train to go straight from Waseca to Hope."
So, there you have it. Now I can run my trains around in circles and sleep at night. Hell, I even have the option of running "magic flying trains", so it's all good.
Anyway, as for the actual "benchwork"; because some of the foam is unsupported (hanging out over gaps in the tables), I opted for the sturdiest I could find (2" thick). Eventually I'll need to streamline some of the foam on the southern end, but I'm not going to worry about that until I have a better idea of what's going to go down there (vis'a'vis track, buildings and scenery). But even oversized, it all seems pretty workable (at least as far as having enough space to move around the room is concerned). Of course, nothing gets set in stone until I actually start plunking down the Unitrack. So, I guess it's high time to make some e-tailer very happy and order up several bazillion dollars worth of the stuff.
Oh yeah, and I also spent a little time working on some silly decal projects (and my apologies to SSW, DRGW and UP fans everywhere) -

Is it just me, or are patch jobs like the coolest thing ever? So gnarly! Now I just need to weather them into utter oblivion.
01/10/11 - Finished the Spookshow version of M&Stl RDC-4 #32

No progress to report on the layout (the holidays being what they are). However, I did find some spare time in which to whip up this M&Stl RDC-4. The Louie actually used these to carry passengers on their Minneapolis / Des Moines route (retrofitting them with a small 17-passenger compartment in the rear). Model-wise, this basically involved adding some windows (two on one side and three on the other).
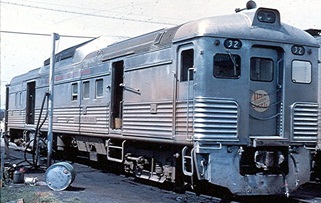
Now, the prospect of cutting windows in my nice new Kato shell was a little scary at first, but since I've been spending the past year+ cutting windows in styrene I decided to just dive right in. Basically I just sliced rough openings with my Exacto and then used a file to get them to the appropriate size and shape. To help get a uniform size I used some cannibalized RDC window inserts as a guide - filing away until they fit snugly in the openings. Once I had my openings, I then glued said window inserts in place. Unfortunately, somewhere along the line I lost track of which side I was working on and wound up putting the toilet (the two-window side) on the left instead of the right. Oh well, I guess it wouldn't be a Spookshow project without some sort of major screw-up, eh?

The Kato model doesn't actually have numberboards, so I just fudged those by using decals (white numbers on a black background). Also, neither of the Microscale Rock Island decal sets have the appropriate red and white "MStL Gopher" logo for the end doors, so I just cheated and used "Peoria Gateway" logos instead. As for the handgrabs, vestibule steps, roof-mounted headlights and whatnot, well... I ultimately decided to leave those to the master modelers So, yeah, kind of a foobie. But hey, good enough for me. And the good news is that, unlike The Louie, I've been able to pull my mail trailer around without any noticeable torque converter problems.
01/24/11 - More M&StL Fun 'n' Games

I dug out my can of brown paint, and just any old day now I'm going to be getting around to de-pinkifying the foam base on my "layout". In the mean time, I whipped up this M&StL 44-Tonner and caboose. And although I'm not sure how close a match Bachmann's 44T model is for the prototypical M&StL #149, I guess it's close enough for me.

The M&StL logo decal came from Microscale's "M&StL F Unit" set (culled from the nose herald), the white sidesill stripes came from a Microscale "generic stripe" set, and the nose stripes came from a Microscale "Rutland Diesel" set (the only yellow chevron-style stripes I could find in their catalog). I couldn't figure out how to get those stoopid Bachmann window inserts reinstalled after I'd finished spraying my black paint (eventually breaking them in the process), so I just filled in the side windows with Krystal Kleer. Kind of klunky looking, but hey, that's life in the Spookshow.

The caboose is an Athearn wood-sider. And once again, although not a dead-on match for any particular M&StL prototype, close enough to the above-pictured #1320 for my purposes. The decals came from "Oddball Decals". And although nice looking, it took just a ridiculous amount of time to get them (having actually ordered them back in July). I was quite glad to finally receive them though, since Microscale's selection of white M&StL decals is exactly nil.
So, that's that. Here's hoping my next entry has something to do with the actual layout. No, seriously. Stop snickering!
01/29/11 - Finished painting the foam

Well, I guess that was my last excuse. The canvas is ready, time to buy some track.
02/24/11 - The Unitrack has landed!

If you've ever wondered what a thousand bucks worth of Unitrack looks like, well, now you know. And I have to say, the stuff is everything I'd hoped it would be - easy to put together (and take apart) and solid enough to be reliably operational even in a "mocked up" (IE, non-affixed) state. After laying the track I spent literally hours and hours running great huge trains around in circles (using some of my fussiest locomotives and rolling stock), and so far not a single problem to report. I tell ya, for someone like me who prefers to spend some "beta testing" time with a layout plan before committing to anything permanant, this Unitrack is just what the doctor ordered. I guess the only real down side is the roadbed (which I'll need to figure out how to conceal in all of my various yard and siding situations). But apart from that, it's bloody perfect. And speaking of running trains, OMG, it's a brave new world for me. I swear, I was running an eleven-car streamliner passenger train around (my C&NW "400") and the thing looked like friggin' Z Scale on this layout. Better still, the thing took like two full minutes to make a lap around (just a bit different from my table-top roundy-rounder days, where the folks on the observation car platform could wave at the engineer in the cab).
Which is not to say there weren't some bumps in the road along the way. In order to fit all of my unreasonable track-related demands into the available space, Nick wound up having to use just lots and lots of "adjustable" Unitrack sections in XTrkCAD (his layout design tool of choice). And yes, when I placed my Unitrack order, I dutifully ordered up said buttload of adjustable sections. Unfortunately, once I had them in hand I was quite horrified to discover that they all look like grade crossings!
Now, it's the sliding wooden "crossing" portion of the section that actually makes these things adjustable (allowing one to customize their overall length). But if you ask me, it also makes them fairly limited in their appeal (I mean, who wants to have a bunch of nonsensical grade crossings all over the place?) So, suffice it to say, I promptly chucked them all into the "only if I'm desperate" box.

Another problem with XTrkCAD is that it apparantly doesn't know about (and hence, didn't include) the short sections of "beveled roadbed" track that are required for one or the other of the diverging routes of a Unitrack turnout (needed because there's not enough room for two sections of "normal" Unitrack to meet at a turnout).

So, right from the get-go, what I wound up with was a plan that used a bunch of adjustable grade crossings that I wanted nothing to do with, and was missing a bunch of turnout pieces that I absolutely needed. In other words, my "hard-and-fast track plan" had suddenly turned into a "general guideline". But, y'know what? Ultimately not really that big of a deal since plans and actual implementation rarely intersect over here at the Spookshow anyway.
The good news it that "real life Unitrack" is quite a bit more flexible than "XTrkCAD Unitrack", so I was able to do things with it that XTrkCAD would never dream of doing. Fortunate for me, since I had to seriously refinagle things on the eastern side in order to provide adequate space for the SunRich and Hope buildings (not to mention space for the road through town). And although it's still going to be a pretty tight squeeze, I'm thinking at this point I should be able to comfortably compress a good portion of the prototypical town into the available space.
Speaking of refinagling, I decided fairly early on that it looked kind of boring having so much of the track running parallel to the edges of the layout. So, to break up some of the monotony, I added some interesting angles to both the Waseca yard and to the track on the New Richland side.

Unfortunately, even with the new angles it's still basically just a room-sized oval of double track. And I have to admit, my old layout-building demons have been whispering in my ear - wondering when I'm going to be adding all the fun tunnels and bridges and grades and over/under "toy train layout" stuff. To which I have to respond, "Dudes, have you ever actually been to southern Minnesota? This is totally what it looks like!" Still, they do have a point - from a "watching the trains run" standpoint, it's just not all that exciting. Here's hoping that adding all the buildings and scenery and whatnot eventually changes that. In any case, it seems like a decent enough plan for now. And the good news is that I only had to use one of the adjustable sections (and no custom-cut sections). However, I'm guessing that will likely change once I start setting things in stone (or glue, as the case may be). At the very least, some of my tandem curves are a bit funky looking (not equidistant) and will eventually require some tweaking.
Although temporarily "mocked up", I did have to make at least a few concessions to permanance by wiring up a bunch of feeder sections. Why, you ask? Well, although the turnouts do allow current to pass through, the same cannot be said for the two double-crossover sections. And since I was installing feeders anyway, I figured I might as well do it right and wired one into each main on each of the four sides of the layout (for the mathamatically impaired, that makes a total of eight). As a cost-cutting measure, Nick was somewhat loathe to include these feeder sections in his track plan, but I didn't have any difficulty fitting them in as needed. And honestly, I'm more than happy to spend a couple of extra bucks if it allows me to leave my soldering iron to gather dust in my workshop.
Since I don't necessarily want to limit myself to running DCC-equipped locomotives, I decided to electrically isolate the two mains. The double-crossover sections already do that automatically, so all I had to do was put some insulating joiners on the one turnout on the south side where the two mains meet. Then, I added a second Atlas "controller" box to my control platform - allowing me to select what power goes to what loop (DCC to one and DC to the other, or DCC to both). Since the Waseca yard employs a "wye", I also insulated the rails there (on the two turnouts into the wye). I'll eventually need to wire in an auto-reverse module up there, but that's something to worry about later on. For now all I care about is my roundy-rounding (in fact, I haven't even wired feeders into the yard yet).
The turnouts are kind of interesting; each having a number of screws on the bottom that one can move around in order to change how a given turnout routes current. One set of screws allows you to have all rails live or have it so that current only flows through the "open" route. Another screw allows you to have the frog be either powered or dead (although I can't for the life of me figure out why you wouldn't want to have all your frogs live). As for turnout switching, I suspect that somewhere along the line I'm going to be wiring up controllers for most (if not all) of them. But for now, they're easily switched by hand (and once switched, they stay switched - always a plus).
Incidentally, I'm told that only the #4 turnouts have the handy-dandy screws on the bottom. The #6 turnouts are an older design and do not have all the bells and whistles. Fortunately for me, all of my turnouts are fours.
I haven't spent much time worrying about the "where and how" of my eventual liftout section, so it's been a lot of crawling around on my hands and knees. Which, fortunately, hasn't been that big of a deal (although I can see where it would eventually get to be a bit annoying). I guess at this point I'm content to live with the duckunder - at least until I'm sure that this is the track plan that's going to stick. In the mean time, I get to run trains (yay) as I press on with the buildings.
03/03/11 - Finished the Hope Bank (click the link for side-by-side comparisons with the prototype)

Well, it took seven months to finish, but by God, it's finally done. Funny thing is, if it weren't for my pal Dayna over at Woodland Scenics, the damned thing would probably still be gathering dust on my workbench (but more on that in a moment).
For the walls of the bank proper I used RSLaser peel'n'stick wood "brick" sheets stuck on top of generic styrene. And although that combination does make cutting and sanding smooth and even corners and edges a bit more difficult, there's just no getting around the fact that Rich's bricks are the best looking N scale bricks currently available. For coloring, I used Floquil Roof Brown (and then a bit of Bragdon dark brown for a more "bricky" look). For the "apartment" (or whatever it is) walls, I simply used two layers of Evergreen styrene (one scribed and one plain). And once again, I reminded myself to offset the two layers in order to leave a foundation around the bottom. I then painted the apartment walls with Floquil Earth.
As on my previous scratchbuilds, I let the windows and doors determine the overall dimensions of the walls - selecting door and window details that more or less matched the prototype, and then cutting the walls to accommodate them. Then it was just a matter of punching out the openings, filing them smooth and even (more or less) and then sticking in the window/door details (painted Floquil Reefer White). Once I had the basic walls put together, I added some scribed white styrene around the top for the "crown" (or whatever you call it). For the stone trim around the foundation, I took thin strips of styrene and added a bit of Squadron Putty to provide some texture. I painted the crown with Floquil Reefer White, the foundation with Floquil Concrete, and the stone trim with Floquil Earth.
So, it's at this point that I needed to figure out what I was going to do about the awnings (and basically the point where the entire project comes to a screeching halt). First of all, nobody (and I mean nobody) sells N scale awnings. Windows and doors? Hey, take your pick, there are thousands to choose from. But awnings? Rotsa ruck pal, 'cuz that cupboard is completely bare. Which is just totally incomprehensible to me, since it seems like such a no-brainer staple. But anyway, I figured it was either scratchbuild them or take the coward's way out and turn the clock back on the building (since the windows are entirely awningless in pictures taken shortly after the bank was built).
I ultimately decided to at least give scratchbuilding a try. And my plan was to cut curvy side supports (ala the prototype) out of styrene and then use some of that bendy Campbell scribed sheet-metal siding for the actual awnings. Which, as it turns out, was just completely insane (even by my standards).

The basic problem is that those side supports are beyond tiny, so cutting them with any sort of accuracy is damned near impossible (at least for me). Making matters worse was the fact that I would've needed to make fourteen of the damned things (and somehow make them all the exact same size and shape). So, suffice it to say, I gave up on that idea pretty quickly. Unfortunately, at that point I didn't really have a back-up plan (apart from going out and buying a Trans Am and then putting the whole model railroading thing on hiatus for a while).
So, fast-forward a few months and I'm doing my daily scan of model railroading e-tail sites, looking for new products (hey, all these encyclopediae don't update themselves, y'know). And, lo and behold, there it was - the Woodland Scenics "Lubner's General Store" prebuilt - complete with exactly the kind of awnings I'd been looking for!

After a bit of research, I eventually learned that WS makes a sheet of plastic "vacuum-molded" awnings in various sizes and shapes. Further, said sheet is included in a number of their building kits (in fact, it came with the "Town & Factory Building Set" I purchased for my Scenic Ridge layout way back when - a useful fact that I'd somehow managed to forget). Unfortunately, WS does not sell said awning sheets separately. Worse still, each sheet only comes with one skinny/square awning, so I'd need six full sheets to do my bank (and no, I wasn't about to go out and buy six Lubner kits just to get the awnings I needed - I may be crazy, but I'm not that crazy). So instead, I tried contacting WS to see if I couldn't purchase the sheets I needed directly from them. And I'll be damned if they didn't offer to just send me the six sheets I needed for free! Well, after a bit of time on the family fainting couch and then a few whiffs of smelling salts, I eventually managed to stagger back to my computer in order to email back to WS that a great huge pile of free awnings would be just okey-dokey with me.
Now, as great looking as they are, these WS awnings are still a bit of a pain in the ass to deal with when it comes to cutting them out from the plastic sheets (and not wrecking them in the process). Not that I'm complaining mind you, but suffice it to say, I was extremely careful with my tools; because with just six of the small/square awnings at my disposal, I literally had no margin for error (not unless I wanted to go crawling back to Dayna in order to beg for more freebies). Fortunately, I managed to get the requisite six freed from their sheets without damaging them. Hell, they even wound up being pretty much the same size too (well, pretty much). Then it was just a matter of sticking them on (along with the wider awning over the large front window) and applying a bit of blue paint. And although said paint wound up looking a bit sloppy, it certainly passes the "three foot" test (well, the "six foot" test anyway). Trust me, these close-up photos are (once again) not doing me any favors.
With the accursed freaking awnings finally out of the way, I was then able to finish up with the rest of the detailing in fairly short order.
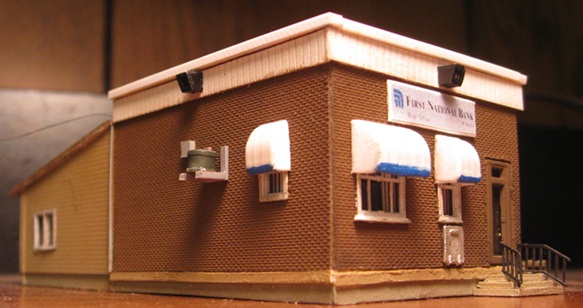
I made the steps by simply gluing together successively smaller rectangles of thin styrene. The handrails, night deposit box door, AC mount and AC unit were just leftover stuff from my goodie box (if you look closely, you can see that the AC unit is actually a barrel sawed in half). I printed the sign on my laser printer (using a shrunk-down graphic cropped from one of my scouting photos and then glued to a thin piece of styrene). The lights are simply Miniatronics bulbs surrounded by small pieces of custom-cut Evergreen "rectangular tube" styrene. And yeah, once again a bit overlarge, but what are you gonna do?

I don't know what the story is with the large black hose on the back of the building. Maybe connected to a sump pump or something? In any case, I replicated it by using black thread that I then stiffened into shape using black paint (kind of an annoying procedure because, as it turns out, thread doesn't like to stay "coiled").
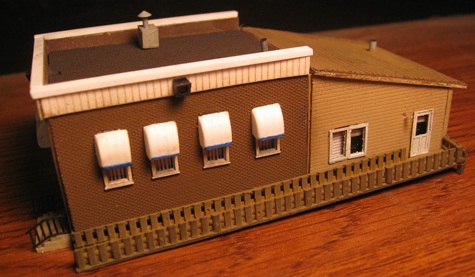
I built the ramp by taking some lengths of Model Power picket fence, Dremeling off the tops and bottoms, and then gluing them to a length of scribed stryrene (all painted Floquil Rail Brown). The light "fixture" by the apartment door is simply a Miniatronics bulb sticking through the wall. And it should come as no surprise that all of the windows received the requisite blind treatment (either vertical or horizontal, as dictated by the prototype). The blinds in the "apartment" are cheap paper facsimilies printed using my laser printer, whereas the bank blinds are fancy see-through plastic sheet ones (leftover from some Shire Graphics set of yore).
For the bank roof, I went with my traditional "sandpaper painted grimy black and glued to styrene" thing (along with the requisite vent/chimney doodads). As for the apartment roof... ugh. Much to my regret, my photos of said roof clearly showed it as having shingles. Consequently, I had to slog through the whole "one glue-infested row at a time" RSLaser shingle mess (yes, RSLaser giveth and RSLaser taketh away). I sure do wish I could find some simple peel'n'stick shingles. 'Cuz, quite frankly, this business of putting on shingles in "nigh prototypical" fashion is just way more trouble than it's worth.
Speaking of glue, I've suddenly found myself falling in love with the idea of applying all of my exterior detailing using white glue instead of liquid cement (even if both sides of the marriage are plastic). Gad, it just make things so much easier! Everything clings together and "tweaks" much more readily, all the paint stays intact (as opposed to gooifying all over the place), and if you screw things up, do-overs are just so much easier. Seriously, just another one of those no-brainer ideas that I should've thought of years ago.
So anyway, that's that. Now I think I need to spend a bit of time working on the north end of Hope (starting with "Miller Farm"). My concern is that the way my two mains pinch together up there, it's possible that I might not be able to adequately model that end of town. And OMG, if it turns out that I'm going to have to punt "Fisher Dude" house, I may just decide to bail on this hobby entirely and take up knitting or something!
03/17/11 - Track rejiggering


I decided to address a couple of track issues that have been bugging me lately. First off, the interchange turnouts down on the south side just never really worked out. I've never been a big fan of using the curving portion of turnouts as part of a mainline to begin with, but I figured I'd at least give it a try. Unfortunately, in order to get everything to connect up, the track joiners wound up a tad skewed on the inner loop turnout and seemed to be causing a fair number of derails. So, I decided to just save myself some headaches and removed the interchange entirely.
My other annoyance was the fact that I had two of the very handy (and very expensive) double-crossover sections, but didn't really have ready access to either of them. IE, if I wanted to switch a train from one main to the other I had to literally get down on my hands and knees and crawl over to one of them. However, given the fact that I'd already eliminated the original "Albert Lea" interchange, I figured there was no reason I couldn't move the New Richland double-crossover down south to replace it. I mean, what the hey, track-wise the whole layout is pretty much fantasyland anyway, so I figured I had nothing to lose but some wear and tear on my knees.
With the New Richland crossover out of the way, I also took advantage of the opportunity to slide the New Richland siding a little further south (providing a bit more breathing room between it and Waseca). That may all change later on when I start in on the New Richland buildings, but it's a good enough placeholder for now.