
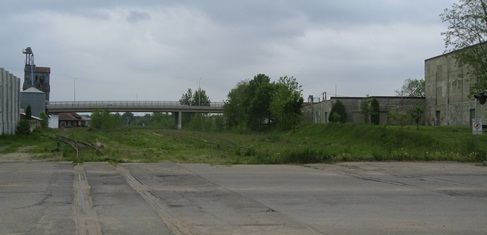
04/20/10 - Finished the North Elevator (click the link for side-by-side comparisons with the prototype)
Way back last year when I was picking out building kits that might conceivably match up with some of Hope's structures, I penciled in the Cornerstone "ADM Grain Elevator" kit as a virtual dead-on match for SunRich's north elevator - y'know, put it together and move on. Well (surprise, surprise), things turned out to be a bit more complicated than all that...
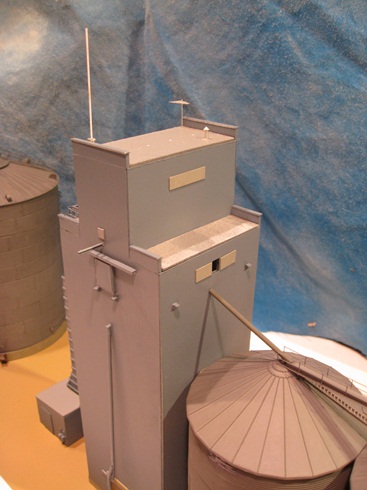
For starters, the ADM kit has eleventy bazillion windows, most of which had to go (since the SunRich building has a whole two). And since there was no way in hell I was going to try to fabricate filler inserts for all those windows, I decided to just cover the walls en masse with styrene. The good news is that since the prototypical walls are corrugated (and the kit walls are not), this did allow me to replicate that particular feature of the SunRich elevator. My next task was to add the little extensions to the tops of each wall, and then an additional foundation layer around the bottom. The extra foundation became necessary when I discovered that the elevator was a little short vis'a'vis the "big bin" (and the conveyor that needed to run between the two). I tell ya, putting together a bunch of buildings that all need to connect to each other somehow is a scary exercise. You think you've got all the heights correct, but unpleasant surprises seem to be the rule rather than the exception (at least for me). Anyway, once I'd addressed the elevator's (ahem) "shortcomings", I then finished things off with various bits of detailing - vents, hoists, access panels, doors, antennaes, spouts, stairs, etc.
Like the main building, the dump shed was kinda/sorta close to what I needed - but still in need of a fair amount of bashing before it would match up with the prototype. The first thing I had to do was slice the elevator-side wall in two and slide the whole thing northward a bit (since the ADM kit basically has a single exposed wall on the elevator side). As part of the great "slice the wall" project, I also added an access door to the southeast wall. Next, I had to add a foundation layer and ramps (since the kit has neither). As for the end/door walls, those I had to fabricate completely from scratch (the kit walls and doors being nothing like the prototype). I then finished things off with more detailing - door openers, handrails, steps, a WiFi antenna (I kid you not), and a spotlight. For the latter, I made a little plastic box and then glued a CA'd wire bulb inside of it. And like the rest of my light fixtures, it wound up looking just way too big. But oh well, I guess that's just the way it goes with these Miniatronics bulbs. What are you gonna do?
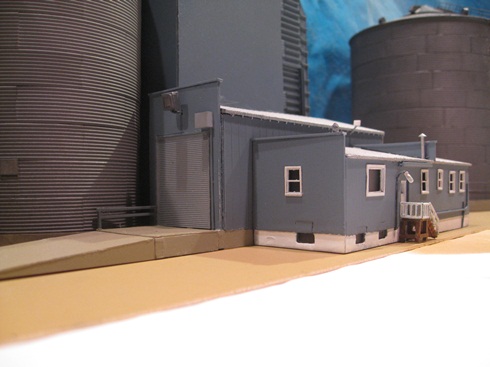
The office was a total scratchbuild (cut the walls, punch window and door openings, glue it all together and stick on a roof). The basement windows were kind of a pain since I couldn't really punch openings small enough to match the prototype. Instead, I decided to just punch oversized openings and then fill in the excess space with small pieces of styrene. Not the most elegant solution in the world, but I guess it worked. On the detailing front, I added a couple of chimneys, a gutter over the doorway, window shades, a satellite dish, steps and railings, assorted electrical conduits and another stiff wire light fixture.

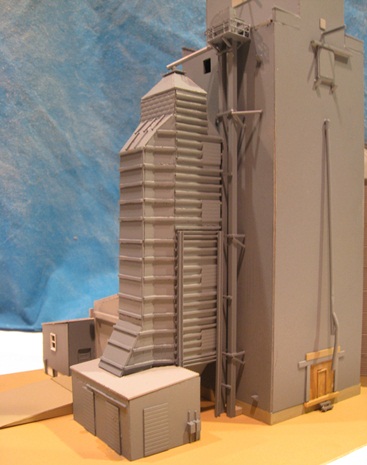
The feeder legs / grain dryer assembly was another total scratchbuild - and yikes, what a monstrousity. I think I spent more time on this stuff than I did on all the rest of the buildings combined. Getting all those angled walls fabricated such that they went together symmetrically was quite an adventure. As for getting all those ribs to line up all the way around... ugh, don't ask. And those in/out spout pyramids? Cripes, if it weren't for Peteski and his templates I'd probably still be sitting here scratching my head in chimp fashion trying to figure out that whole deal.
When it came time to paint things, I was a bit mystified as to what color I should actually go with. Clearly the SunRich buildings weren't the same color gray as the bins - having more of a bluish tint to them. So, I dutifully tried every single bloody shade of gray YOLHS had to offer, and... nothing. Not even close. OK, so gray wasn't going to be the answer. How about blue? Well, as it turns out, yes. Model Master "Intermediate Blue" was an almost dead-on match for the blue-gray I was looking for. As for the rest of it, I went with Floquil Bright Silver for the various roofs, Floquil Concrete for the elevator foundation and ramps, Floquil Reefer White for the office door, window trim, foundation and railings, Floquil Roof Brown for the office steps, Floquil earth for the track-side door, Floquil Light Gray Primer for the end/door walls on the dump shed and the access panels on the elevator, and Model Master Gunship Gray for the spotlight housing.
I decided to skip applying any sort of additional weathering. The SunRich buildings look pretty darned fresh and decidedly undecrepit to me, so ultimately I decided that my sloppy assembly and paint was going to be weathering enough.
So, let's see... What's left? I guess the catwalk / conveyor from the elevator to the big bin, the LP tank between the dryer and the big bin, and oh yeah, the two foot long truck loading shed. Yay.
04/23/10 - Finished the north elevator LP Tank (click the link for side-by-side comparisons with the prototype)

I'm not sure that an LP tank warrants an entire blog entry. But I did kitbash and detail it, so what the hey. The main challenge here was finding a tank suitably large enough to match up with the prototype (about 3" long and with a diameter about the size of a quarter). And as usual, N scale just didn't really have anything like that (flashback to the grain bins). So, now what? A trip to the hardware store for some PVC pipe? A possibility, I suppose. However, I was not entirely enthused about my prospects of custom-cutting a tank out of said tubing and somehow getting the ends nice and even. So, I decided instead to take another stroll down the HO aisle at YOLHS and see what might be found there. And once again, luck was on my side as I stumbled across an Image Trucks / Promotex "20 ft liquid container" that looked to be exactly the right size.
The only down side was the fact that said container had rounded ends (as opposed to the flat ends of the prototype). Fortunately, the ends on the model were separate pieces and popped right off. All I had to do then was trace suitably sized circles on some really thin styrene, cut them out with a scissors, and glue them on. Then, a little sanding and, poof, instant flat ends.

I created the support cradles by cutting short lengths of styrene and then grinding out the indentations with my Dremel. The various fiddly detail bits came from the goody box. Paint and weathering came courtesy of Floquil Reefer White, a light slathering of weatherwash, and a few dashes of Bragdon rust. I did briefly toy with the idea of adding some "rivet" decals (something I've never tried before), but ultimately decided that such heroic measures were probably a bit too "gilding the lily" for a simple LP tank.
So, scratch that one off the to-do list. On to the conveyor!
04/26/10 - Finished the big bin conveyor (click the link for side-by-side comparisons with the prototype)
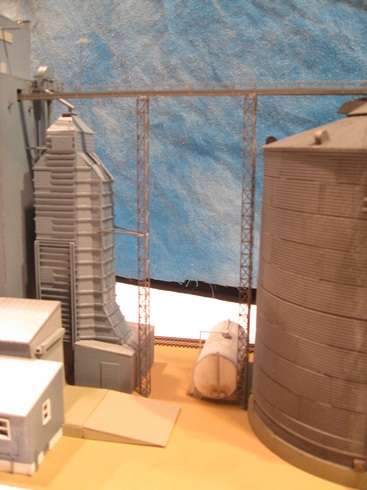
OK, at this point I must re-register my distaste for working with etched brass. Gad, the stuff is a pain. And unfortunately for me, this particular part of the north elevator extravaganza required just a whole lot of it. I started out by building the catwalk from the elevator to the bin (several lengths of Gold Medal Models industrial walkway CA'd together). Next, I CA'd a long strip of styrene to said catwalk to represent the actual grain conveyor (or auger or whatever it is that lurks inside there). This (thankfully) served to stabilize the catwalk assembly, which hitherto had been coming de-CA'd on me on a distressingly regular basis. Next came the handrails (always a fun task). To finish things off, I added a pseudo-motor thingy to the bin end of the conveyor (believe it or not, the semaphores from a couple of Bachmann crossing gates glued together).

The really fun part (not) was adding all the little handrails around the top of the bin and somehow getting them connected to the handrails on the catwalk as well as the handrails on the bin (the ones I put up there back when I first built the bin). And although I did wind up with a lot more CA shmootz on the various joins than I would have preferred, I guess I'm happy enough with the way it all turned out. Put it this way - I sure as hell ain't going to be doing it over.
The last task was the support legs. And for these I opted to use TrainCat brass radio towers. They're really nice looking and turned out to be more than tall enough (11") for my purposes (7"). The only downside to them is that they're three-sided (as opposed to the towers on the prototype, which have four sides). But honestly, would you have even noticed if I hadn't told you? I did actually look into building my own out of styrene (just 'cuz I prefer styrene), but couldn't really find any generic building supplies that looked right.
The TrainCat towers come "pre-bent", so all I had to do was CA the sides together where they join, trim them down to the appropriate height, and then paint them (Floquil Reefer Gray, same as on the catwalk/conveyor assembly). And as you may have noticed, I've been been gluing everything down to a thin styrene base as I've been mocking up this complex (there being no way to get all this stuff joined up correctly otherwise). At this point I'm not sure if I'm going to wind up planting the whole thing (styrene base and all) on the eventual layout. I'm guessing not, but in the mean time it helps to keep everything stuck together when I need to move it around.
I finished things off by adding the two support arms between the north leg and the grain dryer. I also (briefly) considered adding a working spotlight to the south leg (ala the prototype), but eventually decided that it was going to be too much work and probably wind up looking really stupid. Know when to say when, I always say (when I'm feeling lazy, that is).
So, another piece of the puzzle falls into place. On to the truck loading shed!
05/06/10 - Chaos, madness, and a whole bunch of "slight" diversions
Ever find yourself suddenly in the middle of too many projects - none of which seem to want to finish themselves? Well, welcome to the club. I was cooking along on the north elevator project - almost ready to put the finishing touches on the truck loading shed - when I noticed in one of my scouting shots that the thing is actually used for storage -

So, *screech* went the brakes on that project, as I suddenly found myself in need of a bunch of palletized grain sacks. And since I couldn't really think of any clever way to make them myself, I knuckled under and simply ordered up some ready-to-run sacks from an e-tailer. Delivery date is "2-3 weeks", so that whole project suddenly found itself relegated to the back burner.
OK, so now what? Well hell, no problem. There's always something else to do. So, I decided instead to embark upon a fantasyland Rock Island PA/PB project (inspired by this photo from the Rockrail website) -
And although I did get a good start on the initial masking and painting, I eventually came to the conclusion that painting the skinny red stripes along the bottom edges was going to lie outside my skills - and that what I really needed there were some stripe decals instead. So, another order placed, and another project moved to the back burner.
So, what next? Well, those Alcos are eventually going to need something to pull, right? So, I decided to go ahead and start working on the Spookshow version of the Twin Star Rocket (train #'s 507/508). As mentioned previously, "Remember the Rock" magazine has a nice multi-part article showing how to assemble a typical late 50's / early 60's consist of the TSR (in HO), and I decided to use that as a basic guide for my train. Now, N scale doesn't have anywhere near as many passenger car options as does HO, so I kinda just had to wing it and go with "right kind of car / not the exact prototype" foobies. And as for all the "master modeler" detailing and weathering delineated in said articles? Um... I plead the 5th.
So, funny story. I'm getting started on this passenger car project when I find myself distracted by some loose wiring on my Shay Stadium layout. And in the process of tinkering around with that, I somehow managed to hook the wrong power supply (12v) to the wrong lighting circuit (1.5v). And faster than you can say "fifty bucks down the drain", I managed to blow up every single mini-bulb on the layout. Gah!
So, the past week (plus) has been an absolutely chaotic exercise in plate-spinning - cars all over the workshop in various stages of being disassembled, stripped, painted, decaled and finished - coupled with torn up buildings all over Shay (in order to replace all the glued-in and burned-out bulbs). Crikey, what a way to run a railroad!
Anyway, the bulb project is still a work in progress (three more buildings to go). However, I did manage to actually finish the passenger cars. And so... here they are (starting from the front) -
The baggage-mail-express car is based on an actual Rock Island prototype - one converted from an old US Government troop sleeper. And since Micro-Trains actually makes such a car, I tried my hand at making the same conversion myself. This involved simply covering up the windows and gluing on a freight door (not an exact match for the door on the prototype, but close enough for my purposes).
Actually, "simply covering up the windows" didn't turn out to be nearly as simple as I thought it would. I started out by just painting over the windows, but that didn't look quite right (the window inserts being recessed inside the openings a bit too far). So, I then tried cutting out little styrene inserts to fill in the recesses. And if I was any good at getting sizes right, this would've worked out ace. But since I'm not, I had to slather Squadron Putty all over the place in a semi-vain attempt at filling in all the gaps. And actually, I did eventually get everything looking pretty good (or at least, so I thought) and went ahead and prepped the car for paint by spraying on a layer of primer.
It was at this point that I discovered that Floquil "Bright Silver" has a number of funny quirks when applied with an airbrush (and not "ha ha" funny either). First of all, it absolutely highlights every single surface flaw - no matter how small. And suffice it to say, my "seemed good enough when primered" window modifications suddenly started looking really pathetic under the glaring light of Bright Silver. So, I dutifully stripped the paint and revisited my putty work (over... and over... and over...) until I finally got something that looked at least halfway decent under the silver.
So, with an at least mediocre looking express car, I then went ahead and sprayed on a bit of flat finish to kill the "way too bright" shine of the Bright Silver and seal up the decals. Well, the next thing I knew, the damned thing wasn't silver at all! I mean, it was freakin' flat gray! Well, WTF?! I've dull-coated Bright Silver before and never had that happen. Now, I don't know if it's because the BS came from an airbrush this time around (rather than a can - my normal modus operendi), but whatever the case, I had to start all over yet again (ugh).
OK, fast-forward a few hours and I'm back to having a too-bright express car. But, this time I figured I'd just go ahead and spray it with glosscoat (to seal the decals) and then simply use some Bragdon light-gray to de-shinify it. Brilliant, right? Well, still being too lazy to use my airbrush to apply the glosscoat, I decided to go with canned glosscoat instead. What can I say? I hate switching airbrush colors (and all of the cleaning and futzing around that that entails). Unfortunately, Floquil apparently doesn't have a glossy counterpart to their canned "Flat Finish", so I grabbed something else that sounded like it would work (as it turns out, Model Master "Gloss Pearl Overcoat"). And I couldn't believe it - it turns out that that damned stuff has metal flakes in it! Jeez! OK, an admittedly interesting look for a railcar, but probably not a direction that the Rock would've ever considered going. So, yeah, I had to strip off all the paint yet again. And this time I finally got out the airbrush and sprayed on some simple, non-freaking-sparkly glosscoat. Yeesh!
So, finally something that looked more or less good enough. OK, still a little klunky vis'a'vis the window mods - but nothing a bit of Bragdon weathering couldn't take care of. And suffice it to say, I decided to keep any additional "make it more prototypical" customizations on the remaining cars to a minimum.
The RPO-Baggage car is an old Con-Cor / Rivarossi smooth-sider (originally in Blue Goose paint). And like the rest of these cars, it doesn't really look much like a Rock Island car. But as I say, one's options are limited. I did go ahead and add mail-catcher and door-bar details (scavenged from a Kato RDC), but beyond that it was a simple strip-it / paint-it / decal-it / glosscoat-it job. And I must say, I think some retroactive props are in order for the CRI&P execs who decided that "silver, and that's it" was a good enough livery scheme for their passenger cars. I shudder to think how long this whole project might've taken if I'da had to worry about fancy-shmantzy multi-color paint schemes and all sorts of crazy parallel lines and whatnot (yikes).

The baggage car is one of the new Walthers 72-footers. And since it was actually available in Rock Island livery, all I had to do was add number decals.

The coaches are Walthers 64-seaters. These also came pre-painted for Rock Island, so I simply applied the names (Wichita and Duncan) and the numbers.

The diner is a Con-Cor Budd streamliner. I purchased it painted/unlettered, so all I had to do was add the decals. And is it just me, or is "Yucca" like the worst name ever for a dining car?
The parlor-lounge car is also a Con-Cor Budd. This one came painted in Amtrak livery, so I had to strip it and re-paint it (in addition to adding the decals). I went with "Missouri" instead of "Thunder Mountain" mainly because the latter wouldn't fit on the tiny little placard space on the side of the car. I suppose the RTR magazine guy would've sanded off the stock placard space and added his own. But after my express car tribulations, I decided I wasn't really interested in stumbling down that particular path.
The sleepers are also from Walthers (one corrugated and one smoothside). The corrugated car came prepainted for Rock Island, so all I had to do was name it (I went with "Forest Canyon", mainly 'cuz my Microscale decals didn't come with any "Buffalo Bayou" decals). Walthers doesn't have any Rock Island smoothside sleepers, so I had to strip and repaint an SP sleeper instead (and then apply my own decals - "Golden Mesa"). I think it was at this point that I finally gave up trying to number every car (applying those microscopic number decals one at a time being a job best reserved for the truly deranged).
The train in the RTR articles ends with the sleepers, but I couldn't resist finishing things off with a Kato corrugated tail-end observation car. What can I say? In the same way that I don't think a freight train looks right without a caboose on the end, I also don't think a passenger train looks right without a rounded observation car pulling up the rear. This one came painted in B&O colors, so I had to strip it and paint it myself. Decal-wise, I decided to dub it "Minnesota" in honor of the tail-end car on the original Kansas City Rocket.
So, that's that. And here's hoping the mailman shows up with some goodies for me today. Otherwise, god knows what other shenanigans I might get up to around here.
05/09/10 - More thumb-twiddling
I'm still waiting for my stacks of sacks to show up, so nothing new to report on the Hope front. In the mean time, I've discovered that 2-10-2 "Santa Fe" steamers were popular freight haulers on the Rock Island back in the day. So, I went ahead and stripped the C&NW foobie decals off my Con-Cor 2-10-2 and transferred ownership to the Rock. Yes, it's still a foobie (what with the boiler detailing being all wrong for a RI 2-10-2), but since the C&NW never had any Santa Fes at all, I guess it's at least a small step forward in the reality department.
I'm still plodding along with my Alcos, but at this point I'm starting to think maybe I bit off more than I can chew with that Rocket paint scheme. Actually, it's not the paint that's causing me problems, it's all the damned stripe decals. God, what a pain in the posterior. I'm going to see the project through to the end, but if things wind up looking too grisly I'll probably have to start over and try something a little less stripey...
I'd really love to get back to working on Hope, but I can't really put the roof on the truck shed and finish things up until I've dealt with all the interior detailing. At this point I'm really wishing those damned doors had been closed when I was down there taking pictures. But nooooooooo, they had to be all bent, broken and wide open. Thanks a million, SunRich!
05/13/10 - Another defoobization
So far I haven't been able to gather a whole lot of useful information about Rock Island heavyweight passenger trains (everybody loves the Rocket trains, but nobody seems to much care about the old heavyweights). However, my impression is that they were generally pulled by 4-8-2 Mountains (and to a lesser degree, 4-6-2 Pacifics and 4-4-2 Atlantics). Well, good news for me as it allowed me to strip the Northern Pacific decals off my Bachmann Heavy 4-8-2 and replace them with Rock Island decals. OK, the boiler detailing isn't quite right for a Rock Island Mountain, the tender trucks are wrong (two-axle instead of three-axle) and I didn't bother renumbering it. So, yes, it's still something of a foobie. But hey, it's at least less of a foobie than it was before (the NP having never rostered any 4-8-2's at all), so that should at least count for something.
At this point my goal is to model one of the heavyweight trains that passed through Hope back in the day - specifically, the Mid-Continent Special (trains 15/18). Unfortunately, so far I haven't been able to find any sort of full consist information for said train. And although I've found a few pictures scattered throughout my various reference works, they're pretty much limited to pretty three-quarters views of the locomotives (and with only tantalizingly useless views of the passenger cars in the background). Having said that, I did manage to scare up some Mid-Continent Special car information from the "Through Car Equipment" page in a 1948 Rock Island passenger timetable -
- Coaches
- Cafe-Lounge
- Chair Car
- 8 Section, 1 Double Bedroom, 2 Compartment Sleeper (Mpls to KC)
- 8 Section, 5 Double Bedroom Sleeper (Mpls to KC)
Now, I don't know how many coaches "Coaches" means, but I'm going to go ahead and assume two. Also, there's no information re head-end equipment. However, based on some of the pictures I've seen that actually do show the first few cars behind the locomotive, it looks like two Full-Baggage cars followed by an RPO-Baggage car is the norm. Then, maybe toss in some sort of express reefer up front and an observation car on the back (just for fun) and I think I have a train. Now I just need to find some pictures of said cars and then figure out how I'm going to acquire/build the models... IE, sounds like a long-term project to me.
As for my Twin Star Rocket Alcos, I did indeed wind up starting over and going with a simpler paint / decal scheme. They're coming along nicely, though.
Better still, I finally finished replacing all of the burned-out bulbs on Shay. So, things are happening around here - just not Hope layout things. Ah well,
so it goes. Soooooome dayyyyyy my stacks will come 
Oh, and here's something that occurred to me the other day; remember last year when I was trying to decide what kind of layout I wanted to build, and eventually discarded the idea of building a "Big Steel" layout? Well, think about it. This Hope layout is going to be big, and Hope is in Steele County. So shoot, it turns out I'm building "Big Steele" after all! Like, how totally cosmic is that?? The mind wobbles...
05/15/10 - My Rock Island locomotive roster expands yet again
As mentioned previously, I didn't much like how that stripey / three-color Rocket paint scheme was turning out on my Alcos. The thick metallic stripe decals down the centers of the locomotives were particularly problematic; for whatever reason they just didn't want to lay flat, and the more I messed around with them, the worse they looked. Decals aside, the final straw came when I screwed up the complicated masking up on the three-color area of the PA's nose - IE, time to punt. And since I had to start over anyway, I decided to make things easier on myself and go with a simpler late 50s / early 60s paint scheme. And wow, I just couldn't be happier with the results. I've always loved that minimalistic stainless steel CB&Q thing (particularly in concert with similarly minimalistic passenger cars), so I'm really geeked about the way these BLI Alcos look (and sound) pulling my Twin Star Rocket cars around Shay. I tell ya, the denizens of Slackjaw were out in droves to see this shiney wonder roaring through town. Oh sure, there were a couple of wiseguys out there asking loud questions about how such a thing could have possibly made it across Kootenay Lake on a carfloat, but they were shouted down and told to "shut the hell up and enjoy the show" in fairly short order.
After watching my TSR run around in circles for a while, I eventually decided that that screwed up baggage-express (nee troop sleeper) car just wasn't going to cut it. And after thinking about how I might do those windows differently (y'know, better) , I think I've come up with an idea that just might work. So, I've ordered up another one to mess around with. What the heck, it's something to do while I wait (and wait and wait and wait) for my sack stacks.
In addition to the Alcos, I also rostered in my Kato/Kobo USRA Light Mikado (the one with the lit firebox and DCC coupler). Based on what I've read, 2-8-2's were (in addition to 4-8-4's and 2-10-2's) popular freight haulers on the Rock back in the steam era, with literally dozens of them finding places on their roster.
Rather than simply changing the tender heralds, I actually went all the way with this one and put prototypical road numbers on the back of the tender, the cab sides, and even the headlight. What the heck, it's not like I have anything better to do at the moment.

So, the steam roster is coming along nicely. And I'm awfully happy that Rock Island's choice of steamers jibes very nicely with the list of better-running N scale steamers out there (an admittedly short list). I think maybe a Life-Like 0-8-0 for my next decal project.
As for the as-yet-unstarted heavyweight project, I was disappointed to discover that my normal source for decals (Microscale) doesn't actually offer any for Rock Island heavyweights. But fortunately, these guys do - Oddball Decals. So, just to be on the safe side I went ahead and ordered up ten sets. I don't know that I'll necessarily be starting in on this project any time soon, but given the way these "mom and pop" model railroad outfits come and go, I figured I'd better get 'em while the gettin's good.
05/24/10 - A road trip to farm country
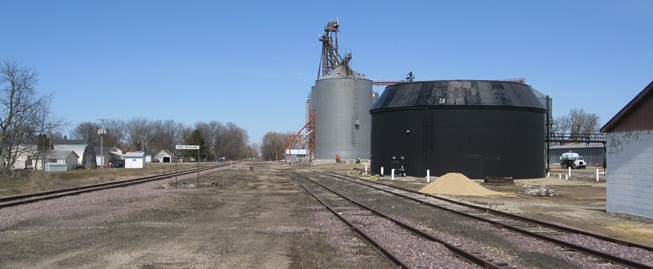
I finally got to spend some time driving around "the loop" looking for potential modeling subjects. And since I've already decided to pretend that Owatonna doesn't exist (since, apart from the mains through town, there's bloody nothing going on there rail-wise), I started my journey by following the DM&E (nee C&NW) line west out of Owatonna towards Waseca. My first stop was Meriden - home to a decent sized grain elevator operation. And like Hope, Meriden is really tiny and the elevator and tracks are right on the edge of "town", so I think I could get away with modeling the elevator itself, a few background buildings, and not much more -

Continuing on westward to Waseca, I discovered that it (like Owatonna) doesn't have a lot in the way of rail-served industries anymore (the most noteworthy of which being a short siding running from the railyard to a giant Bird's Eye food processing plant). And although the plant is probably too big for my layout, that smallish D&ME (nee C&NW) yard facility looks like it could be do-able. Interestingly enough, it looks like the local DM&E admin offices are housed in the former C&NW passenger depot (unfortunately a bit far away from the yard, so probably not something that I'll be able to model) -


Following the D&ME line south out of Waseca I came across another medium-sized grain elevator operation in New Richland. And like the facility in Meriden, the whole thing is basically confined to the edges of a tiny town, so I could conceivably model the elevator scene without necessarily having to worry about much of the rest.
Continuing south, I came across this really huge Cargill operation out in the middle of sweet bloody nowhere. And although the scene looks perfect for inclusion on a model railroad, the siding is overgrown with weeds and appears to have been abandoned. Well, WTF Cargill?! Moreover, there's a scrap metal business just up the road that also appears to have had its rail service terminated. Again, WTF?

A little further south things start to get a little surreal... The DM&E line continues along, but it appears to be nothing more than a four-mile-long parking lot for hoppers. I'm telling you, it's a strange sight - literally hundreds of railcars rusting away in the middle of a corn field...

Eventually the hopper parade ends and the track reaches Hartland (which is, I guess, the dividing point between the D&ME line south out of Waseca and the UP line north out of Albert Lea). Hartland has both a decent-sized elevator operation as well as an anhydrous ammonia fertilizer facility, although the UP track up from Albert Lea is really weedy and disused looking, so apparantly the UP doesn't make a lot of trips up here (and is no doubt itching to abandon the whole operation). It seems odd to me that DM&E doesn't serve this town (or at least I'm assuming they don't - based on that hopper blockade).

The now UP line continues on south from Hartland into Albert Lea where it eventually joins up with the Spine Line and continues on south to Iowa. And what I've recently discovered is that this particular stretch of DM&E/UP (nee C&NW) track originally belonged to the M&StL railroad and only became part of the C&NW network in 1960. The line originally ran from Albert Lea all the way up to the Twin Cities (Hopkins, actually), although all of the track north of Waseca is long gone. Amazingly enough, the remnants of the old M&StL yard facilities can still be found in Alberta Lea. Even more amazing is the fact that the M&StL depot is still standing (now the headquarters for an excavating company, of all things). So yay, another railroad to research (and more locomotives to buy/paint).
The rest of Albert Lea is pretty boring. I guess there used to be a lot of rail activity in town back in the day, but there's not much going on there now (and no "Memories of Hope" style book available for historical reference purposes). The UP does have a small yard facility in town, but apart from the office (which is actually the old Rock Island depot) and the old tower at the CP (nee IC&E, nee SOO Line, nee Milwaukee Road) diamond crossing, there's not much here.

There are a couple more towns with interesting grain elevator operations on the Spine Line between Hope and Albert Lea (Clarks Grove and Ellendale). And as much as I'd like to include them in the festivities, I just don't foresee having enough room to accommodate them. Having never designed a layout with discernable/separate "places" before, I have to keep reminding myself that all of these "places" need significant amounts of breathing room between them - otherwise you wind up with odd situations like the front of a train in one town and the rear in another. It's definitely a different mindset from what I'm used to with my little tabletop roundy-rounders!
So anyway, lots of interesting stuff to consider. I'm particularly enthused about those potential Meriden, New Richland, and/or Hartland grain elevator scenes. As for the yards in Waseca and Albert Lea, well, I guess I'm less sure about those. Obviously I'd like to have a couple of yards, but how does one go about modeling a scene plucked from the middle of a medium-sized town? It seems like it would look a bit odd, especially when juxtaposed with some of my planned "tiny town" scenes (where I'll be able to accurately model the transitions from the surrounding farm fields). So, I dunno, this is going to require some thought.
Now that I've gotten a better look at things, I'm starting to reconsider my decision to go with a single-loop / double-main track plan. Since I'm modeling two completely different rail operations (DM&E and UP), it seems like going with two separate loops would make a hell of a lot more sense. Of course, I have absolutely no idea how I'd pull that off either. So, ugh, more thinking.
In the mean time, I'm still waiting on my shed detailing (blah). However, in lieu of anything more useful to do I did manage to roster in another Rock Island steamer (as threatened, a Life-Like 0-8-0) -

05/26/10 - Built a coal shed

Some of the pictures of the old Hope depot show a small track-side shed nearby, which I'm assuming was used to store heating coal. It's long gone now, but I decided to go ahead and reproduce it anyway (by way of this Blair Line wood kit). A tidy little ten minute project, but hey, it's progress.
As for the long shed, yes, I'm still waiting for my sacks to show up (sigh). However, during the course of my most recent scouting expedition to Hope I was surprised to discover that the contents of said shed had undergone a rather dramatic transformation since the last time I was there - namely, that the palletized sacks had been joined by these huge powdery mounds of "stuff". Vis -


I checked in with Raquel over at SunRich HQ in order to find out just what the heck the deal is with this building. And as it turns out, it is not used for truck loading as I had originally surmised. Rather, it's simply used for temporarily storing low-grade food products. How it works is that SunRich ships grain to their various food processing facilities (Cresco IA, Alexandria MN, et al) and occasionally the resultant generic "food products" don't make the "suitable for human consumption" grade and get shipped back to Hope where they get dumped into this shed. Now re-designated as livestock feed, the stuff eventually gets loaded on railcars and shipped elsewhere.
So cool, now I guess I'll have to put some giant piles of "brown stuff" in my shed (in addition to the eagerly awaited palletized sacks). Fortunately for me, I think I'll be able to handle putting together a few nebulous mounds all by myself, thank you very much.
The other thing I noticed this time around is that there isn't any actual lighting inside this building. Rather, it appears that the only source of light comes from a series of skylights in the roof. So, I guess I should go ahead and chop some openings in my model's roof in order to match that particular prototypical feature.
05/30/10 - Debigulated Klecker's Garage
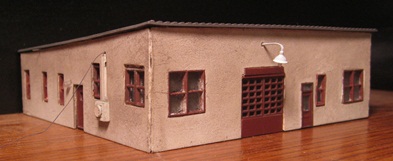
I've been spending a lot of time thinking about potential layout plans over the past week. And in aid of that, I spent a bit of time mocking up my collection of Hope structures (such as they are) in an effort to see just how much space they're going to require when actually situated on a layout. And it was at this point that I decided that I just wasn't going to be able to live with that bloated Klecker Garage model another minute longer. So, in a fit of pique, I tore it all apart and chopped an inch off each of the walls (like I should've done in the first place).
So wow, it's come to this. I've finally been reduced to kitbashing my scratchbuilds. Man, I really do need to finish up that stoopid elevator shed and get this project moving again.
06/01/10 - I think we have a plan (two of them, actually)
As mentioned above, all of these recent scouting trips have gotten me thinking about potential layout plans. And scouting-related enthuisasm aside, I've also come to the conclusion that a bit of general pre-planning might be prudent before I get too far down the "Hope Structures" path. I sure don't want to build the whole bloody town, only to discover that I can't fit everything into the kind of layout I want (yikes). So, time to start thinking about potential benchwork configurations and track plans.
Now, since my ability to generate interesting (yet workable) track plans barely registers, I decided to enlist the aid of one Nick Julius (Atlas Forumite) who was generous enough to offer his assistance in this regard. I started the ball rolling by supplying Nick with a list of my various layout-related druthers -
- Ample space for Hope (at least 8' x 4') - 'cuz, y'know, it's the whole point of the layout!
- Two continuous loops (one representing the UP and the other the DME) - 'cuz, y'know, being able to run two trains at the same time is the other
whole point of the layout!
- Two yards (Waseca and Albert Lea) - one of which needs to be readily accessible outside any duckunder situation - 'cuz, y'now, I don't want to have to crawl
under the layout every time I need to put a lousy box car on the rails
- As many of the other towns in "the loop" (Meriden, New Richland, Hartland, Clarks Grove, Ellendale) as would fit (while still leaving
plenty of "between town" breathing space)
- Have all the towns make sense in terms of of their real world coordinates - IE, if a town is north of another town in the real world, it should be "north" (up)
of said town on the layout
- Wide aisles on the outer edges - IE, the edges that don't abut walls (right/east and south/bottom in the pictures below)
- Shallow (2' max) benchwork on the portions that do abut walls (having learned the hazards of too-deep / accessible-from-one-side benchwork on my very first
N scale layout)
- 2' aisles (at least) around any interior peninsulae (for obvious reasons)
- 19"-radius curves (or broader) on the mains (gots to be able to run those big long streamliner trains around, dontcha know)
- Fit the whole thing into a 13' x 11' space (about all the space I'm willing to commit to the layout, since I still need to be able to navigate around
in this room in an "everyday life" sort of mode)
Once saddled with my ridiculously overreaching requirements, Nick then managed to (somehow) come up with some decent initial plans. And after a bit of back and forth (where, trust me, we tried pretty much everything), I think we eventually came up with some general looks that are at least promising enough to proceed with -
| Plan #1 (four towns) | --- | Plan #2 (five or six towns) |
 |  |
Since I'm likely to want to get rolling on track mock-ups in fairly short order, I decided that Atlas True Track just isn't going to be workable for this layout. As much as it pains me, there simply isn't enough variety/flexibility in the line yet. So instead, I think I'm going to look into going with Kato's Unitrack. What the heck, it's been around forever so the line is suitably robust. Plus, people just don't have much of anything bad to say about it. So, with that decision tenatively made, I had Nick actually program his planning tool (XTrkCAD) to use Unitrack.
I like both plans, but I think I'm actually leaning towards the second one. Without the addition of New Richland there really isn't anything for the DME to do on that first plan (apart from playing around in their yard, that is). OK, at this point I'm not really sure if there's going to be enough room for it up there, but I'm certainly game to try.
In addition to wedging New Richland into the second plan, Nick also added a potential siding for Meriden in the upper-righthand corner. However, given the curving nature of said siding I'd have to seriously warp Meriden reality in order to to fit said town in up there. So, at this point I'm leaning towards simply omitting it.
I've never had a layout with a duckunder before, so I guess I have no real reason to fear them at this point. However, a lot of people are telling me that I'll regret it forever if I do go down that road. Well, maybe... However, model railroaders in general are wont to cluck worrisomely about a lot of things (overly so, if you ask me), so at this point I guess I'm willing to take the risk and see how it works out. Nick did include a lift-out section in Plan #2 (demarked by the red lines in Albert Lea), so if worse comes to worse I suppose I can always try that.
Apart from the whole duckunder situation, the only real trepidation I had when I saw these plans is that I thought the roundy-round action might turn out to be a bit boring (what with everything kind of following the square edges of the layout). However, what the plans don't really communicate are the different elevations - with the UP track being positioned at "ground level" and the DME track generally situated higher. The upshot of all that is that the UP track is hidden from view in a number of spots (along the top backdrop, for example), whereas the DM&E track uses bridges to cross the UP track at a couple of points. So, the end result should be trains that are fun to watch (or at least, so Nick assures me).
In any case, I think it's definitely plan enough for me to proceed with. Like all the rest of my layouts, I imagine things will evolve as I move
through the mock-up process. And in aid of that, I think my first job is to put together some temporary "benchwork" (foam on sawhorses) to see
how the room feels and flows. Then I can start mocking up actual runnable track in order to see what works and what doesn't (my primary
reason for wanting to go with something like Unitrack). Unfortunately, I do have a big (and literal) obstacle to deal with first - namely, Shay Stadium.
Um, anybody out there looking to purchase a tree-infested layout with a lot of pretty blue water? 
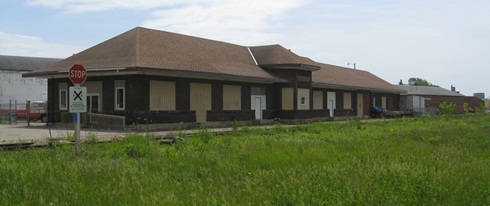
06/06/10 - Finished the north elevator storage shed (click the link for side-by-side comparisons with the prototype)

I never really did get the kind of palletized sacks I was looking for, but after having several e-tailer orders fall through I finally decided that enough was enough and it was time to just make do and finish the damned thing. I did find a guy who sells resin cement sacks on eBay. So, I purchased a bunch of those, painted them brown, glued them to styrene strips, and then glued those together in stacks. Bloody good enough I say, especially since you pretty much need one of those anal probe cameras in order to see them. Man, how many weeks did I waste worrying about this invisible bit of detailing? I swear, sometimes I think I need to get my head examined...
As for the rest of the detailing on the south wall, I made the door slider from a piece of U-shaped styrene, the doors from the same sort of sheet metal siding I used for the walls, and the window grate from some Atlas fencing. The "brown mounds" are piles of AR&M ballast - held together with WS Scenic Cement and colored with a light coating of Highball Products "earth-colored" powder. I only went a few inches in with the detailing, mainly 'cuz you can't see inside any further than that (I may be crazy, but I'm not crazy enough to worry about detailing the whole flippin' interior).

The building itself was a pretty simple scratchbuild, with the main challenge being the extreme length of the wall and roof sections. They're much longer than any of the generic styrene sheets available at YOLHS, so I had to construct each section by cutting and gluing multiple pieces of styrene together. And wow, getting all of that to fit together smoothly was not a simple task - especially where the two halves of the roof join together. To help provide some roof support, I did glue a bunch of styrene poles along the middle of the floor (one every four inches or so). But just between you and me, I wouldn't count on any of those roof seams to keep the rain off the rhubarb.

The floor was a real head-scratcher. My normal modus operendi vis'a'vis floors is to get all the walls glued together, place the building on top of a sheet of styrene, trace the building's outline on the styrene, and then use the lines as a guide for cutting out the floor. Well, the problem here is that this building is so danged big that I couldn't really get it to sit still while I did my tracing (what with the walls tending to want to bend and shift all over the place during the whole process). So, my bright idea was to simply glue the building on top of a huge sheet of styrene (two sheets glued together end-to-end, actually) and then use my Dremel cutter to trim away all the excess. Well, it seemed like a good idea at the time. Unfortunately, the cutting wheel kind of went berserk in a few spots and sanded off some of the siding along the foundation. But, you know what? Given this building's age (and general state of disrepair) I think it all worked out anyway.
I made the Hope Elevator sign by simply taking a picture of the real thing, downsizing it, printing it on laser printer paper, and then gluing it to a piece of styrene.

North wall detailing consists of the same kind of door/track arrangement that I used on the south wall, some generic styrene "electrical stuff", a fan screen (made from a piece of GMM chainlink fence), and a fan (made from the same Bachmann crossing gate that I cannibalized for the big bin auger motor). There was no way I was going to be able to cut that circular fan opening freehand (not if I wanted it to be round, anyway), so instead I pulled out my power drill, fit it with a big-ass bit, and drilled a bunch of holes through a thin sheet of styrene (until I finally got one that looked good). Then I simply cut a square out of the styrene around said hole, glued the fan and screen to it, and then glued the entire assembly inside the rectangular opening I'd cut in the wall. And I must say, I think it worked out pretty well.

Roof detailing consists of a bunch of generic Cornerstone Modular vents. And since I always have a hard time getting those things to look straight when I simply glue them directly to the roof, this time I actually drilled holes so I could stick them right through. I made the skylights by slicing openings with my Exacto and then filling them in with Krystal Kleer (basically white glue that dries clear). The grain spouts are generic styrene tubing, and the spout support structure thingy is a G-scale ladder. I didn't actually glue the spouts to the elevator because I want to be able to lift this whole building out of the way when it comes time to clean the track. To prevent the spouts from falling off during this whole process, I drilled holes through the roof and then glued the spout ends inside said holes.

The walls, spouts and vents are painted Floquil Reefer Gray, the floor Floquil Concrete, and the roof Floquil Bright Silver. Once painted, I brushed on a layer of weatherwash and then followed that up with Bragdon Gray on the walls and Bragdon Rust on the roof (with the occasionally smattering of rust on the walls as well). I finished things off with a coating of flat finish.
OK, so it took forever to finish, but at least it's done! Now I think I need to go ahead and build the "across the SunRich street" Agronomy Warehouse. This will allow me to mock up an entire east-to-west slice of Hope in order to see just how much layout width this beast is going to require. And god help me if it turns out to be more than four feet!