

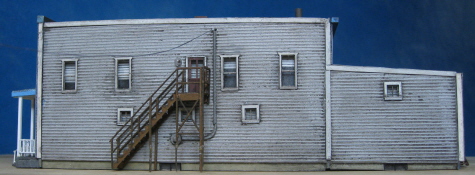
01/04/10 - Finished Hopefull Treasures (click the link for side-by-side comparisons with the prototype)
I really wanted to turn the clock back on this place (IE, reopen Wesley's Grocery). Unfortunately, I didn't have any decent pictures of the original sidewalk-pole sign for Wesley's. Also, I had no idea where all those dinky little grocery store window graphics were going to come from. So, ultimately I decided that Hopefull Treasures was going to be an interesting enough model in and of itself and went that way instead.
I've pretty much got my system for cranking out these simple "box" style buildings down to the level of "mindless assembly line" (maybe even a little too mindless, but more on that later). So, for this one I decided to raise the bar and really focus on the detailing. Y'know, instead of being lazy and skipping the hard stuff, see if I couldn't replicate virtually all of it. And rather than simply making do with whatever pieces of leftover "goodie box" junk I happened to have laying around, I also decided to pay a number of visits to the Plastruct and Evergreen spin racks down at YOLHS in order to find raw materials that more closely matched the detailing of the prototype.
As on previous buildings, I started out by building two-layer walls and punching out the requisite door and window openings. Fortunately for me, all the corner joins were ultimately going to be covered up by strips of "accent" styrene, so I was able to skip the usual step of sanding angles into the corners. This also allowed me to paint the walls prior to assembly (since any glue-initiated paint problems at the corners were going to wind up hidden anyway). Good news for me, since this also allowed me to skip the whole mask-then-spray step in order to get the walls painted different colors.
For paint, I went with Testor's "Flat Gray Primer" for the side walls, Model Master "French Blue" for the gutters and front and back walls, Floquil "Reefer White" for the windows and side trim, Floquil "Box Car Red" for the doors, Testor's "Gloss Light Blue" for the front and back trim, Model Master "Gunship Gray" for the roof, Floquil "Old Silver" for the various bits of metal detailing, Tamiya "Red Brown" for the wooden stairs and landings, and Floquil "Concrete" for the foundation.
For the front landing and steps, I decided to try using Floquil "Reefer Gray" for a change of pace. Unfortunately, this wound up looking just all wrong. I tell ya, I sure wish somebody would come out with a "Concrete" paint that actually captured that "somewhere between gray and yellow" look of old concrete... As for the French Blue, well, there's a story behind that. When I originally took my prototype pictures last spring, the front and back walls were a much more faded blue/gray. However, during a more recent visit I discovered that Dale (Wilker) is in the process of repainting the building - with the front wall being a much deeper blue than previously (and with one of the side walls being half painted in said new blue). So, I decided to split the difference and painted the end walls the aforementioned darker blue (and let the side walls remain gray). And I must say, I find it supremely irritating that the denizens of Hope keep changing the town on me. I tell ya, I can't take my eyes off those guys for a second!
The only real challenge vis'a'vis the walls was that relatively complex front window -

My bright idea here was to chop a single gi-normous opening, glue a piece of clear styrene behind it, and then glue the door, doorframe, small wall sections, and the various window muntins directly to said clear styrene. And what really helped me out here is the fact that all that window wood is white on the prototype - IE, I didn't have to prepaint any of the muntins before gluing them to the window (saving me from completely screwing up the window with giant slicks of paint/glue ooze). Better still, I didn't really need to be 100% accurate vis'a'vis the various glued-on inserts. IE, in the spot or two where things didn't quite line up, I simply applied a smidge of paint to the backside of the clear styrene to cammoflage the "oops" spots.
Detailing-wise, well wow, lots to report. I did actually slog through the process of applying window decals for "HOPEFULL TREASURES" (one bleeding letter at a time). Fortunately, I was able to use a much larger miniscule font from my Microscale "white alphabet" assorment here (as compared to my earlier post office fiasco), so it was only a slightly painful two-hour process. The "closed" sign came from a set of generic Woodland Scenics "business sign" decals. And being of the "rub on" ilk, I quite naturally managed to lose a small corner of said sign during the installation process (gad I hate those things). I went with "CLOSED" because that's all I had. However, given the hours of this place (Friday and Saturday only), I figured I wasn't straying too far off the path. The remaining panes on the prototype are positively clogged with nifty signage, but at this point I had to cede to the gods of 1:160 (IE, fuggedaboudit).
The flag came from the same set of Microscale decals I used on the post office (same basic procedure as well). The "Wilker's" and "ANTIQUES" signs I made myself (custom decals printed on Micromark decal paper). The various bits of "antique store" crap on the porch came from a couple of different Woodland Scenics "Scenic Accent" sets ("newsstand" and "bicycle buddies"). The fence/handrail thingies were from the goodie box (and dang, I sure wish I remembered where they came from because they're bloody handy and I'm bloody running out of them). The window blinds are leftover scraps from various Shire Scenes DPM window detailing sets (and dang, I sure wish I more of those). The window shades are white pieces of styrene. The steps, porch (and hell, pretty much everything else) are simply bits of Evergreen/Plastruct generic styrene of various shapes and sizes.

North wall detailing consists of a couple of BLMA air-conditioners (gad I love those things), a couple of water pipes (or at least I'm assuming they're water pipes), a furnace chimney, more Shire Scenes window blinds, a couple of pieces of construction paper (painted gray) serving as temporary window coverings, and a downspout from the gutter. For the downspout I used a stick of generic rectangular styrene which was thin enough to bend and twist at the top (in order to hook up to the gutter). I think I probably could've gone a size smaller, but since I didn't feel like making a special trip to YOLHS I just used what I happened to have on hand. I did briefly toy with the idea of mangling a big hole in the siding (ala the prototype), but eventually decided to leave well enough alone. Hell, they're no doubt going to be fixing that patch as part of the re-paint project anyway, so I figured I'd give them a headstart.
The basement windows were kind of fun (and a detail I usually wind up skipping). What I did was cornerpunch an opening, glue in a half piece of one of those Walthers "glass block" style window inserts and then grind it flush with the bottom of the foundation with my Dremel. And I have to say, I think they turned out really cool looking.
I made the gutter on the east wall from a piece of U-shaped styrene. The window shades are pieces of white styrene. The landing is a collection of generic styrene with Plastruct stairs. The handrails are thin/round pieces of styrene (same stuff I used for the water pipes). The light fixture is another one of my CA'd wire jobs (and once again looking like a giant UFO hovering above the door).
The stairway/landing on the south wall was yet another RSLaser job (and yet another budding love affair with me). The electrical conduit was more water pipe styrene (thin enough to bend at the bottom) with a little round "meter" dealio glued to the end and a length of EZWire glued to the top. And oh yes, more Shire blinds.
I tried something a little different vis'a'vis the "bare bulb" fixture up by the door. Not being happy with how they've been turning out thus far, what I did this time was to drill a hole through the wall large enough for the bulb itself (rather than just the wires) to push through. Then, I glued it in place with only the top half of the bulb visible. And lo, this wound up looking really cool - much more convincing looking than any of my previous attempts.
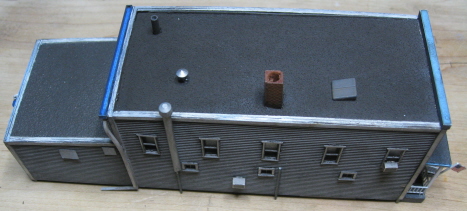
Nothing too special to report on the roof. Once again, I went with sandpaper glued to styrene and then stuck a bunch of fantasy-land vents and chimneys from the goodie box up there for variety. I made the brick chimney (the only detail that I can actually see from the ground) using some leftover Cornerstone Modular pieces.
For weathering (and as you can see, there's a lot of it) I basically went nuts with weatherwash and various shades of Bragdon gray (and sometimes even Bragdon gray mixed with weatherwash). Lastly, I sealed everything up with a coating of flat finish.
So, that's that. And although I'm really happy with the way all that detailing turned out, I can't believe how badly I screwed up the windows. Have you noticed how the second story windows on the prototype are all at the same height? Well, I didn't. Or at least not until I'd completely finished putting the whole thing together. Yikes, what a punch to the gut! Oh well, that's me and my tunnel vision I guess. I get so focused on one thing (a wall, for example) that I completely fail to see the big picture (four walls and how they relate to each, for example). Sheesh...
Anyhoo... no time to wallow in the past now. I've been spending the past couple of months beating the bushes for everything I think I'll need to build that big north elevator over at SunRich. So, whatdya say? Let's hit it!
01/27/10 - Finished the "Big Bin" (click the link for side-by-side comparisons with the prototype)

The "north elevator" at SunRich is actually a small collection of individual structures - the elevator itself, an office of some sort, a grain dryer, an LP tank, a long shed, two skinny bins and this "big bin". And brother, I mean big! So big, in fact, that when it came time to select an appropriately sized / shaped kit I quickly discovered that there literally aren't any available in N scale that even approach its majestic hugeousity. So, what to do? Well, I did briefly toy with the idea of scratchbuilding one. But then I started thinking about what it would take to create all those corrugated panels (IE, dozens and dozens and dozens of CA'd foil squares) and... quickly abandoned that idea. Instead, I decided to take a peek over the fence and see if there wasn't something in HO that I could work with.
Since I'd already decided to go with the Cornerstone ADM kit for the elevator, what I needed was a bin that was going to be tall enough to line up with the opening on the elevator where the grain conveyor comes out (approximately 7" up the side of said elevator). And at the same time, it needed to be relatively wide in order to capture the "squat" look of the prototype. Well, as it turns out, Cornerstone's cleverly named "Grain Bin" kit (933-3123) turned out to be a dead-on match - 5.5" across and 7" tall. And although the corrugation is far too coarse for N scale, at the end of the day it's not horrible to the point of being distracting (not to my eye, anyway).
Said kit is actually out of production at the moment (and sold out everywhere). But fortunately for me, I was able to score one off of eBay in relatively short order. And once I had said kit in hand and was getting down to the business of actually putting it together, I suddenly remembered just how much I dislike these bloody bin kits. Each bin consists of 10 individual "rings" and each ring consists of 6 individual panels. So yeah, plenty of opportunities for screwing up joints (and as you can see from my photos, I took advantage of each and every one of them).
Apart from my basic inability to glue styrene together and form straight lines, the only other problem I ran into was with the kit's base. For whatever reason, Walthers decided to make it much wider than the bin itself - basically forming a ledge that a person could literally walk around on. Well, this looked really stupid to me (and nothing like the prototype), so I decided to see if I couldn't find a suitable replacement. And lo, sitting right there in front of me on my desk was the solution - namely, the bottom of one of those "blank CD" cannisters. I couldn't believe it, you'd think the thing was made with this specific task in mind. OK, yes, the slippery plastic isn't particularly condusive to modeling. And consequently, the process of chopping it down to size did make for some slightly raggedy edges between the base and the bin. But overall? Not too bad at all.
The only detailing included with the kit are four roof vents. And since said vents look nothing like the ones on the prototype, I chucked them into my spare parts box and filled the supplied roof holes in with Squadron Putty. So, at this point I'm looking at my photos (mainly taken from a long way off in order to capture the bin in its entirety) and I'm suddenly coming to the startling realization that there is a lot of detailing on this bin - none of which I can really make out very well due to my macro-sized pictures. So, it was time for another scouting mission to Hope (as it turns out, 120 miles of driving through pouring rain/sleet and 40 MPH winds... but that's a whole 'nother story).
Once armed with some decent close-up shots, I quickly determined that the first thing I would need was some sort of secondary "cap" for the top. And in this regard, the top from a Rix N scale bin turned out to be an almost perfect match. No, the slope isn't quite right (being slightly steeper than the top of the bin), but the size is dead-on. So, good enough for me.
I created the various vents (or blowers, or whatever the hell they are) by simply taking some generic chunks of styrene and grinding them into shape using a Dremel. Kind of new territory for me, but I think they turned out pretty nice. The walkway/handrail assembly is an etched brass kit from Gold Medal Models.
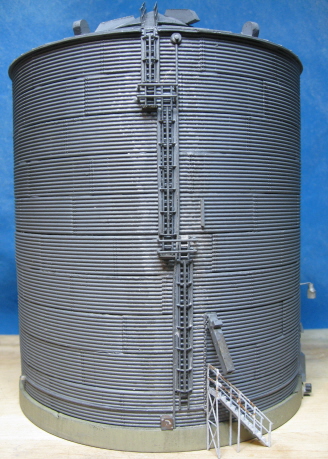
I built the staircase on the west side by kitbashing parts from an RSLaser kit. And for whatever reason, said kit fought me the whole way (with the end result being just a whole lot of crookedness). However, now that I look at the prototype photos, I guess the real thing is actually just as decrepit looking. So, I think at this point I'm just going to claim that I made all those steps crooked on purpose. The ladders are from Plastruct, and the safety cages are from... well, I guess I don't remember. Maybe left over from a Cornerstone water tower kit of yore? Anyway, the landings are more Gold Medal Models "industrial walkway" etched brass (same as up top) and the bars around said landings are bits and pieces of generic styrene. I used the same stuff for the electrical conduit running from the junction box by the base up to the "binindicator" up near the top (a little round gizmo that tells SunRich when the bin is full). The spout was another piece of a generic styrene, to which I affixed a length of A-Line "silver chain". And yes, said chain is grossly out of scale. But hey, if it were actually in scale there'd be no way to tell that it was a chain. So there! Lastly, I stuck on the little bracket thingy above the spout. There's actually supposed to be a skinny little cable running from the spout up to said bracket, but I decided that that was a road best left untravelled.

On the south side, I made all the various electrical thingies out of bits and pieces of generic styrene. I used lengthy pieces of skinny styrene tubing for the electrical conduits running in either direction around the bin (eventually going to a light around the left side and a pair of blowers around the right side). Oh, and that little motor thingamabob down on the base? Based on a quick peek inside the access panel, I think it's used to turn an auger underneath the bin (for purposes of returning grain to the elevator). Cool, eh?

For the light, I decided I was bored with using those Miniatronics fixtures as "good enough" stand-ins, and instead actually built a custom fixture that more closely matches the prototype. Basically it consists of a small piece of frosted plastic tubing glued to a leftover piece of kit-sprue (based on the light beige color, I'd say it probably came from an old box of Cornerstone modular parts). Once assembled, I then drilled a small hole through the sprue thingy and wired a tiny Miniatronics bulb inside the frosted tube. Pretty simple stuff, but I really like the way it turned out. I'll definitely be making more of these in the future.

Another spout / oversized chain on the east (track) side.

And lastly, a couple of blower fans and a bare bulb light fixture (not pictured) on the north side. Oh, and I guess I haven't mentioned the paint yet. Not much to report, really - Floquil "Concrete" for the base and Floquil "Reefer Gray" for pretty much everything else. As for the weathering, since this structure is actually fairly new there just wasn't a whole lot to do. Basically I hit everything with a light coating of weatherwash, brushed on the occasional patch of Bragdon rust where needed, and finished things off by drooling some wet Bragdon light gray around the ladders.
So, that's that. This actually turned out to be a lot more work than I was counting on. I mean, wow, who knew that a simple grain bin would require so much detailing? Not that I'm complaining, mind you. I think all that detailing actually transforms what would otherwise be a fairly mundane structure into something pretty interesting. So anyway, now I guess it's on to the two tall / skinny bins up on the other side of the elevator.
02/07/10 - Finished the north bins at the North Elevator (click the link for side-by-side comparisons with the prototype)

Once again I couldn't find any N scale bins anywhere near big enough for what I needed. So, Hi-Ho, Hi-Ho, it was off to HO we went (again). And in this case, it was Rix to the rescue. The diameter of Rix's HO bins (3.25") is just about spot-on, and of course the height is perfect (since one can add or subtract rings as needed). The Rix kits are the same basic deal as the Cornerstone bin kit (glue the panels together to make rings, and then glue the rings together to make a bin). However, for whatever reason they're much easier to assemble, so I didn't wind up with nearly as many clunky seams this time. On the downside, they do not come with any kind of base / foundation. And since I didn't have any handy 3.25" plastic tubes laying around on my desk, I opted to just make my own by gluing together concentric rings of skinny / bendable styrene around the base -

Funny story - I thought I'd be clever and make all the strips at once. And being the mathamatical genius that I am, I made them all the same length. Raise your hand if you know why that didn't work. Yeesh, what a dope...
For the south bin I used Gold Medal Models etched brass ladders and safety cages (having run out of my leftover styrene caging). And cripes, what a pain in the rear those things are to assemble. Trying to get all the microscopic little feet on the cage plugged into the microscopic little holes on the ladder is definitely not my idea of a fun time. Anyway, once assembled, I then CA'd the whole shlabotnik to the side of the bin and then added an additional ladder running up to the top of the cone (it's hard to tell from my scouting pictures, but I think that's what's up there). I also added a hatch up there (which I assume is how they tell whether or not the bin is full - IE, no fancy binindicator on these). Next, I added a couple more hatches down towards the bottom of the ladder/cage assembly.
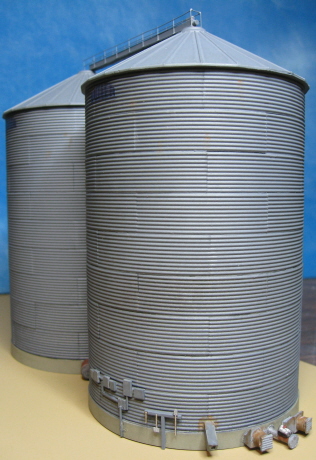
For west (non-track) side of the north bin, I added another "is the bin full?" hatch up on top, a couple more access hatches down by the base, and a ladder up to one of said hatches. Next, I used various bits of generic styrene for all of the assorted electrical foofarah on the track side. Then I fabricated the spout, fans, auger, and tool rack (more generic styrene) and stuck those to the base. And yes, I even went so far as to purchase a set of "beyond tiny" GCLaser laser-cut wood "tools" in order to provide a couple of shovels and a mallet for the tool rack.
For the walkway and auger up top I used Gold Medal etched brass "industrial walkway" (the assembly of which is just as annoying as the ladders and safety cages), to which I affixed a long stick of generic styrene for the auger housing. I then stuck a little round dealio on the end of the housing for the auger "turner", and a tiny little block of styrene on top for the auger motor. And yes, at this point we're talking about details that are reaching the "smaller than a breadbox" stage, so trying to make actual models of them starts to get kind of pointless. Basically I just shoot for a simple, impressionistic representation of the prototypical detailing (the working theory being that just having "something" there is good enough, and certainly better than "nothing at all").
So, at this point I was kind scratching my head over the south bin - wondering why it didn't have fans and a return auger like the north bin. And after going back and rechecking all of my scouting photos, I did discover that, yep, it did indeed have a couple of fans. Damned near impossible to see, but definitely there. Unfortunately, by this point I'd gotten pretty bored with bin detailing and decided that I just wasn't interested in scratchbuilding any more danged fans. So, letting laziness be my guide, I went ahead and simply used a couple of the fans that came with the bin kit itself. No, they don't really look like the fans on the prototype, but oh well. Sometimes sloth trumps obsessive-compulsiveness. As for that mysterious second return auger, I remain stumped. I never did find one so I don't know if the one auger serves both bins or if the south bin's auger is tucked away inside the elevator itself, or... well, who knows? In any case, I'm not going to lose any sleep over it.
I was only marginally successful in my attempt to come up with workable graphics for the "Butler" decals. I guess Butler was bought out by Brock back in the 90s, and apparantly that old "humpback" Butler logo hasn't been used for quite a while. So, I couldn't just go to a Butler website and grab a handy .gif file or something (ala my Hubbard decal). The best I could manage was a Butler logo culled from a sign I found here. Unfortunately, it's really small and "upsizing" it made it a bit blurry. My cheap-ass inkjet printer didn't help much in that regard either (I really do need to bite the bullet and get a decent printer one of these days). But anyway, the logos are there and they're better than nothing (I guess).
For paint, I once again went with Floquil "Concrete" for the base and Floquil "Reefer Gray" for pretty much everything else. For the weathering (what there is of it), I airbrushed on a light layer of weatherwash and then added the occasional drool of wet Bragdon rust here and there (for whatever reason, mostly up near the top on the prototypes).
So that's it for bins (thank god). Now I suppose it's time to get after the actual elevator.
02/09/10 - A slight detour to DME-land
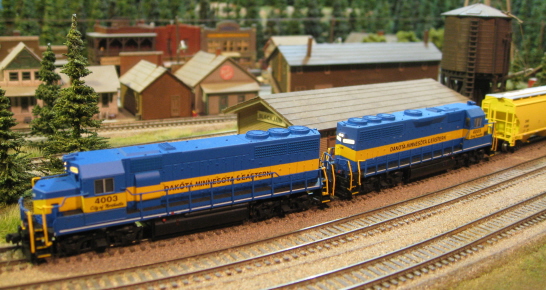
Finding myself a bit bored with buildings, I decided to instead spend a bit of time messing around with locomotives. I tell ya, this hobby rocks - if ya get bored with one thing, there are always twelve different other things to play around with. Anyway, since I've more or less decided that I'll be including DM&E trackage in the (eventual) Hope festivities, I figured I'd also (eventually) want to run some DM&E locomotives around said theoretical layout. And since the DM&E is a relatively dinky operation, I also figured I'd probably be doing all the painting and decaling myself. Well, wrong-o locomotive breath! As it turns out, Atlas did actually release a triumverate of GP40's in DME livery. And as pictured above, I've managed to track down two of them (#4003 - City of Northville and #4005 - Larry Pressler). So wow, a headstart that I hadn't anticipated.
I followed up that acquisition with an honest-to-gosh custom painted GP9 (#1463 - City of Onida) -

For the three or four people in the universe who might actually care about such things, the blue is a mixture of Floquil Conrail Blue and CSX Blue (approximately three parts Conrail to one part CSX). The decals are from Microscale. And although it's awfully nice that Microscale actually has DME decals at all, they are fairly limited in their "era" (representing, I believe, a fairly narrow snapshot in time). Still, I guess you take what you can get when you're a member of the mediocre masses. I used Floquil CN Yellow on the step edges and the handrails around the steps. It's a good match for the yellow that Microscale used on their stripes, although a bit off as compared to the yellow/gold that Atlas used on their's. The only prototypical modification I made to the model itself was to glue an Atlas SD35 bell to the top of the nose.
I also picked up a Bachmann 44-tonner and whipped up a quickie set of "Hope Elevator" decals for it. Y'know, just in case ye olde trackmobile turns out to be deficient in its mustard-cutting abilities.

So, that was fun diversion from the fershlugginer grain bins (ugh). In fact, it's put me in the mood to try my hand at some DME SD9 and SD10 models. What the heck, why not?
02/17/10 - More DME fun and games
I guess my goal here is to have at least one of each kind of locomotive owned by the DME at one time or another (GP9, GP38, GP38-3, GP40, SD9, SD10, SD40, SD40-2 and SD40-3). And in aid of that, I decided to transfer ownership of my Kato "mid-production" SD40-2 from the CN to the DME. Unfortunately, this project turned out to be something of a disaster - both in terms of prototypical accuracy as well as the modeling...
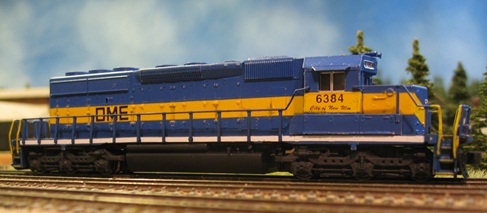
Selecting which unit to model turned out to be a bit complicated. DME only has one SD40-2 that is configured like the Kato model (#6056, a former BN unit). Yes, the Kato model has a brake wheel and #6056 has a brake lever - but apart from that they match up pretty well. Unfortunately, the Microscale DME decal set doesn't come with "City of Highmore" decals (the name currently assigned to #6056), so #6056 was off the table. Further complicating matters is the fact that all of the name/number combos that DME does supply are for ex-Milwaukee SD40-2's - and those have all sorts of prototypical differences from Kato's model (the aforementioned brake wheel / lever discrepency, differently mounted ditch lights, differently mounted bell, et al). But figuring I'd already committed worse sins in the past, I decided to go ahead and model one of the ex-Milwaukee units anyway ("City of New Ulm", #6384).
Now, somewhere during the course of looking up pictures of various DME SD40-2's and applying my decals, I got confused and put white stripes on the sidesills (a feature found on #6056 but not on #6384). So, strike one. Similarly, I stuck sunshades on the cab (which also turned out to be a feature only found on #6056). So, strike two. Next, I had just all sorts of problems with air pockets forming under the long yellow side stripe decals. This led to a lot of ugly pockmarks, and I wound up having to double (and in some cases, triple) layer the stripes. And this in turn led to some fairly globby looking decals. So, strike three. Lastly, all my striping woes led to an excessive amount of shell manhandling, which wound up wearing away the paint in a lot of spots. So, I had to do a fair amount of brush "touch up" work (which never looks good on an airbrushed paint job). So, uh, strike four? OK, no, it didn't turn out so bad that I had to bury it in a lot of unneccesary weathering (or even bury it in my back yard). But, not my finest hour either. Here's hoping my SD9 / SD10 project turns out better.
02/23/10 - Yeah, sorry... yet another boring DM&E diversion

This was my first shot at some marginally ambitious locomotive "shell hacking" - to wit, turning a generic high-nose Atlas SD9 into an ex-CNW low-nose SD9 (#6610, "City of Waseca"). And although it's probably not going to be garnering me any "modeler of the century" awards, I'm still awfully encouraged by the results. Frankly, the thought of attacking a perfectly decent locomotive with sharp tools has always scared the hell out of me. But, y'know what? It's actually not that big of a deal. And now that I've done it, I feel like the sky's the limit as far as taking on other models that can't be bought "off the shelf".
OK, the big caveat here is that we're talking about modifying an Atlas shell. Y'know, Atlas - the bottomless supply of cheap locomotive spare parts. I had to burn through four SD9 shells before I got this thing right, and if it were anybody else's model (Kato, Life-Like, Con-Cor, you name it), I'da been screwed. Let's face it, the only way to get a locomotive shell from most of those other manufacturers is to buy an entire freaking locomotive (yikes). So, major kudos to Atlas and their parts department.
For this project, I opted to chop the nose the same way EMD did it on the prototype - namely, cut a section out of the middle. This involves making two cuts (thus doubling the amount of work), but the good news is that all of the molded-in shell detailing winds up in the right spots. The main thing here is to have the right tools. And fortunately, they're pretty basic - a Zona razor saw (the more teeth the better) and a couple of sandpaper sticks.
Although there are probably better ways to go about this, I kept things pretty simple. Basically I eyeballed where I thought the cuts needed to go, grabbed the saw, and had at it (no fancy clamps or miter boxes or any of that other stuff). The main thing is to cut less material than ultimately needs to be removed and then use the sandpaper sticks to fine-tune things. And although I wrecked a few shells in the process, I did eventually wind up with cuts that looked pretty good.
As for the detailing, I started off with an SD24 cab for the number boards and forward cab windows. This involved cutting off the front of the cab with a razor saw, sanding it super thin, and then gluing it to the front of the SD9 cab. The winterization hatch and air horns came from an SD24 as well (I filled in the original airhorn holes with squadron putty). The bell came from an SD26.
These ex-CNW SD9's actually have four exhaust stacks (as opposed to the two found on the stock SD9 shells). So, I cannibalized the extras I needed from my smoldering pile of "failed nose cut" shells (hacking them out with a box cutter). For this model I actually tried gouging out little rectangular indentations in the shell so that the stacks would sit flush with the roof. And wow, what a lot of messy work that turned out to be. On my next shell (my as yet unfinished SD10) I decided to make things a little easier on myself by sanding the bases of the stacks as paper thin as I could get them and then simply gluing them right to the top of the shell. No, not the most elegant solution in the world, but I saved a lot of sanity points in the process.
On the decal side of things, I finally figured out why I've been having so many air pocket problems. After applying all my assorted magic decal potions (Micro-Set, Solvaset, et al), I've been leaving the locomotives laying on their sides while everything dries (being afraid that the decals might tend to sag if I let them dry with the shells sitting upright - a problem I've had in the past with skinny stripe decals). Well, this causes all of the various solutions to pool up, and before you know it, here come the air pockets. So, my bright idea this time was to try letting things dry with the shell sitting upright (letting gravity do its work). And lo, no sagging and no air pockets. I guess these stripes are wide enough that they aren't prone to sliding around once in place. And hey, it only took me three locomotives to figure that out.
So anyway, that was fun. Now I just need to finish up my SD10 and we can get back to working on this bloody layout.
03/04/10 - Finished my DME SD10 (#551, City of Brookings)
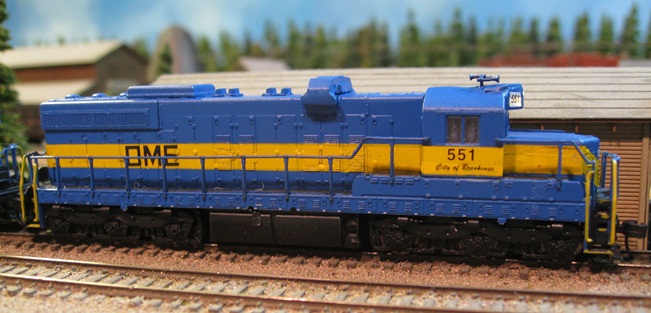
Pretty much the same deal here as my SD9 - just with the obvious exception of the Horst air filter and the less obvious exception of the peaked forward number boards. The filter housing is a white metal detail part from Sunrise Enterprises (no longer in business, so good luck finding one). As for the angled peak coming off the number boards, I stuck a tiny piece of styrene at the pointy tip of the cab (to provide the angle) and then a thin piece of styrene (the thinnest I could find) on top of that (shaped to follow the contours of the number boards). Next, I filled in the space underneath said styrene with glue and squadron putty and then spent simply hours and hours and hours fine-tuning it with sandpaper and files until it looked more or less right. Yeah, it's still a little klunky looking, but I eventually decided that I was never going to get it perfect and ultimately decided to go with "good enough" instead.
Oh, and my "spookshow" moment on this one came when I realized I'd put the rear "Chevron" stripe on upside-down (and after I'd already solvaset'd it in place). D'oh! Then, I got to teach myself how to remove a thoroughly attached decal (as it turns out, lots and lots of Solvaset and a toothpick).
So, that's it for my DME shenanigans (for now, anyway). But watch out, 'cuz it looks like I done been re-bitten by the history bug (having spent the past few days researching Rock Island passenger train operations through Hope). However, that's a story for another day, so stay tuned...
03/19/10 - OK, so now I know a little something about Rock Island passenger trains in Minnesota

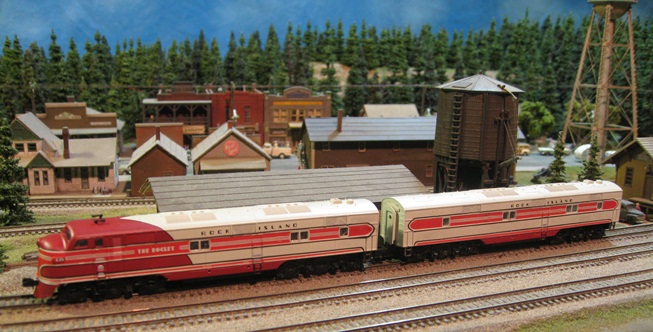
After spending a bit of time browsing Greg Stout's "Route of the Rockets" and perusing various old Rock Island passenger timetables (cheap and plentiful on eBay), I've learned that Hope did indeed see its fair share of passenger traffic back in the "golden age" (20's through the 50's). Namely, four northbound and four southbound trains each day. Most noteably, a couple of Rock Island's famous "rocket" trains made daily trips to and from Minneapolis - the Kansas City Rocket (pictured above) and the Zephyr Rocket (service to St. Louis). The Kansas City Rocket was actually a fairly shortlived train and would later be supplanted by the more famous "Twin Star Rocket" (service to Houston).

Sadly, Rock Island passenger service along the Minnesota portion of the Spine Line was gradually phased out starting in the early 1960s. By 1967, all of the old rocket trains had been replaced by the single (and rather frowzy looking) "Plainsman" train (service to Kansas City). And by 1970, Rock Island passenger service to Minnesota was discontinued entirely.

The last actual scheduled passenger train to stop in Hope was way back in 1957. However, I don't think I'm going to let inconvenient facts like that prevent me from modeling a couple of the trains that served the area back in the Rock Island heyday. There's a really nice four-part article in "Remember the Rock" magazine that shows how to model a typical 1950s version of the Twin Star Rocket. And although I haven't found any really good references covering the pre-diesel era yet, it looks like all I'd need there is a 4-6-2 (or a 4-8-2), a couple of railway express cars, and a few generic heavyweights.

Anyway, as much as I'd like to get started on those projects now, I think I've probably wasted enough time on non-layout related nonsense for the time being. IE, time to get back to the grain elevators (sigh).

On a completely unrelated note - as you can see, the pooltable is finally gone (along with all the pooltable-related furniture). So, yep, I now have lots of space in which to build that room-sized empire I've been contemplating (at least 12' X 14', depending on how I arrange things). However, the first thing I need to worry about is installing additional lighting down here. With only two fluorescent panels in the ceiling and the two hanging pooltable lamps, this room has always been a bit dim. And since I want to eventually be able to light this room up to levels approaching broad daylight, the working plan is to lose the hanging lamps in favor of another 8-10 fluorscent panels. So, we'll see...
04/04/10 - Still plodding along on the north elevator complex


Yes, I'm still alive and kicking (in case you were worried). I've been making decent progress on the elevator / dump shed / office triumverate, however the yet-to-do list remains daunting (grain dryer, truck loading shed, conveyors, spouts, lighting, assorted detailing, yadda, yadda, yadda). For some reason I thought that this was going to be a lot simpler than it's turning out to be (silly me).
In the mean time, I decided to take a break from all that and whip up a fantasyland DME caboose -
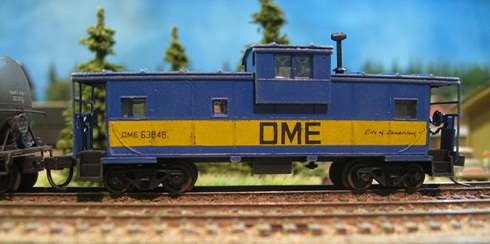
No, the DME never actually rostered any. But what can I say? I like cabooses. Anyway, that's probably enough fun for one day. Time to get back to scratchbuilding that grain dryer...
04/07/10 - More locomotive hacking and slashing

This doesn't have much to do with the Hope layout, but since I'm still plodding along on the grain dryer I don't have much else to write about at the moment. Anyway, I've recently started divesting myself of some of my "locomotive encyclopedia" test crew (mainly 'cuz rostering one of every north American prototype locomotive ever made takes up a ridiculous amount of space, and frankly I'm just sick of looking at the things). With that in mind, I've been pruning things back to the stuff I'm actually going to want to use on this theoretical layout (IE Rock Island, C&NW, UP and DME locomotives that run good). And as I was going through my C&NW locomotives, I came across my old Life-Like "plastic chassis" FA-2/FB-2s and lamented the fact that, although the shells are decent, the mechanics aren't quite up to modern standards (especially the dummy B unit, which doesn't have any mechanics at all). I further lamented the fact that Life-Like is unlikely to ever re-run these C&NW Alcos using their newer (and much better) metal-chassis mechanism.
So, once I finished with all the lamenting, I decided to actually do something about it - namely, ditch the old plastic guts and cannibalize the guts from my pair of metal-chassis Alcos (in this case UP, but way out of the UP/Minnesota era, and hence unusable). As it turns out, the two versions share nearly identical shells and the entire project wound up being kind of a no-brainer. So, I figured I'd go ahead and document the procedure here for others who might be similarly inclined.
Since the couplers are mounted on the trucks on the old models, the first task is to remove the coupler mounting clips that Life-Like retrofitted to the new shells (back end of the "A" and both ends of the "B"). These mount on little plastic posts inside the new shells and simply slide up and off with a minimum of prying. The old shells don't have the posts, so I used CA to hold them in place. Next, you need to make some indentations on the insides of the shells that match up with the little metal nubs on the metal chasses (these hold the new shells to the new chasses). I used a Dremel and one of those pointy-ended grinders.
The last task (the pilot on the "A") is a bit tricky. The old A shell has a huge gaping hole to accommodate the truck-mounted Rapido coupler and, as such, is a bit of an eyesore. Now, the easy solution is to simply cover up the hole with some styrene, paint it, and be done with it. However, I opted for the more ambitious solution - namely, cutting the pilots off the old and new shells and relocating the new shell's pilot to the old shell. Fortunately, this isn't all that difficult since you're basically making single, short cuts that are easily delineated by the contours of the shells. Just be sure to cut off a little more "new" pilot than you really need so you have some wiggle room vis'a'vis the sanding. I used a Zona razor saw to make the cuts, sanded the top of the amputated new pilot to get a straight/flush fit, painted it, and then glued it to the old shell. Once the new pilot was firmly in place, I then glued the pilot knuckle-coupler mount from the new shell to the old. I then finished things off by putting some number decals on the numberboards.
So, that's that. I think the whole project took about an hour, and now I have a pair of super sweet running C&NW Alcos for my roster. Better still, Aztec Mfg sells DCC-Ready replacement frames for these (on a swap basis) should I ever decide to go that route. So, it's all good.
04/12/10 - Still working on the grain dryer

Still plenty of work to do on this baby (ribs, ribs and more ribs). However, I thought I'd take a little break and spend some time discussing pyramids (IE, the in and out spouts). With literally no idea how to proceed on these things, I started out by spending a ridiculous amount of time trying to fabricate them free-hand (y'know, making one side at a time and then hoping they would somehow magically form a pyramid of the right size and shape). And man, this got me absolutely nowhere. I never even came close to coming up with something that looked like a pyramid.
Now, being regular geometric shapes you'd think there'd be some easy way to sit down with pencil and paper and plot out templates ahead of time. But if there is, I sure don't know what it might be. Fortunately, computers have allowed us (or at least some of us) to move beyond such stone-age tools. And for those with the digital know-how, plotting these things out with a graphics program (such as CorelDraw) is a pretty simple task (or so I've been told).
As for me, I've never really had any call to learn how to use such programs, so I was basically stuck. But fortunately, a kind soul over on the Atlas forum (yo Peteski!) volunteered to whip up a few generic templates for me to use. And wow, they worked great! All I had to do was resize them (template) to fulfill my specific needs (a task I actually do know how to do on a computer) and voila, perfect pyramids.
In addition to plodding along on the grain dryer, I also spent some time upgrading my old plastic-chassis Life-Like Rock Island E7s with the newer all-metal guts and shell-mounted couplers from a couple of Life-Like E8s -
Pretty much the same procedure here as with the FA-2/FB-2's, excepting that no pilot swapping is neccessary. One new wrinkle is that the window inserts on the old E7 shells don't really work with the new E8 chassis and had to be jettisoned. Instead, I used some Krystal Kleer to form new windows that are flush with the interior of the shell (I also painted the chassis black behind the windows). Lastly, I used an Exacto blade to remove the ribs from the inside of the old shells (since the new chassis does not have corresponding slots for said ribs). So there you go, another pair of diesels ready to rock the Hope layout. Um, y'know, some day...