

10/31/09 - Finished the SunRich feed mill (click the link for side-by-side comparisons with the prototype)
This building started out its life as a Cornerstone "Valley Growers Association" kit (two of them, actually). And I have to say, kitbashing
something that's already pretty close to the desired prototype is just one whole heck of a lot easier than, say, trying to turn a machine shop
into a creamery. Better still,
I'm really starting to get a handle on this whole business of punching door and window openings and creating all the
little custom bits and pieces that go into a good old-fashioned kitbash (be it modifying existing parts or fabricating completely new parts out of
Evergreen styrene). And once again, all my handy new tools (Chopper, Cornerpunches, et al) helped to make the job that much easier.
Basically this was almost exactly like building a kit - just with no instructions... and some of the pieces missing... and some of the existing
pieces needing doors and windows added (or filled in) or other similar tweaking. But apart from that, exactly like building a kit! 

Fortunately, I had numerous photographs to provide instruction and all sorts of .030" Evergreen "metal siding" styrene with which to fabricate the missing pieces (not to mention the plethora of kitbash fodder provided by the second kit). I guess the only really tricky part was deciding what to do when. First off, I'm not nearly clever enough to completely pre-fabricate all the custom pieces. Rather, I just have to sort of feel my way one piece at a time - assembling the stock kit parts as far as they take me, and then cutting and installing the custom pieces as needed. Unfortunately, since the roof pieces and wall pieces require different colors of paint (Floquil "Bright Silver" and "Reefer Gray" respectively), I pretty much had to paint most of the pieces prior to gluing. And man, I really hate manipulating painted styrene (be it cutting, sanding or gluing). Nevertheless, things did progress fairly smoothly and rapidly. Heck, I only had to tear the whole thing apart and start over once (when I realized I'd forgotten to add a couple of windows to the north wall - oops).
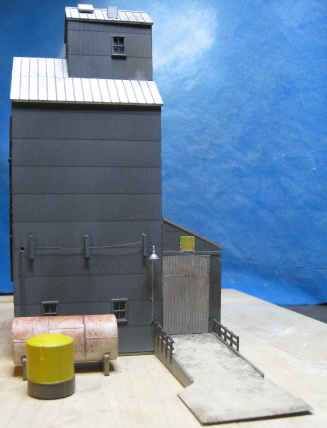
As usual, the real fun was in the detailing. In this regard, I always save the original "macro" (IE, huge) pictures I take on my scouting trips to Hope so that later on I can zoom in and pick out all the interesting little fiddly bits. As pictured at the top of the page, I started by adding an escape ladder to the east wall (scavenged from my goodie box). Next, I added a couple of venty widgets to the north side roof (one from my Cornerstone assortment and the other fabricated from a chunk of styrene).
On the north wall I added three generic wall brackets for the electric line as well as a generic styrene conduit. As on previous buildings, the actual EZ-Line "wire" goes in through a hole in the wall just above the conduit (glued to the inside of the wall with FTG). I also drilled holes through the three brackets in order to feed the line through them.
For the external light fixture, I relived my creamery triumph by taking a Minitronics bulb/fixture, CA'ing the wires into both an electrical conduit as well as an arm, painting the whole thing silver and then FTG'ing it to the wall. I tell ya, I don't come up with that many bright ideas, so I'm still awfully darned proud of that one.
The "Hubbard Feeds" decal over the door was kind of a challenge. My original plan was to take a picture of the actual sign on the building, shrink it down, and print it out on decal paper. Unfortunately, that damned electric wire runs right across it, ruining any chances at a decent photo. Fortunately, I managed to Google up the exact same graphic (on Hubbard's own website, as it turns out - duh) and used that for my decal instead.
I finished things off on the north side by building a couple of Cornerstone storage tanks. Unfortunately, I neglected to take any pictures of the piping, so I'll have to worry about all that later on. But I'm telling ya right now, I will worry about it. I'm completely bored with fantasy-land model storage tanks that don't actually connect to anything (rant, rave, snort).

For the overhang/shed on the south side I constructed the wooden platform out of, well, wood. The stairs and railings were scavenged from one of my RSLaser stairway/landing kits. I finished off the scene by adding a door ramp, a couple of barrels, and a Woodland Scenics "dude". For the ramps up to the dump shed, I brushed on a bit of Golden Mediums "Fluid Matte Medium" and then sprinkled on smatterings of Highball "dirt colored powder" along with a multi-colored mixture of Arizona Rock & Mineral ballast. Once the matte medium dried, I spent a bit of time brushing off the excess clumpage until I reached the desired look (a thin layer of dirt mixed with gravel).
Weathering-wise, I tried a couple of new things this time around. I started off with some generic "weather-wash" (India Ink mixed with alcohol). But instead of brushing it on, I tried applying it with an airbrush. My goal was to eliminate the "sloshy slather" look that one occasionally gets when using a brush, and I certainly accomplished that. Overall though? I dunno... I mean, it's subtle to the point of practically being invisible. I guess I'll leave it up to y'all to decide whether or not it was worth the effort. Anyway, after the weather-wash dried I brushed the walls with Bragdon dark gray, the shed doors with light gray, and the wooden bits with light brown. Then I blew off the excess with my airbrush and sprayed everything with a coating of flat finish.
The roof sections on the prototype are kind of interesting. Yes, they're rusty - but only smatteringly so. And although Bragdon Powder makes for great rust, it doesn't do "smattering" very well (not dry, anyway). So, my bright idea was to brush on the Bragdon and then use a wet brush (and eventually my fingers) to "smatterize" it. It's kind of an arcane art, but the results are great. And the beauty of Bragdon is that you can completely remove it (with water) and start over if things have gotten too far out of hand. Once I'd achieved the level of smatterousity I was after, I sealed it all in place with another layer of flat finish.
So, that's that. And what a lot of fun it was! I think I'm finally hitting my stride with this stuff, and I'm definitely looking forward to my next project - a scratchbuild of the adjoining trackside storage building.
On a side note, it is my sad duty to report that I've basically given up on my NWSL "Sander" tool. What seemed like a neat idea at the time has turned out to be kind of useless. First off, when smoothing the edges of a piece of wood or styrene you're basically only using a very thin strip in the vast sandpaper-equipped sanding block. The upshot of which is that one is forced to replace said sandpaper (99% unused) on an annoyingly frequent basis. And as bad as that is, I'd put up with the annoyance if I could actually make smooth and accurately angled wall-join edges with the thing. Unfortunately (and as I've vented about previously), it's only really good for sanding walls that are laying flat - IE, no wall edge beveling. So, until such time as I discover a better tool, I guess I'll continue honing my "grinding block" skills. What can I say? The "it never wears out" feature alone overcomes whatever other shortcomings it might have.
11/10/09 - Finished the feed mill storage shed (click the link for side-by-side comparisons with the prototype)


The shed that came with the Valley Growers kit turned out to be completely useless for my purposes (wrong walls, wrong roof, wrong everything), so this was a 100% scratchbuild. And as you can see, I took some serious liberties with the length. I don't know the exact dimensions of the prototype, but just eyeballing things it looked to me like it would need to be a good 12-13" in length in order to match up with the feed mill (vis'a'vis the relative sizes of the two buildings). And, yeah, if this were going to be the centerpiece of the whole operation, I probably would've gone ahead and built it full-size. However, given the overall hugeousity of everything else that needs to go into this space, I decided that it would be prudent to engage in a bit of selective compression right from the get-go. So, the upshot of all that is that I went with a length of 9" (punting a door off of each side and scrunching the remaining doors and windows a little closer together in the process).
For a scratchbuild, this was about as easy as it gets - four walls, six windows, a roof and not much else. And I have to say, I love the sliding doors. Since none of them are actually open, all I had to do was glue them right to the wall - IE, no messing around with cutting openings. In fact, so basic was this project that I probably should've finished the whole thing off in a couple of days. Unfortunately, that's not how we roll over here in Spookshowville. Here's the thing... as I was preparing to put the finishing touches to the weathering, I accidentally grabbed a can of gray spray paint when I meant to grab a can of flat finish. And oh man, the subsequent expletives flew as fast as that damned paint. Can you say "time to start over"?
Anyway, I once again went the whole "two layer" route with the Evergreen styrene (ala the hardware store). However, this time around I went a bit thinner with the inner layer (.030" instead of .040"). This wound up making window cutting considerably easier (no unwanted cracks when punching near the edges). For the outer wall layer, I went with Evergreen "Car Siding" (HO, 3.25" spacing, .020" thick). Kind of an odd choice I know, but it's the only scribed 13" X 8" siding I could find where the vertical lines run the 8" way rather than the 13" way - thus allowing me to cut 9" walls all at once (as opposed to trying to glue multiple pieces together and somehow get all the edges straight). For the doors and roof I went with .020" sheet metal siding of varying spacing (wider than the wall spacing for the doors, and wider still for the roof). For the door sliders, I used some "L" shaped Evergreen girders. The windows and window glass came from my goodie box of leftover parts (most likely from an old Cornerstone kit).
This time around I actually took advantage of the two layer system to model a couple of unique features of the prototype. First off, I trimmed the external wall layers up from the base a bit (about 1/8") to create a foundation (something I always forget to add until it's too late). Secondly, I cut a big gash in the external layer on the eastern wall to match the big gash in the eastern wall of the prototype.
For paint I went with Floquil Reefer Gray on the walls, Bright Silver on the roof, and Concrete on the foundation. I painted two of the doors Floquil Reefer White and the rest Reefer Gray. And yeah, I kind of went overboard with the Bragdon weathering. What can I say? I like the grunge. However, in my defense I will say that this is a really beat up building. And weathering is really the only way that I know off to simulate said decrepitude (apart from tearing great huge rips in the walls, that is). As on the feed mill, I used a bit of water to get more of a smattered look to the Bragdon rust (on the door sliders and the roof). Same deal for the doors (smattered gray to simulate peeling paint).
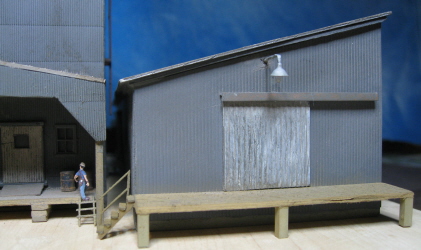
I built the loading dock bumpers and the rear and end door landings out of various wood scraps (painted Floquil Roof Brown, Reefer Gray, and Earth respectively, and then Bragdonized Gray for that "aged wood" look). The stairs and railings were once again provided by RSLaser (man, I would be so screwed without those things). The wall light was yet another stiff-wire/fixture job (painted Floquil "Old Silver" and then flat-finished).
One feature of the prototype that I decided to skip entirely was the short/enclosed passageway between the feed mill and the shed (connecting the shed to the door on the east wall of the mill). Frankly, it just seemed like a lot of unneccesary and annoying work for something that was ultimtely going to wind up being virtually invisible anyway. So, screws it, I says!
Anyway, yay, another building down. What next, you ask? Maybe take a whack at turning the clock back on Klecker Garage? Hey, sounds like a plan, it does! Oh, and um... I don't suppose you have any better pictures hanging around anyplace? Uhhh... do me a favor and take a look, eh? 'Cuz otherwise, I'm out here on an island making things up as I go along (yaaaaaarrrgh!)
11/18/09 - Finished Klecker Garage (click the link for side-by-side comparisons with the prototype)

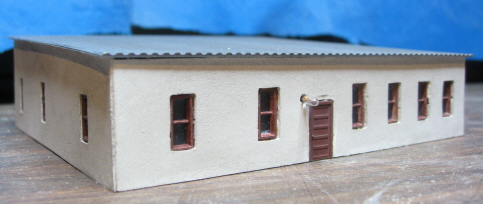
As threatened, Klecker Garage is indeed back in business. And although I only have a couple of pictures of said garage in its earlier non-storage incarnation, I did the best I could with the information on hand. For the walls I went with plain Evergreen styrene (.030" on the inside and .020" on the outside). I built the main garage door out of various bits and pieces of styrene and scavenged the rest of the doors and windows from my goodie box. The roof is simply a thick hunk of Evergreen sheet metal siding.
I followed the same basic procedure as on my previous scratchbuilds (select the doors and windows, cut wall sections to fit them, trace pen outlines where the openings need to go, and then cornerpunch 'em). And although my cornerpunching skills continue to improve, I still wind up with more than my fair share of screw-ups (particularly on a building with this many doors and windows). Which is why I'm absolutely falling in love with Squadron Putty. I tell ya, it makes fixing those occasional "oops" spots ridiculously easy.
Based on the couple of historical pictures I do have, Klecker Garage started out its life with simple cinder-block walls. Later on, said walls were covered with white stucco (or something like stucco). However, rather than using that decidedly unsubtle Plastruct stucco sheeting, I instead decided to try coarse sanding the flat styrene in order to add a bit of texture. And lo, this actually worked out pretty well. I did wind up with a couple of gougy scratches on the southern wall (something I didn't notice until I'd applied the weathering). But overall, I think I achieved the desired affect. Should I ever repeat the procedure, I'll just have to remember to spend a bit more time on the sanding (and thus eliminate any big scratches).
At present, Shuler's storage shed is white from stem to stern. So, I started by painting the walls Floquil Reefer White. Intriguingly, the older pictures make it look like the doors and windows might have actually been painted some darker color back in the day. Now, I suppose that could just be an optical illusion (these are not good pictures), but in any event, I decided to throw caution to the winds and paint mine. And not having the faintest idea what said nameless color might have been, I opted for Floquil Boxcar Red. The current roof is white, but it's also relatively new (the old one having been torn off when Shuler converted the building). And without any photographic evidence to guide me, I decided to simply paint it Reefer Gray. Once painted and assembled, I airbrushed on a light coating of weatherwash and then applied a bit of Bragdon light gray (hello scratches!)
Not much to report on the detailing side of things. I started off by adding a meter box / wire conduit to the southern wall (with yet another EZ-Line wire glued next to the conduit). Next, I finished things off by adding three lights (one stiff-wire fixture over the main garage door and a couple of bare bulbs by the side and rear doors). And I have to say, I'm getting kind of bored with these bare bulb "fixtures". Yeah, they get the job done, but they sure don't look very realistic. One of these days I'm going to have to think up some way to improve their appearance...
Overall, I'm pretty pleased with the way this building turned out, but I do think I wound being a bit overly generous with my door and window spacing. I thought I was matching up the prototype pictures pretty well as I went about the task of mocking up the walls. But once I'd finished all the fabrication and assembly, my initial reaction was "wow, this is too big". In retrospect, I think could've scrunched things a little closer together and shaved about an inch off of each wall. But, oh well, that's what you get when you don't spend the time to take exact measurements. And at the end of the day, I still think I captured the basic look of the place pretty well (if not the exact dimensions).
So, that's that. Now I guess I need to build that adjacent shed. I guess this would be a meta-shed?
11/23/09 - A slight detour to Trackmobile fantasyland

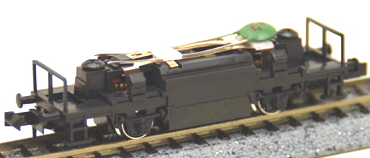
Finding myself suddenly bored with buildings, I decided to spend a bit of time worrying about how I might replicate the nifty little Trackmobile that SunRich uses to shunt their grain hoppers around. And it didn't take me long to figure out that nobody makes an N scale Trackmobile (powered or otherwise). IE, whatever I was going to wind up doing, I was going to be doing it on my own.
Complicating an already complicated situation is the fact that SunRich's Trackmobile is a really tiny one (as pseudo-locomotives go), measuring less than 15 feet from end to end -
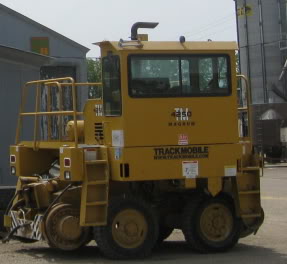
As such, it seemed pretty unlikely that I was going to be able to find (or make) a once-inch long N scale power chassis (the mind reels). And since I kind of had my heart set on building a Trackmobile that I could actually operate, I gave up on the idea of a straight copy of the SunRich Trackmobile pretty quickly. My next thought was to try to copy the prototypical N scale Trackmobile built by "Tiny Loco" guru Randy Gustafson (as documented on the Atlas N scale forum)...

...then I thought about it a little more, and decided that fabricating all those tiny little pieces of styrene (and handrails and whatnot) was probably going to lie outside of my current skill level. It's like the pro athletes are always saying - you gotta stay within yourself. And so, inside myself is where I ultimately decided to stay - IE, rather than biting off more than I could chew by trying to scratchbuild an accurate Trackmobile, I decided to try kitbashing a made-up "trackmobile style freight car mover" instead (using simple / readily available parts).
So, with my sights firmly set as low as they could possibly go, my first task was to select a workable (IE, tiny and easy to adapt) power chassis. And in this regard I did follow Randy's lead by going with a Kato 11-104 (currently available on eBay for twenty-some bucks from Japanese seller "plazajapan") -
I then proceeded to chop off everything that didn't look like it belonged on a trackmobile (ersatz or otherwise). Now, Randy recommends dumping the metal "underplate" and swapping out the stock wheels in favor of the lower-profile wheels found on Kato's 11-105 power chassis (to achieve a lower / more prototypical critter). However, after a bit of experimentation in that regard, it seemed to me that losing that much weight was going to result in iffy performance. So, I decided to just leave well enough alone -
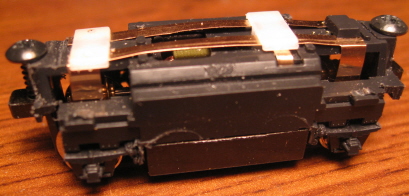
My next task was to get some sort of prefab "sidesill / stair / handrail" assembly in place (mainly 'cuz there's just no way I was interested in bending and otherwise wrangling my own handrails). Happily, I had an unused Kato RS-2/RSC-2 sidestill assembly laying around. So, I chopped out the middle and CA'd the two ends together (CA'ing a couple of generic styrene strips to the underside for additional stability along the way) -

After filing various bits off the chassis and the Franken-sill to achieve a better fit, I then added some generic styrene filler pieces to cover up the exposed guts of the chassis -

Now came the hard part - coming up with some within-my-skills Trackmobile-esque detailing to stick on the thing. And finding myself completely bereft of actual good ideas, I decided to simply hie myself down to YOLHS to see what ready-made cheats they might have tucked away in the mediocre modeler aisle. And what immediately jumped out at me was Life-Like's #1638 HO road grader (for the cab and engine) and Herpa's #742115 HO Hummer (for the wheels) -


Thus armed with a dubious selection of cheats, I then proceeded to skulk my way home. And once safely tucked away in the macabre dungeon secreted 'neath Spookshow Labs, the unnatural experimentation began in earnest. I started out by cutting a rectangular piece of generic .030" styrene and CA'ing it to the sidesill assembly (giving me something upon which to stick all the other stuff). Next, I hacked the cab and engine from the grader, stuffed them full of tungsten putty, and then CA'd them to the styrene base (cackling madly all the while). Lastly, I sawed one of the individual tanks off of a Life-Life SW1200 fuel tank (just happened to have one laying around) and glued it to the engine (figuring the engine needed to get its fuel from someplace) -

Once I'd finished with all the heavy lifting, I then fabricated a couple of thin pieces of shaped styrene to cover up all the ugliness underneath the sidesill ends. Next, I CA'd a couple of Micro-Trains passenger truck couplers (with their "sliders" removed) to the tongues that stick out from the metal underplate (happily, they wound up being at exactly the right height). Lastly, I glued the Hummer tires to the sides of the chassis -

My original plan was to retain the screws that hold the metal underplate to the plastic chassis by drilling holes through the ends of the sidesills and running said screws through said holes. However, that whole decision was rendered moot once I'd painted everything and stuck the Hummer tires in place (all of which serendipitously served to hold the underplate firmly to the chassis). So, I punted the screws and got on with my life. And here's hoping that I never need to remove said underplate in order to mess with the guts of the mechanism... No, not an impossibility, but definitely a major inconvenience...
For paint, I used Floquil "CNW Yellow" (stem to stern) followed up by flat finish. I used an airbrush on the upper level assembly (prior to CA'ing it to the chassis), and a brush for the chassis itself (not wanting to screw up the model's performance with a lot of airbrush overspew). I brush-painted the tungsten putty in the cab windows with Floquil "Engine Black" (excepting for the skinny side windows, which were just too flipping tiny). I finished things off by sticking an Atlas rotary beacon detail to the roof of the cab and applying a couple of yellow/black "warning stripe" decals to each end -


So there you have it, a poor man's kinda/sorta trackmobile. Despite its overall hugeness and prototypical nebulousity, I actually think it's pretty darned cool (no, seriously). Better still, performance is surprisingly decent for a dinky / four-wheel locomotive (just have to keep the wheels and track spotless and don't try to run it through turnouts with non-powered frogs). Unfortunately, my little creation doesn't seem to have garnered much love from the modeling community. I dunno, I guess maybe I took too many liberties with Trackmobile reality for my peers' tastes. Ah well, sometimes you hit a home run and sometimes you just get beaned. But hey, either way you're still on base, right?
So anyway, that was a fun diversion. Meanwhile, time to get back to all those exciting sheds...
11/28/09 - Finished the Klecker "Meta-Garage" (click the link for side-by-side comparisons with the prototype)


This was going to be a pretty boring scratchbuild. So, to spice things up I decided to try my hand at duplicating the "multi-sheet corrugated siding" look of the prototype. So, first things first, I cut the walls out of plain .030" styrene, punched the holes for the windows and doors, glued everything together and then had at it.
First of all, I decided that there was just no way I was going to be able to literally duplicate the siding pattern of the prototype (40 individual sheets on each of the long walls - yikes). So, I just picked a workable size out of thin air and ran with it. To both save time and insure that each of the individual sheets was more or less the same size, I laid four sheets of Campbell corrugated foil on top of each other and then used a styrene template of the appropriate size to guide the cuts. Once I had a big pile of similarly sized foil sheets to work with, I then moved on to the CA...
Now, my struggles with CA have been well documented over the years, and this project certainly ranks right up there with the worst of them in terms of sticky frustration. I don't think there's a single piece of siding that didn't wind up slightly bent, crooked, or otherwise schmootzed up with CA - which is actually kind of a good thing here, since once again we're talking about a really old and really beat up building. Frankly, I think my inherent CA-inpetitude actually worked in my favor for this particular building. One thing that did help to ease the pain was the fact that I made the individual sheets a little taller than they needed to be - thus allowing me to bend the top sheets over the top of the wall and the bottom sheets under the bottom of the wall (making for a bit of much needed stability in the otherwise unstable world of CA).
Once all the siding was more or less safely glued in place, I then set about fabricating the roof pieces. And here I suddenly remembered that cutting a two-piece peaked roof requires that the walls all form a perfect rectangle, and that the height of each individual wall section matches up with the heights of all the rest (something I guess I'd forgotten while building all those flat-roofed structures). The upshot of all that is that my roof wound up fitting not quite right. However, at that point there's no way in hell I was going to re-do whichever walls were causing the problems, so I decided to just live with it. Next time I build a peaked roof I'll just have to remember to fabricate my roof at the same time as the walls and make sure everything actually fits together properly before moving on.
While gluing the siding to the walls, I actually glued sheets right over the holes for the windows. So, once it came time to install the window inserts, I simply used a sharp Exacto blade to cut the foil and reveal the holes underneath (probably the same procedure they used when building the prototype - just with a larger Exacto knife).

For paint, I used Floquil "Old Silver" on the roof, "Reefer White" on the big door, and "Reefer Gray" on the windows and small door. Not wanting to lose the underlying shine of my foil siding, I avoided using paint on the walls entirely. Once assembled, I airbrushed everything with alternating coats of flat finish and weatherwash. I then finished things off with a dusting of Bragdon light gray (followed up by a final coating of flat finish to seal it in place).
So, another building down. Now I guess it's time for... another building!
On a side note, it looks like my basic plan for this layout has suddenly gone right out the window. My step-brother informs me that he's in the process of building an addition to his house and will finally have room for his pool table (the one that's been taking up space in my train room all these years). Bad news for my pool-playing buddies, but it also means that I'll soon have carte blanche to build pretty much any size / shape layout I want (limited only by the four walls of my basement) - IE, I've finally been liberated from my 7' X 3' world. And to tell you the truth, this couldn't have happened at a better time. During this whole "building the buildings" stage I was starting to have some serious doubts about my ability to cram all this Hope stuff into my usual "Top O' The Pool Table" space (let alone make a roundy-round out of it). But now? Heck, the sky's the limit. I'm already foreseeing some sort of three-pronged arrangement with a full-size yard, Hope (in its entirety), the industrial edges of a second town, and two roundy-round loops (yeah, I've really been missing the ability to run multiple trains lately). Anyhow, that's all vague "wannas" at this point, and I certainly don't have any sort of actual plan yet. I guess that's all stuff to worry about when the pool table is actually gone.
12/01/09 - Revisiting Hope Hardware

I was scouring Memories of Hope for pictures of Slezak's shed when I happened across a picture of Hope Hardware back when it actually had a sign on the front of the building. Ten minutes later, I had a sign on the front of mine ('cuz, y'know, signs are cool). Now, the prototypical sign has white lettering on a dark background. However, since I don't have an expensive printer capable of rendering such things, I decided to just keep things simple and go the other way (black lettering on a white background).
12/04/09 - Finished Slezak's Shed (click the link for side-by-side comparisons with the prototype)


I decided that resurrecting this old building was probably going to be more interesting (not to mention easier) than scratchbuilding the structure currently on the lot ("Stafford's Toy Box"). Further, Slezak's shed (nee feed store) was most likely the first structure built in Hope (after the depot), so it just seemed more deserving of enshrinment on my layout than did some old plutocrat's "Barn Full O' Expensive Cars".
The actual building was torn down a number of years ago. And unfortunately, there are only a couple of pictures in Memories of Hope (and not particularly good ones at that). Basically I had one decent picture to work with. And since it only shows the front and north sides, I pretty much had to use my imagination for the remaining walls. Also, said photo was (presumably) taken shortly before the building was torn down, so my model represents it's "dilapidated shed" phase (as opposed to it's more interesting feed store / farm implement shop phase).
Having found myself going a bit overlarge on my previous two buildings (Klecker garage and meta-garage), I made a concerted effort here to get this one scaled properly. Basically it's the facade that drives everything, and it's the two doors and one window that drive the facade. So, it was just a matter of picking the right doors and window, getting them properly spaced, and then cutting an appropriately sized piece of styrene for the front wall (which is not to say that I didn't follow that same exact procedure on those previous buildings - I guess I just tried a little harder this time). And as near as I can tell, mission accomplished - it seems just about right to me.
Nothing particularly noteworthy to report on the scratchbuilding front, as I basically followed the same procedures documented for my earlier buildings. The front is two-layer styrene, the walls are single layer styrene with foil CA'd on top, and the roof is v-groove styrene. I did add a handful of small windows to the rear and side walls just to make them a bit more interesting. Hey, who's to say the real building didn't have them? Without any pictorial evidence, the prototype police are powerless against me!
This time around, I did manage to fabricate all of the various pieces (walls and roof) prior to assembly. Or more accurately, "during preassembly mockup". Not having any better ideas, what I did was assemble all of the wall pieces (literally gluing them together). Then, before the glue could totally set up, I worked up the roof pieces - cutting and sanding them as needed to get a good fit. And once all the pieces looked like they were going to work, I de-assembled everything and continued on with the paint and whatnot. An odd system for sure, but I'm just not skilled enough to create these pieces without ultimately resorting to trial and error.
For paint, I went with Floquil Reefer White for the doors and windows, Floquil Roof Brown for the facade and wall support thingy, and Floquil Old Silver for the roof. And as evidenced above, I went absolutely berserk with the weathering. However, as an "about to be torn down" eyesore with sloppy metal siding, it seems to work. I started by spraying the walls with a couple of alternating layers of flat finish and weatherwash. Next, I dry-brushed on a sloppy smattering of Floquil "Old Silver". After that, I wet-brushed on a witch's brew of Bragdon gray and Bragdon rust, and then sealed everything with a final coating of flat finish.
So, another building down. Now I think it's time to take a stroll back across the street and see about building Hopeful Treasures (nee Wesley's Grocery).
12/15/09 - I'm liking what I'm seeing with this Atlas Code-65 True-Track
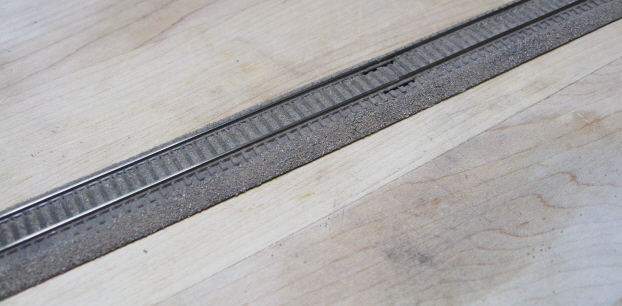
My LHS recently started carrying a full selection of Atlas True-Track, so I decided to pick up a couple of packages and conduct some experiments. My primary concern was the stock whitish-colored ballast (and how I was going to make it look more like the CNW-style ballast found around Hope). Fortunately, this turned out to be pretty easy to deal with. I started by spraypainting everything with Floquil "Roof Brown". This served to both paint the rails and make the underlying white ballast easier to hide. Next I applied a small amount of Arizona Rock & Mineral ballast between the ties (there's just enough room to get some in there) and fixed it in place with WS Scenic Cement. Lastly, I brushed the sides of the roadbed with Fluid Matte Medium and then sprinkled more ballast onto that. And as you can see, the end result is track and roadbed that's virtually indistinguishable from the combination of Atlas Code-55 track and cork roadbed that I used on my previous layout. So, at this point I think I'm pretty much sold. All I need to do now is pick up a couple of turnouts and see how well I like those.
I've also been spending a bit of time cogitating on how I might best use all of this new layout space that I'll soon be inheriting. And at this point, the working plan is to model the loop of track the runs from Owatonna to Hope to Albert Lea to Waseca and then back to Owatonna. The loop is a mix of UP and DME track, so I don't know how totally realistic it will be to run UP (or DME) trains around in circles on it. It's all former CNW track though, so if I get to feeling too guilty I suppose I can always just pull out my CNW locomotives and say it's 1985.
Both Waseca and Albert Lea have large rail yards (presumably with interesting maintenance facilities), so I'll for sure be modeling one of those (rather than going with my original plan of modeling the Valley Park yard up in Shakopee). There are also numerous small towns scattered around the loop (Ellendale, New Richland, Hartland, Manchester, Clark's Grove, et al) that (based on satellite photos) look to have some potentially interesting (and model friendly) rail-served industries. I envision picking and choosing a handful of the most interesting and workable trackside scenes and scattering them around the loop - but with Hope (in its entirety) remaining the major focal point of the entire layout.
I'm also leaning hard towards totally cheating and going with a double-track main all the way around. What can I say? I really like running two trains around in circles at the same time. And since there's a really long passing siding down through Ellendale, I guess I can always say that the whole thing is the world's longest passing siding. Hey, whatever it takes to help me sleep better at night.
Addendum - I picked up a True-Track 12.5" remote-control turnout (the only one currently available) and wow, I am seriously impressed. I mean like "pinch me, I must be dreaming" impressed. Not only do these turnouts come with completely hidden motors, they also have fully powered metal frogs that do not require any extra wiring. Better still, I test-ran a couple of my finickiest steamers (an Atlas 2-6-0 and a Bachmann 4-4-0) back and forth over said turnout and both glided through like it wasn't even there.
So yeah, I am definitely sold. The only sticking point now is the (currently) extremely limited selection of track - only two kinds of curves (11" and 12.5") and only one kind of turnout (the aforementioned 12.5"). IE, plenty enough for a trainset-style layout, but not even close to enough variety for a real model railroad. However, I'm told that Atlas is working on expanding the line, so we shall see. Fortunately for me, it will be many months before I'll be ready to even start thinking about acquiring track. So in the mean time, get busy Atlas!