

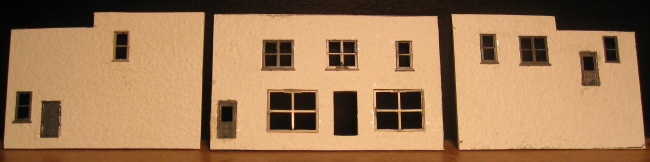
04/29/09 - Started work on the creamery (Building #30)
I was hoping to use Cornerstone Modulars here. Unfortunately, the Cornerstone windows are all wrong for this building (what is Walther's obsession with those round-topped windows anyway?) So, I opted instead for kitbashing a Cornerstone "Machine Shop" kit (one of the few Cornerstone kits that actually has the right kind of windows).
The first thing I decided was that I wasn't going to get all hung up on exact dimensions (IE, literally trying to measure walls and doors and whatnot and then dividing by 160). Being pretty much of a novice at both kitbashing and scratchbuilding, I figured this whole project was going to be difficult enough without worrying about all that. As long as the various walls, doors and windows scan like the original (vis'a'vis their relationships to one another), that should be good enough for my purposes.
This is actually my first kitbash attempt where I'm trying to turn a particular building (EG, a "Machine Shop") into a more or less literal representation of a completely different building (EG, "Hope Creamery"). My kitbashing experiences hitherto have all simply involved modifying an existing building to better fit in with its surroundings (changing its shape, height, or whatever). And now that I've started down this road, I'm starting to wonder if scratchbuilding might not ultimately turn out to be easier. My hunch is that starting out with a blank slate might actually be less work than the whole "round peg into square hole" world of kitbashing. Oh well, I guess I'll find out later on, because I'm certainly going to get more than my fair share of scratchbuilding on this layout before all is said and done. On the plus side, kitbashing a building like this does tend to give it that whole crazy quilt "been modified a zillion times over the past 90 years" look of the prototype.
Cutting and shaping all the various pieces of styrene "filler" is an extremely time consuming task, and one that's definitely pushing the limits of my so-called "skills". I'm not sure what the secret is to getting the puzzle pieces to fit exactly, and inevitably I wind up with a lot of tiny little gaps, cracks and crevices everywhere. However, rather than drive myself crazy trying to get everything perfect, I've decided to just get them as close as I can and then fill in the "oops" spots with "Form-A-Gasket" sealant (weird yes, but it's all I had on hand at the time). And truth be told, it's actually working out pretty well. I just squirt a bit on the back side of the crevice in question and then smoosh it in with my fingers. So far so good, but I guess I won't really know how it all turned out until I actually get some paint sprayed on.
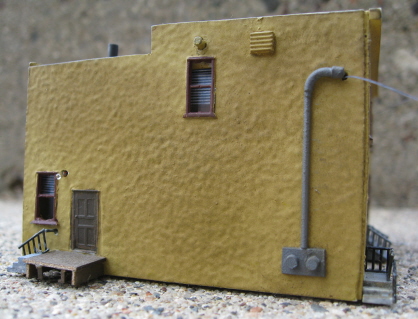
I've been assembling structure kits for, what? Ten years now? So, not surprisingly, I have quite a war chest of various leftover fiddly bits at my disposal. However, just to be on the safe side, I also picked up a couple of Tichy Train Group "Window & Door Assortment" packages. These contain a nice variety of doors and windows, and so far they've come in quite handy. The large water tank (or at least I'm assuming it's a water tank) came from a Cornerstone Modular storage tank assortment. As for the refrigeration unit, that started out life as a shipping container. All I did was cut it in half and then stick a propane tank on top (hey, ya goes with whats ya gots).
So, work continues. Time to get after those side walls.
05/09/09 - Finished the creamery "garage thingy" (or whatever the heck it is)

As mentioned previously, I don't have much experience with scratchbuilding. So, I've been spending a bit of time (and a fair amount of money) acquiring various samples of this 'n' that in an attempt to get a grip on just what's out there. And at least at this point, I guess I'm a bit disappointed by what's available on the "generic brick wall" front. I'd always assumed (apparantly incorrectly) that one could simply buy the equivalent of styrene "kit" brick walls, just in big generic sheets. But, I guess not. Anyway, these are the options I've managed to scare up so far -
These guys have an OK selection of 11" X 7" styrene sheets imprinted in various "brick" patterns. However, I'm not really sold on their usability. The bricks on the N scale brick sheets are probably correctly sized for N scale, but they're also virtually unrecognizeable as bricks. Now, 100% scale fidelity may appeal to some people, but if I'm building a brick building I want to be able to actually see bricks (I know, call me crazy). Making matters worse is the oddball pattern they chose. Basically you have rows of "long side facing out" bricks alternating between rows of "short side facing out" bricks. So, a bit weird looking. Conversely, their HO scale brick sheets have a more traditional pattern (with all rows being "long side facing out"). Of course, they're also way too big for N scale bricks. And given the dimensions of the individual bricks, they don't really make for good N scale cement blocks either. On the other hand, their HO scale "cement block" sheets look great - except that they're way too big for N scale. And from the "huh?" department, they don't make N scale cement block sheets at all.
Anyway, appearance aside, the thing that annoys me the most about these Plastruct sheets is their thickness (or lack thereof). I mean, the dang things flop around like so many sheets of paper, so it's not like you could really build anything out of them. I dunno, I guess you're supposed to glue the brick sheets to thicker generic styrene sheets (which Plastruct also sells). So, a lot of extra work (and expense). And since I don't actually like any of their brick sheets, I'm not sure if I'm all that interested in bothering...
Oh, and lastly, Plastruct also sells brick sheets printed on paper. Which I suppose (once implemented), will ultimately look exactly like what they are - IE, printed paper. So, to heck with that.
These guys have lots and lots and lots of styrene sheets of varying thickness and in varying patterns - none of which are brick. So, handy for buildings with lots of parallel lines (wood and metal siding, roofing, etc). But, brick buildings? Not so much.
These guys sell sheets of stamped wood in various patterns. Unfortunately, their conception of scale leaves a lot to be desired. Of their various brick sheets, the only one I can see any use for at all is their N scale brick sheet - which actually makes for decent N scale cement blocks (in fact, it's what I ultimately wound up using for the creamery garage). They also sell "stucco" sheets, which I'm hoping will work for the (eventual) hardware store. On the downside, these wood sheets are really thick (like a quarter inch), and also pretty warpy.
Rich makes a peel'n'stick N scale brick sheet that's the best looking I've seen so far (laser-cut from super thin wood/resin sheets). And although I'd prefer having something that I can actually build a model out of (y'know, something relatively thick and rigid), I guess if I had to go the two layer route, this is what I'd use.
As mentioned above, I did go ahead and fabricate this particular building from a Model Tech "N Scale Brick" wood sheet (which scans pretty well as cement block). Cutting and sanding four walls was a pretty simple operation. However, I did learn that there is a right way to cut window openings from wood as well as numerous wrong ways. Unfortunately, I opted for one of the latter... Namely, I sliced my little window opening using an Exacto knife, and then pushed it out from the inside - causing a couple of very noticeable splinters to break off from the brick side. Oops. And although I suppose I should've just made a new wall, I decided that this project was already taking a sick amount of time as is. So, to heck with it. Lesson learned, and next time I'll endeavor to do better. In the mean time, it's a beat up old building in real life, so a bit of wall shmootz isn't that big of a deal (or so I rationalize). Basically I glued the splinters back on, sanded them down a bit, and then prayed to the model railroading gods for forgiveness.
Splinters fixed (or at least addressed), I then glued the walls together with wood glue and sprayed the whole thing with a layer of Floquil "Concrete". Next, I brushed on a layer of Bragdon "weathering" powder, which looked totally ace. Then, I sprayed on a layer of flat finish, which looked... totally sucky. Dang. Another lesson learned - flat finish on wood winds up looking a bit waxy (and decidedly un-concrete like).
I used a leftover Cornerstone loading dock door for the garage door (painted flat white, Bragdon-weathered, and affixed with white glue). For the gutters, I used some leftover "H" beams (from some nameless kit of yore), with the bottom of the "H" sanded off and the right side of the top of the "H" sliced off with an Exacto knife (forming an "L"). I painted these Floquil "Reefer Gray" and glued them on with white glue (dunno if that's the best solution for gluing styrene to wood, but it seems to work OK). Quite naturally, on my very next visit to ye olde local hobby shoppe (YOLHS), I discovered that Plastruct sells the same damned thing ("L" beams) - just, y'know, prefab. Oh well, another lesson learned. The pseudo "glass block" window insert was a leftover part from an old Cornerstone grain elevator project.
For the roof, I decided to try something new. I cut out an appropriately sized piece of styrene, and then instead of simply painting it "grimy black" and sticking it on (my normal modus operendi), I glued a similarly sized piece of heavy grit sandpaper on top of said styrene and painted that grimy black. And I have to say, I think it turned out pretty darned cool looking.
So anyway, yeah, mistakes were made. And gird your loins, because there's going to be a whole hell of a
lot more of them in the weeks and months ahead. But hey, at least I'm learning. I'm guessing by the time I get to building #687, I might just
have things figured out 
05/11/09 - The quest for an easy wall fixture

My creamery needs a couple of curvy external light fixtures (one over the front door and one over the door on the right side of the building). Unfortunately, I've never really found anything "prefab" that looks anything like what I need here. So, I decided that if I wanted something that at least approximates the look of the originals, I'd need to build them myself.
I decided to go with a couple of Miniatronics "Lamp Shades With Bulb" (72-001-05) - mainly 'cuz they're readily available at YOLHS, but also 'cuz the business end of said lights captures the look of the prototype pretty well. So, with my fixture selected, I then spent a bit of time trying to turn various bits of skinny metal tubing into curvy support arms. And, yeah, that got me nowhere. First off, even the smallest tubing winds up looking a bit over-sized for N scale (at least to my eye). But more importantly, I'm just not crafty enough to get those crazy bends right. So, I scrapped that idea - IE, time to find a patented "mediocre modeler" short-cut. And my bright idea was to use the bulb wires themselves for the arms -
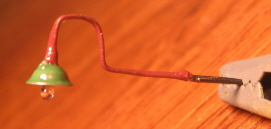
I started off by using some CA to fuse the individual wires together (otherwise they tend to separate from one another when you try to bend them). Once the glue dried I had a nicely stiff, yet still bendable "arm". Next, I bent the wire into the desired shape and then applied a couple more coatings of CA to further stiffen up the wires and help them to hold their shape. Lastly, I painted the arm Floquil "Box Car Red" and the shade Floquil "Dark Green". And by golly, I think the end result is very convincing looking indeed. And getting there was dead simple - I think the whole project took me about 10 minutes.
05/14/09 - Finished the creamery (check out the Building #30 page for a side-by-side comparison with the prototype)


Crikey, this only took two weeks? What an ordeal! I could've sworn it was more like two months... But wow, I sure learned a lot along the way. For starters, this whole notion that modeling the real world was somehow going to be easier than going the freelance route kind of falls apart once you get down to the nuts and bolts of actually fabricating the buildings. Sure, all of the decisions are already made for you, so you don't have to think too hard about what you're building. Very nice, but what gets glossed over is the fact that actually making one's own buildings is pretty hard - requiring a lot of new skills and techniques. To tell you the truth, there were a few times during this whole creamery fiasco where I started to think maybe I'd bitten off more than I can chew. In fact, I must confess that I actually came close to pulling the plug on the entire Hope project on more than one occasion. Early on, this creamery was really looking like crap. And consequently, going back to doing things the easy way was starting to sound like an increasingly attractive option. What can I say? I guess I'd rather take the coward's way out than spend a lot of time and energy building a cruddy looking layout...
Eventually though, I decided to just sack it up and finish the thing. As bleak as things were looking initially, I figured I should at least wait to see how everything turned out before making any drastic decisions. And fortunately, one thing I had working in my favor is the fact that the Hope Creamery is quite the frankenstein's monster in and of itself. So, even if my model turned out to be a complete mess, chances are it wasn't going to look much worse than the real thing. Vis -


As mentioned previously, my main struggle has been with the cutting and the shaping of all the various wall pieces. IE, getting them to fit together smoothly and not look like crap in the process. And at this point, I've pretty much concluded that trying to transmorgrify a Machine Shop kit into something else entirely was not the way to go. I mean, jeez, each individual wall wound up being comprised of a dozen or more different / interconnected pieces. Yikes - talk about making things harder than they needed to be. Worse still, I wound up having to make a fair number of compromises (vis'a'vis the windows) just because I was kind of stuck with what the Machine Shop walls were offering me.
The reason I decided to go the kitbash route in the first place is that I really have no idea how to cut decent door and window openings myself (not yet, anyway). Believe me, if you were to take a good close look at the few openings that I did risk making myself, you'd see that size, shape and angle are not my forte. However, at this point I'm thinking that a bit of additional research might just help with my personal lack of skills. Better tools couldn't hurt either. I'm guessing that my results will improve once I move beyond the stone age realm of Exacto knives, files and sandpaper...
Having said all that, I did actually get better at fabricating the puzzle pieces as things went along. And I'd say the last wall I did (the right side) wound up looking a hell of a lot better than the other three. And once I'd started getting things figured out a bit, I did actually go back and completely redo a few of my earlier (and more inept) efforts. One trick I learned along the way is that one can use model glue to fill in (and smooth out) the seams on the front sides of the walls and further eliminate all the tiny cracks and crevices (or at least the cracks and crevices that the gasket goop didn't fix).
Once I'd gotten all the styrene glued together and looking as good as it was ever going to get, I then started in on the painting, detailing and weathering. I decided to go with an airbrush (rather than a spray can), mainly because I didn't want to lose my bricks underneath a lot of can over-spew. And this actually helped me out quite a bit. After each successive coat, I'd go back and do a little bit of filing here or glue-filling there and then spray on another coat. And after, oh, the third or fourth coat it started looking like I might wind up with a building that I could actually use. And once I'd finished applying all the detailing and trim, all my fears were allayed. No, it's not going to win any beauty contests. But then again, neither is the real Hope Creamery. In any case, it's not an embarassment, so I'm thinking "all systems go" as far as the rest of the layout is concerned (whew).
For the window and door inserts, I either used the ones that came with the kit (the applicable ones, anyway) or used appropriately sized/shaped candidates from my "Big Box O' Stuff". To achieve the bare-bones look of the creamery windows, I wound up Exacto-slicing most of the muntins (honestly, it's a real word - google it). And damn, it is really hard to get clean looking muntins. Ya slices 'em and ya files 'em, and despite yer best efforts, little nubs remain. Ah well... I guess I can't say that my window frames wound up looking any more decrepit than the real ones.
On the paint front, I figured there was basically no way I was going to nail the look of the original. As pictured above, pretty much every single brick is a different color. And no, that wasn't going to happen (the mind reels). So, I just shot for a medium brown by mixing Floquil "Roof Brown" and "Railroad Tie Brown" together. I also used the same color for the modern "replacement" window frames on the first floor. For the rest of the window frames and trim, the front door, and the left-side door I went with Testor's "Flat White".
Nobody makes anything even remotely like the fancy-shmantzy front gable of the prototype, and ain't no way I was ever going to be able to fabricate something like that myself. However, I did come up with something that's at least "good enough" -
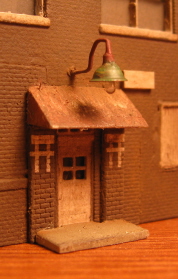
My bright idea was to take a Cornerstone Modular "concrete staircase", sand off the steps, and then trim it down to the appropriate size. I painted it with Testor's "Flat white", drybrushed it with a smattering of Model Master "Rust" and then Bragdon-weathered it from here to next week. Also pictured is my aforementioned "wire arm" light fixture. And OK, yeah, it looks like a gigantic UFO hovering over the doorway. But give me a break, that's Miniatronics' idea of N scale for ya. Honestly though, it doesn't look nearly so crazy in real life.
All of the various trim was made using Microscale "generic white stripe" decals of varying width. And yeah, the process was every bit as tedious and time-consuming as one might imagine -

And no, I didn't even try to make the little crown-shaped tops. Mine are simply rectangular, and I have a freshly dug grave in my backyard for anyone who even tries to call me on it. Once the decals were firmly Solvaset'd, I sprayed the walls with a few coats of flat finish (very lightly mixed with black paint for a bit of grunge) and then brushed on a layer of brown Bragdon powder as a finishing touch.
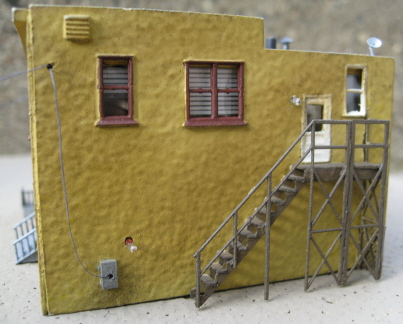
As pictured earlier, I used some leftover Cornerstone clear / segmented plastic inserts for the mangled "glass block" style windows on the rear of the building (the same sort of insert that I used on the garage). However, for the more complex (and prominent) glass block windows on the right side of the building I decided to try something new -

The popular solution for making one's own windows is Microscale "Krystal Kleer". However, YOLHS was sold out of that particular brew, so I made these windows using something called "Super RC Z 56". The theory is the same, though - squirt the stuff into the window frames and it eventually dries pseudo-clear. IE, hello "glass block" windows. Also pictured above is my other stiffened-wire light fixture (this one painted with Floquil "Primer" to match the grayish look of the prototype).
Sadly, my jetpack is on the fritz. So, apart from the chimney, I haven't the faintest idea what the roof of this place might look like. Nevertheless, I'm going to go ahead and say it looks exactly like this -

Or maybe not... Anyway, I assembled the chimney from various leftover Cornerstone Modular bricky bits. Similarly, the other venty dealies were also provided by Cornerstone (their magic "roof thang" assortment). And although I can't prove that this is what the roof actually looks like, I dare anyone to prove otherwise. For the roof itself, I followed the same procedure as with the garage - IE, sandpaper on styrene, painted grimy black and Bragdon-weathered.
On the detailing side of things, I went ahead and added three downspouts (as provided by the Machine Shop kit). Yes, the real creamery only has one, but too bad. I likes 'em, I does. Plus, the holes were already there in the walls and I didn't want to mess around with filling them in. I also used a downspout to create the "electricity in" conduit on the back wall -

For this, I simply flipped the downspout upside-down and glued a square-thingy-with-roundy-sticky-outy-thingy to the bottom (creating an ersatz meter box). For those who might conceivably care, the latter came from some of the circus-colored fiddly bits contained in the venerable Model Power "Fueling Platform" kit. Next, I drilled a small hole just above the top of the conduit and glued in a length of Berkshire Junction "EZ Line". This will in, oh, five or six years, be hooked up to an eventual utility pole (hey, I'm thinking ahead for a change). The window vent is yet another Cornerstone Modular bit of detailing, as is the storage tank behind the garage (pictured below). Cornerstone Modulars - don't leave home without 'em, man. For the tank, I glued on a couple of generic styrene support legs to match the prototype.

So, wow. For one building, this turned out to be an awful lot of blather. But I guess since it took so many years off my life, it earned it. Next up? The Post Office! Stick around and see if this is the one that finally puts me six feet under.
06/04/09 - Finished researching the SunRich grain elevator operation

I kind of got sidetracked from my post office project (painting and decaling a bunch of passenger cars instead). However, I did manage to get down to Hope and photograph all of the elevator structures. I also received a lot of invaluable assistance from SunRich's Raquel Hanson, who (over the course of half a dozen emails) taught me everything I currently know about grain elevators.
Now, I don't know that it's strictly necessary to know all the operational nuts and bolts of an industry you're trying to model (especially when you're not an "operations" guy), but it certainly couldn't hurt. Plus, I just can't help myself. My curiousity about this kind of stuff seemingly knows no bounds.
Anyway, if you're interested, go back to the main page and click on the various building entries for pictures and descriptions.
06/16/09 - Progress on Building #15, the post office (such as it is)

Wow, I knew that having a finished layout (Shay) at my disposal was going to impact my normal layout-building alacrity, but this is ridiculous. My apologies for all the tumbleweeds blowing through this normally active blog lately, but at the moment I'm apparently a lot more interested in working on rolling stock and locomotives than I am in getting on with this "to be completed in a thousand years" layout project.
Having said that, I did actually manage to work in a bit of kitbashing between other projects recently. Namely, trying to turn a couple of American Model Builders "Windsor Hotel" wood kits into a reasonable facsimile of Hope's ancient post office. And so far so good (I guess). As expected, I have another Frankenstein on my hands (kitbashing being what it is). However, the good news is that hacking and slashing wood has turned out to be about a million times easier than working with styrene. Also, I went ahead and acquired a couple of nifty little tools that have helped to further ease my pain. Namely, NWSL's "Chopper II" and "True Sander" gizmos -

The chopper is basically a miniaturized paper cutter (just with a more robust blade). It also comes with a couple of angled guides for making mitered cuts. And I must say, it's been quite the godsend so far (me being the president of the "can't cut a straight line" club). My only concern is that the thing has an awfully small blade (1.5") and I'm wondering what the heck I'm going to do when I need to cut larger pieces... Oh well, we shall see.
The sander has come in equally handy (I'm also a charter member of the "can't sand a straight line" club). For cutting window "fill-in" pieces, I basically use the chopper to cut a piece that's close to the correct size and then use the sander to fine-tune it to fit the window opening in question. I acquired both of these tools about halfway through this project, and the quality of my workmanship jumped noticeably as a result. In fact, I actually went back and re-did some of my earlier (and lamer) efforts using said tools (and with muchly improved results). Like the chopper, the sander also comes with various guides for sanding angles and suchlike.
At this point I'm still sort of feeling my way around with these things - figuring out their potential uses. But wow, I can't wait to see how my next styrene building turns out now that I have these little wonders in my arsenal. But before that happens, I suppose I need to actually finish this bloody post office - which I guess will happen some day. I mean, it pretty much has to, doesn't it?
Actually, I've more or less finished up with all the walls, and at the moment I'm just waiting on some roofing material (shingles and corrugated tin) to arrive in the mail. Once I get that stuff I should be able to get on with putting everything together.
06/24/09 - Still here, still plugging along...

Well, I got the friggin' shingles on (ugh). Got the walls glued together too, but obviously still a ways to go yet. Unfortunately, a Northern Pacific passenger train (as in the painting and decaling of) is diverting my attention at the moment.
07/07/09 - Finished the post office (click the link for side-by-side comparisons with the prototype)

I'm pretty happy with the way this turned out. No, it's not a masterpiece, but it's at least good enough to be encouraging. Hopefully I'll get this whole kitbashing thing figured out before I run out of 100 year-old buildings to model. I have a feeling that the less decrepit ones are going to be a bit less forgiving.
As it turns out, the Windsor Hotel kit proved to be a surprisingly apt fit for this project. The main building was pretty much dead-on in terms of the size I needed. And really, most of the work boiled down to simply filling in all the various pre-cut holes (for windows and whatnot) that I didn't need. I sure wish AMB would've left the cut pieces for the windows and doors in place (or included them in the box) - it would've made my job that much simpler.
I decided right away that I wasn't going to worry about getting all the side windows in exactly the same spots as the prototype (since that would've involved both filling in the pre-cut windows and cutting new ones). So, I just picked the ones that more or less approximated the windows of the real structure and then filled in all the rest. For the "used to be a door" on the second story, I cut out a piece of flat wood and then used an exacto and a straight edge to scribe vertical lines in it.

The facade of the Windsor kit did present some challenges. It originally came with windows on the second story that needed to be filled in. Also, the gable was designed to mount above said second story windows, so there were a bunch of slots up there that needed to be filled in as well. For all the various pieces of filler, I simply cut appropriately sized pieces of wood, stuck them in place, and then sealed up the gaps with wood glue. I actually bought two Windsor kits, so I had plenty of raw material to work with (and now I have lots of leftover stuff for future projects). Ironically enough, the real post office used to have second story windows on the front as well (back in its general store days). In fact, I bet if you peeled off the vinyl siding (a relatively recent addition), you'd probably see filled-in window holes very much like the ones on my model (or so I tell myself).
In addition to filling in all the unwanted holes in the second story of the facade, I also had to rejigger the doors and windows on the first floor to better match the prototype. Hope's post office has double-wide windows as well as double doors (whereas the Windsor has single-wide windows and only one door). So, I used my trusty exacto to double the size of the existing openings. And although I would've preferred to make the windows even larger, removing all that wood seriously destablized the entire facade. And after breaking it into multiple pieces (and subsequently gluing it all back together) more than a couple of times, I decided to just leave well enough alone. To finish things off, I sliced off the round facade top and glued on a small rectangular piece of wood to match the crown of the prototype.
Normally when assembling wooden kits, I prefer to paint them prior to any sort of gluing (as the glue tends to warp the unpainted wood). But since I was kind of making this up as I went along, I figured it was probably best to hold off on the paint until I'd finished with all my customizations. And although I did try to go easy on the glue, a certain amount of wall warpage did creep into the equation. Not too much though, and after sticking the walls under a stack of encyclopedias they flattened out pretty well (hey, take that internet - turns out we still have uses for encyclopedias after all).
For the one-story section on the back, I took my second Windsor kit and fashioned an appropriately sized chunk from its rear end. Being lazy, I decided to just use the existing windows on the side walls (despite the fact that they're not quite the right shape). For the rear window and side door, I cut appropriately sized / shaped holes. I had also originally planned on using a small section of foundation (ala the main building). Unfortunately, I screwed the pooch gluing it together and wound up wrecking it. Oh well, I doubt anyone's going to note its absence unless alerted to it ahead of time. So schtum.
The Windsor kit actually comes with a funny shaped annex that slots into the back wall. Unfortunately, it was pretty much useless for my purposes. In fact, about all it did was provide me with a bunch more slots that required filling (both on the back of the main building as well as the one-story section).
Once I had all my walls fabricated, I went ahead and spraypainted them. The current vinyl siding on the post office is sort of a creamy-tan / off-white, so I decided to go with Floquil "Concrete". For the windows, I went with Floquil "Reefer Gray" on the frames and Testors "Flat White" on the inserts.
For the double-doors on the front, I glued two doors together and surrounded them with frame pieces with their inner / vertical supports removed. For the double windows, I used two frames - one with it's inner / vertical support removed. Since there are no muntins on the real post office's front windows, I left all the actual window inserts out (IE, frames only). For the windows on the side walls, I went ahead and used the stock frames and inserts. For the rear window, I used a stock frame (just turned on its side) and left out the insert.
Once I'd finished all that, I went ahead and glued the walls together (as well as gluing on the front gable). And fortunately, everything went together pretty well. Better still, I actually remembered to drill a hole through the base of the main building (for future lighting purposes) prior to assembly. Next, I decided to go ahead and stick on all the corner trim pieces (despite the fact that the prototype doesn't really have any). Not much choice here - given the way AMB's kits are designed, you need them to hide the ugly joins at the corners. For the little awning over the side door, I simply cut a rectangular piece of wood (and a couple of sticks for supports) and then glued said triumverate to the wall.

Next, I needed some three-tab shingles for the front gable and side awning. And after a bit of research and experimentation, I decided that RSLaser's shingle product was pretty much my best option. Basically all it is is laser-cut paper (that you then cut as needed and glue in place - one row at a time). I was kind of hoping for something of the "Peel'N'Stick" ilk, but if such a thing exists, I sure couldn't find it. What I wound up doing was using white glue to hold the shingles in place (which subsequently wound up making a bit of a mess). To make matters worse, I also fell victim to some sort of brain malfunction when it came to coloring said shingles. RSLaser only sells these things in yellow and black, so I decided to go with the yellow and then use Bragdon powder to turn them brown. Combined with the glue, this made even more of a mess. It eventually dawned on me (about halfway through the gable) that it is actually possible to use paint on paper. So, once I'd finished the gable I went ahead and brushed the shingles with Floquil "Roof Brown" (and for the awning, I sprayed the entire sheet brown prior to installation). So, ultimately a bit of a mishmash, but I guess it turned out OK.
I originally thought that the main roof was shingled as well. However, after examining some of my photographs I discovered that it's actually corrugated metal (rusty tin, presumably). And after checking out the various available options, I decided to try using some Campbell Scale Models "Corrugated Aluminum" (mainly because YOLHS happened to have some on hand). Each package contains nine individual stamped foil sheets (7.5" X .75") - thin, but not entirely flimsy. I used five pieces for each roof - two on each side, and then one bent over the peak. White glue seemed to work best for sticking them to the wooden roof, and CA definitely worked best for sealing the seams between each layer. Once that was all glued down, I went ahead and sprayed everything with Floquil "Box Car Red". And for this I used my airbrush (not wanting to lose my corrugation in a flood of paint overspew).

With my roof sections assembled, painted and ready to go, I then finished up all the interior work by gluing clear plastic inserts to the insides of the windows. Then I went ahead and glued the rear roof on. For the main roof, I decided to use the stock chimney (painted Concrete) in its stock hole. It's size and shape don't quite match the prototype, and it's not in exactly the right spot, but I wasn't going to sweat that too much. Installation basically involved exactoing an opening through the foil and then jamming the chimney into the hole. Lastly, I used a bit of white glue on the inside to fix it in place. For the smaller chimney / vent, I just grabbed a couple of appropriate thing-a-ma-widgets from my goody box and glued them to the roof. Prior to putting on the main roof, I Dremel'd a small hole through the side wall and glued in a length of EZ-Line (which, once again, will hopefully one day hook up to a utility pole someplace).
Speaking of windows, I did briefly experiment with applying prototypical graphics to the front windows ("US Post Office - Hope Minn"). Unfortunately, this turned out to be a major exercise in futility. I started off by acquiring a set of generic "white letter" decals from Microscale (which are, I believe, designed for freight cars and come in various sizes). Given my space limitations, I had to downsize the text ("POST OFFICE - HOPE MN") and use the absolute smallest font available. And brother, I mean small. I mean like small enough to stick on the head of a pin and still have some elbow room left over. Sounds fun, yah? Well, I soldiered on and managed to get a "P" in place... and then an "O"... and then an "S"... And then when I got to the "T", I managed to lose both it and the "S" into some nameless dimension (probably the same one that eats Micro-Trains coupler springs). So anyway, after about an hour of work I was back to "PO". It was at this point that I decided to rule in favor of sanity and abort the mission. IE, no window graphics. Hell, the way I figure it, nobody would've been able to see them anyhow.
So, with the roofs in place and the window graphics abandoned, I finished things up with a bit of weathering and detailing. I started off by Bragdonizing the walls a bit, and unfortunately, kind of messed up the color scheme in the process. I thought that using the lightest shade of Bragdon brown would go well with the Concrete paint, but it actually wound up a bit darker than I would have preferred. I did recover things a bit by brushing on some light gray, but at that point the damage had already been done. Oh well, who's to say this building never looked like this at some point in its history? Hell, anything's possible (or, once again, so I rationalize).
For the gable supports, I cut four custom-sized legs (painted Flat White) and glued them in place. For the meter box and electrical conduit, I used the same sort of plastic fiddly bits that I used on the creamery. The window air conditioner is a nifty little etched metal doodad courtesy of BLMA models (one piece folds into a box and a second piece CA's to the back and holds it all together). For the air conditioner support, I cut a small section out of an old plastic fence and CA'd it in place. The mailbox, bench and "loitering kid" came from a Model Power "Park Scenes" set. The flagpole was, well, a piece of plastic (god only knows from what), and the flag came from a Microscale "American Flag" decal set (stuck to a thin piece of clear plastic). And yes, I did actually experiment with trying to put some waves into that flag by softening it up with a blow dryer (and eventually, a heat gun). However, after destroying several flags in the process, I eventually decided that enough was enough. Cripes, the last thing I need is the feds breaking down my door and nailing me for flag desecration.
The front sign actually comes from the real post office. I clipped the graphic from one of my pictures, resized it, printed it on my inkjet printer, and glued it to a piece of wood. It actually wound up a tad larger than it should be, but any smaller and it would've been completely illegible (as is, it's still pretty tough to read - but not too bad).
There's one last piece of detailing about which I remain undecided. The real post office has a small spotlight mounted on the top of facade (to illuminate the flag). Now, it'd be awfully cool if I could find a light that's small enough, bright enough, and actually works like a spotlight (IE, directional). However, at this point I don't know that such a thing exists. In any case, I decided to go ahead and leave the main roof unglued so I at least have the option of adding something later on (should said "something" happen to drift across my transom).
So, that's that. Now I think it's time to move on to the Hardware Store and test out my theory that the grass is indeed greener on the scratchbuilding side of the fence. Anybody taking bets?
07/28/09 - Mocking up Hope Hardware
So I'm sitting at my workbench, pondering how to get started on Hope Hardware, when it dawns on me that I've never actually scratchbuilt a building before and haven't the faintest clue how to go about it. However, not being the kind of guy who likes to waste a lot of time researching the right way to do things, I decided to just shoot first and ask questions later.
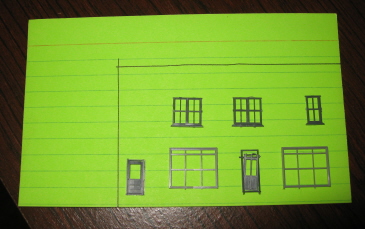
Since I'm going with prefab windows and doors, I decided that the best way to get started was to select doors and windows that more or less matched the prototype and then situate them on a mock-up card - basically trying to space things such that the relationships between the various elements matched the prototype. After that, it was simply a matter of deciding where the edges of the walls should go and drawing them in with a pen. And voila, wall templates.
No, not exactly an earth shattering breakthrough in scratchbuilding technology, but it at least got me started. Now it's time to see if I can figure out how to make walls out of raw styrene and then somehow figure out how to cut window and door openings in them without embarassing myself. However, before I do that I need to find (and build) some wooden stairs and a landing for the second story door on the south side of the building. That's the trouble with kitbashing and scratchbuilding. Unlike kit building (where everything you need is right there in the box), I find that these custom projects frequently tend to come to screeching halts as I discover that I can't proceed until I acquire such-and-so thing-a-ma-dealie.
08/02/09 - The hardware store has walls

I made the walls out of Evergreen sheet styrene (.040" thick). And as suspected, the blade on my "chopper" is way too small for jobs like this (kind of a bummer, that). So instead, I just did things the old fashioned way. Namely, I used a marker to trace the outlines of my notecard "templates" on the plastic, used an Exacto knife and a straight edge to score the lines, and then simply snapped the styrene at the scoring. Lastly, I used my sander to smooth and straighten the edges.
The next step is to cut the door and window openings - a task I've been dreading. However, I'm told that Micro-Mark makes a corner punch tool that should hopefully simplify the process. And just as soon as I get one, I guess I'll find out if that's true.
09/15/09 - The hardware store has honest-to-gosh doors and windows
I doubt this is the way the master modelers go about it, but I guess I've cobbled together a method for scratchbuilding buildings that, if not easy, at least turned out to be moderately pain-free. Which is not to say that the entire experience didn't come with its fair share of lows. There were many discouraging points of uncertainty along the way where I was seriously tempted to bail on the whole project and declare my undying loyalty to kit-building. In fact, if it weren't for this blog I probably would have. Fortunately, the thought of all that sniggering from the peanut gallery (should I admit ignominious defeat) was enough to keep me plodding along. Hell, if nothing else, it was going to make for another humorous "Gad, I'm feeble" spookshow-type story.
So anyway, the way this works is to go with two-layers of styrene - a concept that I originally thought sounded pretty stupid way back when I was researching scratchbuilding materials earlier in the year. Shows you what I know. You start with a relatively sturdy underlayer of styrene for basic structural integrity, and then couple that with a really thin external layer.
As noted above, I created my wall underlayers using .040" styrene. The next step was to temporarily fix all the windows and doors to the walls with a bit of white glue and then trace their outlines on the styrene with a pen. Next, I punched out the openings with a couple of Micro-Mark corner punches (3/16" for the small openings, 5/16" for the larger ones). The procedure is pretty simple - place the punch where you want to make a corner and hit it with a hammer until it goes through the styrene. And if the corners don't wind up overlapping (IE, the desired rectangle is still stubbornly stuck in place), use it on the sides to join up the corners.
This whole corner punch thing was the real key to my success, and I owe it all to a suggestion from one Tim Horton (yo Tim!). Actually, I should clarify - it later turned out to be the key to my success. Trying to punch the initial rectangular holes through the thick pieces of styrene wound up looking like hell (and definitely one of those "I'm going back to kit-building" low points). Yes, it was fast and easy. Trouble was, it was a fast and easy way to get a bunch of crooked looking openings. Worse still, I wound up making unwanted cracks in the styrene where the desired opening was too close to the edge of the wall. Ugh, a real disaster no matter how you sliced it.
Nevertheless, I persevered (again, the inevitable sniggering being my main motivation). Once I'd finished with my mangled openings, I created thin wall layers using Plastruct "Stucco" (#91572) for the front and side walls, and Evergreen "Metal Siding" (#4526) for the rear wall. This was a simple task - I simply placed the thick wall on top of the thin material, traced its outline with a pen, and then cut out the new wall layer with a scissors. Once cut, I glued the two pieces together (repairing any unplanned cracks in the thick layer along the way) and then went a lit a candle to St. Foobie (the patron saint of hapless modelers).
Next came the real test. Could I make punches through the thin layers and actually get my window and door inserts to fit inside them (and not look like crap in the process)? Well, as it turns out, yes I could (whew). Frankly, you could've knocked me over with a feather when I punched my first window opening and said window insert fit flush and perfect inside it. It seems like black magic to me, but despite my craggy "thick wall" openings, cutting quality openings through the thin layers was dead simple. I guess the difference is the thickness - it's much easier to be accurate when punching through those thin layers than it is with the thick ones. Using the sides of the inner-wall punches as a guide definitely helped. Plus, I always tried to err on the side of "too small", so if I wound up miscalculating it was simply a matter of filing the openings a little wider. Yes, inevitably I did wind up with some openings that weren't quite perfect. But as I did back on my earlier kit-bashes, I simply used glue to fill in the gaps. I also purchased some "Squadron Putty" filler in case I wound up with some really messed up openings (of which there were a couple). The stuff is really nifty, basically working like Bondo auto-body filler. Definitely a handy arrow to keep in one's quiver just in case.
As for the doors and windows, I went with a selection of Grandt Line inserts. Nice stuff, but those guys have a muntin obsession that does not jibe with reality (or at least, not Hope reality). Consequently, I wound up seriously demuntinizing most of them in order to get windows that looked more like the prototype.
The only real heavy lifting left now is to build the fancy recess for the main door on the front wall. Then I can finish this baby up and move on to something else. And despite the fact that things seem to be working out here, I'm pretty sure that my next project is going to be neither a scratchbuild nor a kit-bash. I mean, jeez, I need a break!!
09/17/09 - Another trip to SunRich

We've been enjoying an unusually mild late summer / early fall up here in Minny, so I decided to take advantage of the fine weather and drive down to Hope to scout out the freight car situation. Basically what I discovered is that SunRich uses three-bay hoppers pretty much exclusively - builders vary (Gunderson, NSC, Trinity, ARI, et al), but all in the 5100-5200 cuft ballpark. I think the Trinity 5161 three-bay hopper is probably the only exact prototype currently available as a model, but at this point I doubt that I'm going to get totally hung up on accuracy vis'a'vis my rolling stock.


I'd really like to see some freight operations down there as I have no idea what sorts of trains stop at Hope (or roll through without stopping, for that matter). Trouble is, I guess it's wholly unpredictable (at least as far as when trains stop at SunRich to pick up and/or drop off cars). According to Raquel, there isn't any sort of regular schedule. And even on the days when they expect a train to stop, it could be in the morning or it could be in the afternoon - they literally have no idea. So, I guess one of these days I'm just going to have to drive down there in the morning, set up camp for the day, and "hope" I get lucky. It sounds kind of boring, but I don't know what other options I might have. Somehow I doubt the UP is publishing freight train schedules on their website...
09/23/09 - Finished Hope Hardware (click the link for side-by-side comparisons with the prototype)

Wow, seven weeks? Is that all? It felt like a lot longer... Fortunately, it seems to have turned out OK, and I think I learned enough along the way that future projects should go faster (providing of course that they're of the "four square walls and not much more" ilk).
So, just to finish up my previous "fabricating the doors and windows" bloviation - for the front wall "recessed entry", I took a door, hacked together some smaller side-window/filler pieces to attach to it, glued the whole assembly together, and then hoped for the best. Fortunately, things went together pretty smoothly and I think it turned out pretty nice.
Once I'd finished with all the door and window wrangling, I set about sanding 45 degree angles on the wall edges (for that "this wasn't built by a rank amateur" look). Unfortunately, I have to say that my "True Sander" turned out to be pretty much useless in this regard. Yeah, it's great for stuff that you can lay down flat. But stuff that you have to try to stand up (and hold) in perpendicular fashion? Not so much. What I wound up doing instead was grabbing my grindstone and freehanding the angles as best I could. And no, I did not wind up with "45 + 45 = 90" degree angles. So... there's probably an easier way to do this, but I guess I just don't know what it is yet. Anyway, what I did wind up with worked well enough, so I glued the whole shlamanza together (adding the little front wall overhang in the process) and moved on to the paint.
I started out by spraying everything with Floquil "Concrete", which turned out to be all wrong. So, I went into mad chemist mode, mixing various levels of Floquil "Earth" and Floquil "CN Yellow" until I thought I had a dead-on match. But now that I see the side-by-side pictures, it's obvious that I went too yellow. Rats. I guess this is why I let my wife make all the color decisions when it comes to painting our house...
Anyway, once I'd sprayed the walls, I then set about painting the doors and the window frames - IE, time to get out the teeny-weeny brush and the magnifying lamp. Yes, I would have much preferred to paint all this stuff prior to installation. But given the whole "make it up as you go along" vibe, it simply wasn't an option. As I've learned from painful experience, glue, paint and files do not play well together. So, yeah, I knew going in that this was eventually going to be the bitch task of the whole project - requiring one hell of a lot of manual dexterity (and in most cases, probably more than I actually possess). One of those "pick yer poison" situations, I suppose. I will say that the entire operation would've been completely impossible without a magnifying lamp. If you don't have one, go shopping. They're cheap and indispensable.
So, with the basic structure assembled and painted, I then got on with the detailing. For the main front steps, I hacked-and-slashed a Cornerstone modular stairway. And I have to say, yikes, what a mess. For all the subsequent staircases I simply glued together successively shorter pieces of thin styrene (kind of a no-brainer when you think about it, but it took me a while to really get into the "build everything from scratch" mindset). For the railings, I scavenged appropriatly sized / shaped parts from my "Big Box O' Unused Kit Parts" (same deal for the railings on the left-front staircase).
On the left wall, I cobbled together various random bits and pieces for the electrical conduit / meter boxes. Additionally, I added a way oversized "vent" (or whatever the hell it's supposed to be), a roof drainage pipe, a 1.5v light by the door, and the whole landing / staircase dealio. Lastly, I glued in some EZ-Line to hook up to the eventual utility poles.
And the back wall? Well, honestly, not much to report here...

The feature attraction on the right wall is the RSLaser second-story stairway / landing - a really nifty little wood kit that fit this building to a "T". Additionally, I added another grossly oversized "vent" thingy, a couple of 1.5v lights (one at the bottom of the stairs and one by the door), a telephone line utility box (I'm assuming) along with various EZ-Line wires, and an honest-to-gosh satellite dish (courtesy of Ngineering).
For the roof, I once again went with one of my patented "sandpaper glued to styrene" deals. And since I'm still shopping for that personal jet-pack, I just guessed at what sorts of generic sticky-uppy doodads might also lurk up there.

Next, I applied just a bit of Bragdon powder weathering (my grubby fingers having already supplied more than their fair share of grunge to the equation) and then sprayed the whole thing with a coating of flat finish.
I finished things up by adding clear plastic window inserts and a variety of blind / window shade graphics. Sadly, the only eye-grabbing "signage" on the whole bloody prototype is the "OPEN" sign in the right front window (mine coming from a generic Woodland Scenics "press / rub" decal set). I guess when a town is this small, people know what's what ahead of time and don't need a lot of extra signage to identify the buildings (boring as that might be to us modelers). The real sign is actually neon, and it would've been seriously cool to go with an electric sign in my model. Unfortunately, I've yet to come across any electric signs that small (less than 1/4" wide), so, oh well.
So, that's that. Despite its various imperfections, I'm pretty pleased with the way this building turned out. Apart from the color issues, I think I nailed all of the main features of Hope Hardware pretty well. And although the model turned out a bit raggedy here and there, it's certainly no more raggedy than the prototype itself (possibly even less so). Once again, I catch a break by virtue of the fact that I'm modeling 90 year-old rural buildings. But wow, that was a lot of work. I promise you, my next project is going to require a lot less sweat.
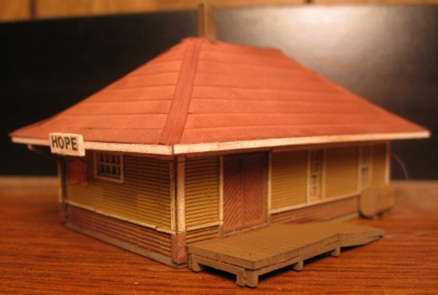
10/19/09 - Finished Hope Depot (click the link for side-by-side comparisons with the prototype)

Well, I've gone and done it. After all my rantings and ravings about only modeling "stuff I can see", I've decided to throw caution to the winds and model the "no longer on this planet" Hope Depot (and by extension, the "also no longer on this planet" Slezak's Shed). Oh well, what can I say? The idea of modeling an old-fashioned depot melts more of my Hope butter than does the idea of modeling some rich guy's generic storage building (EG, Stafford's Toy Box), so sue me.
Actually, what made my decision all the easier is the fact that Blair Line makes a wood kit (Leeton Depot) that's a virtual clone of the old Hope Depot (both structures apparantly being based on a more or less "standard" Rock Island design). Frankly, I doubt I would have started down this road without it (my handful of grainy "Memories of Hope" B&W photos of said depot not being much of an architectural guide).
I did wind up tweaking the kit a little bit in order to match the specificities of the prototype. The kit has a loading door on the south wall and a high / double-wide window on the east wall (a flip-flop of the Hope configuration). And it's here that my "Chopper" really came in handy, as I was able to rejigger the southern and eastern walls easily and accurately. Honestly, the cutting was a no-brainer operation, and the resulting seams are barely visible.
Of course, I did manage to screw up the roof (putting the chimney on the wrong side). And (also) of course, it wasn't until I'd completely finished the kit that I noticed that the west-side freight door in the pictures was half the size of the door provided by the kit. Ah well, so it goes in Mediocre Modeler land...

Mediocre Modeler missteps aside, I also had the anticipated "can't go visit it" struggles. First of all, what colors to go with? In this case, I decided to go ahead and follow the paint scheme suggested by the instructions (sandy brown for the walls, maroon for the roof, doors, and the area below the wainscoting, and white for the trim). Based on the available pictures, coloring varied quite a bit over the years. But said suggested scheme did appear to more or less jibe with the more recent photos. And yeah, you're just going to have to take my word for it that that roof is indeed maroon. Frankly, I think my camera has a mind of its own...
The next conundrum was the detailing. I mean, there's just not much to work with in those old snapshots. Ultimately, I decided to just go with what I could see and leave it at that. So, I added the supplied "Rock Island" graphic to the south end (and another one on the north end just because it seemed to make sense), a couple of "Hope" signs (printed on my laser printer and glued to square pieces of styrene), a couple of downspouts (scavenged from an Atlas passenger platform kit), a water (or is it heating oil?) tank on the east wall, and an electricity-in wire (also on the east wall).
Some of the earlier photos show a train order semaphore tower that runs right through the roof on the western side of the depot, and my original idea was to replicate that. However, once I took a look at the available semaphore tower options (EG, NJI), I decided that running it through the roof was likely going to result in a whole lot of mangulation (if not out-and-out ruination) of the roof. Consequently, I decided to take the easy way out and will ultimately be plunking said tower next to (as opposed to right through) the depot.
I would have loved to have added all sorts of other detailing to the building (hello, exterior lighting). But without any sort of firm photographic evidence to guide me, I ultimately decided to go with what I could see and eschew a lot of fantasy-land extravaganza.
So wow, despite the lack of visit-ousity, this was crazy easy and just a whole lot of fun (at least as compared to scratchbuilding). And the good news is that my next project (the Sun-Rich Feed Mill) should be just as much fun (and almost as easy). Woohoo!