
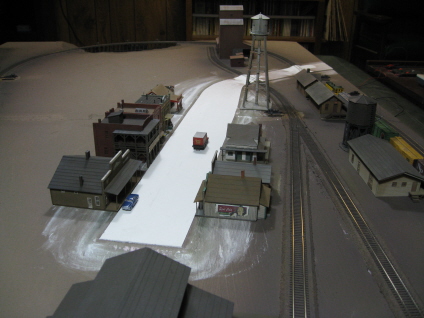
04/01/08 - Strapped for building ideas, I plastered up a road instead


I've been stuck in this "I can't figure out how to finish Slackjaw" quagmire for what seems like weeks. Oh wait, I know why it seems like weeks - because it has been weeks. I initially thought that that mobile home was going to put the period to the housing sentence. But, as mentioned previously, the town still felt like it needed something else. So, I've been going back and forth trying to figure out where else I might stick a house of some kind (and not having much luck with it). Worse still, the more I looked at that trailer (and where I put it), the more I thought that it didn't really fit in with the rest of the layout.
Well, no surprises here I guess. My visualization skills have never been particularly keen. So, rather than continuing to wander through "I just can't picture it" land, I decided to just go ahead and actually put down the road into town (as well as the main street itself). Hell, couldn't hurt, right?

Well, amazingly enough, this seemingly innocuous exercise wound up crystalizing my needs (and hence my plans) in a trice. First things first- sorry NMTG, but you're probably going to have to find someplace else to squat. I'm fairly convinced that you and your trailer just aren't going to find anyplace on my layout (not this one, anyway). Secondly, I think that that thin stretch of terrain between the post office and the water tower is going to be absolutely perfect for an AMB "Railroad Rooming House". And lastly, I think a decent sized house (say, Atlas's "Kate's Colonial Home") will fit next to the gas station quite nicely (being the first structure encountered as one drives into town).
So, that's that - a definite plan. And once again - lesson learned. When one finds oneself becoming lost whilst juggling the various theoretical bits and pieces of one's layout, it usually helps to translate at least some of that theoretical jumble into actual physical reality. The rest of the lost lambs generally seem to find their way home shortly thereafter. Or, y'know, whatever. I seem to have gone all pedantic here, so let's just call it a day...
A couple of side notes-
I experimented around with reconfiguring the main street to support "pull in first" (as opposed to parallel) parking, and was surprised to find that it just plain looked weird parking cars that way. Correctly aping reality almost always yields a "Eureka! It's Perfect!" moment for me, but not so in this case. I can't really explain why, but it just don't look right. So, I guess I'll be sticking with parallel parking after all.
I continue to find vexing little irritations with this Code-55 track. Case in point- each time I trot out a new locomotive to play with, I inevitably find that virtually all of its wheels require painstakingly minor gauge adjustments in order to successfully navigate my turnouts. It never fails - locomotives that I've run without problem over Code-80 track for years suddenly get all finicky traversing these C55 turnouts (the tolerances of which are apparantly so fine that even the slightest variance from dead-on perfect wheel gauging will cause a loco to hop a little wheelie as it crosses over the slidebar).
Another issue I've run into is with the whole "file down the spike heads" solution to the rumbling wheels problem. I recently discovered that this seriously destabilizes the track - to the point where the rails will actually pop off the ties if you're not extremely careful handling them (I discovered this when I removed the track running over the bridge in order to paint it - and consequently had to replace it all). Most annoying, and I'm starting to think I might want to switch to some other kind of track for my next layout.
04/010/08 - Finished Life-Like's "Country Cottage" kit
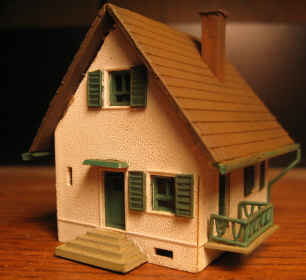
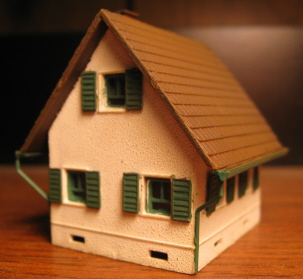
My usual mail order source (BLW) was temporarily out-of-stock on Atlas's "Kate's Colonial Home", so I decided to take a stroll down the N scale aisle at YOLHS and see what other housing options might be found there. And mighty glad I am that I did, as I discovered some hitherto unknown (to me) kits that had Slackjaw written all over them.
Most of the N scale houses out there (Kate's included) are, for whatever reason, overly big (y'know, "I make $250K a year, have 9 kids, and live in a MacMansion" big). And as such, I figured I'd probably have to limit myself to just one of them (my hunch being that two would wind up taking up way too much space and generally wind up being out of step with the whole Slackjaw oerve). However, this kit (along with the as-yet unbuilt "Dormer House" kit) are very nicely small-town looking and should be right at home on Main Street Slackjaw.
The kit itself is a bit of a mixed blessing - the details are nice, but the execution leaves a lot to be desired. I had to sand off a lot of irritating shmootz and de-warp a lot of warps before I could get glue anywhere near this thing. Also, I was not particularly impressed with Life-Like's chosen color scheme, and wound up having to repaint all of the pieces in more sane colors. Unfortunately, painted styrene always makes assembly that much more sloppy and difficult. Nevertheless, I think the results I got are pretty decent.
For paint, I went with Testor's "Flat White" on the walls, Floquil "Roof Brown" on the roof, Floquil "Concrete" on the front steps and the balcony, Floquil "Dark Green" on the window inserts, shutters, gutters and downspouts, and Tamiya "Red Brown" on the chimney (with Floquil "Grimy Black" on the top). I finished off the spray-fest with an overall coating of Testor's Dull-Coat.
I usually reserve major weathering operations for commercial structures (or buildings where I've really screwed up the paint and/or assembly). And since this one turned out pretty clean, I decided to go with minimal weathering. Basically, I limited the damage to a light dusting of Bragdon powder on the roof (and skipped the weatherwash all-together). Yeah, weathering is fun when it comes to businesses and industry. But frankly, I didn't really want to similarly beat up my housing here (and as a consequence, portray Slackjaw as some kind of loser-town).
Am I the only one who worries about offending the non-existent residents of their fictional towns? I wonder...
This kit also comes with a base that has some intriguing cobblestones molded into it, but at this point I'm thinking I'll probably just skip it. It might work in an "out in the sticks" situation. But, in town? I don't think so.
04/10/08 - Finished Life-Like's "Dormer House" kit
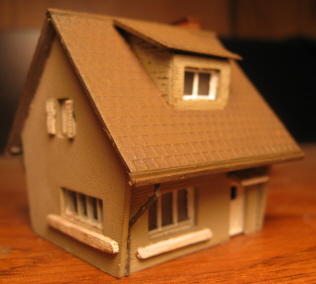
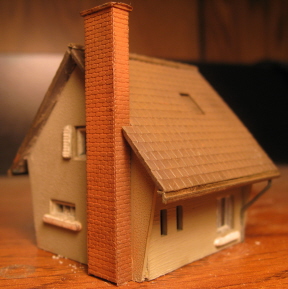
Ugh, I can't seem to catch a break on my housing choices. When I purchased this kit I didn't notice that it sports a pair of cutesy-pie pentagonal "Hansel & Gretel" style side walls. Worse still, I didn't notice that the roof peaks are on the sides (rather than on the front and back ala Country Cottage). So, very quaint and all, but it looked really awkward parked next to the other house. Yeah, a little variety is fine, but when your housing district consists of two whole houses, it seems to work best if they're at least kinda, sorta similar.
Having recently been hepped to Branchline Trains' nifty little line-up of small-town housing kits (thanks, Jason), I was all set to punt on Dormer House and try one of those instead. But I dunno, there's just something about this house that I find very appealing (in spite of the goofy walls - or maybe even because of them). So, my bright idea was to add a door to the left side of the house and turn that into the front of the house. And I have to say, this worked out really well. The two houses now look very cozy sitting next to each other.
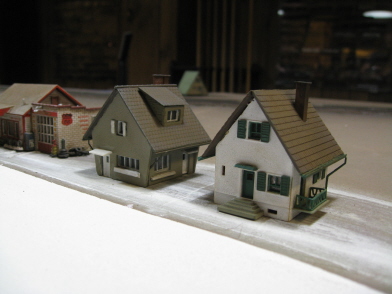
For paint, I went with Floquil Concrete on the walls, Floquil Roof Brown on the roof, gutters and downspouts, Tamiya Red-Brown on the chimney (Grimy Black on the top), and Testor's Flat White for the doors, windows and various pieces of trim. And yeah, once again I was not hugely impressed with the quality of the pieces - lots of sanding and Exacto-knifing required in order to find straight edges amongst all the flash. And I had just one hell of a time getting the roof over that dormer assembly. So tight was the fit, that I actually wound up scraping off some of the paint on the dormer in the process. Oddly enough, I decided I liked the look (it looking very much like a house in need of some fresh paint), so I just left it that way. Lastly, I finished things off by spraying on a coat of flat finish and then applied a light dusting of Bragdon powder.
So, that's that. Next, the rooming house.
04/22/08 - Finished AMB's "Railroad Rooming House" kit
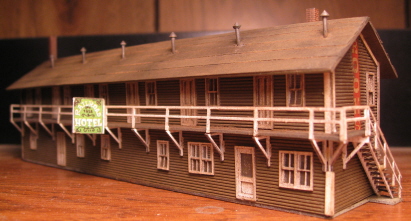
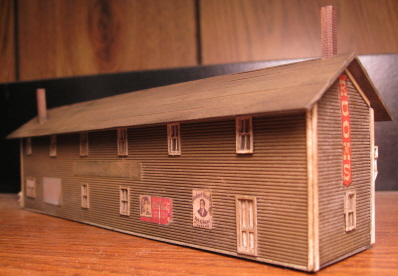
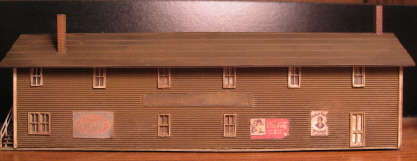
Another nifty little AMB kit, and I think at this point it's pretty much safe to say that I've put my fear of wood of behind me. I didn't have any more problems putting this relatively complex building together than I would have had with a similar plastic kit. Which isn't to say I didn't have any problems (hey, remember who you're talking to here). Trying to get all those corner edging pieces installed correctly still gives me fits. And lord, don't even get me started on all those multi-piece windows and doors!
Anyway, I started by painting the base with Floquil "Concrete", the walls with Floquil "Rail Brown", the walkways and the roof with Floquil "Roof Brown", the brick chimneys with Tamiya "Red Brown", the ventilation stacks with Floquil "SP Lark Dark Gray" and all of the trim/window/door/railing pieces with Testor's "Flat White".
One thing I've learned while building AMB kits for this layout is that the tolerance level on their tab/slot system (as related to connecting roof pieces to wall pieces) is insanely fine. And frankly, paint just doesn't seem to fit into the equation - IE, paint the pieces and then proceed to destroy your fragile wooden building whilst trying to manhandle the various tabs into the various slots. Having learned these timely lessons on previous kits, I made sure to run a file through all of my slots (post-paint) before trying to mate said tabs with said slots. And happily, things went much more smoothly this time around.
Further proof that I'm actually starting to get a handle on this whole "building the buildings" thang - I actually remembered to install some window detailing prior to sealing up the interior - IE, I glued some simple paper blinds to the insides of the windows (I forget where I got them - some nameless kit from god knows when). No, they're not really visible in the light of day. But once the building is lit up from within and the room lights are off... Nirvana! See? I'm not as clueless as you might've thought!
Oh, um, upon further review, there's this... In typical short-sighted fashion, I glued the walls and base together and forgot to first drill some holes in the base for said future lighting. "Hey, no problem", I thought, and proceeded to attack the base with my drill. And yeah, you guessed it - the drill grabbed the base and spun that whole building around like it was caught in a tornado. And we all know what tornados do to buildings... Suffice it to say, I had to spend the next hour or so putting the whole damned thing back together again...
Once reassembled, I attacked the signage problem (definitely the downside to these AMB kits - they provide nothing). And not feeling particularly inspired, I decided to go with the previously eschewed paper signs from my Life-Like "Railroad Hotel" kit. (the "Rooms" signs on either end, the "Railroad Hotel" sign on the front and the now massively weathered "Railroad Hotel" sign on the back).
At some point I decided that I didn't really like the look one gets with paper signs that are simply glued to the sides of a building. They just don't have that "painted on" look that one gets with a Solvaset-softened decal. And after a bit of inquiry, I learned that the best way (or at least a way) to get that more realistic look with paper is to spray the front with some sort of sealant and then sand the backside until the paper is virtually tissue paper thin (and then saturate the whole thing with watery glue and stick it on like wallpaper).
Well, that all sounds great in theory. But man, sanding paper that thin apparantly requires a whole lot of skill that I do not possess. My efforts at sanding were wildly uneven, with some places barely sanded and other places sanded all the way through to the other side (oops). And not surprisingly, the signs I glued to the walls wound up looking decidedly not "painted on". In fact, the "Railroad Hotel" sign I put on the rear wall wound up looking so lame that I decided to weather over it completely. And in a desperate attempt to further divert attention from said sign's basic disasterousness, I also went ahead and stuck on a few additional generic (and less ModelPower-esque) advertising signs from my collection.
So, suffice it say, that's about it for me and the whole "sand the paper signs" thing. I'm sure it can be done... just not by me. In the future I think I'll stick with decals and Solvaset.
The good news is that the sign on the front of the building wound up looking pretty nice (not to mention being much less of an ordeal). I simply stuck the paper signage to either side of a custom-cut piece of styrene and then glued the whole assembly to the walkway handrails.
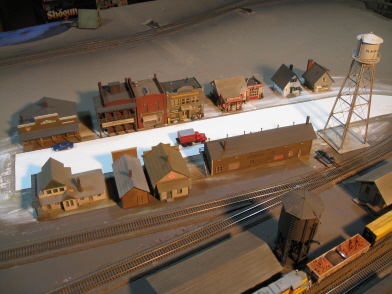
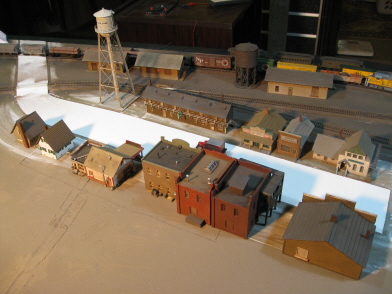
So yeah, mistakes were made. But fortunately, I think the whole thing turned out pretty OK. Better still, that is it for buildings. Now it's time to finish up the plaster for Slackjaw's foundations and sidewalks and then get on with some scenery and lighting!
04/25/08 - Tweaking the log dump
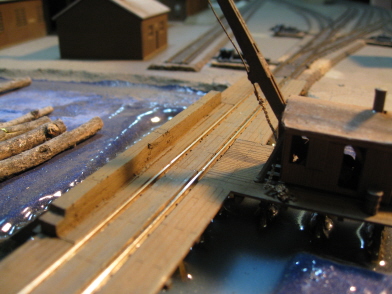
I'd always kind of assumed that due to the rather obstructing presence of my log dump (and its boom), I'd be more or less limited to running fairly small locomotives on this layout. But lately I've been playing around with larger locos and, as it turns out, it's that big wall o' timbers across the tracks from the boom that actually creates the biggest obstacle. It's just close enough to the rails that wider locomotives can't quite sneak through without scraping it (or flat out crashing into it).
Now, running Shays and Moguls is fun and all, but I also like to run some of the rest of my locomotive collection on occasion. So, I decided to go ahead and shave some of the width off said wall. And since the dump structure is completely fixed in place, I had to make said modifications in situ - basically taking a box cutter and slicing off a couple of millimeters worth of wood. Fortunately, this basswood (or whatever it is) cuts really easily and the entire operation went quite smoothly. And after a bit of paint/Bragdon touch-up, it wound up looking pretty good. Yeah, a little bit more beat up than previously. But since we're talking a log dump here, it's hard to imagine that it could ever look too decrepit. Now, where's my Big Boy??
04/26/08 - Finished plasterizing Slackjaw
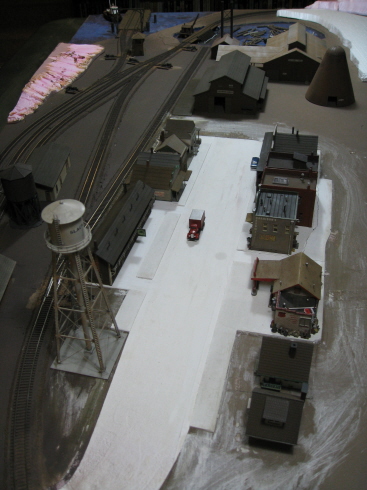
It's taken me quite a long time to achieve a modicum of comfort with the Woodland Scenics "Road System". But even now I still live in fear of screwing things up. As such, my inclination has always been to keep my street/sidewalk/foundation shenanigans as simple as possible. On previous layouts, I'd basically start by putting down a street layer that encompassed the entirety of the town and then add a second sidewalk/foundation layer that covered everything that wasn't actual street surface. To finish thing off, I'd sand little transitions into the sidewalk/foundation layer to provide street access to alleys, parking lots, etc, and then differentiate foundations from alleys from parking lots by simply painting them different colors. No, not entirely realistic looking. But good enough at the time.
However, as I was preparing to plasterize Slackjaw, I started looking at the unpaved portions of town and got to thinking that given its size, setting, and era, there'd probably be a lot of areas that wouldn't necessarily be paved over (alleys, parking lots, etc). Unfortunately, my brain basically went into emergency shutdown mode as I started trying to decide what should get plastered over and what shouldn't (and what the transitions between the different areas might look like). Ultimately, I figured that since I'd already decided to introduce the added complication of boardwalks into my paving plans, I had more than enough in the way of new challenges to worry about without also trying to add dirt alleyways and gravel parking lots into the mix. And anyway, I'm comfortable with paving and just plain like the way it looks. So, once again, 100% pavement.
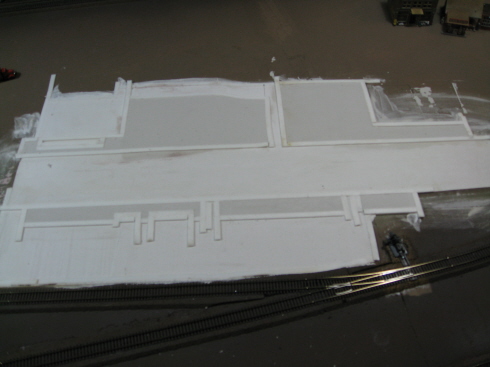
My first task was to mask out the sidewalks and, at the same time, leave little empty rectangles for the various boardwalks. And as I moved through the process of applying the paving tape, it occurred to me that the boardwalk-equipped buildings were not going to be able to sit on top of the foundation layer. With their boardwalks sitting on the street layer, trying to put the actual buildings on top of a foundation layer was going to pitch them at a slant. Well, no problem there I thought. Since said buildings already have their own built-in foundations, I'd just skip applying the second layer of foundation plaster underneath them and place them directly on top of the street layer.
It's at this point that I had my eureka moment. As I was masking out the sidewalk level and leaving open spots for the don't-need-a-foundation buildings, it dawned on me that the alleyways and parking lots don't necessarily all need to be at the same elevation as as the sidewalks - IE, parking lots and alleyways can have curbs too. So I started masking things out to leave most of the alleys and parking areas at their initial street-level heights. And rather than having to sand street-to-alley and street-to-parking transitions later on, I also went ahead and masked out spots through the sidewalk for those.
Ultimately, the only places that wound up really needing that second layer of plaster were the sidewalks themselves and the areas underneath the three brick buildings and the gas station. And lo, once I'd removed the paving tape and sanded the plaster smooth, I was extremely pleased by the results - much more realistic looking than any of my previous town-building efforts. Better still, although setting up all the paving tape did take a bit more cogitation than I'm used to, the actual plaster wrangling was much simpler this time around (what with their being just a whole lot less of it to deal with).
At this point I'm really itching to get it all painted, but I think I'll probably hold off on that until I finish drilling holes for all the lighting and whatnot (flying plaster = ad nauseum paint retouching). In the meantime, since I seem to be in full-on plaster mode, I think I'll go ahead and get started on building up the hills and stuff.
04/28/08 - There's hills in them thar hills!
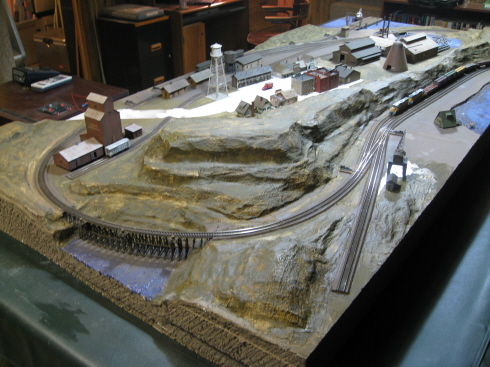
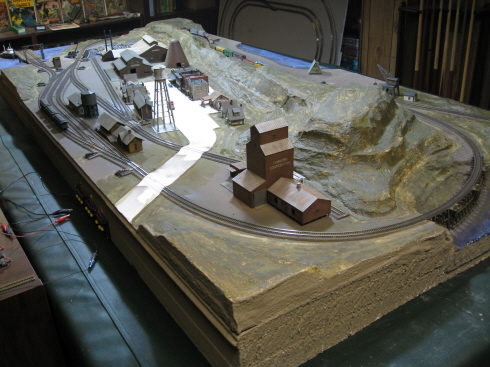
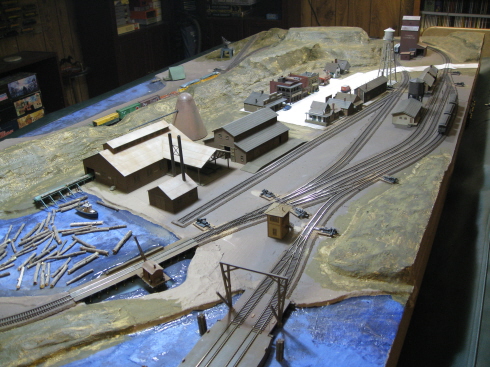
According to the Kootenay plan, pretty much every square inch of this layout (not otherwise occupied by track or buildings) needs to be filled in with foam elevation (IE, hills). And no pussy-footing around either - most of said plan calls for steep geology (quickly rising up to 4" in height).
Now, my first thought was something along the lines of "are you kidding me?!" I mean, I guess I'd been living with my so-far layout (in all its glorious flatness) for so long that the thought of suddenly taking it all vertical was decidedly unnerving (what with the potential end-result being a seriously bizarre looking layout). However, not having any better ideas myself, I decided to follow the plan and see what happened. What the hell, it's just foam (and easily removed should the results wind up sucking too loud).
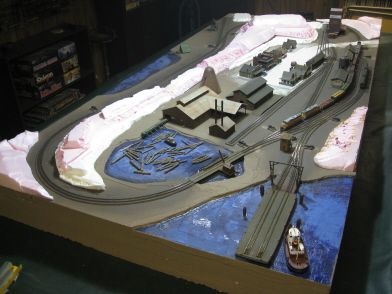
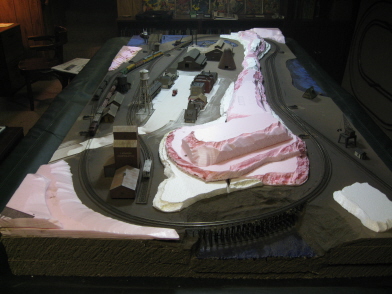
So, I started cutting variously sized chunks of leftover foam using my WS hot wire and then gluing them in place. And to help minimize the overt stratification of the whole operation, I also used my WS hot knife to melt the 90 degree edges into more gradual (and hopefully more realistic) inclines. And as you can see, I decided to leave the top levels entirely flat and mesa-like (assuming that later on I'd go ahead and build some newspaper+plaster cloth lumpiness into them).
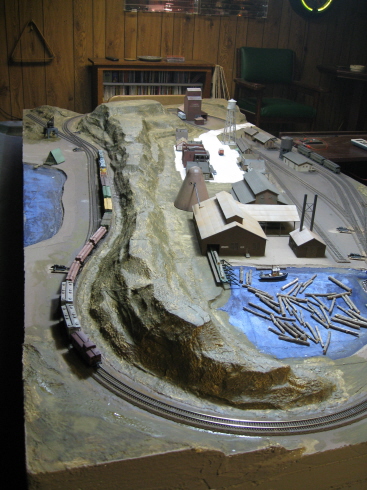
As I began applying plaster cloth to the assorted foam monstrosities, I started to think that there might indeed be some method in the Kootenay madness. The long and tall line of hills down the center of the layout had suddenly transformed a very obvious roundy-rounder into something else entirely. It was definitely one of those "slap yourself on the forehead moments" for me. All of my previous roundy-round layouts had had multiple tunnels (serving to minimize the watch-the-train-go-round-in-circles affect), and now these tallish hills were fulfilling that very same need - IE, basically dividing the layout into two distinct halves!
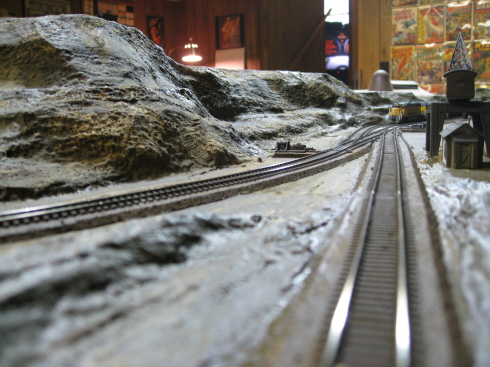
At this point I'm still debating whether or not I need to lumpify the "mesas" (I actually
like the way they look now), so we'll see what happens there. And then there's the whole tree/vegatation problem - IE, what
should I plant where? And what about the hills themselves? Do I need to geologify them with some sort of rock
formation scheme? At the moment, I remain clueless on all these issues. But however that all shakes out, I still remain
quite pleased (and stunned) by the way everything turned out here. Man, I really love these "surprise yourself" layout-building
moments 
05/15/08 - Prepping for lightage
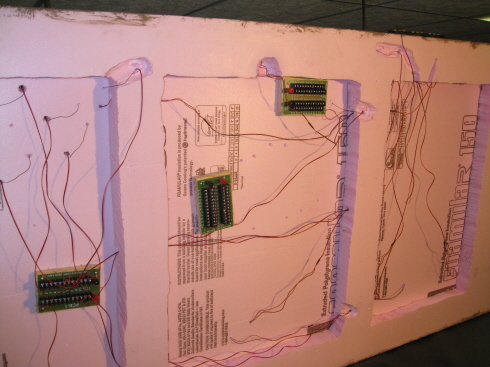
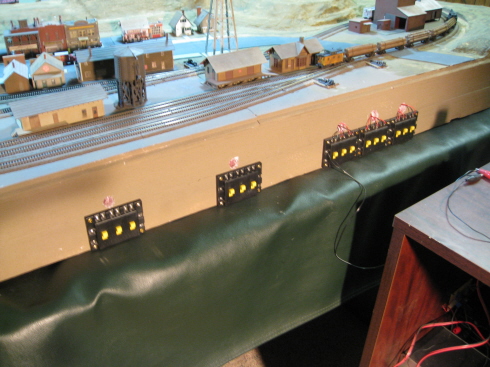
I decided to go ahead and get the rest of my electronical infrastructure taken care of - namely, installing power and wiring support for all of my eventual lights. I started by installing a couple of Miniatronics PDB-2's (one for wiring up the low voltage lighting circuit and one for the high voltage circuit). Next, I installed a couple of Atlas "Connectors" (one for each PDB) so I can turn lights on and off as needed.
Since each PDB-2 only supplies terminals for 24 wiring pairs, I may ultimately need to install a second one for the high voltage lights (24 probably not being enough). But, whatever... At this point I'm content to worry about crossing that bridge when/if I need to (hey, PDB-2's ain't cheap).
For power, I went with two different solutions - one off-the-shelf and one homebrew. I built both right into my "command console" (the one I retain between layouts), so hopefully it'll be a permanant solution (IE, able to provide juice for my layout lighting right up until they haul me off to the old model railroader's home).

The retail power supply came from Parts Express (item #120-536). It supplies up to 2 amps of variable voltage juice (12, 9, 7.5, 6, 4.5 or 3 volts) and cost a whole $22 (shipped). This one I'll be using for my larger bulbs (interior lighting, streetlights, crossbucks, etc).
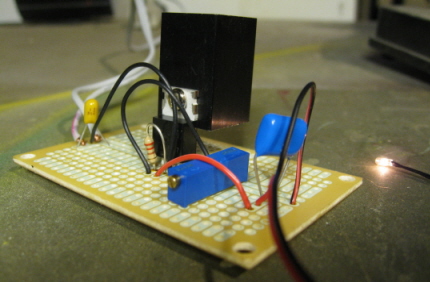
For the weeny 1.5v bulbs I'll eventually need to power (exterior accent lighting, signals, etc) I built one of Max Magliaro's adjustable low-voltage power converter boards (takes current from a high-voltage power supply and throttles it down to more manageable levels).
On my previous layout (the URR), I actually built my own custom mega-amp power supply. Consequently, I didn't really have to pay much attention to how many bulbs I was using or how many amps they were drawing. Basically, I just bought whatever I wanted and installed them in mass quantity. However, on this layout things are going to be a bit different. Frankly, I have no interest in wiring up 100+ bulbs again (ugh). And anyway, given the reduced number of structures on Shay, there's no reason I should have to.
As far as figuring what sort of power supplies one needs for lighting, it's pretty simple. First off, bulbs generally come in two different flavors - either 12v (give or take) or 1.5v. And if you want both, you really do need to have two different power supplies. There's no way around it - a 12v power supply will instantly fry 1.5v bulbs, and a 1.5v power supply will barely light 12v bulbs.
So, once you've sorted out the voltage issue, you then move on to amperage. Happily, this is simple arithmatic. Any given power supply will have some maximum amperage rating (usually expressed in mA - thousandths-of-an-amp). For example, my Parts Express power supply can handle up to 2 amps (2000mA), whereas my homebrew power supply can handle up to 1.5 amps (1500mA). On the draw side, each bulb will similarly have an amperage rating. In my case, I generally prefer Miniatronics 12v 50mA bulbs on the large side, and 1.5v 40mA on the weeny side. So, with 2000 mA available on the big-bulb circuit, I should be able to comfortably power 40 of the 50mA bulbs. And on the weeny side, 37 of the 40mA bulbs. Which should (god help me), hopefully be enough for this layout.
I also went ahead and drilled holes underneath all of my buildings for the eventual bulb wiring. And no, I didn't take any pictures of said holes (sheesh, use your imagination already). Anyway, this does mean that I can now go ahead and paint Slackjaw's streets and sidewalks... which I may just do. See if I don't!
(Sorry, I seem to have suddenly started channeling a Vogon for no apparant reason - would you like to hear some of my poetry?)
05/16/08 - Finished painting the town


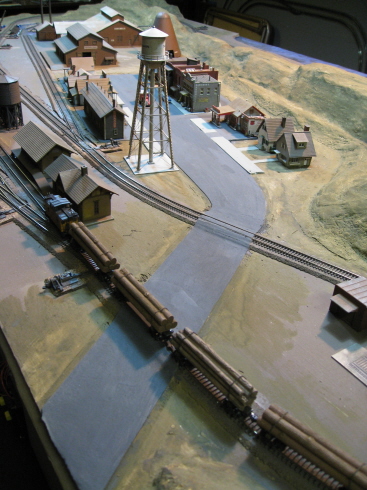
Nothing particularly exciting to report here - for the streets, alleys and parking areas I used WS "Asphalt" pigment. For the sidewalks, I used a mixture of WS "Concrete" and WS "Stone Gray". For the service station, I used a mixture of Asphalt, Concrete and Gray (just to help it stand out from the adjoining alleyway a bit more). I did sand a couple of entrances for the service station, although they're pretty subtle and probably don't show up too well in the photos. But trust me, they're there.
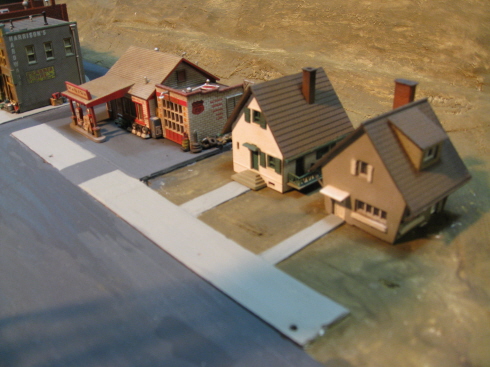
As I was drilling holes for my streetlights, I managed to wreck the sidewalk in a couple of spots. And as I was repairing said damage, I decided that as long as I was in Smooth-It mode again, I should go ahead and build a couple of sidewalks for my houses. And so, I did.
I tell ya, having the alleys and parking areas pretty much all at the same level as the street really made painting a lot simpler this time around. There was only one spot where I had to fake a transition using paint (between the sidewalk and the service station). And yeah, that was (as usual) a pain in the ass. If I had it to do over again, I would've just built a sidewalk in front of the service station and left everything else over there at street level (including the entrances and exits - which would've eliminated the need for sanding entirely). Unfortunately, back when I was first putting down the plaster, the idea of painting the service station area a different color to differentiate it from the alley hadn't occured to me yet. Oh well.
05/17/08 - Re-plastered the hills
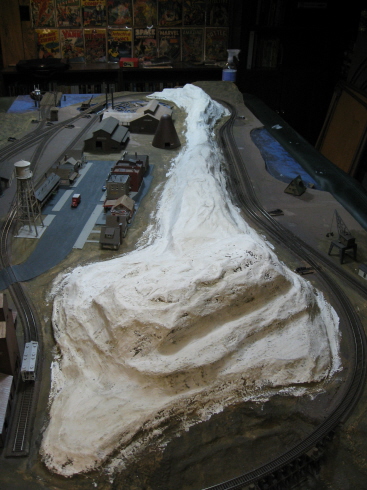

Before I get serious about adding rock formations to my hills, I decided to go ahead and do a bit of clean-up work on the plaster cloth first (hiding seams and filling in the swiss-cheese holes). This simply involved whipping up a big bowl of Smooth-It and smearing it around like mad with my fingers. An oddly enjoyable task...
I also added the odd bit of random newspaper lumpiness to some of the "mesas", just to de-mesafy them a bit.
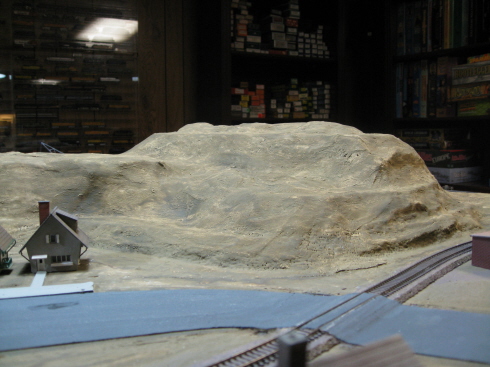
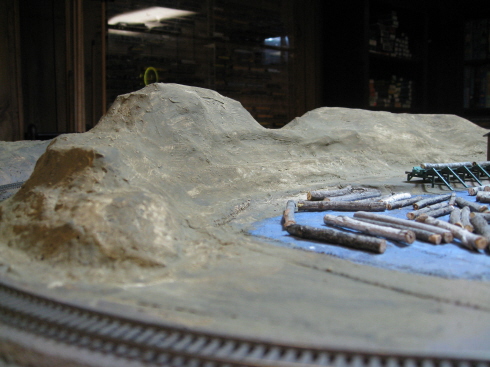
For my geology, I'm going to be trying something new and different (not to mention more abitious). Instead of making generic rock castings and gluing them on, or using tin foil to form random rock formations, I'm going to try actually carving sedimentary rock formations (think crumbling limestone) using sculptamold and a wire brush. I've never tried anything like that before, so we'll see what happens.
05/22/08 - Finished with the rocks
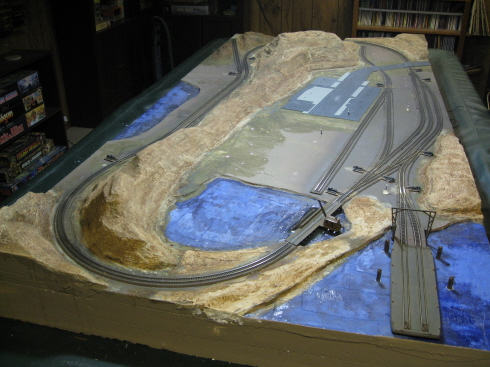
This is always my happiest day during the course of building a layout - namely, the day I can safely put all my sloppy plaster away (until the next layout, that is). Better still, I think this whole Scultamold experiment turned out pretty nicely - in fact, quite a bit better than I was actually hoping for.
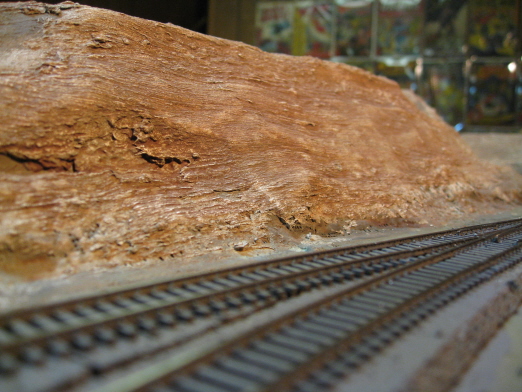
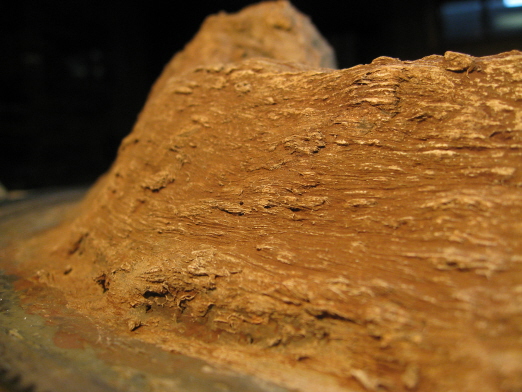
Basically all I did was mix up a big batch of Sculptamold, slather it on with my fingers, and then carve striations into it using a stiff wire brush (basically a toothbrush with metal bristles). I guess the only tricky part is determining when it's safe to go in with the brush. If you go in too soon, the stuff just mooshes around. And if you wait too long, it's too hard to carve. After a bit of trial and error, I finally decided that waiting 15-20 minutes was probably about optimal.
Sculptamold is very strange stuff. When you first mix it up, it looks for all the world like some bizarre mixture of whipped cream and cottage cheese. And as it starts to set up, it takes on the consistancy of stiff, lumpy oatmeal. And it's the lumpiness that had me concerned at first. As I was carving my stratifications I simply could not prevent lumps from forming here and there, and I was really starting to worry that the whole thing was going to wind up looking pretty stupid. However, after the plaster dried and I got down to the business of brushing on coloring, I really came to appreciate all of that lumpiness. If anything, I think it actually makes the rock faces look more realistic.
For coloring, I started with a very watery wash of diluted WS "Stone Gray". Next, I brushed on a layer of similarly diluted WS "Yellow Ochre". Lastly, I finished things off with a slightly less diluted wash of WS "Burnt Umber".
So that's that - next stop, ballast!
05/26/08 - Finished with the ballast
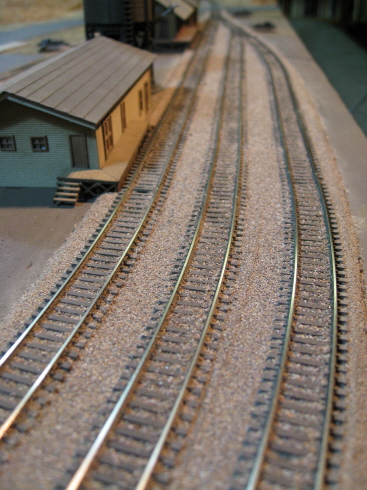
If finishing with the plaster is my happiest layout-building day, then finishing with the ballasting is definitely a close second. At this point, I think the only significant millstone left dangling around my neck is lightbulb wiring. So, things are certainly progressing.
For this layout, I wanted to try something a little different vis'a'vis my ballast. I'm pretty bored with the homogenous ballast offered up by Woodland Scenics. I mean, having one's ballast all one color just doesn't look very realistic to me. And although I've been quite happy with the Arizona Rock & Mineral ballast I've been using lately, I really wanted something that more or less approximated the wild mixture of colors one finds in ballast up here in Minnesota - pink, gray, brown, etc -
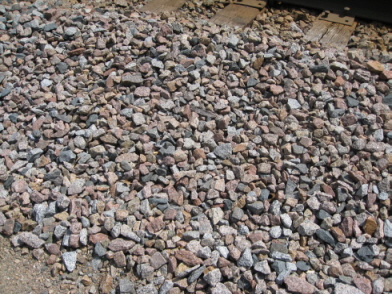
So, I ordered up a ridiculous amount of ballast from AR&M (in a whole bunch of different colors) and started experimenting. I started with a bag of their "Conrail East Cumbres & Toltec" (light brown and off-white). I then mixed in a bag of their "C&NW/ATSF Mauve" (mauve and white), but that wound up looking too pink. So, I went ahead and mixed in a second bag of the Conrail. Now it looked too brown! So, next I added in a bag of "Empire Builder GN/BN Basalt" (medium gray) - and voila! Damned near as close a match as I'm ever likely to get -
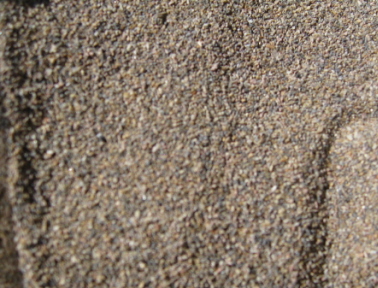
As far as the actual ballasting goes, I followed pretty much the same procedure here as I have on previous layouts - but with one small change. When applying the ballast between the ties (inside the rails) I also made sure I got ballast between the ties outside the rails at the same time. This minimized the problem I always used to have during the matte medium step where I'd brush matte medium onto the roadbed outside the rails and inevitably slobber it onto the tie-ends (and consequently, wind up with ballast on top of the ties). Now, with ballast already glued between the tie-ends from the first pass, I didn't need to worry about getting matte medium and ballast in there during the second pass. And consequently, no more ballast on the ties (or at least, not nearly so much).
05/28/08 - Added a "grade crossing" to the saw mill
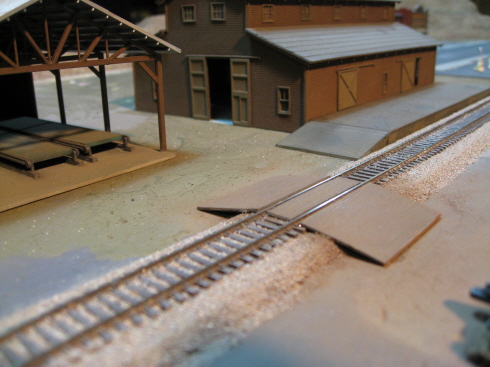
Saw mills make boards - lots and lots and lots of boards. And based on the pictures of real saw mills that I've seen, said boards wind up taking up every square inch of available space in and around a given mill. So, I figured the guys at Pineywoods would probably use that big open space on the other side of their siding for stacking and drying scads of fresh-cut lumber. However, I also figured they'd need some way to get their utility vehicles across said siding. So, I built this little grade crossing for them to use (Evergreen V-groove styrene painted Floquil Roof Brown). And yeah, I'll be filling in that empty space underneath the boards once I get down to the serious scenicking stage. But since Pineywoods doesn't even have any vehicles yet (or lumber, for that matter), I don't imagine they're in any great hurry for me to finish.
At this point I think I've more or less decided that my transfer building needs some sort of semi-finished interior. Given the (eventual) interior lighting (not to mention all those big, open doors), I think it's probably going to look pretty dumb if I leave it all empty inside. I haven't given it a whole lot of thought just yet, but I guess some sort rudimentary infrastructure for stacking ready-to-ship lumber and then maybe some kind of small clerical office type thingy would do the trick. This is what I get for leaving those stupid doors open...
05/28/08 - Got started on the lighting
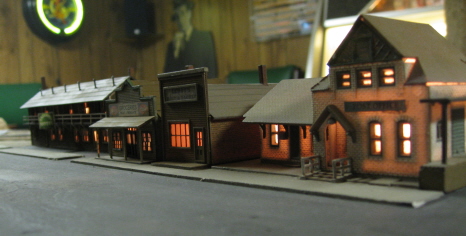
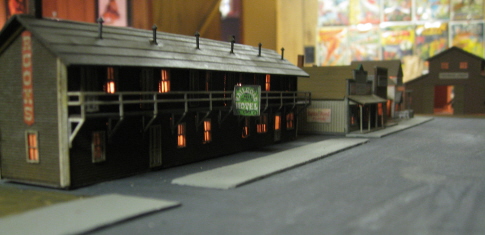
I get pretty bored with this whole "wire up the bulbs" thing pretty quickly, so I figure if I go at it in dribs and drabs between other projects, it'll eventually get done without costing me too many sanity points. One 12v bulb per building pretty much does the job, although I did wind up having to wire up two for that big long boarding house.
I had to crank up the juice to 12 volts in order to get some good pictures, which explains why the post office looks like it's about to burst into flames. Normally I would run these at 9 volts.
At this point I'd like to just glue these buildings down and call them "done". However, I haven't decided which (if any) of them would look good with some exterior 1.5v bulbs. So, for now they remain movable.
06/04/08 - Installed track bumpers on my three sidings

You don't see a whole lot of elaborate bumpers like these Cornerstone "prebuilts" out there in the real world. But when it comes to model railroads, preventing ones trains from accidentally landing on the floor does seem like a good idea. So, I generally use them on all of my sidings.
06/04/08 - Gravel and turf
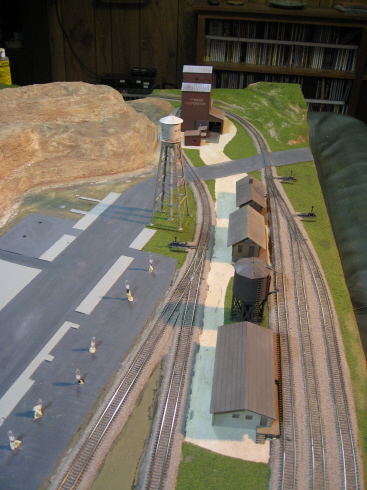
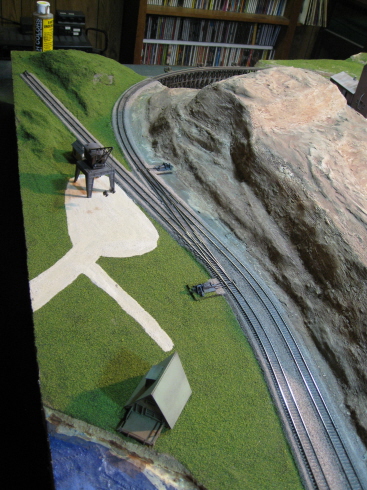
For some variety, I decided to go with gravel roads and parking for the elevator, depot, log crane, and lake cabin areas. I normally use Highball Products "Light Brown Earth" for modeling gravel, but they didn't have any of that at YOLHS, so instead I went with AR&M "Apache Stone Base Color" (which wound up looking pretty much the same as the Highball stuff anyway). Installation is pretty simple - I start by plotting out where I want the gravel to go (drawing lines on the foam with a pencil). Next, I brush a heavy coating of WS "Yellow Ochre" pigment inside the lines. And while the pigment is still wet, I then sprinkle on the ground cover. This AR&M stuff is really fine, and after a bit of experimentation, I decided that doling it out with a salt shaker worked best. Once the pigment dries, I then suck up the excess with a vacuum (lightly brushing the surface with my fingers to help smooth things out and dislodge the stubborn stuff as I go).
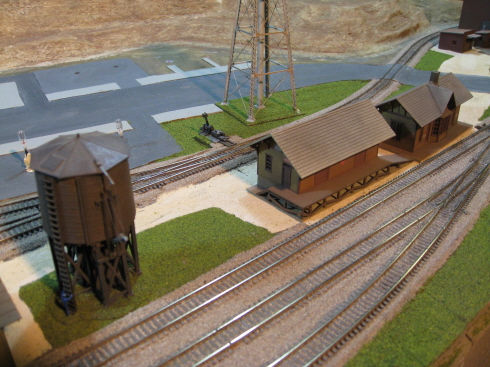
And since I was already in ground-cover mode, I decided I might as well go ahead and get started on the turf too. Same basic procedure here - brush on a coating of WS "Earth Undercoat", sprinkle on some WS "Blended Turf" (Green Blend), and once dry, vacuum up whatever didn't stick. For the sprinkling part, I use one of those little plastic condiment containers with some holes drilled through the lid.
I also took the opportunity to apply some turf to the bases of my two water towers (in order to camoflage them a bit). Although, from the looks of things I'll eventually need to do a little bit more work around the edges. Yeesh - fakey plastic bases, I hates 'em I does.
At present, everything looks a bit too perfectly manicured for real life (outside of a golf course, anyway). But that'll all change once I start adding patches of differently colored turf, coarse turf, bushes, trees, etc, etc, etc. Seriously, trust me.
06/09/08 - Kootenay Lake finally gets some water
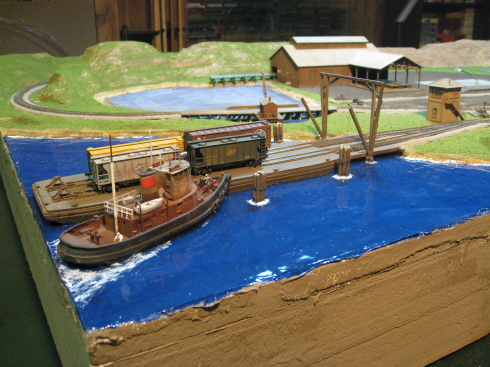
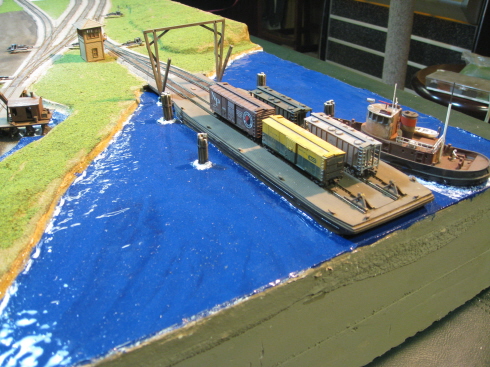
Although I've had great success in the past using Woodland Scenics "Realistic Water" for streams and ponds and suchlike, I've come to the conclusion that it might not be the best choice for large expanses of water (like lakes). It's kind of hard to get it to spread out evenly over large, flat areas. Also, given its fluid nature and lengthy "setting up" period, you can pretty much forget about getting any surface fun (ripples, waves, etc) into it.
My biggest problem with this lake was thinking I could get away without any sort of solid lip around the edge of the layout. Forgetting just how pernicious this stuff can be (as far as using gravity to find microscopic cracks and crevices through which to escape), I thought I could get away with a temporary rim comprised of duct tape (hey, it seemed like a good idea at the time). But, after I'd dumped about a bottle and a half of RW into the lakebed I was not at all pleased when I checked it out a few hours later and discovered that most of it had escaped through a couple of miniscule gaps in my duct tape levee (winding up in a big gooey mass on top of my pool table cover - ugh). Undeterred, I let that all set up (except for the stuff on pool table, obviously), allowing it to form its own seal. Then, I put on more duct tape and had at it again. And this time everything (well, almost everything) stayed in the lake.
Once the RW had solidified, I set about painting the surface. Yes, I'm a water painter. What can I say? I like pretty blue lakes. And after much experimentation on previous layouts, I've found that thinned Testor's "Dark Blue" enamel gets me that "Land of Sky Blue Waters" look I like best. However, I was a bit surprised when I started painting Kootenay Lake and discovered that my blue just wasn't looking right at all. What had looked perfect on previous layouts (on rivers, mainly) just wasn't working on this big lake. For whatever reason, it was much too light - almost boardering on baby blue. So, I de-thinned it by adding a couple more bottles of paint into the mix. And although darker, it still wasn't that deep water "navy" blue I was after. So, my next bright idea was to mix in some black paint (Floquil "CSX Black"). Happily, this wound up looking just right (to me, anyway). Unfortunately, I don't think my pictures quite capture the reality of it all (what with the color fluctuating depending upon the light and the angle from which the water is viewed). Nevertheless, I'm quite happy with the end results.
As much as I would've liked to have gone all artistic with the wave action, I honestly don't think I'm talented enough to pull it off. However, I did use WS "Water Effects" to create small breakers on the shoreline as well as turbulance around the pilings and the tug boat. And although out of the bottle the WFX is white, it does tend to go all clear on you after it dries. So, I revisited said areas with a bit of white paint afterwards. Oh, and in the above pictures, a lot of what looks like very nice waves away from the shore is actually just an optical illusion created by light reflection. Believe me, I'd be a very happy man if I could actually paint something like that. And who knows? Maybe I'll eventually sack it up and revisit the whole wave situation later on. I suppose the worst that could happen is that I'd have to repaint everything blue.
Although I did have my usual assortment of frustrations building this lake, I did have a bit of serendipitous good luck along the way as well. While I was waiting for the lake surface to dry, I found myself applying ground foam elsewhere on the layout. And air currents being what they are, I guess a bit of foam found its way onto the as-yet undried lake surface. Well, I didn't think much of it at the time (figuring it would all basically vanish once I painted the surface). However, I was quite pleased to find that, once painted, said smattering of surface lumpiness created a really nice "sparkly" effect on the lake - livening up an otherwise fairly boring surface. Hell, I'm half tempted to go for the same effect on my other lake (this time on purpose). On the other hand, I have no idea how I might replicate the perfect distribution of foam that I wound up with by accident. Knowing me, I'd probably "oops" it and wind up with a foam covered swamp...
06/09/08 - Started stacking lumber
I'm rapidly approaching the serious detailing stage of things, so I thought it was high time I turned my attention to the saw mill and all those theoretical "stacked up and waiting to dry" piles of boards. And after a bit of research, it turned out I had a few options to consider. I could either go cheap and easy (styrene stack kit), expensive and easy (preassembled wood stacks) or cheap and tedious (make my own wood stacks). Well, "cheap and easy" being my middle name, I decided to investigate that option first - namely, Atlas's "Stacked Mill Lumber" styrene kit (#791). And although I had my trepidations about going with styrene "wood", at $4 a kit I also figured I didn't have much to lose. And as luck would have it, YOLHS actually had a "791" in stock. So, I snagged it and headed home to check it out.
As it turns out, each kit contains enough pieces to build a good 9-10 different stacks of variously sized boards. And after assembling a few stacks and hitting them with a coating of flat finish, I was more than satisfied with the look. So, I went ahead and ordered several more kits from an online source (having already scavenged YOLHS's entire inventory of "one").
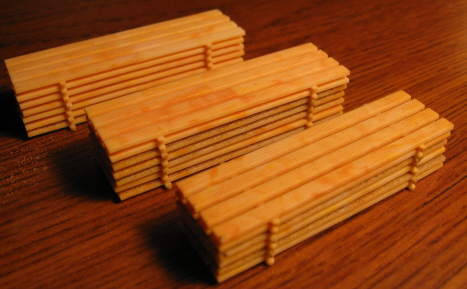
Oddly enough, I discovered that the "wood" in these Atlas kits has changed rather drastically over the years (and not necessarily for the better). The kit I scored at YOLHS actually came in one of those really old box Atlas "pink boxes". And as pictured above, the styrene used for the boards in said kit was quite impressive looking - nicely mottled and lumbery looking. On the other hand, the styrene used in my newer kits was decidedly less impressive -
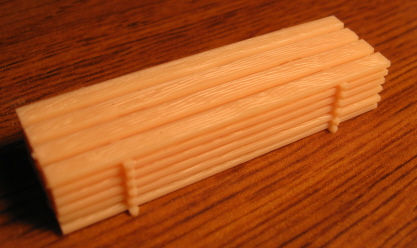
Undeterred by the seeming lameness of these new boards (IE, not being interested in wasting my time trying to track down a lot of "old" kits), I instead tried my hand at weathering them. And after a coating of flat finish and bit of Bragdon "yellow", I think got a pretty decent look. No, not nearly as nice looking as the older Atlas kits (let alone actual wood boards), but certainly good enough for my purposes. And given the dough I've already sunk into this layout, there's probably something to be said for trying to save a few pennies at this point.

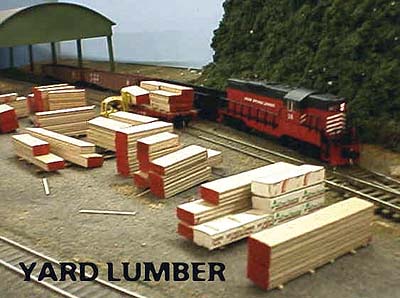
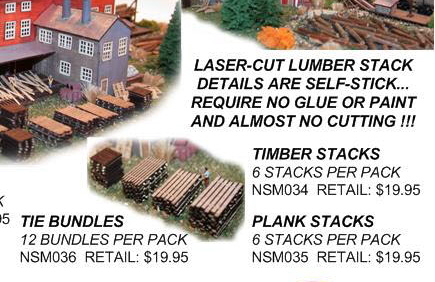
As for the gold plated solutions (IE, real wood), here are a couple I looked at -
06/09/08 - Exploring the whole concept of "dirt"
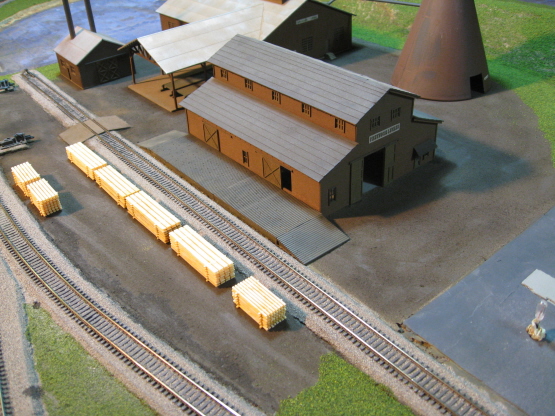
When building layouts in "make it up as you go along" mode, deciding what the surface of a given "large, industrial area" is going to look like is always a challenge. Case in point - my saw mill. Now, my general modus operendi in the past has been to go with either gravel or asphalt. However, having already been-there/done-that with those two options a million times, I decided that I wanted to try something new and different with the mill. And after considering the problem for a full minute (or possibly even two), I decided to go with a basic "super-compacted/well-traversed raw dirt" look. Wow, inspired!
Anyhow, coming up with said surface turned out to a much longer trip around the block than I'd originally anticipated. I mean, just settling on something that actually looked like dirt took several tries. My original idea was to go with Woodland Scenics "Fine Turf - Soil". Unfortunately, that wound up looking way too fluffy for my purposes. Yeah, I guess it might work for a plowed field or something, but for a busy saw mill? Not so much...
At this point I figured that what I needed was some sort of fine powder like the Highball Products (or AR&M) brews that I've used for gravel - just, y'know, "dirt" colored. So, I headed down to YOLHS to see what they might have on hand, and found... not a damned thing. OK, so now it was internet ordering time. And as such, I immediately said to hell with AR&M. Yeah, they have very nice stuff (especially their ballast), but their website is a bit of an impediment. Their pictures suck (as far as being able to determine what anything actually looks like), and their minimum order policy (6 bags) is out-and-out Draconian. So, I decided instead to see what Highball might have for me.
And as it turns out, Highball did indeed have something called "Regular Dark Brown Earth". Well holy shzit, that sounded pretty damned perfect. Unfortunately, their internet website provided no pictures of said shzit whatsoever. So, I had to order it on faith alone (hey, wasn't I just griping about AR&M's lack of decent website pictures scant moments ago?) Anyway, you guessed it - once in hand, Highball's "Regular Dark Brown Earth" turned out to be entirely not brown at all - more like medium gray (and with a bunch of strange white chunks thrown in for good measure).
Well, throwing caution to the winds (IE, being too lazy to look for something else), I decided to go ahead and use said gray shzit anyway (it being the desired texture, if nothing else). And once stuck to my layout (same procedure as with turf), it actually looked pretty darned good - except for the color. So, I pulled out my airbrush and sprayed it all with Model Master "Raw Umber" acrylic paint for that "it just rained a couple of days ago " dark brown look. And I'll be damned if it didn't turn out just about perfect!
06/14/08 - Finished the first layer of ground cover
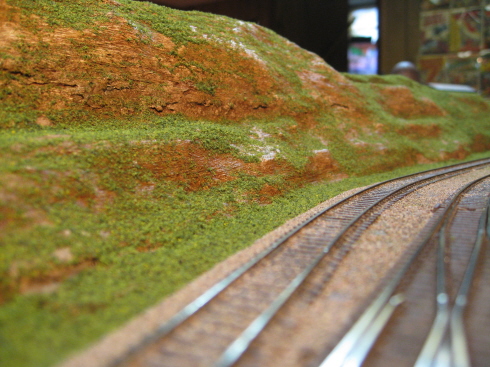
As I set out to cover up the "mountains" with Blended Turf, I wanted to make sure I didn't lose all of my rock formations. So, what I wound up using was WS "Scenic Cement" (as opposed to Earth Undercoat, or any other sort of pigment). I brushed a thick and goopy layer on the horizontal areas, and then a less thick and goopy layer on the more vertical areas. Then, as I sprinkled on the turf, I tried to get it to rain more or less straight down so it would pile up more thickly on the horizontal areas (and again, less so on the vertical areas). Once I'd vacuumed up the stuff that didn't stick, I think I wound up with exactly the look I was after (although, as I vaccumed, I did occasionally have to "help" some vertical turf come loose with my fingers in places where I wanted more rock to show through).
Incidentally, if you're thinking of doing something like this, don't use Elmer's "Spray Adhesive". I actually experimented with that myself (fortunately on a very small area), and discovered that it dries glossy (yikes). Having learned my lesson there, I switched over to the Scenic Cement (which dries flat and pretty much invisible) and redid the area in question. Fortunately, everything turned out nicely, so I went ahead and finished the rest of the mountains using said Scenic Cement.
06/14/08 - Finished stacking the fresh-cut lumber

Not much to report here - I glued the stacks together, weathered them a little bit, and then glued them in place. I think I wound up using about three boxes worth of Atlas "lumber" for the whole job.
Now I just need some stacks of finished (ready to ship lumber) to stack up inside the transfer building and on the loading dock. And for that, I think I'm just going to buy some cheapo basswood sticks and make my own stacks. Here's hoping the "real wood" stacks don't clash too badly with my plastic stacks...
06/17/08 - Bullrushes and cattails
As I've gone about my business plotting out all these various lakes and ponds, I've had this niggling idea in the back of my mind that somewhere along the line I should probably liven them up with some sort of marshy aquatic greenery. But, the question I've been putting off is, well... how to do it?
I guess the popular solution vis'a'vis adding bullrushes (or reeds, or whatever you want to call them) is to go with WS "Field Grass". Unfortunately, me and field grass just don't get along. Frankly, the thought of trying to plant all that unwieldy crap one tiny thread at a time gives me palpatations. And yeah, along with the field grass, I've also come across references to various other seemingly hare-brained solutions (brush bristles, faux fur, horse hair, etc, etc). Not surprisingly, none of those were doing much for me either.
So, one day I was browsing the scenery section down at YOLHS (shopping for some ground cover or something) and I happened across a really nifty little product from Busch - "Grain Field and Reeds". Basically it's the same thing as WS field grass, but all in one big bundle (held tight with a ring of cardboard around the outside, and some sort of minor adhesive on the bottom).
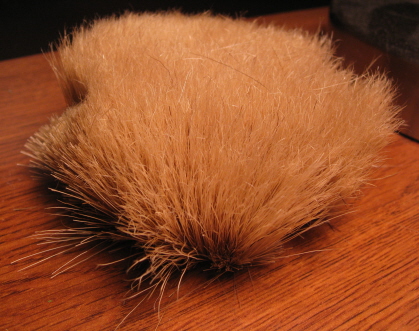
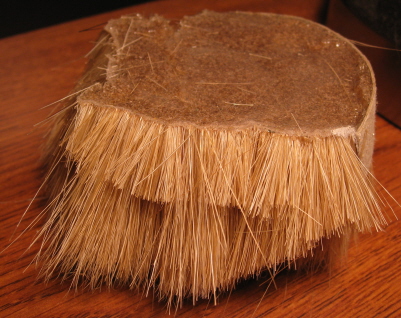
Well wow, I thought to myself, now here's something I can work with! So, I picked up a box and headed home to try it out. And the first thing I discovered is that the adhesive (or whatever it is) on the bottom of the bundle doesn't really hold things together - IE, if you remove the cardboard hoop, the whole thing starts to fall apart on you. So, my bright idea was to absolutely slather the bottom of the bundle with white glue. And sure enough, once that all dried, I was able to remove the cardboard without de-bundling the bundle.
So, once I had my solid bundle, it was simply a matter of cutting off small clumps a few at a time, trimming them down to the appropriate height, and then gluing them in place along "water's edge" (prior to pouring the actual water, obviously).
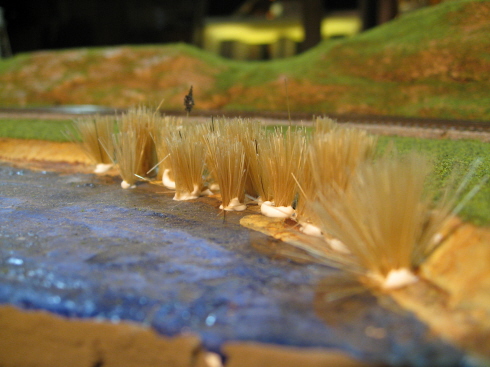
Now, I suppose it would've been nice if the stuff came in "reed green" instead of "wheat brown". But, oh well, I guess you can't have everything. Anyway, I found that brushing them with some green acrylic paint was pretty a simple task (and with the end result being some very convincing looking plant life). And truth be told, the stock non-green coloring can actually come in handy. Based on "real world" observations, these sorts of shoreline reed colonies aren't necessarily 100% green. Rather, they seem to generally consist of a mix of healthy plants, not-so-healthy plants, and last-year's dead plants. So, leaving a bit of brown mixed in with the green can actually look more realistic.
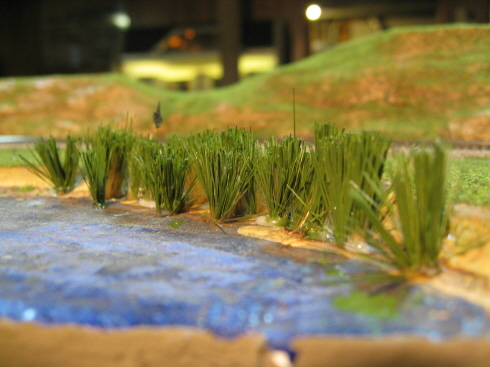
This whole operation turned out to be ridiculously simple, and yet the results were way beyond my expectations. So, thus enthused, I decided to up the ante and take a whack at adding some cattails into the mix as well. Now, as far as I know, Scenic Express is the only game in town as far as "prefab" cattails are concerned. Unfortunately, they don't offer their bullrush/cattail product in N scale (just O and HO). So, figuring I'd need to build my own, I asked around on the Atlas Forum for some ideas. And surprisingly, I got a very sensible (and seemingly do-able) suggestion - namely, take a piece of WS field grass, dip one end in white glue, and then dip the glue into some WS "soil" turf.
The only problem was, ugh, the field grass. I mean, the stuff is just impossible to work worth. "Flimsy, whispy and microscopic" doesn't even begin to cover it. However, before suicidal depression set in, my brain started making odd connections (as it is wont to do), and I suddenly recalled a recent painful experience where my son (the jokester) had lit upon one of our cat's discarded whiskers and then (as kids are wont to do) proceeded to spend a fair amount of time poking me with it. "Great caesar's ghost!", I cried. "Cat whiskers are as thin as a piece of human hair, and yet have the tensile strength of styrene!"
So, swept up in an Archimedean "Eureka" moment, I managed to scrounge up said whisker from the table-top where my son had abandoned it, and then proceeded to turn it into a cattail (ala the Atlas Forum suggestion). And I'll be damned if it didn't work perfectly! And so, ladies and gentlemen, I give you the world's first cattail made from real cat -
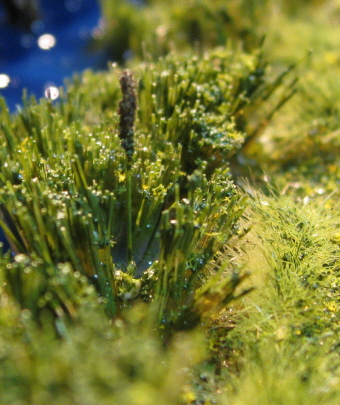
OK, after my initial excitement, I realized that this whole "cat whisker" thing was an impractical solution to an impractical problem. First of all, I'm never going to be able to find enough whiskers to make all the cattails I need. I mean, I might be slightly unbalanced, but I'm certainly not the kind of guy who's going to go chasing after his kitties with a scissors. And secondly, I'm not sure this whole cattail thing is really worth the effort anyway. I mean, unless you're down there with a magnifying glass (or a camera on super zoom mode), you can't see the bloody things anyway.
Still and all, it's an interesting conversation piece. So, I guess I'll keep adding them as events warrant (IE, based on whenever my cats decide to cut loose with a whisker and I happen to stumble across it).
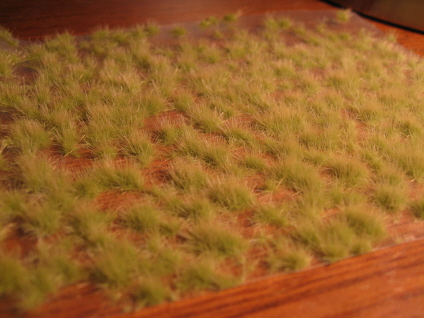
Oh, and speaking of Scenic Express... as it turns out, they do have a product that I can actually make use of - namely their "buffalo grass" clumps (a few of which can be seen in the above cattail picture). This stuff is totally awesome, and pretty much puts all of Woodland Scenics "turf" products to shame. Basically what you get are several plastic sheets with these amazingly realistic looking clumps of grass stuck to them. They're available in a variety of colors (spring, summer, fall, etc) and each sheet contains clumps of varying size. To install, you simply peel them off the plastic, dab a little bit of glue to the bottom and stick them in place. This is definitely one of those "where have you been all my life?!" type products, and one I expect to be making liberal use of on all my future layouts.
06/18/08 - Finished another lake
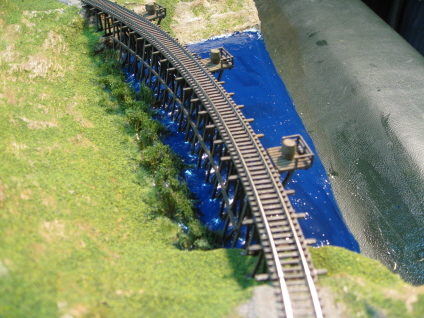
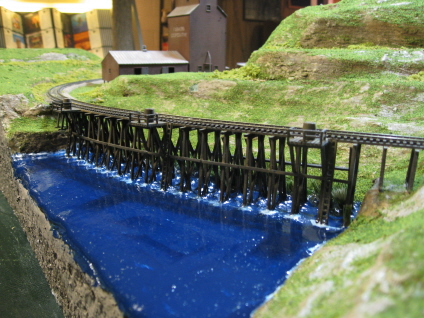
I finally figured out a way to keep my Realistic Water inside the playing field. I went with the duct tape again, but this time I sealed the seam between the tape and the edge of the lake with white glue (prior to pouring the water). And happily, not even a smidge of leakage this time around. Vis -
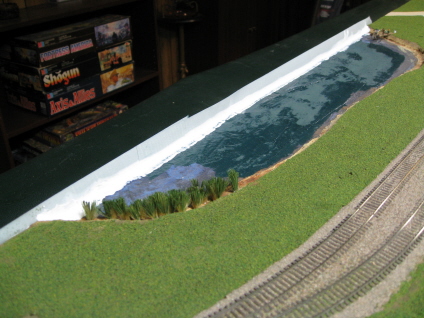
Now, I get a lot of teasing about my "O So Blue" lakes. And since this particular lake is relatively small and "out of the way", I decided to experiment around with some alternative surface coloring (just to mollify the naysayers, if nothing else). For inspiration, I used this picture of a "typical" north country lake -

And wow, is that color (or mix of colors) ever insanely difficult to match. I mean, I don't even know what you'd call it. I guess there's some blue in there... and some green... and some, I dunno, brown? Well, anyway, I tried various combinations of dark blue and dark green and black and never hit upon anything even remotely close to the coloring in the picture. And frankly, none of the colors I wound up with were as aesthetically pleasing to me as my original (ridiculously) blue water. So, I dunno, I may take another whack at it somewhere down the line. But for now, I'm sticking with what I like.
So, with one failed experiment behind me, I decided to try my hand at using WS Water Effects to create some waves. And yeah, that didn't work out either. Simply trying to create them freehand (using nothing more than a paintbrush) got me absolutely nowhere, as what I wound up with didn't look anything like waves. So, my next idea was to create some "pseudo" waves by simply brushing on the occasional whitecap with white paint. And no, that didn't look very good either. Eventually I decided that I simply don't possess the necessary artistic skills to pull this off and painted over the whole mess.
Now that I think about it, I guess I probably should've done a little bit more research prior to embarking on this whole lake project. I mean, there must be some mediocre-modeler-friendly methods for modeling interesting looking lakes out there. Unfortunately, I just don't know what they are. And at this point, it's not like I can really start over and do things differently. Oh well... I'm happy enough with what I have, but I must admit to being disappointed that I wasn't able to come up with something more impressive.
06/21/08 - Wired up some crossing signals
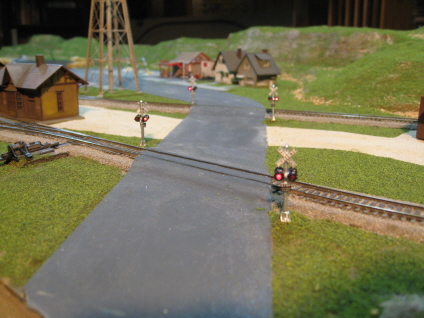
All of this lake pouring has been interfering with my ongoing "wire up the lights" project (since I can't tip the layout up on its side while the RW is setting up). However, I did get a brief window of opportunity between my second and third lakes that I used to install these NJI crossing signals. Animation is provided by a couple of Dallee Electronics flasher modules stuck to the bottom of the layout -
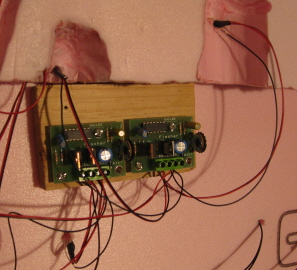
I decided to go with simple flashers rather than the elaborate crossing gates I normally like to use (just for "something different", if for no other reason). I don't know how well it shows up in the pictures, but each of these signals is bi-directional (two lights in either direction).
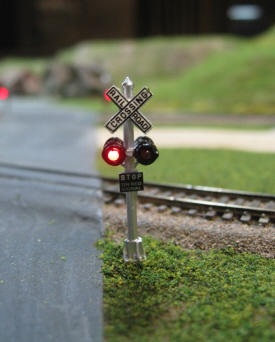
Each of these signals comes with three wires (two of which have resistors soldered in-line). The upshot of all that is that I had to drill some relatively wide holes through the base in order to get all of that electronica pushed through to the underside of the layout. And unfortunately, said holes wound up being a bit larger than the supplied bases on the signals. So, prior to doing anything else, I cut my own (larger) custom bases out of cardstock, painted them green, sprinkled them with turf, and then glued them to the bottom of the signals. This allowed me to safely plant said signals atop said wiring holes without having them embark on an unscheduled "Journey To The Center Of The Earth".
After that, it was just a matter of attaching the signal wiring to the flashers (along with wiring to the power grid). The flashers are kind of cool, at least insofar as they allow you to adjust the flash rate of the signals. One thing I learned about these signals is that polarity matters. So, if you're installing them and find that they don't work at all, try flip-flopping your power input wires.
06/24/08 - Finished another lake
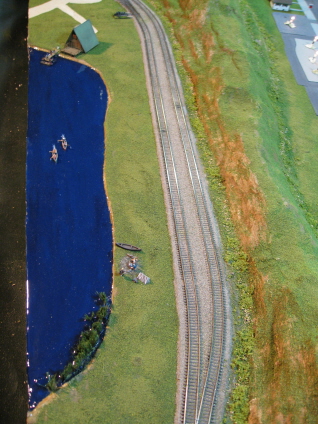
Yeah, it's blue. So go ahead, get your snickering out of the way.
Anyway, nothing new to report here - IE, same deal as all the rest of 'em. Although, I did take the opportunity go ahead and plunk down a few Woodland Scenics "folks doing outdoorsy stuff" hither and yon (and do please ignore the current desperate lack of trees) -
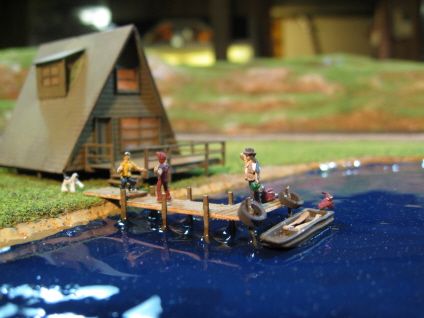
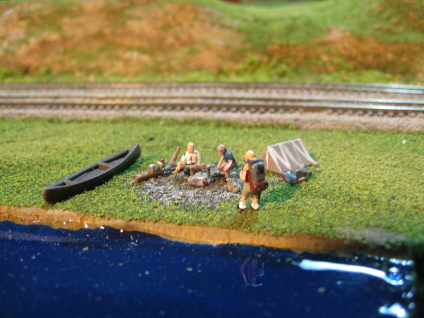

I tell ya, I don't know what we'd do without WS's figures. Their variety is quite impressive these days, and you can't beat the quality.
BTW, the tires on the dock are some old Calumet Trains diesel traction tires I had laying around (painted black). Seriously, I am not making this up. They were the best thing I could find...
06/24/08 - More lights

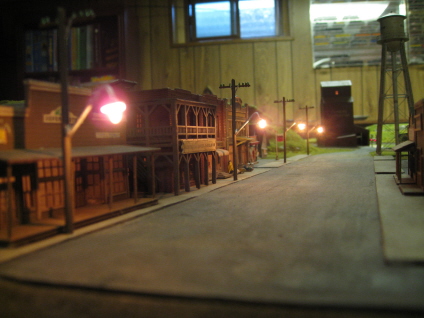

I've actually done a quite a bit more than what's pictured above. But honestly, do we need a picture of every single lit building? I think I'll save all that for when things are a bit more "done".
Anyway, the telephone pole / streetlight thingies are a frankensteinian creation of my own. The actual poles (with light arms) are from Lo Cascio Originals, and the telephone pole tops are from N Scale of Nevada. Basically, I took the LCO poles (custom-ordered sans their usual tops) and then stuck on the clipped-off tops from some NSN poles (which look way better than the plastic ones LCO uses). Et voila!
This is the second layout where I've used these LCO streetlight poles, and to tell you the truth I don't think they're all that great looking. The flexible rubber streetlight arms (or plastic, or whatever the hell they're made of) are not particularly elegant looking. Unfortunately, they're the only game in town when it comes to telephone-poles-with-built-in-streetlights. Kind of odd, considering what a ubiquitous feature said poles are in the real world.
06/25/08 - One last water experiment
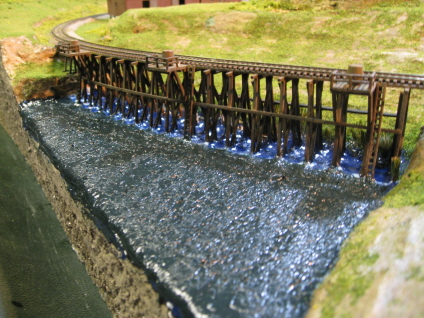
Figuring I needed to make up my mind one way or the other on this whole lake situation, I decided to take one last stab at making waves and not-blue water. Either I was going to come up with an acceptable method for modeling decent looking waves, or I was just going to learn to be happy with flat calm. Similarly, either I was going to find a not-blue that both looked good (to me) and looked more realistic, or I was going to have learn to live with the catcalls from the peanut gallery and be happy with my blue lakes.
Unfortunately, I can't say that anything's really changed. First off, I used WS Water FX to create all sorts of generic surface turbulance. But does it really look any better than smooth and flat? I don't think so. And secondly, I tried all sorts of different combinations of dark green, black, brown and blue to come up with a more realistic color for the surface, and quite frankly, the further I got away from blue, the less my lake looked like a lake to me.
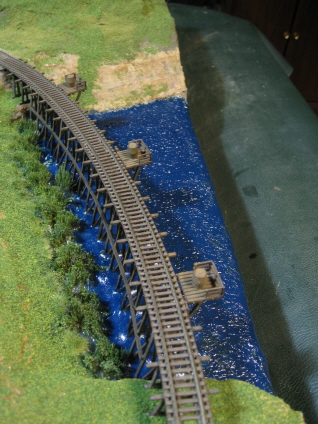
So, back to the blue. I dunno, sometimes it seems like a more impressionistic approach to modeling works best (as opposed to trying to force reality into places it doesn't want to go). And I think at this point it really does boil down to personal taste. In a model railroad situation, blue water just plain looks "right" to me, and everything else looks "wrong". So, that's that. Flat/blue water for me from here on out. Now it's time to worry about something else for a change (like where am I going to put all the umpteen bazillion trees this layout is going to need?!)
07/04/08 - Added some detailing to the transfer building
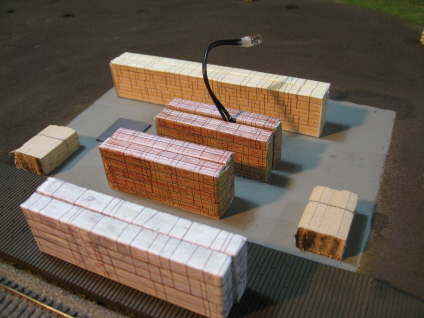
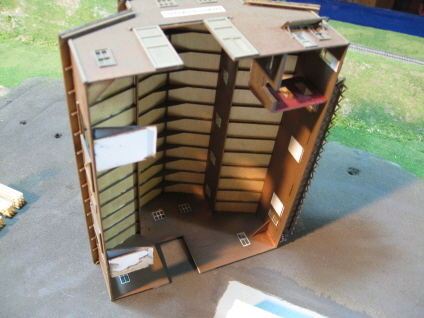
As previously mentioned, my intention was to build my own lumber stacks, but... Well, I did actually purchase a few packages of variously sized "Micro-Cut Scale Lumber" and gave it the old college try. But after discovering that it took a whole pack of said lumber to make a decently sized stack, and that cutting and gluing together said stack (one bloody stick at a time) took well over an hour, I decided that that particular experiment just wasn't going to fly.
So, my next experiment was to try some N Scale of Nevada "Lumber Loads". And as the name implies, these things are basically designed to ride on freight cars. Still, I figured that since they were kinda/sorta cheap, I didn't have much to lose by giving them a try. So, I ordered up three different kinds - two "unwrapped" and one "wrapped".
As it turns out, these things are pretty chintzy. Basically what you get is a laser-printed sheet of cut-and-fold "lumber" and a few pieces of styrene (out of which you're supposed to scratchbuild a box upon which to affix the cut-and-folded "lumber"). Although, I have to say, being able to custom-build the stacks in various different sizes did turn out to be helpful.
The "unwrapped" stacks are not particularly realistic looking. I mean, I guess they might look OK on a freight car. But as pieces of detailing, I think they're pretty well suited to sitting inside of a building (IE, not sitting outside and subject to close scrutiny). So, that's where I put them.
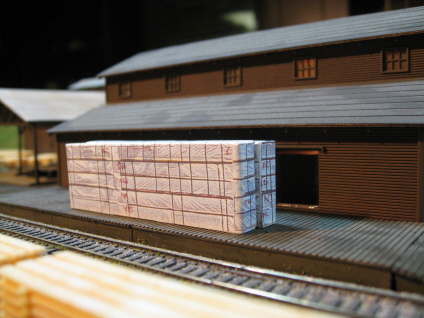
On the other hand, the "wrapped" lumber turned out to be quite a bit more conviincing looking. Well, no surprise there, I guess. Using printed paper to model printed paper (or plastic whatever real lumber is wrapped in) does seem like a no-brainer. So, these I plunked on the loading dock.
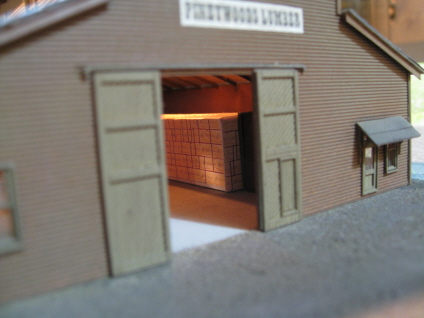
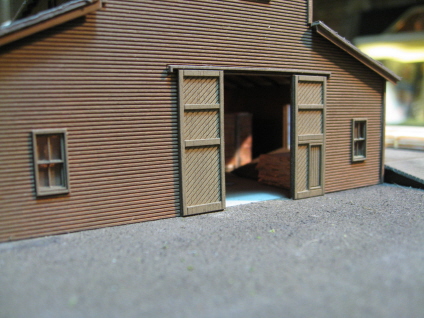
For the building interior, I added a couple of walls to form a rudimentary "office". I also added a couple of ramps to get from the floor of the building to the exterior loading dock. Then I just scattered my unwrapped loads hither and yon (along with the one "real wood" stack I built - sawed in half to fit). Basically the goal here is to provide the impression of something going on inside the building (without necessarily trying to make it 100% realistic). This building is eventually going to be permanantly affixed to the layout, so it's not like I'm going to be pulling it off and showing off the interior detailing. However, it does eliminate the "hey, it's empty" effect you'd otherwise get when taking a peek in through one of the doors.
Next up is a detailed interior for the main sawmill building. And here, I plan to get fairly ambitious. So, we shall see what we shall see...
07/16/08 - Detailing the saw mill
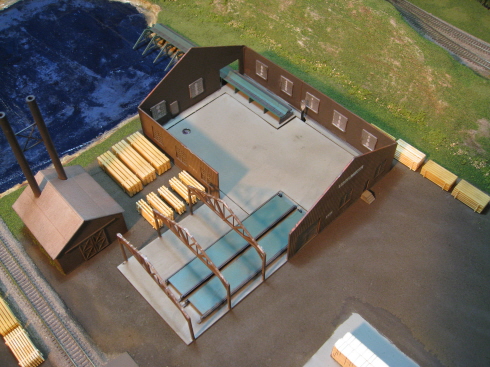
Well, this is without a doubt the stupidest and most irritating project I've ever embarked upon. I've spent much of my time over the past several weeks thrashing around trying to come up with some decent looking interior detailing for my saw mill - and all because one stupid wall is open to outside viewing. And why, you ask, would I even bother going to all the trouble of adding a lot of interior detailing to a building when most if it's going to be barely visible? Well, I'm not exactly sure. But I suspect it's because I've gone completely off my rocker...
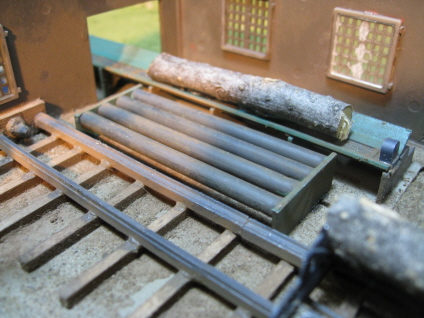
Anyway, when I started on this project I didn't know a blessed thing about the inner workings of a saw mill. But I tell ya, right now I think I could probably operate one myself. Basically you have your logs arriving via the jack slip and log deck. Logs then get moved onto the shotgun carriage - a moving platform that runs the log back and forth through a giant band saw. The band saw makes the initial rough boards, which are then transferred to the edger via live rolls (basically platforms with rollers). The edger then finishes the rough boards, and off they go to the transfer table and on out of the mill for sorting and stacking.
So, great. Now the question was, how to go about constructing all this assorted machinary? My first experiment was with JV Models' "Lucas Sawmill" kit. Based on pictures and descriptions found on various websites, it sounded like it a had fair amount of interior detailing. And since it only cost $23, I figured I didn't have much to lose. So, I ordered one. Unfortunately, this thing turned out to be a complete joke. First off, it's one of those "super craftsman" kits - basically consisting of a bunch of wooden sticks and a skimpy set of instructions. Worse still, it turns out that the N scale version is simply a downsized copy of the HO scale version - sans all the interior detailing! So, completely useless.
Next, I decided to check out Republic Locomotive Works' "Coon Gap Sawmill Parts Set". This one was really a leap of faith as there aren't any pictures of it on RLW's site. The description wasn't much help either, although it did state that the kit included "white metal and lasercut parts to make the machinary for the Coon Gap sawmill". Well, running out of options, I decided to risk my forty bucks and give it a go. And yeah, this one turned out to be every bit as useless as the JV Models kit. Basically what I got was a lot of tiny little flash-ridden white metal parts, a few sheets of lasercut wood parts, and a diabolical set of so-called instructions that must have been penned by Lucifer himself. Like the instructions for my log dump, these had been written for the HO scale version of the kit and made absolutely no sense for the N scale parts I was provided with. I mean, without some sort of pictorial diagram that showed which part was what, I don't know how one would even go about getting started on this mess. The other problem was that everything was beyond tiny, and it looked like when all was said and done it might have taken up half the available space in my Cornerstone mill. So yeah, another dead end.
Having exhausted all of the known N scale options, I decided to take a peek over the fence and see if HO had anything I might be able to use. And the good news is that, yes, it did (well, sort of). Keystone Locomotive Works has a complete line of saw mill machinary. And I mean everything - band saws, edgers, shotgun carriages, live rolls, cut-off saws, transfer tables, log decks and jack slips. The bad news is that Keystone apparently went out of business a while ago and much of their stuff is out of stock at Walthers (they list live rolls and shotgun carriages and that's it). So, I spent a bit of time checking eBay and otherwise scouring the net, and yeah, much to my dismay, this stuff appears to have vanished from the face of the Earth.
So, dang, now I was worried. Without a band saw (the heart and soul of any saw mill), this whole project was going to come to a screeching halt. But before I gave up hope entirely, I decided to check out YOLHS to see if, by some odd stroke of luck, they might have some of this stuff in stock. And wow, did they ever! I mean, they had it all! So, I greedily scarpered up a band saw, an edger, a shotgun carriage and some live rolls (figuring that's about as much giganto HO machinary as would comfortably fit inside Pineywoods Lumber) and got out of there before somebody pinched me.
So, first things first, I pulled the roof off the mill (ouch) and painted the interior walls Floquil Roof Brown. Then I made myself a custom floor (cut out of a sheet of styrene) and painted it Floquil Concrete. Now, time to see what I can do with all this Keystone cornucopia.
07/17/08 - Finished the Keystone "Band Saw" and "Edger" kits
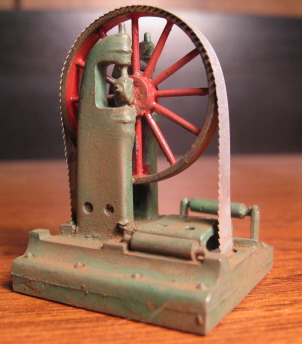
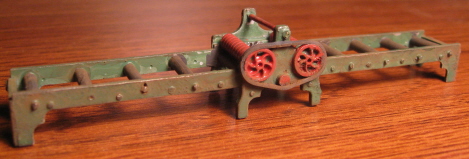
Boy, the fact that I'm not going start out by whining about how much I hate "white metal & CA" kits should tell you just how relieved I am to even have these things... And, truth be told, both of these kits were fairly painless to put together. The parts are extremely high quality (not a hint of flash anywhere), and the instructions are stellar. I mean, not only do they hold your hand as far as telling you how to put the individual parts together, they also include specific instructions for painting them (not to mention extremely helpful information vis'a'vis the "real things" - IE, telling you how they were all used together, and even going so far as to provide drawings of suggested floor plans). I mean, jeez, what more can you ask?
For the band saw, I painted the saw with Floquil "Bright Silver", the outside of the main wheel with Floquil "CSX Black", the inside of the wheel with Testor's "Flat Red", and everything else with Floquil "Dark Green". And no, I didn't even bother with the "under the floor" parts of the saw. I mean, I might be crazy, but I'm not that crazy.
For the edger, I painted the feed rollers and pulleys Testor's "Flat Red", the other rollers Floquil "Grimy Black", and everything else Floquil "Dark Green". For the pulley belts, I used small orthodontic rubber bands (the kind kids used to use on their braces), painted Grimy Black and rigidified with CA.
As for weathering, I did the usual weatherwash/Bragdon thing (surprise, surprise). I also wound up shmutzing them with some sawdust later on, but you'll have to wait a bit before I reveal all that (patience, my precious).
One thing I noticed about both of these kits is that the various "roller" holes are universally undersized. So, save yourself a bit of trouble and use your Dremel to drill them out a bit larger before even trying to put any of this stuff together. These white metal castings are relatively flimsy, so any sort of man-handling is just going to wind up bending/breaking stuff (and yeah, don't ask me how I know this).
07/18/08 - Finished the Keystone "Shotgun Carriage" kit
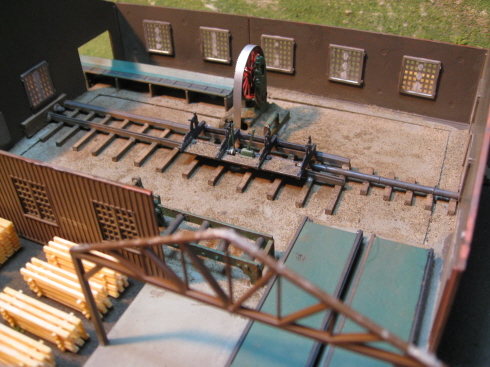
Another slick little kit that went together in no time flat. I started by applying weatherwash and Bragdon powder to the ties and then FTG'd them to the mill floor. Next, I assembled the carriage (painting the platform Roof Brown, the control levers Dark Green, and everything else Grimy Black). Prior to painting the rails and shotgun cylinder, I had to trim things down a bit in order to get all this HO gear to fit inside my decidedly N scale building. Once suitably debigulated, I painted them Grimy Black and glued them in place using Elmer's "Ultimate". Once that all set up, I CA'd the carriage to the rails.
As you can see, I went pretty nuts with the sawdust (well hell, it's a saw mill, right?) And not knowing exactly what sawdust is supposed to look like, I decided to just use the real thing. IE, I dumped out the contents of my sander's dust bag and used that. Basically I just brushed the whole place with a light coating of Scenic Cement, dumped sawdust everywhere, and then blew off everything that didn't stick. Voila, instant mess.
At this point I really like the look I'm getting with this Keystone machinary. Unfortunately, I don't think I'm going to be able to put any actual human figures in there to operate said machinary. Frankly, sticking N scale guys next to a bunch of HO scale machinary is going to quickly blow the whole illusion and turn the entire scene into something straight out of "Land of the Giants". Oh well, no biggie. We'll just say it's lunch hour or something.
Next, I'll need to build some live rolls to get the boards from the band saw over to the sorting tables (and presumably on to the edger). Unfortunately, this is where I'm going to have to deal with the fact that Walther's decided to put a somewhat inexplicable "change of direction" into their crazy little mill (IE, logs come in one end, make a right turn somewhere along the line, and boards come out the side). Oh well, I'm already well into fantasyland with this whole setup anyway, so I'm not going to sweat that too much. Once I've finished with the rolls I'll then need to scratchbuild some sort of contrivance to get logs off the conveyor and onto the shotgun carriage (oh goodie).
07/21/08 - Finished the mill interior
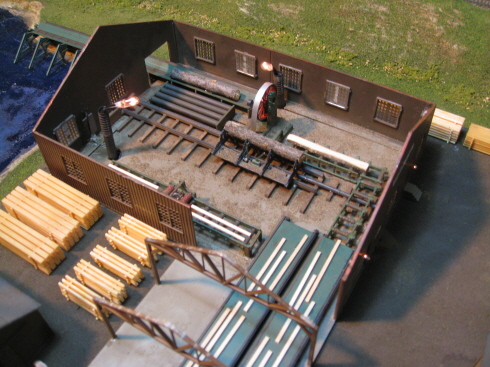
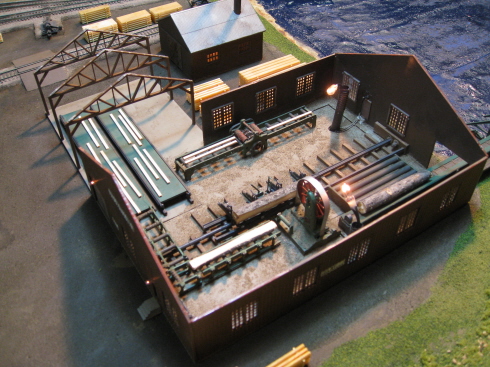
Well, for something that doesn't make a whole lot of sense (logically speaking), I think everything actually wound up looking pretty nice. Still, if I had it to do all over again I think I would have definitely relocated the log conveyor to the center of that southern wall. Then I would have able to put the shotgun carriage on the western wall and flipped it around so that the everything was moving generally eastward (instead of every which way). Ah well, despite my normal anal-retentiveness about such things, I'm not going to waste too much energy worrying about it now. As viewed through the one opening, it looks like there's a log cutting operation going on in there (as opposed to "nothing at all"). So, mission accomplished as far as I'm concerned.
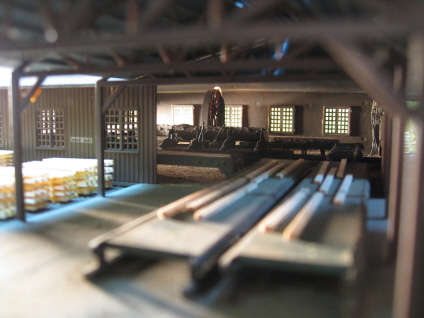
For the "live rolls", I painted the rollers Roof Brown ('cuz I guess they're supposed to be made of wood) and the superstructure Dark Green. For the "thingy" that allegedly moves logs from the conveyor to the shotgun carriage, I simply glued a few rollers (Grimy Black) to a couple of braces (Dark Green) and called it good enough. The rollers were actually leftover support pillars from a Rix highway overpass kit. And as luck would have it, they turned out to be exactly the right size.

I didn't like having those interior lights flipping and flopping all over the place, so my bright idea was to run them through a couple of pieces of drinking straw. I used the "bendy" ends so that I can position the lights more easily. Kind of slick, if I do say so myself. And as long as I was in wiring mode, I also went ahead and put three 1.5v accent lights on the exterior of the building (one over each of the doors).
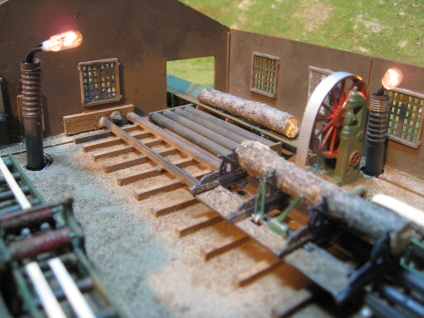
So, that's that. With the mill building detailed and glued down, I guess now I can finally pull my tug out of dry-dock and get on with finishing the log pond.
To be continued...
Part 2 - Base construction, tracklaying & wiring (and more buildings)
Part 4 - Scenery, detailing (and yet more lighting)
Part 5 - Trees, detailing, and the end of the line